RR&Co Computor Control: Discussion
Posted

Full Member
Post any questions arising from "First Steps with RR&Co"
I am not very familiar with Tram Operation so my remarks have to be taken in the context of railway operation.Blocks generally should be as long as the longest train…..its not mandatory and isnt always possible….but desirable.
Provided the above can be achieved and allowing for cost then more blocks provide greater operating flexibility
Only one loco is permitted per block other than for joining another train. A schedule ie the movement of a loco/tram has to start in one block and finish in another although you specify any number of scheduled stops (limited ti the time set by you) in the start, intermediate or destination blocks.
If I recall you are only planning to run 2 or 3 trams and there wont be any shunting so your original 12 block plan is fine but as you ae going to have the additional capacity you may as well install more blocks as suggested because as as you progess I suspect the TC bug will take hold and you will be hooked on more complex operations
Regards

Posted

Inactive Member
Who knows, I might get hooked on a shunting layout and the trams might be relegated.
I guess it's better to start with more blocks. I could reduce them later if needs be.
Max
Port Elderley
Port Elderley
Posted
Guest user
I am attempting to work my way through the tutorial and I am following this discussion, especially the parts relating to uncoupling routines with Silver and finding it all very useful.
My layout is in the early stages, I am tracklaying and wiring in the storage loops:

The block allocation is provisional except in the first two storage groups which are already laid. When I get several blocks wired and detected I can start some serious testing with Silver demo but until then I am having to do a lot of guessing. For example, each baseboard section in the loops has two long blocks and four short. The short blocks are a virtual MPD where engines released from the station will run in tender first and re-emerge in sequence as required from behind the scenic break after virtual coaling and turning. My alternative was two long and five short, using seven detectors of the eight in a module, or as it is shown where the long blocks have a stop section about 15" long with its own detector and shifted stop marker, using all eight detectors.
My reasoning is that my trains are a mixed lot and rolling resistance differs between them. Also some blocks have a straight section but most are curved. I assume that this will affect train speeds and I cannot see any way to compensate for this in either Silver or Gold, so shuffling up the blocks and travelling at restricted speed for about 75" could produce big differences in the actual stop compared to the computed stop, no matter how carefully the engines are profiled. Does that sound reasonable in your experience?
In the discussion about S88 detectors no one has mentioned the PCBs available from Adventure in Miniature, I have built the 16 input switch contact version and found it a very easy job.
Posted
Guest user
What i can’t get my head around is the condition tab, now i can set up a trigger to operate green then amber and then leave the red as default. So if none of the above triggers are met it turns to red. This works fine, i am using flagmen. It gets more complicated as you move to the next signal and try to operate the two together. To cut a long story short i was using triggers and could not get them to operate correctly as it gets to complicated once you go into multiple point work or routes. I then noticed the condition tab……. can someone explain how the conditions works with triggers, as i see it
A trigger will operate a flagman
A condition will stop the trigger from operating
For example if a point is set against the route in the conditions, unless the point is with the route the trigger will not function.
Or am i barking up the wrong tree.
Posted
Guest user
In the discussion about S88 detectors no one has mentioned the PCBs available from Adventure in Miniature, I have built the 16 input switch contact version and found it a very easy job.
how strange, no posts for a couple of weeks and then we both post at the same time:???:
a guess at your question as i am at the same stage as you (just started laying track)
i thought that the profiling was so the software can determine all aspects of the trains movements. then in the software calculates what adjustments it needs to take in order to operate all locos at the same speed. for example a 20 year old loco would not run as well as a new one, so the software calculates what adjustments it needs to take in order to get the old loco to run at the same scale speed as the new loco. for example to run at 50mph the new loco would need 10% power whilst the old loco would need 25% power.
i am normally wrong so don't listen to me:thumbs
brian
could you explain a little more on the 16 input switch contact, i have never heard of them.
Posted
Guest user
I agree about the profiling of each engine.
The problem I think I can see is when the engine pulls a shiny new train with free running wheels and needing very litle effort, then on its next run it pulls an old train with much higher friction. If it stops in exactly the right place on the first run then on the second I think it would run more slowly. The back EMF function might compensate completely, I just don't know. My understanding is that TC calculates, from the profile, how long it should take to reach the stop position and stops it on a timer. I am assuming with Silver that I will not be able to assign the trains automatically and in any case I cannot see how to adjust for this setup.
I'm not sure if I have that right, which is what I was asking, or if the difference will be as much as I'm anticipating. If the train is running more slowly than the computer thinks it is then it will stop short and perhaps overhang into the block behind.
The blocks are 80" long and if the train is just moving one block up the storage track then the time will be long and the error could be large. The short stop block keeps the time between stop marker and stop position much shorter. The problem is that I don't know what I'm doing and could have got the whole thing wrong and as yet I cannot try it out.
It's the chicken and egg loop, I should not lay the track until I know the answer, and I can't get the answer until I've laid some track.
It's not vital, but doing without those stop sections would have given me five more short blocks of about 16".
The feedback decoder:
In the original post I entered the link to the site, but something went wrong, it linked to an advertising site for his day job so I edited it out. If you Google for Adventure in Miniature you will find it.
He does two, one uses switches as inputs so it can use push buttons, on-off switches, reed switches, optical sensors or transistor switches.
The other is a standard current flow occupancy detector, 16 of them on one board. Both of them use the s88-N feedback bus so to be of any use your system must use s88.
Hope that helps. Sorry I cannot comment on your signalling problem, I'm tearing my hair out trying to uncouple and runaround in the sim.
Posted
Guest user
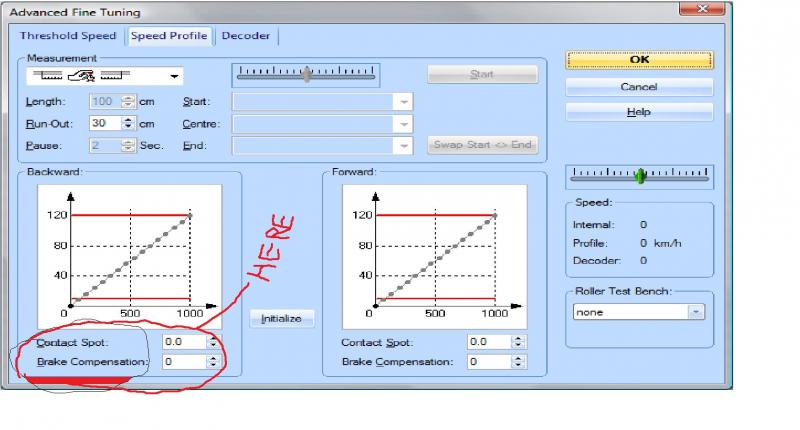
if i remember from the meet up when andy was talking about speed profiling he mentioned an adjustment you can make after the profiling. he drew a tree on the board as a referance point and said if a loco under shoots or over shoots that point you can adjust it by entering the disatance, this is called the brake compensation, this should resolve the problem for each loco
Posted
Full Member
I am assuming with Silver that I will not be able to assign the trains automatically and in any case I cannot see how to adjust for this setup.
Hi Brian.
Whilst I do not have a hook up yet between my PC and controller, I have been playing with RR&Co Silver for a while, and do have occupancy detectors in place and connected to the PC.
I have found that it is most useful in Silver to give each train a separate identity, and not just the loco. This is easily done. An entry needs to be made for each loco to start with - and of course, they can be run light engine. With that done, you can create each train you require, assigning a loco to that train as you go. So you can have 10 trains identified, all using the same loco.
I have not been able to do profiling yet, but I am assuming that there will be no problem profiling each train, rather than the loco, and that Silver will use that train profile. I am sure there will be a way of doing this somehow.
I have just ordered my controller's PC interface, so I hope to be working live soon.
Posted
Guest user
Thanks for the info, I guess the only way to get a definite answer is to try it for real. I am playing safe in the loops so I'm laying the short blocks as 4 x 20" on each baseboard and including a separately detected stop section on each long block, eight detectors per board.
I expect it will be another two or three weeks before I get the blocks wired up and operational, then I will report back.
Posted
Guest user
i have found with the software you can have more than one work around for a problem, the problem is finding a solution. one click out and you can mess a lot of things up. very frustrating but very rewarding when it works.
what DCC system do you have?
Posted
Guest user
Thanks. If I can profile each train that would probably give consistent stop positions, but the plan is to change engines (but not the suburban/branch services, they will run around) before every departure and run the released engine light into loop 3 (the virtual MPD).
With five trains (say) working their way around the storage loops and more than five engines waiting on the inner loop that will be a lot of schedules if each train+engine combination is treated separately, and a lot of separating/rejoining. I really feel the need to go live and do some experimenting.
You will have guessed that I am trying to get passenger operations to run autonomously for long periods and that will cause lots of problems.
I am building up the tutorial layout in Silver and plan to try some moves with it on the sim. If I manage to do anything useful I will upload the files.
Posted
Guest user
I have the old Black & White ESU ECoS, updated last month to firmware 3.0.1. I am very pleased with it, especially now that I can have on screen track plans with push button route setting etc. When I bought it I had not heard of RR&Co, but it still has the advantage that it just plugs into the PC with a standard crossover cable, no need for any extra hardware.
While we were in Oldham did you see Peter's setup: New colour ECoS plugged into a router, using an app. on his phone to drive the trains. That was really impressive.
Posted
Full Member
I am sorry not to have replied earlier
Here are some observations regarding stop markers and speed profiling.
First I think we have the same aspirations Brian….I want to work an intensive passenger service from the storage yard/branch to a mainline through station where there is an engine exchange for both expresses and short commutor trains.
My practical experience today has been confined to engine exchange in the storage yard (the process will be identical in the terminus) and engine runaround in the branch. This has been limited to a two carriage B Set…..sometimes augmented by a siphon but has involved 4 different locos
Given this limited experience I am quite satisfied that it can be done. Smooth running engines, accurately profiled are key. I spend a lot of time ensuring that on a 12" braking ramp each loco will always stop within .25" of the test marker. All the profiling is done without carriages attached and so far I havent noticed any difference…….a 6 coach train may be different. On some occasions I havent told TC about the weight of the carriages but it still works…….I do intend to play around with the weight and momentum settings but right now TC seems to do it for me
I would suggest setting up some test track…..with 3 blocks and do some profiling and then checking how accurately they will stop
With Gold I am not persuaded that short "stop blocks" are at all necesscary. Are you using Kaydees and Kaydee Magnets to uncouple? Assuming this is so the challenge is to make sure the loco stops with its tail somewhere over the magnet. The magnet is 2 1/8" long so that actually gives you almost 1 3/4" of tolerance for locos with slightly different profiles. In the worst case scenario just put in another stop marker with conditions attached to both. It is important to recognise that with V7.0 and the introduction of shifted stop markers you can insert an almost infinite number of stop markers in a block with appropriate conditions……..I am developing a pick up goods shunting routine and in one block I have 5 markers to be used according to whether I need to drop 1 thru 4 wagons off
I didnt follow your comment about restricted speed in an 80" block………………you can control the speed in a number of ways
Block Properties
Schedule Specific Block Properties
Action Marker
Operation when entering etc the block
but the most common is to use a brake marker attached to a stop marker…………taking your 80" block as an example:
Lets assume as its a terminus block the block spped limit is 20 mph and you want the head of the train to stop 3" from the buffers…………so a stop marker is set at 77" and a brake marker with a ramp of 12" and a distance of 65"
The train enters the block at say 30mph and immediately slows to 20mph (this can be arranged smoothly by putting a speed marker in the preceding block)…………..it travels at 20 mph for 65" and then slows gradualy over 12" to threshold speed and stops 77" from the block entrance……………………every time……………honest:doublethumb
I dont know if that helps………….I hope it wasnt too garbled…………….please fire off some supplementaries
Kind Regards
Posted
Full Member
i thought that the profiling was so the software can determine all aspects of the trains movements. then in the software calculates what adjustments it needs to take in order to operate all locos at the same speed. for example a 20 year old loco would not run as well as a new one, so the software calculates what adjustments it needs to take in order to get the old loco to run at the same scale speed as the new loco. for example to run at 50mph the new loco would need 10% power whilst the old loco would need 25% power.
i am normally wrong so don't listen to me:thumbs
I think that is correct Matt
Posted
Full Member
I have been playing with 3 aspect signals for the last couple of nights. I am now completely grey.
What i can’t get my head around is the condition tab, now i can set up a trigger to operate green then amber and then leave the red as default. So if none of the above triggers are met it turns to red. This works fine, i am using flagmen. It gets more complicated as you move to the next signal and try to operate the two together. To cut a long story short i was using triggers and could not get them to operate correctly as it gets to complicated once you go into multiple point work or routes. I then noticed the condition tab……. can someone explain how the conditions works with triggers, as i see it
A trigger will operate a flagman
A condition will stop the trigger from operating
For example if a point is set against the route in the conditions, unless the point is with the route the trigger will not function.
Or am i barking up the wrong tree.
Hi Matt
On the Wirral Fine Modelling Site there is a great tutorial from Dave (Beast 6606) who was at your get together…..thats what got me started on RR & Co
Why dont you post a specific problem ie one turnout and two signals or whatever…..it might be fun for us to work out a solution together and then we could put it in our tutorial…….I am a real novice with Flagmen but would like to have a go
Kind Regards
Posted

Full Member
John i have been following your tutorial following Matts info, all i can say is, its a masterpiece! I should have my occupancy detectors fitted this weekend so i shall be able to see the thing working!
Once i get it going satisfactorily with the Kadee Shuffle, the next challenge will be integrating the TT to work automatically.
Its a lash up based on the Peco offering, a loco decoder, meccano drive and bespoke pcb controlling the timing of a rotation and hall magnets to stop it in alignment superb if it works.
Thanks again john.
Regards
Pete
 Last edit: by wogga
Regards
Pete.
ECOS2 with RR&Co Traincontroller and a load of other electronics so i can sit back and watch the trains go by.
Pete.
ECOS2 with RR&Co Traincontroller and a load of other electronics so i can sit back and watch the trains go by.
Posted
Inactive Member
Max
Port Elderley
Port Elderley
Posted
Full Member
Pete
Regards
Pete.
ECOS2 with RR&Co Traincontroller and a load of other electronics so i can sit back and watch the trains go by.
Pete.
ECOS2 with RR&Co Traincontroller and a load of other electronics so i can sit back and watch the trains go by.
Posted
Full Member
Hi Geoff,
Thanks. If I can profile each train that would probably give consistent stop positions, but the plan is to change engines (but not the suburban/branch services, they will run around) before every departure and run the released engine light into loop 3 (the virtual MPD).
With five trains (say) working their way around the storage loops and more than five engines waiting on the inner loop that will be a lot of schedules if each train+engine combination is treated separately, and a lot of separating/rejoining. I really feel the need to go live and do some experimenting.
You will have guessed that I am trying to get passenger operations to run autonomously for long periods and that will cause lots of problems.
Sorry should have answered this earlier
I think Geoff is using this as a silver workaround………..but regardless if you have a schedule from A-Z and you start it and there is a train in Block A it will run (unless you have conditions limiting the trains that can run with that schedule)
In other words you only need one schedule to run from A-Z regardless of how many trains you have set up.
Your scenario of a number of trains automatically feeding into the terminus is quite feasible.
Regards
Posted
Inactive Member
Max
Port Elderley
Port Elderley
1 guest and 0 members have just viewed this.