RR & Co Advanced Fine Tuning
Posted
#128203
(In Topic #6757)

Full Member
Mastering Brake Compensation
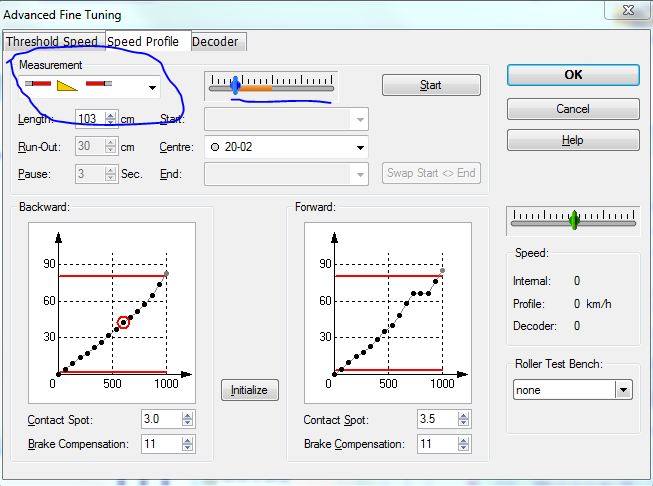
Having finally mastered the dark art of "speed profiling" I thought I would have a play around with the Brake Compensation feature.As per usual there is very little of any use in the manual and I'm puzzled with how to get the "test Brake compensation with occupancy sensors" to work and how to make use of it to profile the braking of my locos.
I can move the blue slider back and forth and click the start button and watch the speed slow down to a halt AND get a speed calibration completed message - but have no idea what this is actually doing and how it relates to the number in the brake compensation box at the bottom!!
:hmm
I have learned that you have to set the blue slider to a speed ( in this case a backward speed as highlighted by a red circle and then hit start- the green slider will then move towards zero and then you get the completed message.
PS The good news is that my new computer has solved the problem of not being able to run more than one schedule without the software losing connection to the loco. I am now running eight locos on different schedules at the same time without any problems
:Happy
 Last edit: by gdaysydney

Posted

Inactive Member

Max
Port Elderley
Port Elderley
Posted
Full Member
you mean " HELP"Was there a question in there, Dave?
Posted
Inactive Member

Pity he's on holidays for another week or so. :sad:
Max
Port Elderley
Port Elderley
Posted
Full Member
Morning Max,Mr Dew. Are you free?
Pity he's on holidays for another week or so. :sad:
I received a prompt response to a posting I placed on the RR&Co forum explaining how its done. I haven't had time to try it out yet but will do so this morning ( I'm on holiday for a week). If it works OK I'll post how its done :cheers
Posted
Inactive Member
Max
Port Elderley
Port Elderley
Posted

Full Member
[user=269]MaxSouthOz[/user] wrote:Morning Max,Mr Dew. Are you free?
Pity he's on holidays for another week or so. :sad:
I received a prompt response to a posting I placed on the RR&Co forum explaining how its done. I haven't had time to try it out yet but will do so this morning ( I'm on holiday for a week). If it works OK I'll post how its done :cheers
Hi Guys
I am back now!
Its covered in the tutorial here http://yourmodelrailway.net/view_topic.php?id=7591&forum_id=152
but maybe I could re write it a little more clearly…….or index it? Let me know what you think
I never leave profiling until I have done three consecutive successful brake tests forward and back
Incidentally thats an interesting speed graph Dave…….I get plateaus like that but usually at the bottom
Posted
Full Member
Welcome back John,[user=540]gdaysydney[/user] wrote:[user=269]MaxSouthOz[/user] wrote:Morning Max,Mr Dew. Are you free?
Pity he's on holidays for another week or so. :sad:
I received a prompt response to a posting I placed on the RR&Co forum explaining how its done. I haven't had time to try it out yet but will do so this morning ( I'm on holiday for a week). If it works OK I'll post how its done :cheers
Hi Guys
I am back now!
Its covered in the tutorial here http://yourmodelrailway.net/view_topic.php?id=7591&forum_id=152
but maybe I could re write it a little more clearly…….or index it? Let me know what you think
I never leave profiling until I have done three consecutive successful brake tests forward and back
Incidentally thats an interesting speed graph Dave…….I get plateaus like that but usually at the bottom
Since my last post I spent some time "playing" with the the brake compensation test feature but got fed up with it and just continued to do as i have done in the past and that's to adjust the numbers at the bottom until I get the stopping I require - any enlightenment on the test feature would be welcomed.
I find that no matter what decoder I use ( the speed profile in the picture was from a ESU Loksound decoder) I always seem to get a plateau or "wobbly bit" and unlike yours its normally at the higher speeds. I have found that it does not make any noticeable impact on performance of the loco but it is mystifying. I have put it down to the track as that appears to be the only common factor but I'm lost to understand why.:???:
Posted
Full Member
On my test track I have a marker 12" from the start of the centre profiling block.
To carry out a brake test I alter the measurement distance from the 60", which is the length of the block, to 12". I then set the speed to 15 mph forward and place the loco in the start block. I keep testing and adjusting the compensation until the front of the loco consistently stops with the uncoupler over the mark………then I do the same in reverse.
I selected 12" because that is my typical ramp and 15 mph a typical approach speed……..but I have an 18" mark as well for larger locos not involved in shunting.
This doesnt mean I dont have to adjust syop markers in schedules but it does mean that I am starting off from a solid base ie I know all my locos have passed the test on the same piece of track
Hope this helps
Regarding speed graphs…….I may make separate post……I would like to better understand the relationship between adjusting CVs and Juergens speed steps
Cheers
Posted

Full Member
Question: what do you do when the locos you are brake profiling consistantly (thats means all of them regardless of decoder) stop short of the stop marker by a couple of centimetres or so? i.e i don't neen brake compensation, i need the brakes to ease off a bit more????
Test brake ramp is 89cms and it has an approach speed of 50 kph. What i have noticed is the the engine slows with the speedo but when it finally stops on the track the speedo still shows 2 kph for a few seconds before the "test over" window apperars?
Decoder brake setting is 0.
Regards
Pete.
ECOS2 with RR&Co Traincontroller and a load of other electronics so i can sit back and watch the trains go by.
Pete.
ECOS2 with RR&Co Traincontroller and a load of other electronics so i can sit back and watch the trains go by.
Posted
Full Member
Is 89cm the typical ramp distance on your layout Pete? It seems kind of long to me.
If you reduce the ramp (I use 12") that will solve your problem. The other solution is to reduce the contact measurement but that has some limitations.
Kind Regards
Posted
Full Member
I shall persevere i have mainly got ESU decoders but imo for running qualities can't match a Lenz. I have ordered a DCC Concepts from Bromsgrove to give that a go.
Just done a Lenz silver at 30cms and 40kph with the same result, i am afraid i am becoming a candidate for the Royal Artillery a "Drop short"!
Regards
Pete.
ECOS2 with RR&Co Traincontroller and a load of other electronics so i can sit back and watch the trains go by.
Pete.
ECOS2 with RR&Co Traincontroller and a load of other electronics so i can sit back and watch the trains go by.
Posted
Full Member
I get some differences between locos but they rarely stop short with 0 brake compensation
The other possible solution is to reprofile a loco and see what happens
Posted
Full Member
Regards
Pete.
ECOS2 with RR&Co Traincontroller and a load of other electronics so i can sit back and watch the trains go by.
Pete.
ECOS2 with RR&Co Traincontroller and a load of other electronics so i can sit back and watch the trains go by.
Posted
Full Member
As we all know when we setup our B&S markers we specify what part of the train is the stop point, not so in the brake compensation test……any ideas?
Regards
Pete.
ECOS2 with RR&Co Traincontroller and a load of other electronics so i can sit back and watch the trains go by.
Pete.
ECOS2 with RR&Co Traincontroller and a load of other electronics so i can sit back and watch the trains go by.
Posted
Full Member
Hi Pete,Hi gang, hopes you are well. Brake compensation profiling now i have never done this before but stands to reason why it must be done.
Question: what do you do when the locos you are brake profiling consistantly (thats means all of them regardless of decoder) stop short of the stop marker by a couple of centimetres or so? i.e i don't neen brake compensation, i need the brakes to ease off a bit more????
Test brake ramp is 89cms and it has an approach speed of 50 kph. What i have noticed is the the engine slows with the speedo but when it finally stops on the track the speedo still shows 2 kph for a few seconds before the "test over" window apperars?
Decoder brake setting is 0.
I'm still experimenting ( when I get the time - first chance tonight in two weeks to have a "play"on the layout with two sound fitted class 20s - experimenting with schedules with the two locos joined - but more on that another day)
I started out using long ramps - my logic being that it would give the loco a more realistic slowing but I found that as my blocks are relatively short it was a better look to slow the train down in the block before and then shorten the ramp in the stopping block. I also found that when the distance and ramp did not add up to the distance to the stopping block - something that I did deliberately to achieve a very slow crawl before stopping, I got the same effect as you are seeing although my loco was still moving.
Last edit: by gdaysydney
Posted
Full Member
Its not quite the same thing Pete…….you dont specify front, tail or middle…….you specify direction……. forward or reverseI am still dropping short on the brake compensation test, just a thought I am not sure where the engine should stop I.e. The tail the front or the middle of the train.
As we all know when we setup our B&S markers we specify what part of the train is the stop point, not so in the brake compensation test……any ideas?
I put my loco anywhere in the start block…………in the profile block I have markers set at 6", 12" and 18" (I select and enter whichever is the most appropriate distance for the loco)……………..if I am testing in a forward direction I expect the loco to stop with the front kadee coupler to be right over the mark……in reverse the rear kadee coupler of the loco to be directly over the mark.
I agree with Dave regarding the significance of Ramp distance. I find that the shorter the ramp distance (commensurate with realism!) the more precise the result…….I have a lot of short blocks so I control the speed in schedules by imposing speed limits in the block or blocks prior to the destination block
Posted
Full Member
I have just tried a dcc concepts decoder with stay alive, isn't it nice to start an engine at a crawl when profiling and be able to go away and come back with the PC displaying speed complete and not having the engine stopped halfway on it's first pass.
Dave re brake ramps that my thoughts exactly, however I shall shorten distances to See if it looks ok JD has never disappointed us yet, brake profiling is little discussed on the RR&co forum so I must be doing it wrong.
Regards
Pete.
ECOS2 with RR&Co Traincontroller and a load of other electronics so i can sit back and watch the trains go by.
Pete.
ECOS2 with RR&Co Traincontroller and a load of other electronics so i can sit back and watch the trains go by.
Posted
Full Member
I started out using long ramps - my logic being that it would give the loco a more realistic slowing but I found that as my blocks are relatively short it was a better look to slow the train down in the block before and then shorten the ramp in the stopping block.
Oops…..that will teach me to speed read…………….I just repeated what you said above:oops:
and I should have commented here:oops::oops:………………the sum of brake distance and ramp must always match the assigned stop distance……………….otherewise TC gets confused.I also found that when the distance and ramp did not add up to the distance to the stopping block - something that I did deliberately to achieve a very slow crawl before stopping, I got the same effect as you are seeing although my loco was still moving.
Posted
Guest user
1 guest and 0 members have just viewed this.