Jeff's (SRman) work bench and projects
Posted

Full Member
Staying on the thread Kevin.

Posted

Full Member
It should be a straightforward DCC hard-wire job, with the only proviso being where can you fit the decoder physically. Choose a small decoder; TCS M1 is good but may cost more than the locomotive is worth, otherwise, perhaps one of the Hattons mini decoders might do. It may be possible to hide the decoder in the bunker and run the wires across the bottom of the cab so they remain hidden.
The TCS M1 in one of Hornby's Peckett saddle tank 0-4-0 locos, which are even smaller than the locomotive you have bought.

 Last edit: by SRman
Jeff Lynn,
Amateur layabout, Professional Lurker, Thread hijacker extraordinaire
Amateur layabout, Professional Lurker, Thread hijacker extraordinaire
Posted
Full Member
Isambard Kingdom Brunel built a " Transhipment Yard" between Broad Gauge and Standard Gauge. That would have been a tight PITA to work. But two Standard Gauge lines with an independent DC line may work? Theres me full of ideas that never go further than ideas? Number 1 job buy a Man Cave with a house attached. Kevin
Staying on the thread Kevin.
Posted
Full Member
My upper level will be simpler, for DCC only.
Jeff Lynn,
Amateur layabout, Professional Lurker, Thread hijacker extraordinaire
Amateur layabout, Professional Lurker, Thread hijacker extraordinaire
Posted
Full Member
"Have the Wrong Gearing" or "They are Alright for Whizzing around the Track". All the best. Kevin
Staying on the thread Kevin.
Posted
Full Member
Staying on the thread Kevin.
Posted
Full Member
There are other photo hosting services, but in my experience, all have their good and bad points, and all are subject to the occasional temporary failures.
Being a member of several forums (as are you), it gives us a central repository for our photos, rather than uploading them separately to each forum in turn. That then also cuts down the total size of your uploads through the Internet Service Provider.
Jeff Lynn,
Amateur layabout, Professional Lurker, Thread hijacker extraordinaire
Amateur layabout, Professional Lurker, Thread hijacker extraordinaire
Posted
Full Member
Staying on the thread Kevin.
Posted
Full Member
Staying on the thread Kevin.
Posted
Full Member
Jeff Lynn,
Amateur layabout, Professional Lurker, Thread hijacker extraordinaire
Amateur layabout, Professional Lurker, Thread hijacker extraordinaire
Posted
Full Member
Staying on the thread Kevin.
Posted
Full Member
It caused me a few headaches in the final finishing, because the initial coat of satin varnish dried high gloss, then a following coat of matt varnish dried even more glossy (if that was possible!). A coat of Testor's Dull Cote reacted with the previous paints so had to be scraped off again. Some weathering powders eventually took the shine off (literally) and gave it a well-used look.
I took a couple of posed shots on my layout first, and a final one in its new home, complete with number plates fitted.


Jeff Lynn,
Amateur layabout, Professional Lurker, Thread hijacker extraordinaire
Amateur layabout, Professional Lurker, Thread hijacker extraordinaire
Posted

Inactive Member
Max
Port Elderley
Port Elderley
Posted
Full Member
Staying on the thread Kevin.
Posted
Full Member
All the best. Kevin
Staying on the thread Kevin.
Posted
Full Member
Assembly with Araldite 5 minute epoxy works well, although I glued the van end on to the chassis with superglue.
I tend to pre-paint everything before final assembly.
A Ford Transit minibus I'm doing for myself is like the cars, with three main components (body, chassis/wheels, rear longitudinal seat unit) plus steering wheel and glazing. Simplicity itself!
The Humber Tourer is also a John Day kit but is unusual for their cars in having separate axles and six separate wheels (two are spare wheels for mounting on the running boards). Both kits are in the process of being painted, so ignore all the rough edges; they will be tidied up.
Last edit: by SRman
Jeff Lynn,
Amateur layabout, Professional Lurker, Thread hijacker extraordinaire
Amateur layabout, Professional Lurker, Thread hijacker extraordinaire
Posted
Full Member
Staying on the thread Kevin.
Posted
Full Member
The unpainted shells are very dark and my lighting was poor, so these first two shots are only just sufficient to show the initial construction. The clear plastic driving ends will need a little modification to the lights to match the later, refurbished condition, and are not glued in at this stage. They will also be easier to mask off for painting while not installed.
The instructions advise to remove all of the moulded-on door gutters and add new continuous gutters from microstrip. A quick look at some photos online of 455/9 units proved this correct and also showed at what height the new gutters should be mounted - I found that the height suggested in the instructions looked too low, so mounted mine at what looked correct to me, based on the photos of the real things. The ends of the gutter strips at the driving cab ends need to be cut back slightly, but I thought it better, and easier to correct, to have them too long rather than too short.
The MSO (Motor Second Open) coach has already been test fitted to the Replica Railways chassis that will power the whole unit. This had to have the continuous footstep moulding cut off, and a minimal amount filed off the width, then slotted securely straight into the assembled body shell.
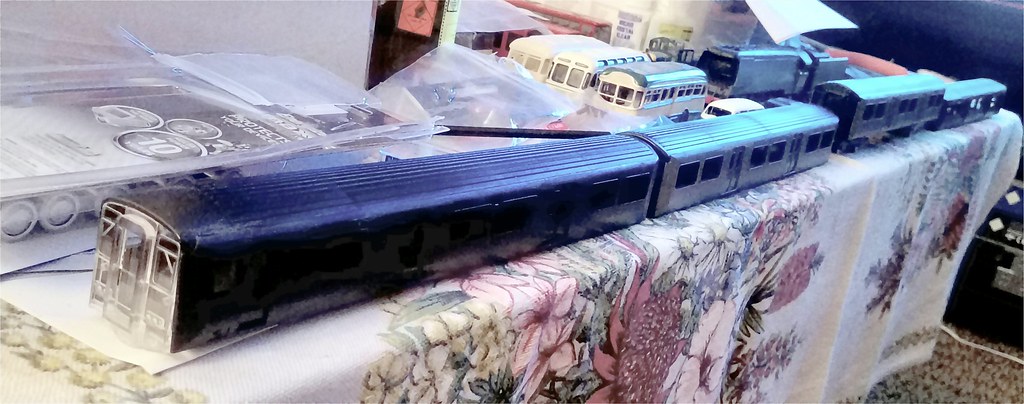 Bratchell Class 455-9 Under Construction - 1 cropped by Jeffrey Lynn, on Flickr
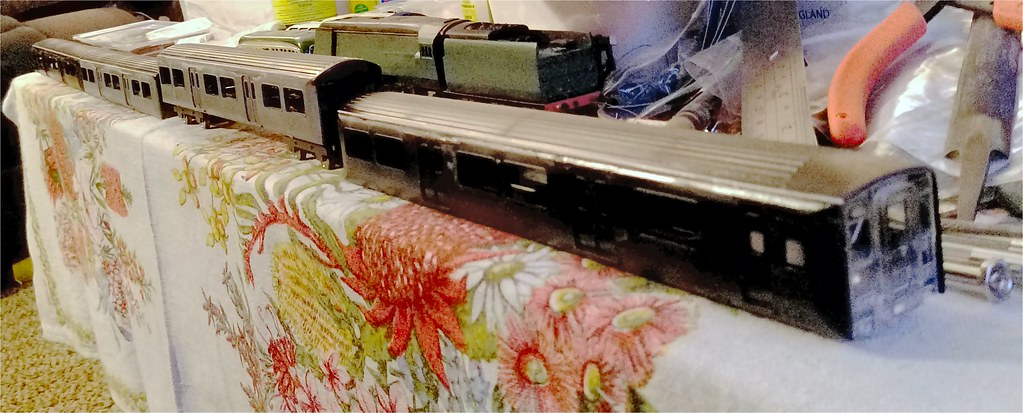 Bratchell Class 455-9 Under Construction - 3 cropped by Jeffrey Lynn, on Flickr
Jeff Lynn,
Amateur layabout, Professional Lurker, Thread hijacker extraordinaire
Amateur layabout, Professional Lurker, Thread hijacker extraordinaire
Posted
Full Member
 All the best. Kevin
Staying on the thread Kevin.
Posted
Full Member
A few of the DEMUs in their later days did get 4 CEP trailers (usually TSOs). In the case of the class 207s, the CEP cars were wider than the 'native' DEMU cars, so stood out even more (not to mention the preserved Hastings unit).
The units with CEP trailers all had refurbished versions, so the Bachmann models are not quite right - they need hopper windows to complete the illusion, but using one 'as is' would certainly not look wrong to me.
Jeff Lynn,
Amateur layabout, Professional Lurker, Thread hijacker extraordinaire
Amateur layabout, Professional Lurker, Thread hijacker extraordinaire
1 guest and 0 members have just viewed this.