Jeff's (SRman) work bench and projects
Posted

Full Member
Hi Jeff Thank you, excellent information, one of the jobs that I have in mind is to change the number, if possible, on one of my brake vans from the London Transport sets , I have found the numbers online, so that's not a problem. It is a problem if I cannot find matching transfers though.
all the best. Kevin
Modelmaster do a whole sheet of waterslide LT wagon and brake van transfers, their sheet 4669 (also available from Peter's Spares - picture here on their eBay listing http://www.ebay.com.au/itm/Modelmaster-4669-London-Transport-Wagon-Numbers-OO-Gauge-Transfers-/322019720267?hash=item4af9defc4b:g:sPAAAOSwKtVW0EAU). I used some of these to change the number on one of my Bachmann LT brake vans (I may have said this before, but it doesn't hurt to run it again!).

 Last edit: by SRman
Jeff Lynn,
Amateur layabout, Professional Lurker, Thread hijacker extraordinaire
Amateur layabout, Professional Lurker, Thread hijacker extraordinaire

Posted

Full Member
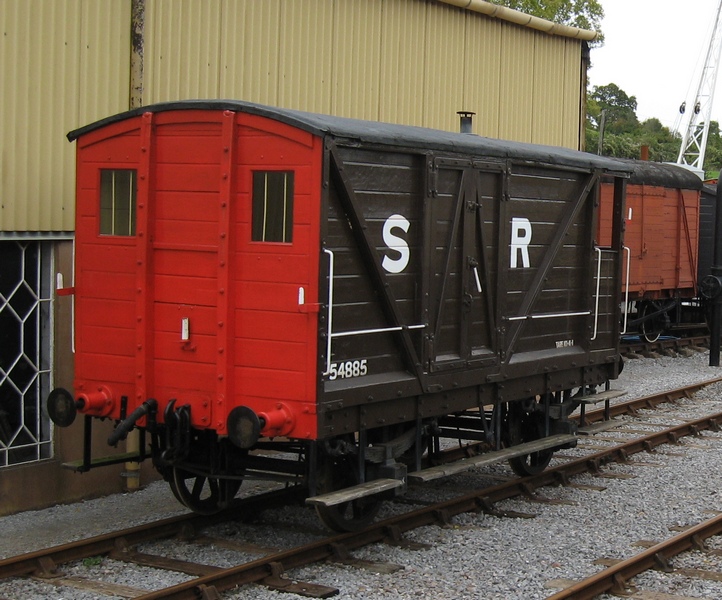
the original number on the van being B581, other numbers include
B583 and B584. The vans are painted grey with red ends, so there is no problem reading the white numbers. I have never used transfers at all, and in this case it would only be necessary to change the last digit, ( if I can purchase the same font) if that is possible?? Without making a mess.
all the best. Kevin
Staying on the thread Kevin.
Posted
Full Member
that were very cheap, and how he finished the job, I should be so lucky?
all the best. Kevin
Staying on the thread Kevin.
Posted

Full Member
In the BR era ex PO wagons were becoming extinct by the 60s but those that were left tended to look extremely careworn with only the barest indication of their previous owners left. BR numbered them in the "P" series.
John
John
Posted
Full Member
all the best. Kevin
Staying on the thread Kevin.
Posted
Full Member
Wheels - there are a lot out there but I can't think of a brand that's bad. Hornby, Bachmann, Markits, Gibson are some I can think of. The latter two will have thinner tyres than the former for fine scale. It comes down to price and perhaps availability. As a kit builder you do need to know what type of wheels are correct for the vehicle you are building - it all comes with experience.
Vents? You can buy air vents but most kits that I'm aware of will include these.
I just ordered some 7mm coach kits - this is a field where I am a bit like you - trying to figure out what I need and where to get it.
John
John
Posted
Full Member
I mentioned the unfinished Bachmann three plank wagons and Richard Proudman certainly got his feathers ruffled, Bachmann have never sold on eBay . Also, I read about Hurst Nelson brake vans, are you familiar with these at all? all the best. Kevin
Staying on the thread Kevin.
Posted

Full Member
Doug
'You may share the labours of the great, but you will not share the spoil…' Aesop's Fables
"Beer is proof that God loves us and wants us to be happy" - Benjamin Franklin
In the land of the slap-dash and implausible, mediocrity is king
"Beer is proof that God loves us and wants us to be happy" - Benjamin Franklin
In the land of the slap-dash and implausible, mediocrity is king
Posted
Full Member
Great detail in the photo: it reminds me I must remember to put the bars behind the end windows before I glue the roof on.
Jeff Lynn,
Amateur layabout, Professional Lurker, Thread hijacker extraordinaire
Amateur layabout, Professional Lurker, Thread hijacker extraordinaire
Posted
Full Member
Doug
'You may share the labours of the great, but you will not share the spoil…' Aesop's Fables
"Beer is proof that God loves us and wants us to be happy" - Benjamin Franklin
In the land of the slap-dash and implausible, mediocrity is king
"Beer is proof that God loves us and wants us to be happy" - Benjamin Franklin
In the land of the slap-dash and implausible, mediocrity is king
Posted
Full Member
Jeff Lynn,
Amateur layabout, Professional Lurker, Thread hijacker extraordinaire
Amateur layabout, Professional Lurker, Thread hijacker extraordinaire
Posted

Full Member
Hi Kevin,Hi Jeff. I have just had an indignant reply to my enquiry to Bachmann
I mentioned the unfinished Bachmann three plank wagons and Richard Proudman certainly got his feathers ruffled, Bachmann have never sold on eBay . Also, I read about Hurst Nelson brake vans, are you familiar with these at all? all the best. Kevin
Currently on Eebuygum UK are 1218 Bachmann OO wagons and 233 OO vans, including 4 Graham Farish Bachmann vans, OO, two unpainted. Definitely says Bachmann China underneath. There is also several fruit vans for sale in the original box, undecorated. Definitely old, and probably dating to when Bachmann took over Mainline.
The Bachmann HO/OO Thomas range is often unpainted.
The only place I've seen odd Bachmann stock being sold by Bachmann is at Warley (Caveat emptor as it's mostly returned and repaired stock). They only sell through dealers (who often use Eebuygum) or from their own website. Hence the ruffles.
Nigel
©Nigel C. Phillips
Posted
Full Member
Staying on the thread Kevin.
Posted
Full Member
I have considered converting the locomotive to DCC but each time I opened it up to have a look, I put it into the 'too hard' basket and put it away again … until now.This time I made a determined effort to fit a small TCS M1 decoder in. Being an early model, it isn't DCC-ready, so the decoder had to be hard-wired. That's not that difficult as the motor is already isolated from the chassis, although the electrical pickup arrangements leave a bit to be desired - that's something I'll improve in the near future. At present, it picks up from one side of the tender and the other side of the locomotive.
The first photo shows the chassis with the TCS M1 decoder fitted and held lightly in place by Blu-Tack for testing purposes. A test on the programming track showed all should be well, so a quick run on the rolling road was done to prove the installation was good to go.

To allow room for the decoder, I had to remove the solid weight from the boiler, but to compensate for the loss of traction weight, I added some thin lead sheet curved to fit into the smokebox and front part of the boiler while leaving the decoder space in front of the motor block. A strip of duct tape was added to insulate the lead from any electrical contacts and the decoder.
However, I had decided that while I was about it, I would add a couple of YouChoos locomotive lamps on the front, and their orange SMD firebox glow in the cab. To complicate things, I decided that it would be best to add a 3-pin plug (also from YouChoos) to allow the body to be easily separated from the chassis for maintenance purposes while leaving the lights attached to the body.
The next photos show the lamps and firebox LED tacked loosely in place in side the body. You can also see the lead sheet and tape at the top of the boiler. The wires were later shortened. The front lamp wires were threaded through the plastic footplate just behind where I wanted them, and then threaded through holes in the frames before going through another, larger hole in the bottom of the boiler, behind the smokebox. The tricky bit was threading the thin, and rather flexible wires along the inside of the boiler, but I eventually got them all through.
The blue wires were all collected as a common return and soldered to the blue wire of the plug. Three resistors were soldered to a small segment of pcb, with the tracks cut through on each side of the resistors. The two white wires from the front lamps were soldered to individual resistors on the circuit board, visible in the third photo below, as was the orange wire from the firebox LED. This latter wire becomes the yellow wire from the decoder.


The firebox SMD was mounted into a hole drilled into the firebox door, and angled inwards to attempt to simulate the fire bed as it would be visible through the open door.

I forgot to take photos of the plug wiring, but it all went together well and fitted neatly (well, fitted, anyway!) inside. The decoder was fixed down with double-sided tape, rather than the temporary Blu-Tack used earlier.
Here is the loco on test on the layout. At present, because I have used a TCS M1 I am limited to using the white and yellow wires (there are only two functions available), by default the front lamps light up when going forwards and the firebox lights up in reverse! A simple bit of reprogramming will allow both to be on regardless of direction, although I am going to see if I can remap the firebox one (yellow wire) to function 1, then program a flicker into it.


Even as it stands now, I think I have succeeded in what I set out to do. It merely needs a couple of minor adjustments and improvements to the locomotives track pickups to complete the project.
Jeff Lynn,
Amateur layabout, Professional Lurker, Thread hijacker extraordinaire
Amateur layabout, Professional Lurker, Thread hijacker extraordinaire
Posted

Legacy Member
:thumbs;-):cool:
Owen
web-cam http://82.2.74.174:8081
if the lights are off no cam
if the lights are off no cam
Posted
Full Member
It was still totally dependent on the Lima brass wheels and dodgy electrical pickups, however. That remained the achilles heel for running qualities. Hard-wiring a Bachmann decoder allowed much finer tuning for the motor speeds and also tamed the acceleration and deceleration using the inertia/momentum settings, but still those brass weheels and poor electrical characteristics prevented reliable running, with the occasional prod from a large finger being needed.
A partial solution has since become available in the form of a Hornby dummy bogie from Peter's Spares. The Hornby bogie not only has better wheels but also picks up from both sides of the bogie, where the Lima one only picked up from one side. Fitting the bogie required the hole in the chassis for the original Lima one to be enlarged a little, using a round file. The Hornby bogie could then be clipped in, after first threading the two wires through. When I originally rewired the Lima chassis for DCC, I followed the convention of using a red wire for the right-hand track feed from the power bogie (which is always the number 2 end of the Lima/Hornby models). Hornby have very kindly marked one of the two black wires from the new bogie with a red patch - this also goes to the right-hand side of the bogie. I simply soldered the red-patch wire to my existing red connections, and the black wires together, then tested for short-circuits before putting the loco on the programming track and double-checking that all was well.
Doing this modification means that I have electrical pickup from four decent quality wheels on the dummy bogie, and two (on one side only) through the Lima brass driven wheels. I could wire up extra pickups for the remaining two wheels on the motor bogie but these also have traction tyres, so the benefit would be marginal, to say the least. Anyway, the running, while not perfect, has improved considerably, to the point where 73 142, Broadlands, can now rejoin the main fleet and not be parked languishing at the back of the drawer.
In the photos, the motor bogie looks like it has a standard Lima 'pancake' motor, whereas, in fact, the ModelTorque motor is installed from the other side, away from the camera. The first photo shows the new bogie clipped in place after opening out the hole, with the two wires floating loose, and the original Lima clip arrangement also detached, awaiting removal.

The second photo shows everything soldered in place and all joints covered with heat-shrink tubing. I had to use a short stretch of red decoder wire to extend the reach of the Hornby wire to the original wiring.

Here's a short video to how the improved running and controllability. It's by no means perfect, but it is much better than it was.
https://youtu.be/Un_HQ-BfDuE
I may have to consider putting a newer, better decoder … I'm not even certain that the existing one has BEMF facilities, it's that old!
Jeff Lynn,
Amateur layabout, Professional Lurker, Thread hijacker extraordinaire
Amateur layabout, Professional Lurker, Thread hijacker extraordinaire
Posted
Full Member
I used JMRI Decoder Pro to create a speed table and limit the top speed to something reasonable (the real locomotives had an official top speed of 90 mph, although at least two have been clocked at 107 mph on the Bournemouth line).
There is more to do, but I am now pretty happy with the quality of the running of this locomotive.
I have been progressively fitting etched nameplates to all of my locomotives, but Broadlands has eluded me as none of the plate manufacturers that I can deal with from here in Australia seem to offer them.
Jeff Lynn,
Amateur layabout, Professional Lurker, Thread hijacker extraordinaire
Amateur layabout, Professional Lurker, Thread hijacker extraordinaire
Posted
Full Member
Two more of my class 73s have now had the printed plates covered with proper etched versions: 73 004, The Bluebell Railway, and 73 129, City of Winchester, both look much better now with their Fox Transfers etched stainless steel plates. Both are on Hornby chassis, but 73 004 has a Lima body. I mix and match bodies on the Hornby chassis - I have eight of the chassis but around 12 bodies of both Lima and Hornby origins.


A banger blue Heljan class 47 also got the treatment. 47 508, S. S. Great Britain, now sports the Fox plates.


Jeff Lynn,
Amateur layabout, Professional Lurker, Thread hijacker extraordinaire
Amateur layabout, Professional Lurker, Thread hijacker extraordinaire
Posted

Inactive Member
Max
Port Elderley
Port Elderley
Posted

Site staff
Ron
NCE DCC ; 00 scale UK outline.
NCE DCC ; 00 scale UK outline.
1 guest and 0 members have just viewed this.