Jeff's (SRman) work bench and projects
Posted

Full Member

Jeff Lynn,
Amateur layabout, Professional Lurker, Thread hijacker extraordinaire
Amateur layabout, Professional Lurker, Thread hijacker extraordinaire

Posted
Full Member
For Melbourne Cup Day, we have a public holiday here in Melbourne, so I have put in a little modelling time this morning, decorating a couple of items of stock.
First up is the Hornby class 08 shunter that I repainted into BR blue a little while back. I have not heard any more from PH Designs regarding the etched steps (I transferred the money but nothing seems to have happened at the other end), but in the meantime, I found the plastic steps I had removed from the Bachmann 08 chassis I used under my SR 15203 shunter. With a small amount of trimming and drilling of holes, these are now attached to the Hornby chassis. I am still missing one shunter's handrail at the front but that will be easily replaced with a handrail knob and some wire. I then numbered it as D3272, which (so far) is the only 08 I have found pictures of on the Southern Region that seems to match the configuration of the model, although even now I'm not 100% sure it's right.

I also replaced the single 'sugar cube' speaker (the last one I had in stock at the time) in this locomotive with a matched pair in parallel with a double mounting, from DC Kits. The sound from the Zimo decoder (Paul Chetter/Digitrains sounds) is much better now.
For quite a while, I have owned a Dapol track cleaning car, which came from Hattons with their own branding on it in grey and white livery. I repainted into blue and grey, and arbitrarily assigned a DCC number to it (1074), which I kept forgetting. I have now given it a fictional Derby test livery with white edging to the grey (wider stripes than standard) and a red band below the waistline. It is now called Laboratory 26 and numbered RDB905090 (5090 for DCC purposes, lthough I could have used the '26' instead). I'm not sure what the real Lab 26 was, or what it was for, and it almost certainly wasn't RDB905090, which probably also exists, but since the whole shebang is fictional anyway, it gives an illusion of legitimacy to it!


As this vehicle is sometimes propelled in front of a locomotive, I may add some wasp stripes to the ends at some time in the future.
Edit: I trimmed the excess red stripe off at the ends after the photos were taken.
 Last edit: by SRman
Jeff Lynn,
Amateur layabout, Professional Lurker, Thread hijacker extraordinaire
Amateur layabout, Professional Lurker, Thread hijacker extraordinaire
Posted
Full Member
This will be 15203 with late style crests when done.
Today, I have added most of the handrails. A quick check of photos of the real thing showed that I have a couple of small handrails to add on the bonnet top, The door locking handles and the lamp irons are still to be added, but this still marks a good step forward.
While drilling holes for the handrails, I decided to use short lengths of the handrail wire to reinforce the joints between the edges of the running boards and the plasticard extensions. These will be hidden with a little filler before repainting the sides.
The resin steps have also been added but these are a little weak, so may require the same trick of using handrail wire to reinforce the joints.
Eventually, I will have to scratchbuild the front steps out of plasticard.


Last edit: by SRman
Jeff Lynn,
Amateur layabout, Professional Lurker, Thread hijacker extraordinaire
Amateur layabout, Professional Lurker, Thread hijacker extraordinaire
Posted
Full Member
Close-up shots like this are extremely cruel, but show me what still needs doing, very clearly! Obvious things to do include straightening up those handrails a bit, so they are all in line, filling the keyhole slots in the buffer beams, somehow extending the footplate/running board at the front and widening the buffer beam to match, and fixing up the black and yellow stripes at the cab end, which are still a bit rough.
Looking at the photos and comparing them to the real thing, those prominent ridges along the engine top cover also need to be filed down and eliminated - the real ones are almost unnoticeable.
Still, overall I am quite pleased with the way it is coming along. Once all the body works have been completed, I can do something about sitting the body down properly on the chassis.


Jeff Lynn,
Amateur layabout, Professional Lurker, Thread hijacker extraordinaire
Amateur layabout, Professional Lurker, Thread hijacker extraordinaire
Posted
Full Member


Last edit: by SRman
Jeff Lynn,
Amateur layabout, Professional Lurker, Thread hijacker extraordinaire
Amateur layabout, Professional Lurker, Thread hijacker extraordinaire
Posted
Full Member
The Maunsell 0-6-0 d-e shunter 15203 has been sat down a bit on its chassis and a few more paint touch ups done. One handrail seems to have gone back out of kilter but I will fix that again soon.

I have also commenced some weathering on these projects. I must emphasise that these are only the initial attempts and all need more work before I am satisfied with the effects.
The S15 4-6-0 has had a crew fitted and some Humbrol black weathering wash applied to tone down the brightwork, cab roof and smokebox. Lots more work to do here with browns and greys before I will be able to claim it is finished!

The O2 0-4-4T has had the pipework fitted at the front and all the brightwork toned down with the black wash, plus a wash of brown on some of the brake gear. Again, more needs to be done before it is convincing. A crew has also been fitted in the cab.

And finally, the blue 08 has copped a heavy weathering using the black wash, some oily stains and a white 'dust' wash (which was not successful in representing the chalky paint effect I wanted! It got another thin black wash to compensate). Again more needs to be done but I am happy with the effect so far. I do want to redeem a little more of the blue again but that can be done by dry brushing. I also want to add a driver and a couple of shunters hanging on to the front steps and in an open cab door. After a bit more research and digging through photos, I think I need to renumber this one to D3219, which has a better match to the features of this particular model.


Last edit: by SRman
Jeff Lynn,
Amateur layabout, Professional Lurker, Thread hijacker extraordinaire
Amateur layabout, Professional Lurker, Thread hijacker extraordinaire
Posted
Full Member


Jeff Lynn,
Amateur layabout, Professional Lurker, Thread hijacker extraordinaire
Amateur layabout, Professional Lurker, Thread hijacker extraordinaire
Posted
Full Member
I have slightly unweathered the Hornby 08 by dry brushing some BR blue back over the black washed edges and roof panels. It still needs a lot more work before I am happy with it, but I think it does look a little better than before.

The Hornby S15 has had a little more Humbrol black wash added, over the smokebox, cab roof, footplate and running boards, tender top and cylinders, plus a very thin application along the boiler top.


The Kernow/DJM O2 has also had some more of the Humbrol wash added to similar areas to the S15, plus the tank tops and bunker rails.

At risk of boring everyone with these slow step by step illustrations, I hope to show that weathering is best built up slowly, in layers, which is pretty well how it occurs on the real thing.
Jeff Lynn,
Amateur layabout, Professional Lurker, Thread hijacker extraordinaire
Amateur layabout, Professional Lurker, Thread hijacker extraordinaire
Posted
Full Member
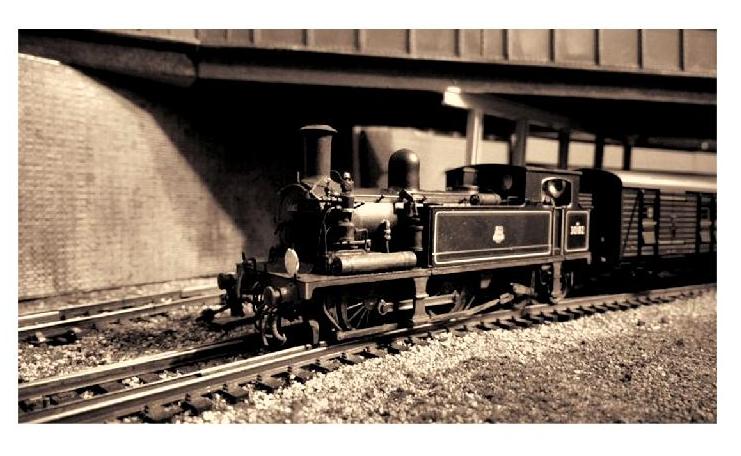
In the case of the O2 I also 'doctored' two of the photos to resemble older images in black and white and sepia tones. They then give me some comparisons with the photos I am working from in various publications.
The 08 shunter has had a partial wash and partial dry-brush effect with grey, Humbrol #66 (called olive drab). I had to use a cotton bud and turps to feather the edges over the top corners of the bonnets. I also used a few dry-brushed strokes of rusty brown along the lower edges of the frames and brake blocks and rodding.


And to the O2, with a lot of grey (#66 again) washed and dry-brushed over most of the areas below the footplate, plus the running board top surfaces and smokebox.


And the black and white versions of two of these:


And the sepia tones. I think these look particularly effective, myself.


As before, these are still works in progress, but I am happy with the way they are going, at present.
Jeff Lynn,
Amateur layabout, Professional Lurker, Thread hijacker extraordinaire
Amateur layabout, Professional Lurker, Thread hijacker extraordinaire
Posted

Full Member
I think you should be justifiably proud!
Doug
Last edit: by Chubber
'You may share the labours of the great, but you will not share the spoil…' Aesop's Fables
"Beer is proof that God loves us and wants us to be happy" - Benjamin Franklin
In the land of the slap-dash and implausible, mediocrity is king
"Beer is proof that God loves us and wants us to be happy" - Benjamin Franklin
In the land of the slap-dash and implausible, mediocrity is king
Posted
Full Member
I was going to experiment a bit more myself, and add a few scratches and other artifacts that creep into old photos.
:doublethumb
Jeff Lynn,
Amateur layabout, Professional Lurker, Thread hijacker extraordinaire
Amateur layabout, Professional Lurker, Thread hijacker extraordinaire
Posted
Full Member
In the meantime, I have played around with it further myself and got a few other effects. My last attempt was to add smoke and steam - not entirely convincing yet but I am on the right track. I won't post any of the other attempts until I have something that is sufficiently different or significantly pushes the idea forward.
The actual idea was to make the model convincing without too much phototrickery; adding smoke and steam violates that idea just a little but it also gives the proof that the earlier versions may, indeed, be realistic.
Jeff Lynn,
Amateur layabout, Professional Lurker, Thread hijacker extraordinaire
Amateur layabout, Professional Lurker, Thread hijacker extraordinaire
Posted
Full Member
D
'You may share the labours of the great, but you will not share the spoil…' Aesop's Fables
"Beer is proof that God loves us and wants us to be happy" - Benjamin Franklin
In the land of the slap-dash and implausible, mediocrity is king
"Beer is proof that God loves us and wants us to be happy" - Benjamin Franklin
In the land of the slap-dash and implausible, mediocrity is king
Posted
Full Member


Jeff Lynn,
Amateur layabout, Professional Lurker, Thread hijacker extraordinaire
Amateur layabout, Professional Lurker, Thread hijacker extraordinaire
Posted
Full Member
After the initial Humbrol black washes, I added a wash of their dark brown. This actually came out a bit more patchy than I wanted, but it was still a step in the right direction


I then decided that for a more even finish, I would revert to my older technique of mixing up the grunge colours and adding some matte or satin varnish. I used Humbrol 62, leather, Humbrol dark grey wash, and Humbrol satin varnish stirred very well, then added some Humbrol coal black 85. I do not mix this thoroughly, allowing the brush to pick up various shades and mixes of brown shading to dirty black. This was all thinned down with some mineral turps, before using the weathering wash the boiler and smoke deflectors, cab floor, cylinders and steps, some of the valve gear, all wheels and visible frames and pipes, the tender sides and steps, and a few other minor bits and bobs. I left the crests on the tender with a slightly thinner covering, as if they had been cleaned off in the ast but had gained a newer layer of dirt.
This has dried much more evenly, and I am much happier with the effect so far

The overall finish is just a tad too brown at the moment, so now needs a wash of dark grey shading to black to finish off the main weathering. That will be followed by a few rusty and limey streaks around the cylinders and firebox washout plugs. Then I will have to see if there are any final adjustments or additions needed to make it as near completely convincing as I can.
The eagle-eyed amongst may have spotted that I have not done anything about the slightly slanting cabside number (as all of these models have, from the factory). That may be something I'll tackle at a later stage … or maybe not!
Jeff Lynn,
Amateur layabout, Professional Lurker, Thread hijacker extraordinaire
Amateur layabout, Professional Lurker, Thread hijacker extraordinaire
Posted
Full Member
The two 40' containers for Hanjin and OOCL are now complete, apart from possibly a bit of weathering.

The pre-finished Freightliner containers from the late '70s and through the '80s are shown here mixed in with some more modern containers. The finish on them is superb.

I still have two of the kit-built tank containers to finish off in there!
Last edit: by SRman
Jeff Lynn,
Amateur layabout, Professional Lurker, Thread hijacker extraordinaire
Amateur layabout, Professional Lurker, Thread hijacker extraordinaire
Posted
Full Member
One man has already found his way into the cab doorway on the 08 shunter!


Last edit: by SRman
Jeff Lynn,
Amateur layabout, Professional Lurker, Thread hijacker extraordinaire
Amateur layabout, Professional Lurker, Thread hijacker extraordinaire
Posted
Full Member

After this, painting is next.
Last edit: by SRman
Jeff Lynn,
Amateur layabout, Professional Lurker, Thread hijacker extraordinaire
Amateur layabout, Professional Lurker, Thread hijacker extraordinaire
Posted
Full Member

This wagon is now ready for painting. It will go into either very dirty black or very dirty departmental olive green.
Jeff Lynn,
Amateur layabout, Professional Lurker, Thread hijacker extraordinaire
Amateur layabout, Professional Lurker, Thread hijacker extraordinaire
Posted

Legacy Member
:thumbs;-):cool:
Owen
web-cam http://82.2.74.174:8081
if the lights are off no cam
if the lights are off no cam
1 guest and 0 members have just viewed this.