Jeff's (SRman) work bench and projects
Posted

Full Member
Staying on the thread Kevin.

Posted

Full Member
 P_20191003_124418_vHDR_On by Jeffrey Lynn, on Flickr
 Last edit: by SRman
Jeff Lynn,
Amateur layabout, Professional Lurker, Thread hijacker extraordinaire
Amateur layabout, Professional Lurker, Thread hijacker extraordinaire
Posted
Full Member
Staying on the thread Kevin.
Posted
Full Member
With this list of previous conversions in mind, plus future class 119 and 129 conversions still in their boxes, I have now set up the class 123 Swindon Intercity unit to be done. This will accept several compromises, not the least of which is that the 123 units did not really have marK 1 side profiles, but had a flatter upper section and shallower windows. However, the layouts of the internals and external windows and doors was very, very close to those of the equivalent mark 1 coaches. The set will be a 4-car unit with this formation: DMBSO + CK + SO + DMSK. I used mainly bargain bin coaches from Bachmann, but was only able to get a CK and SK in blue and grey (saving repainting of the centre coaches). You may notice that one of these needs to be an SO rather than a corridor SK. I dismantled one of the maroon SOs that I had bought, and swapped the roofs and interiors (the roof vent layout is different between SO and SK), and fitted B4 bogies while I was at it.
The driving motors should have B5 bogies, but I will accept the B4s for now, but when I next order something from Replica Railways, I'll pick up some B5 side frames. I forgot to do this when I ordered a motorised chassis (64' with 12mm wheels), plus some other unrelated bits and pieces for use in other projects.
One minor irritation is that the maroon SOs, as bought, came from earlier Bachmann moulds and had prominent transverse ridges on their roofs, while the blue and grey corridor pair (as bought) have smooth roofs.
No further work has been done on the conversion other than that described above and the fitting of B4 bogies to the remaining two coaches.
Here is what I have for now. There were extra conversion bits to be used in the Silver Fox box not shown here.

P_20191026_092955_vHDR_On by Jeffrey Lynn, on Flickr

P_20191026_092934_vHDR_On by Jeffrey Lynn, on Flickr
While I have collected all of the components, it may still be a while before I complete this conversion. There is a bit of cutting and shutting of sides involved for the DMBSO and the DMSK.
Jeff Lynn,
Amateur layabout, Professional Lurker, Thread hijacker extraordinaire
Amateur layabout, Professional Lurker, Thread hijacker extraordinaire
Posted
Full Member
Staying on the thread Kevin.
Posted
Full Member
What is going to be the DMSK (Driving Motor Second Corridor) has had its underframe trusses removed and the battery boxes shifted, then the resin engine/transmission and fuel tank components glued on. I forgot to mark the position of the centre screw on the coach underframe, so had to guess where to drill an access hole in the resin base - I missed twice, but no real harm done. This particular coach has one body fixing screw at what will be the cab end that won't budge. I have stripped the head of it in trying, but will end up drilling it out completely when the time comes to dismantle the coach for the side modifications. For the DMSK, I have to remove one window bay on each side to the rear of the centre door, then shift the forward portion back to join it, then add the resin cab moulding, so the side ends up with the cab bit, four windows, door, then three windows, a door and a toilet window.

P_20191027_174838_vHDR_Cropped by Jeffrey Lynn, on Flickr
The DMBSO (Driving Motor Brake Second Open) is going to require a lot more work to incorporate the motorised chassis.
Thinking out loud here (so to speak!): I intend to use one of the Replica Railways motorised chassis (they refer to them as RPCs), but as an alternative, I do have a Hornby class 121 I intended for conversions, possibly to power the intended class 119 unit. If the RPC has sufficient power and traction, I may even be able to use a half-chassis with only one motor, thus hiding it in the van section and still allowing full seating for the open saloon section. That would free up the other half of the RPC to power my currently unpowered class 456 EMU.
p.s. Kevin: my work ethic involves doing whatever the whim dictates at any given time! There are days where I simply can't do any modelling through pain or shaking hands, or both.
Jeff Lynn,
Amateur layabout, Professional Lurker, Thread hijacker extraordinaire
Amateur layabout, Professional Lurker, Thread hijacker extraordinaire
Posted
Full Member
Staying on the thread Kevin.
Posted
Full Member
Some further work on the class 123 DMSK, which will not be motorised. I have cut the side sections and butted them up, trimmed the roof (although a tiny bit more may need to be removed, cut a section out of the seat unit, removed the coach end at the cab end, and posed the resin cab at that end. Nothing has been glued and filled at this stage, there is still a small amount of fettling to do. The parts are shown just after cutting, and assembled loosely in a way that gives an idea of how it will look once completed.

P_20191029_180336_vHDR_On by Jeffrey Lynn, on Flickr

P_20191029_183951_vHDR_On by Jeffrey Lynn, on Flickr]
Jeff Lynn,
Amateur layabout, Professional Lurker, Thread hijacker extraordinaire
Amateur layabout, Professional Lurker, Thread hijacker extraordinaire
Posted
Full Member

P_20191112_220609_vHDR_Cropped by Jeffrey Lynn, on Flickr
Last edit: by SRman
Jeff Lynn,
Amateur layabout, Professional Lurker, Thread hijacker extraordinaire
Amateur layabout, Professional Lurker, Thread hijacker extraordinaire
Posted
Full Member
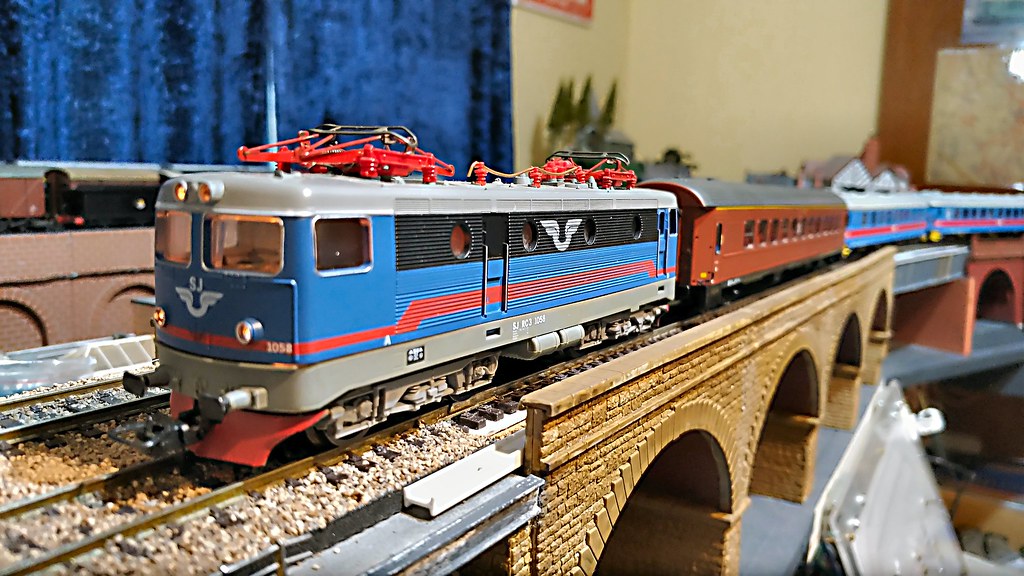
I was even luckier in that the motor brushes are already completely isolated from the power bogie frame, so hard-wiring a decoder was simplicity itself. I connected the red wire of the chosen decoder, a Zimo MX600 with its 8-pin plug cut off, to the electrical pickups on the power bogie, adding a red heat-shrink sleeve to the bare wire coming up from the pickups. The black wire was attached directly to the unpowered bogie's brass clip. The orange and grey wires were soldered to each brush clip, and the loco was tested on the programming track. It worked perfectly, and very, very smoothly first go. It even went in the right direction for what I wanted to be forwards.
The model comes with directional lighting using diodes and bulbs. The lighting wires and diodes were removed from the dummy bogie's clip at the same time as I was soldering the black wire to it, and the light's return wire removed from the motor bogie pickup wire where it was attached. After testing the motor wiring, I could now wire the blue wire to both bulbs and the white wire to what would be the leading bulb (I like the unpowered end to be the "front"), and the yellow wire to the trailing bulb. Once again, I tested this on the programming track, and all worked perfectly when Function 0 was selected.The loco was programmed to its running number, 1058, and sent around the main lines with a suitable train, where it is seen here.All in all, I am pleased with it for what was a very low budget acquisition.
I will in the future do something about the light bleed where the body halves join, and give it some rudimentary cab interiors, which will also prevent the headlights illuminating the (empty) cabs as they do at present.
The coaches are from Roco and NMJ (a Norwegian firm I hadn't heard of before), and are of a very high quality.
P_20200126_113209_vHDR_On by Jeffrey Lynn, on Flickr
Jeff Lynn,
Amateur layabout, Professional Lurker, Thread hijacker extraordinaire
Amateur layabout, Professional Lurker, Thread hijacker extraordinaire
Posted

Site staff

Ed
Posted
Full Member
I haven't even got the third rail down yet. Overhead wires may wait for the next century at the rate I'm going! ;-)
Jeff Lynn,
Amateur layabout, Professional Lurker, Thread hijacker extraordinaire
Amateur layabout, Professional Lurker, Thread hijacker extraordinaire
Posted
Full Member
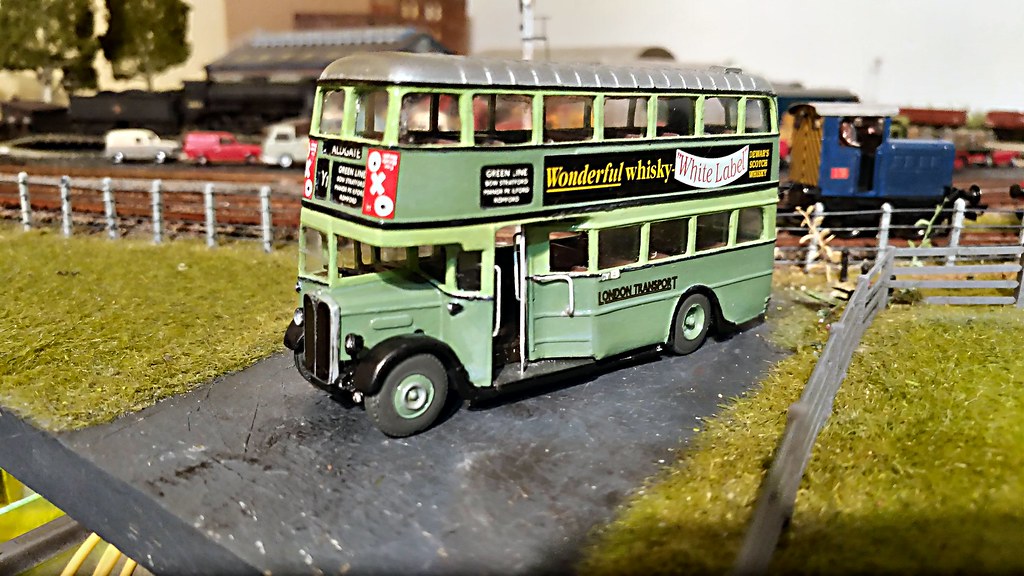
Note that this bus has been 'borrowed' for use on Green Line route Y1. These buses were intended for such use but deemed unsuitable, but were used when certain Green Line routes were reinstated during the War. Buses were known to be substituted for coaches on Green Line services many times to cover for failures or shortages. Green country buses were preferred, but red buses did appear on occasion.
 ]
]P_20200201_230619_vHDR_On by Jeffrey Lynn, on Flickr]

P_20200201_230641_vHDR_On by Jeffrey Lynn, on Flickr
What's missing? I have not yet added registration number plates or fleet numbers, and the half-drop opening windows (three per side upper, two per side lower deck) will be represented with microstrip on the appropriate windows.
Jeff Lynn,
Amateur layabout, Professional Lurker, Thread hijacker extraordinaire
Amateur layabout, Professional Lurker, Thread hijacker extraordinaire
Posted
Full Member
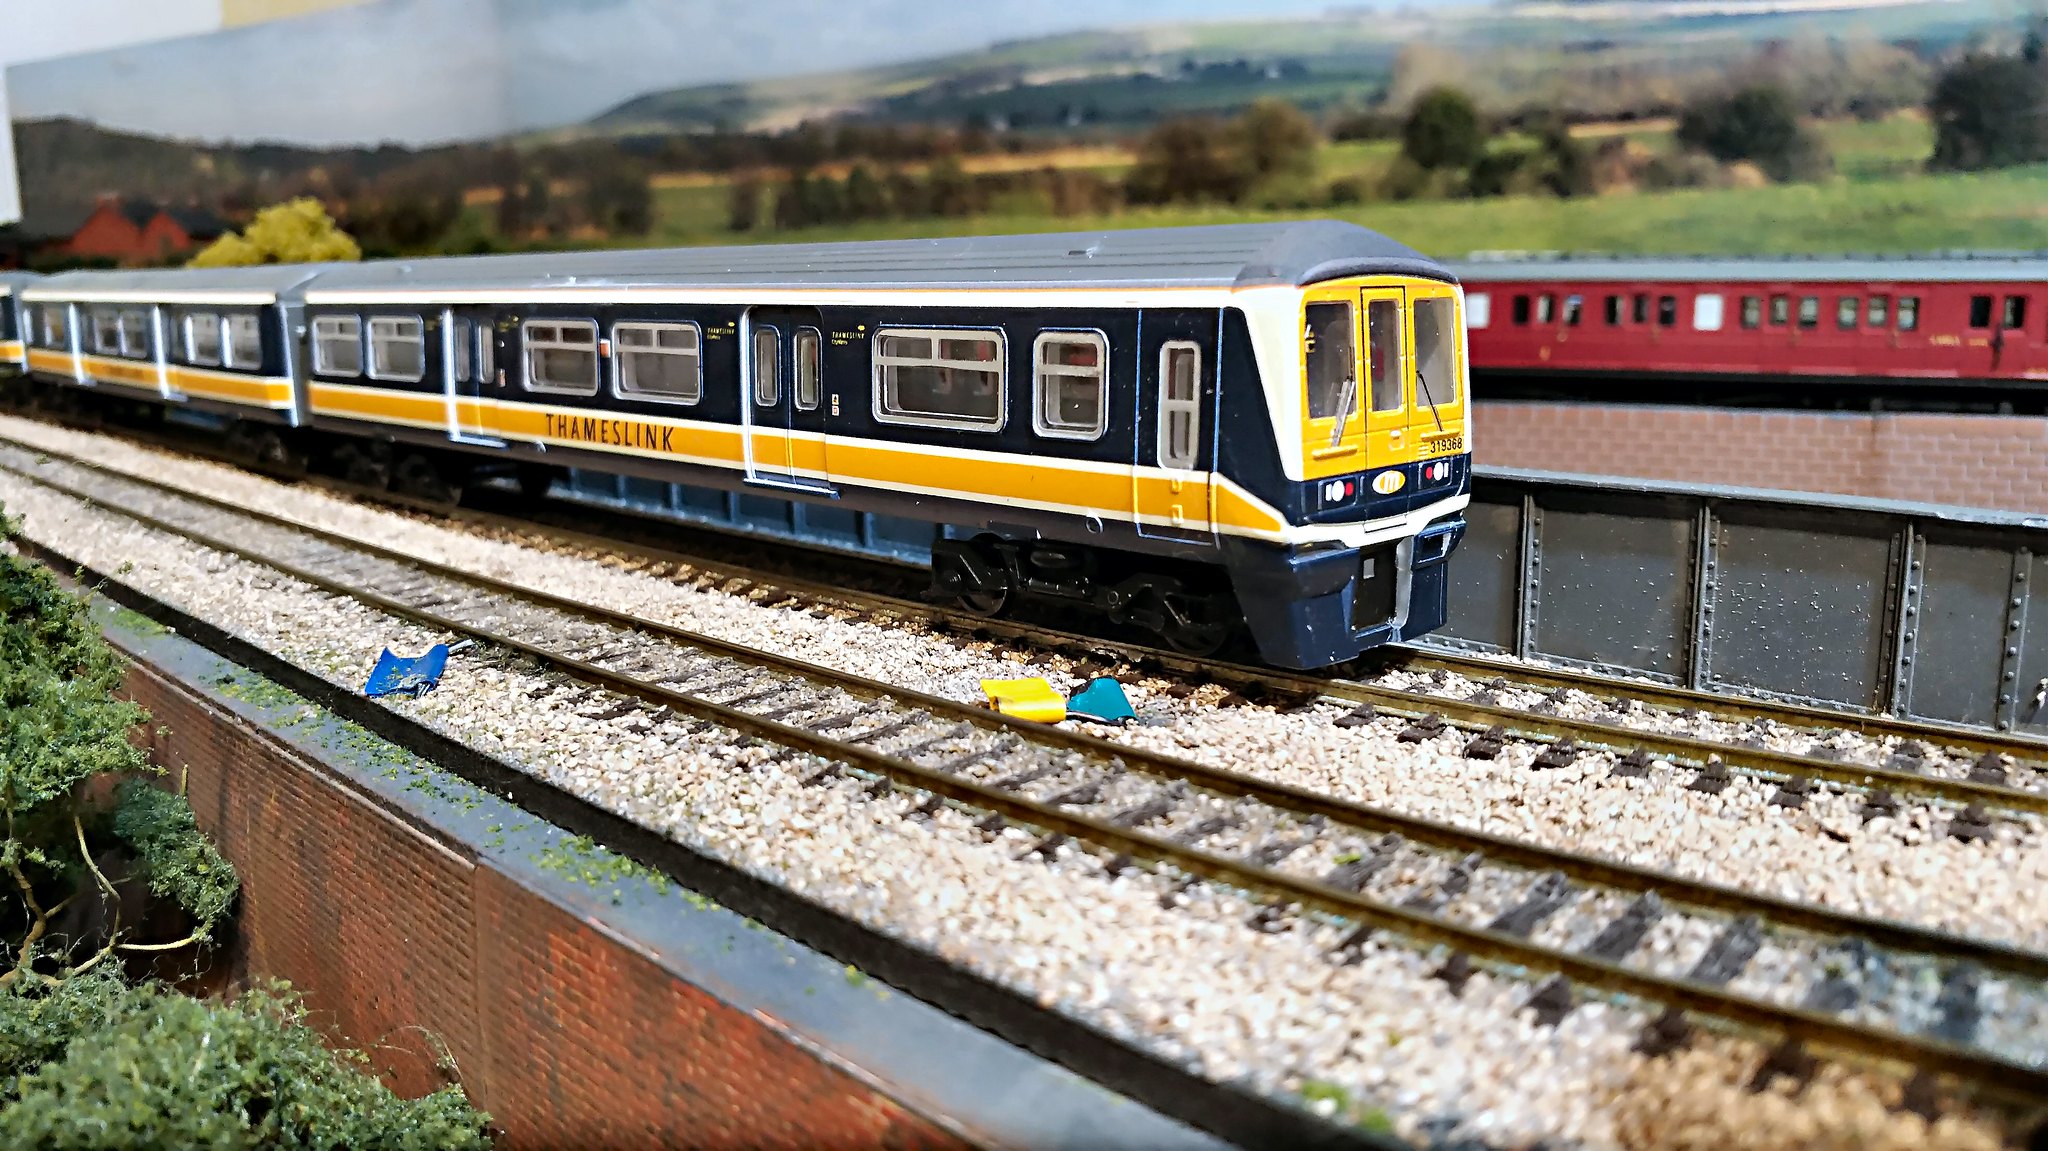
So, here is unit 319 388 posed after a short test run on Newton Broadway. It is still minus all the underframe equipment, and the motor bogie sideframes need to be shortened by 1mm each side to match the Replica wheelbase. I modified and shortened the coupling extension arms and fitted much finer Bachmann couplings to close up the inter-coach gaps. This was successful but needs just a couple of minor adjustments to even up the gaps, after which I will have to apply the same mods to the other four Bratchell units I have built.
P_20200219_182129_vHDR_On by Jeffrey Lynn, on Flickr

P_20200219_182207_vHDR_On by Jeffrey Lynn, on Flickr
Last edit: by SRman
Jeff Lynn,
Amateur layabout, Professional Lurker, Thread hijacker extraordinaire
Amateur layabout, Professional Lurker, Thread hijacker extraordinaire
Posted
Full Member
I bit the bullet and started repainting 10000 into black and silver a few days ago, and have just about completed the transformation now. I have added the BR crests, based on a photo taken at Bournemouth on the Internet. Once that has properly set, I will varnish the locomotive to protect the transfers and the silver paint, which can be a little less hard-wearing than some of the other colours. I also need to replace the missing horn at one end. I'll probably give it a very light weathering after all that.
Both of these locos have been fitted with Soundtraxx Econami BR Diesel sound decoders, using class 37 sounds but with different horns selected, but they need better speakers fitted to complete that side of things.
The photos show 10000 as bought, then after the transformation to an earlier time, together with 10001.

P_20181226_132459_vHDR_On by Jeffrey Lynn, on Flickr

P_20200227_232650_vHDR_On by Jeffrey Lynn, on Flickr

P_20200227_232708_vHDR_On by Jeffrey Lynn, on Flickr
Jeff Lynn,
Amateur layabout, Professional Lurker, Thread hijacker extraordinaire
Amateur layabout, Professional Lurker, Thread hijacker extraordinaire
Posted

Full Member
How do you rate the Soundtraxx decoders and how do they compare price-wise with other manufacturers ?
'Petermac
Posted
Full Member
The Soundtraxx are not too bad for the sounds, but I am having trouble with inadequate speakers. The Soundtraxx can put out 2 watts of power but the speakers I have used are only rated at 1 watt, so pop and crackle a bit, even at low volumes. I do have some better ones in hand to try out.
Price-wise, the Soundtraxx decoders do offer good value for money: they are cheaper than ESU and Zimo, and have six different British diesel engine sounds and umpteen horn sounds available at the change of a few CVs. This was the only way I could justify adding sound to both of the locomotives. It also means that the two won't fight each otehr when in multiple (i.e. consist) because they have the same decoders and motor characteristics.
Jeff Lynn,
Amateur layabout, Professional Lurker, Thread hijacker extraordinaire
Amateur layabout, Professional Lurker, Thread hijacker extraordinaire
Posted

Full Member
Soundtrack do a 4W megabass speaker. Still not a good idea to run the amplifier at full output though. You will still get clipping and both the speaker and the speaker and decoder will get hot. Soundtraxx factory setting is about 1.5W, I take mine down to below 1. Better solution is more speakers, with appropriate selection of resistance.
Not really fair to compare an Econami with an ESU or similar. The Tsunami 2 is the comparable, and just as expensive. The Econami is just as good running wise though.
Nigel
©Nigel C. Phillips
Posted
Full Member
I turn the volume down on all of the locomotives I have with sound, and rarely run more than two of them with sound on at any one time, otherwise it just becomes noise. Incidentally, I have tweaked the settings on the Econami decoders (including one I also fitted to Heljan's 'Lion') by changing the mute to function 1, to bring them into line with all the other British sound decoders (that's the sounds are British, not the decoders!).
:cool: :cool:
Last edit: by SRman
Jeff Lynn,
Amateur layabout, Professional Lurker, Thread hijacker extraordinaire
Amateur layabout, Professional Lurker, Thread hijacker extraordinaire
Posted
Full Member
I know you are not, just want to make sure readers are not disappointed. The name says it all, they are economy decoders. Good value for money though, and with a 2amp rating.
Nigel
©Nigel C. Phillips
1 guest and 0 members have just viewed this.