Jeff's (SRman) work bench and projects
Posted

Full Member
Jeff Lynn,
Amateur layabout, Professional Lurker, Thread hijacker extraordinaire
Amateur layabout, Professional Lurker, Thread hijacker extraordinaire

Posted
Full Member
The photos show the items glued into place, and after a first coat of black paint.

Jeff Lynn,
Amateur layabout, Professional Lurker, Thread hijacker extraordinaire
Amateur layabout, Professional Lurker, Thread hijacker extraordinaire
Posted

Full Member
Is the firebox just fixed with superglue ?
'Petermac
Posted
Full Member
Hi Peter, yes, at present there is only superglue holding it. The side in the photos actually broke, so there is very little contact area. I will be reinforcing the joints on both sides with either some hot glue or some Araldite. Both types of glue have a bit of 'body' to add some mechanical strength to a joint.That looks much better Jeff. :thumbs
Is the firebox just fixed with superglue ?
Jeff Lynn,
Amateur layabout, Professional Lurker, Thread hijacker extraordinaire
Amateur layabout, Professional Lurker, Thread hijacker extraordinaire
Posted
Full Member
The aim is to populate some of the pre-grouping locos with fairly open cabs, and also the Stephenson's Rocket coaches with the passengers.

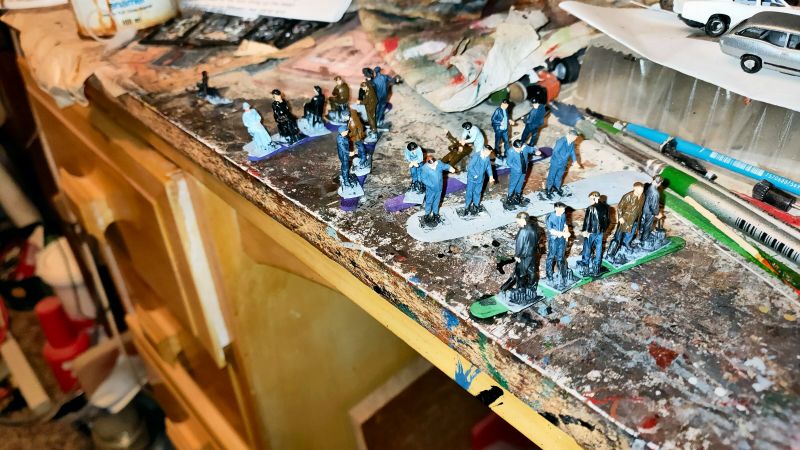
The Hatton's crews come up as looking quite natural in their poses, and the Modelu ones will be just as successful - I think that Modelu might have been responsible for the Hatton's commission. Here's a photo I have posted before, with one of the Hatton's figures in a Dapol B4 0-4-0T.
 Last edit: by SRman
Jeff Lynn,
Amateur layabout, Professional Lurker, Thread hijacker extraordinaire
Amateur layabout, Professional Lurker, Thread hijacker extraordinaire
Posted
Full Member
While I had it open, I took out the Hattons direct decoder and put in a DCC Concepts one, which has given marginally better motor control. I must try to get a better decoder for it, but the choices are limited because there is very little room inside.
Jeff Lynn,
Amateur layabout, Professional Lurker, Thread hijacker extraordinaire
Amateur layabout, Professional Lurker, Thread hijacker extraordinaire
Posted
Full Member
Regarding decoders, I have no idea what size the Hattons one is but had thought they were manufactured by DCC Concepts …….. :hmm If that is the case, there's not likely to be much difference between the two I'd have thought.
Have you looked at the Zimo range ? I'm a big fan now although I do admit to being a total novice on such things.
'Petermac
Posted

Full Member
Posted
Full Member
The DCC Concepts one I have used is slightly smaller, and seems to behave better, but as I said I do want a better one still. It needs a direct plug-in 8-pin decoder. Even the TCS DP2X-UK looks to be too big for the space, although I could try one to see if it fits and works better. I have found that particular decoder to be variable in quality, with some working beautifully and others having odd quirks.Interesting problems Jeff given that the loco is not from the dark ages. Did it run OK out of the box ? Not a particularly good advert for Hornby…….. :roll:
Regarding decoders, I have no idea what size the Hattons one is but had thought they were manufactured by DCC Concepts …….. :hmm If that is the case, there's not likely to be much difference between the two I'd have thought.
Have you looked at the Zimo range ? I'm a big fan now although I do admit to being a total novice on such things.
Then again, I think DCC Concepts have borrowed some of TCS's technology for their designs, and then passed that onto the badge-engineered versions for Hatton's and Rails.
Jeff Lynn,
Amateur layabout, Professional Lurker, Thread hijacker extraordinaire
Amateur layabout, Professional Lurker, Thread hijacker extraordinaire
Posted
Full Member
I do like Zimo, and will have a look at the range on YouChoos's site to see what might fit, next time I'm ready to buy some decoders and/or sounds from them.Agreed regarding Zimo, I have them fitted in a Hornby Terrier (MX622N) and Peckett (MX617N). Then the remaining issue I have is not the Chip but the attendant stay-alive gear.
Jeff Lynn,
Amateur layabout, Professional Lurker, Thread hijacker extraordinaire
Amateur layabout, Professional Lurker, Thread hijacker extraordinaire
Posted
Full Member
Last edit: by RFS
Robert
Posted
Full Member
Thanks for the suggestion. Quite coincidentally, I am in the process of ordering a Lenz Silver Direct decoder - just shopping around for the best price. :cheersI have equipped my H with a Lenz silver mini with which it runs extremely well. I bought the wires-only version and soldered (and shortened) the wires to an 8-pin plug to give me the flexibility of replacing it. What surprised me was how big the interference supressor was! It's actually slightly bigger than the Lenz decoder, so when removed the decoder sits in its place on top of the motor held firm with a small piece of double-sided sticky pad.
Jeff Lynn,
Amateur layabout, Professional Lurker, Thread hijacker extraordinaire
Amateur layabout, Professional Lurker, Thread hijacker extraordinaire
Posted
Full Member
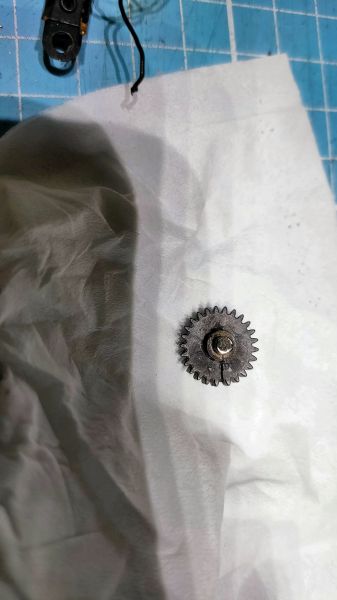
I cleaned the gears in some IPA, then tried filling the gaps and supergluing them to prevent slippage on the shaft, but that still resulted in jamming, albeit with some movement possible. Fortunately, I had a couple of spare sets of these gears in one of my boxes, so after a bit of searching I was able to replace the problem set.
Testing with these fitted showed it to be running better than ever, so reassembly commenced. Before doing that, I had to resolder one of the wires to the tender coupling that had come adrift. Reassembly of these models is fiddly, but I managed to get it back together without damaging the plastic motion brackets or severing any of the wires.
Another test was carried out on the main lines, then it was reversed back into the engine shed roads.

Last edit: by SRman
Jeff Lynn,
Amateur layabout, Professional Lurker, Thread hijacker extraordinaire
Amateur layabout, Professional Lurker, Thread hijacker extraordinaire
Posted

Full Member
Cheers MIKE
I'm like my avatar - a local ruin!
I'm like my avatar - a local ruin!
Posted
Full Member
If that had been mine, I fear it would have become a static model pending construction of a scrap yard diorama …………. :oops:
'Petermac
Posted
Full Member
A friend of mine is a watchmaker, and also collects older model railways, so quite often turns up gears or axles or other parts to get his models running again. He actually saw my post on Facebook (Platform 1 MRC group), and suggested he could try turning some brass rings to sit over the projecting boss on one of the gears, but there is nothing to seat such a ring on the other gear on the same shaft. It could still be worth a try.I often wonder how much extra it would cost to fit metal gears instead of splitting prone plastic ones; I suppose they hope to make more money on spares and/or repairs
Jeff Lynn,
Amateur layabout, Professional Lurker, Thread hijacker extraordinaire
Amateur layabout, Professional Lurker, Thread hijacker extraordinaire
Posted
Full Member
Testing on the programming track again showed all was well with my wiring. I had to resolder one wire that had come adrift from its bogie pickup during my handling of the loco, but other than that it worked perfectly first go anyway. I have removed the weight at one end to sit the decoder on top of the bogie gear tower, held in place by a bit of black tack - there is plenty of weight in the chassis in any case. That black wire should have been tidied up and run along the side of the PCB; I'll fix that up next time I take the body off.
Now all I have to do is add all the handrails and other add-on bits that came sealed in their bag in the box, and choose a number from the transfer sheet that was also included.


Last edit: by SRman
Jeff Lynn,
Amateur layabout, Professional Lurker, Thread hijacker extraordinaire
Amateur layabout, Professional Lurker, Thread hijacker extraordinaire
Posted
Full Member
Jeff Lynn,
Amateur layabout, Professional Lurker, Thread hijacker extraordinaire
Amateur layabout, Professional Lurker, Thread hijacker extraordinaire
Posted
Full Member
Posted
Full Member
:cheers
Next project:
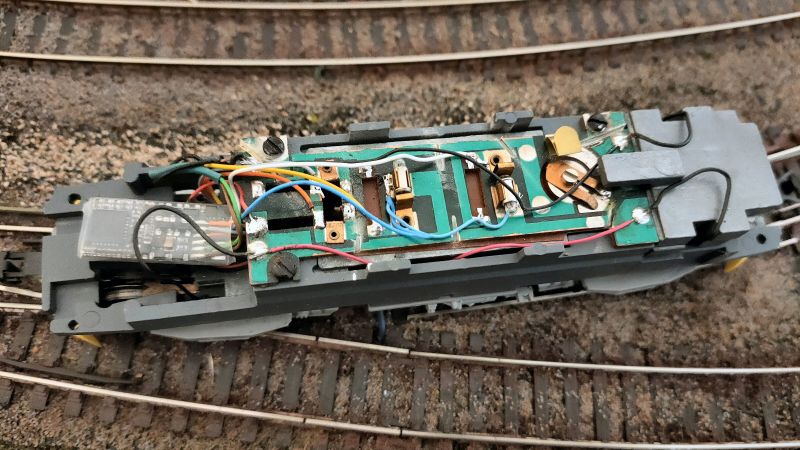
While adding strengthening braces to the undersides of the drawers in an Ikea Alex unit with all my (heavy!) locomotives in, I had to remove all the locos as I took each drawer out. I found a good few little bits and pieces that had fallen off various locomotives and their couplings. Among those bits was a pair of air hoses from a class 73. I identified the loco as 73 141 in First GBRf livery, an earlier release Dapol model that had lighting faults built-in to the PCB through poor design and lack of quality control on Dapol's part. I had already fixed one early model, in (sort of) BR early blue, and decided I would treat this model as well while I had it out.
The problems with these models were that the headcode and headlights (where fitted for the latter) worked the wrong way when a DCC decoder was fitted - forwards for the model resulted in the rear lights coming on, and reverse meant the front lights came on. There were a couple of fixes for this: one was to swap the F0f and F0r functions on the decoder, another was to reverse the brush wire connections on the PCB (which was the one I chose). Either solution results in the lights working the wrong way again if the decoder is removed and the model restored to DC only working.
The other lighting problem was that the cab lights at both ends were permanently on when the model was powered; on DCC that's all the time! Dapol's so-called solution was to advise owners to put some tape over the two contact pads at one end behind the cab mouldings, which then left the cab lights permanently off. Someone quite some time ago posted the solution to fix this, which involved cutting two tracks and soldering two jumper wires. I did this with the previous model, and decided to repeat it on this one too. Once done, it allowed the cab light at No. 1 end to be operated with F1, and that at the No. 2 end on F2 (on a Zimo MX634 non-sound decoder). Once I had this successfully operating, I reprogrammed the outputs slightly to switch the cab lights off at anything above speed step 0. the pictures show the headcode and headlight operating independently of the cab lights, and combinations of both cabs on or off, and each one in turn on.

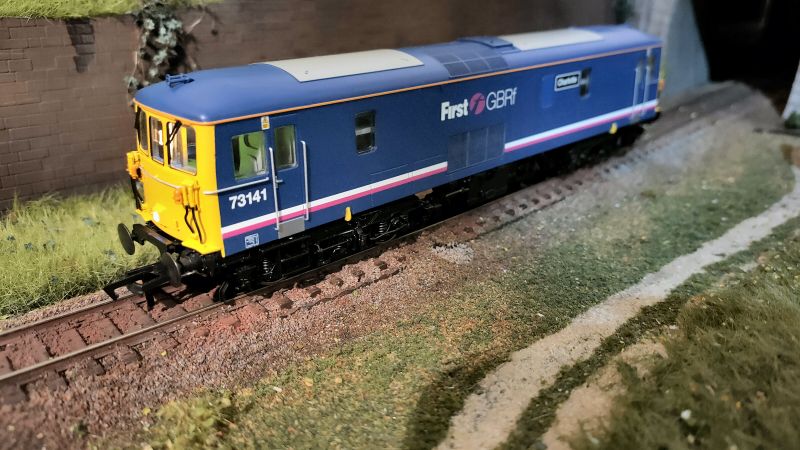
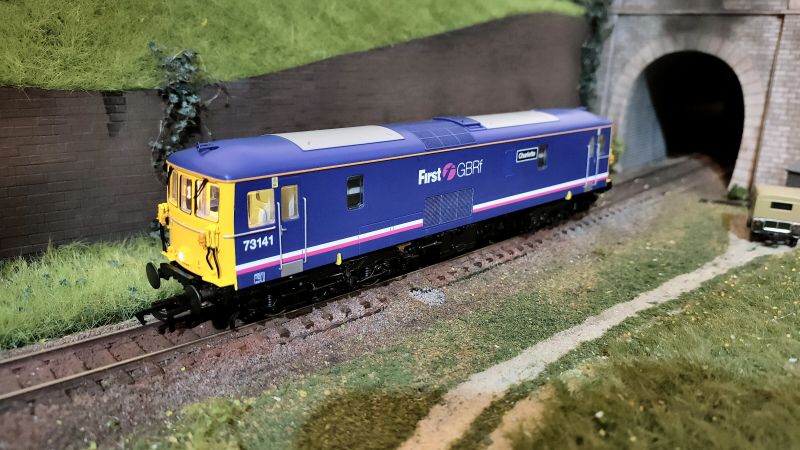
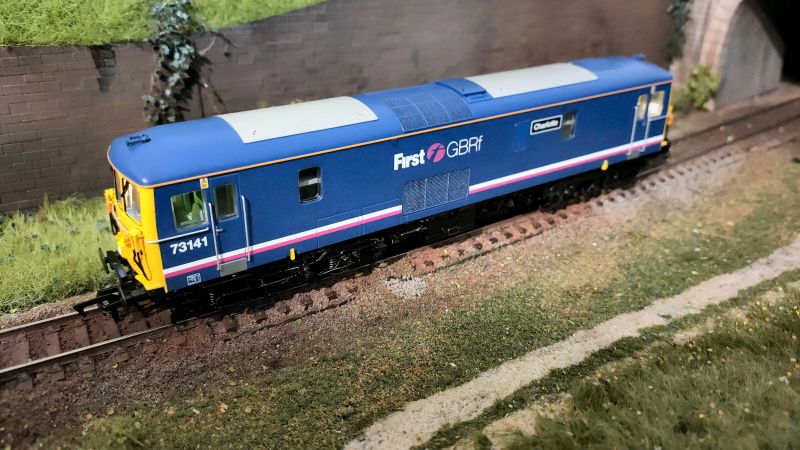
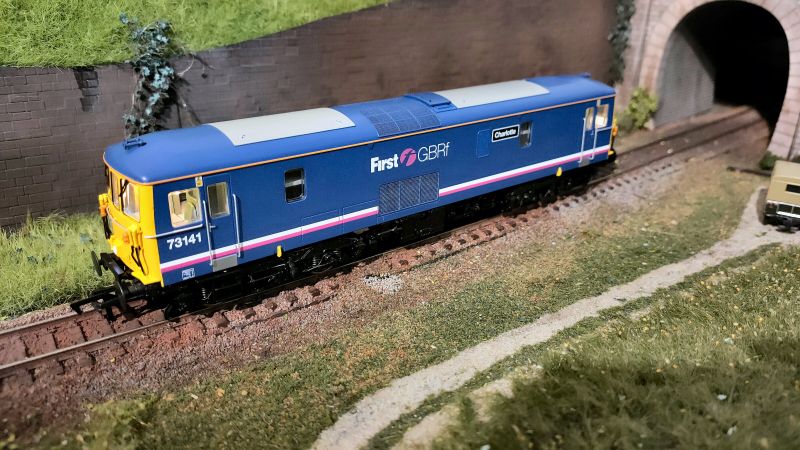
Now all I have to do is give it a really good run, as the pickups are a bit dirty so the loco is spluttering a bit on the tracks.
Jeff Lynn,
Amateur layabout, Professional Lurker, Thread hijacker extraordinaire
Amateur layabout, Professional Lurker, Thread hijacker extraordinaire
1 guest and 0 members have just viewed this.