Brendan's Workbench.
Posted
#212073
(In Topic #11578)

Full Member
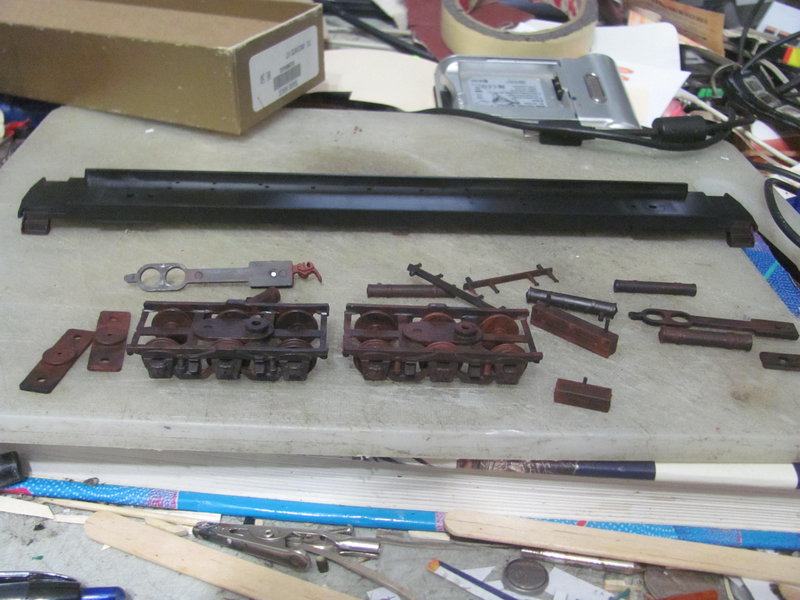
I've begun by weathering the bogies (trucks in American parlance, but I do tend to go with British parlance more) and the underbody detail parts, weathering them to make them look more realistic. The bogies have been quite transformed - those familiar with the kit know that they were originally an especially plastic-looking gloss black and that just won't do at all. I do wonder if I've overdone it a bit, though, since this is supposed to be a well-kept, in-service car:


Posted

Full Member
Are those the original wheels? I just had a look at my stock of Pullman Palace cars, they are plastic. I use Reboxx single insulated 36" wheels, they run smoother, look better (shiny tread) and allow pick-up for lighting. My suggestion would be to do the truck frame separately from the wheels. Use some plastic primer, then steam or grimy black or equivalent, light dusting of brake dust around the shoes and springs. Oily black on the journal boxes. Bit heavier with the frame dust/track dust on the wheels, which should be dark grey. If you have one or can borrow one a model sand blaster will give that dull cast iron look to the trucks. The degree of weathering you have would be fine for an MOW, probably a tad heavy for express varnish duty.
The MDC 6-wheel trucks are pretty close to the prototype but unless you have 18"track radii you don't need those Talgo couplers. Put the KDs on the end of the body.
Nigel
©Nigel C. Phillips
Posted
Full Member
And yeah, they're the original wheels. I don't have a stock of metal replacement wheels or anything like that, but I don't mind plastic wheels.
Thanks for the advice, I'll be sure to fine-tune things accordingly. Based on what you said, I would guess I indeed overdid it with the rust paint on the wheels
 Last edit: by ZeldaTheSwordsman
Posted
Full Member
Eighteen inches you will need the Talgos. Don't forget to cover up the axle holes when painting/spaying. Metal wheels and axles are are a good investment. As is one of those pinpoint axle hole cleaners. Metal axles and wheels run much better than plastic ones. Check the axle length if you do swap over. Reboxx have lengths to suit MDC Palace trucks.
Which car are you modeling?
Nigel
©Nigel C. Phillips
Posted
Full Member
I know metal wheels are better, but there are currently other kinds of parts higher on my priority list for when I have money. Plastic wheels can function at least decently when the tyres are free of flash and the axles are turning freely.
Posted
Full Member

I've been working on a scratchbuilt water tower. It's primarily being made out of matchsticks. The deck planks are popsicle sticks glued to a middle layer cut from cereal box cardboard.
According to a calculation based on scale measurements of the tank, the capacity is a scale 19,764.13091 US gallons. Not too shabby.
Posted
Full Member
82 tons of water, just a small one then, although you'd better get a few hawser cables around that beast quick, otherwise it'll be a flood plain waiting to happen.
Nigel
©Nigel C. Phillips
Posted
Full Member

Revised weathering on the bits. Also got one bolster glued on, as well as the undercarriage bits.

Bought a complete set of Athearn Gunderson Maxi-III well car shells. It was just the shells, so no details or even connectors. I'm making my own connectors instead, and making them as eyes rather than imitating the original connector parts. This is for added cornering ability: I'm going to glue a plate with two posts on it over each middle bogie, and the eyes will each slip over the nearest post. More flexible that way.

Also working on this
Last edit: by ZeldaTheSwordsman
Posted
Full Member
Dire straits then.
Watch the flashing on the Pullman Palace windows, PITA to remove after painting, and impossible after glazing. Flat file works well. Trucks look really good.
Gundersons. All five? Blue Box? I think the recommended minimum radius is 22" so getting them around 18" corners without tipping over should be fun. Lots of weight in the bottom container seems to work. What trucks are you going to use? Using 2 pins on the same truck is a good idea, should give you that extra couple of mm's to get you around the bends. That way you can keep the height of the couplers the same, and avoid frictional forces (one pressing on the other). Neat.
Caboose. Bit too modern for me. Is that car primer?
Nigel
©Nigel C. Phillips
Posted
Full Member
That's not car primer on the caboose, it's just brush-on acrylic. I've had good results with it usually.
Posted
Full Member
Nice brush work then. What (whose) acrylic are you using?
Nigel
©Nigel C. Phillips
Posted
Full Member
Wouldn't say that the brushwork on that caboose is all that nice - the blue dried rough in patches on the top coat. Sigh.

I completed the connectors and custom Jacobs bogies for the well car set. And indeed, it navigates 18" radius curves. Sorry about the iffy focus in the photo.
Posted
Full Member
With some double stacked that will look very nice.
I like the Apple Barrel acrylics, decent coverage with a couple of coats.
Nigel
©Nigel C. Phillips
Posted
Full Member
Posted
Full Member
Pete.
it was already on fire when I got here, honest!
Posted
Full Member
Hi Brendan,Getting containers to load this lot with… Oh, that's going to be all kinds of fun financially… Scratchbuilding corrugated sides seems like it would be a pain in the butt to get right, but I might have to see if I can pull it off because yeah.
I believe you can get styrene sheet in appropriate corrugation sizes. Build a box first though. What is going to give you an "ouch' moment is the cost of the decals. What is then going to give you more grief is getting the decals on. Do some budget calculations first, eebygum often has job lots of containers. How about card containers? Or KIBRI #10924?
Nigel
©Nigel C. Phillips
Posted
Full Member
I've found a card kit of 20' containers but none bigger than that so far. I was planning on scratchbuilding mainly from cardboard and card, not styrene, and just printing the logos and such out from the household printer.
Posted
Full Member
That's the problem with Gundersons, consist of 5 double stacked will set you back $100+. I've seen them with double stacked, single stacked, and half stacked (40"+ 20' on the bottom) containers on the same train, as well as trains with multiple consists all empty, so you don't need them all filled. Tank containers tend to be on their own, normally full of nasty stuff.
I've seen them at model trains shows for $2-3 each. 40' ones are $6.99 at modeltrainstuff.com (plus postage).
Nigel
©Nigel C. Phillips
Posted

Site staff
Don't suppose these are any good as they're OO and more UK/European.
http://www.modelrailwayscenery.com/2014/09/40ft-shipping-containers-oo4mm176/
Ed
Posted
Full Member
1 guest and 0 members have just viewed this.