Knottworthy Magna in 0/16.5 7mm Narrow gauge.
Posted
Full Member
A new circular layout by the creator of Glen Ogle in 009.
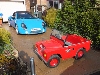
Thank you Bill, I'm glad you liked my ramblings and found an interest in my little wandering off piste. Lomax made good use of the 2CV chassis for their kit car too.Kind regards,
BrianT.

Posted

Site staff
Just shows what can be done in 7mm in a small space.
Ed
Posted
Full Member
I mentioned in my ramblings that the layout benefited from a train turntable fiddle yard, accessed trough the low relief engine shed.
I thought some of you might be interested in its design?
Off scene behind the engine shed, is a shelf bolted to the layout that carries the turntable as shown below. This view also shows the 12v 7Ah dry battery that powers the layout electrics, and a view of the inset toggle switches that operate the servo operated engine shed doors, the level crossing gates and various lighting effects around the layout, with LED's to show what is powered when.

A close up of the turntable shelf and the turntable.

The shelf removed for illustration purposes, and turned at 90 deg. to its direction of delivery, and one of the cassettes mounted on it.

The underside of the turntable platter showing ball bearing upon which it turns, and the fact that I got the bearing socket too near to the edge and had to drill a second one adjacent.

The cassettes are 100mm trunking lids, with the track glued to the inside of the lid, these fit inside two right angle strips of hardwood, such that the plastic is securely aligned, but can be slid backwards and forwards easily. This is to accommodate the fact that the turntable has to turn in a circle, so the square edges have to be removed on the turntable platter, and the cassettes need to be able to slide into position when in place to deliver a train to the layout through the engine shed. Once the platter is aligned with the exit hole, the cassette can be slid hard up to the adjoining layout track. The reason for the over-wide trunking I used, is because this turntable was originally designed for my Glen Ogle layout, and the 100mm (4") lid hold 3 pieces of 009 track side by side, so three complete 009 trains could be accommodated per cassette. I the event, the turn table was never used for its designed purpose as I turned Glen Ogle from an end to end layout into a dog-bone type, with track returning to the opposite end behind the back-scene.


I hope the pictures make every thing clear, its not rocket science, but it works.
Regards,
BrianT.
 Last edit: by gtmspyder
Posted

Legacy Member
i assume your electrical contact is pushing the rails on the trunking up to the layout track for contact?
Brian
OO gauge DCC ECOS Itrain 4 computer control system
Posted
Full Member

A battery and a receiver per Loco, controlled by a transmitter, no mucky track to bother about, any fallen leaves, branches or bodies will be happily climbed over, none of my trains are ever late.
Kind regards,
BrianT.
Posted

Full Member
That river bank IS a popular spot and justifiably so, the factory staff must be quite envious?
Is the layout “finished†or do you feel the need for a signal or two?
Posted
Full Member
No, the layout is not considered finished, it will be at Pudsey Narrow Gauge North in March, and I am still trying to do a little bit at it, but at the moment, typing is about all I am fit for, I am struggling with my health at the moment.
Owld age is not something to look forward to.
Kind regards for your interest,
BrianT.
Posted
Full Member
It will be an 0-4-0 on a smoky Joe chassis and radio controlled as usual, so a bit of Pasticard and a few bits from the scrap box saw it in the builders yard, ( our dining table ) I've got a very tolerant wife, especially since she's seen me in print and can show the neighbours a picture of Knottworthy Magna on the front cover of Narrow Lines, the 7mm narrow gauge magazine.
So here we go:-
Still in its early stages, looks like a coffin on wheels at the moment, white Plasticard super-glued together 'cos I've run out of MEK Pak solvent, so when I've done typing this, I'm off to Marcways, my local model shop to buy some, and some static grass to tart up the layout a little with my home made scatter'er.

Most of the required bits on my window sill.


I'm considering a sliver of copper tube along the tank top to represent the top of the boiler, any thoughts folks?
Right I'm off shopping now, more when I've done it.
Regards,
BrianT
Last edit: by gtmspyder
Posted

Full Member

Posted
Full Member
Posted
Site staff
Agreed, possibly extending to a smoke box slightly proud of the front of the tanks…. if that is at all possible?
Larger diameter tube :hmm
Ed
Posted
Full Member
I have been busy since getting back from the model shop, I decided that 15mm copper tube was the wrong size for the boiler, and 22mm was too large, so I looked around for a this'l do piece, and settled for an AA battery.
I'm not going to get my tripod out to take pictures tonight, so you will have to wait until tomorrow, and let the words paint a picture.
The battery was sawn in half, length way's, (if anyone has ever wondered what is inside a modern AA battery, watch this space and all will be revealed when I take a picture.) This gave me a suitable tube diameter, but a little short on length, so I reduced the length of the side tanks at the boiler position, leaving the tanks extended beyond the boiler, as though the tank capacity had been extended, so that to work the factory yard, would only require an overnight fill up with a hose pipe to get it through the days shunting duties.
The battery was the same diameter as the smoke box door casting from my bits box, so this was super glued to the negative end of the battery casing, the half tube had the chimney and steam dome and safety valve glued in place so that I could line them up nicely, then the half tube was super glued to the tank top with the positive end butting up to the spectacle plate.
The space between the tanks and boiler front was filled with Blue Tac moulded into shape, ( I did not have any modelling clay, (Plastacine to UK readers), which filled the void and could be shaped easily to follow the required contours, and will accept paint easily.
Any other cracks and fissures left during modelling was filled with Milliput two part filler and sanded smooth when hard.
That'll do for now, pictures tomorrow.
Regards,
Brian T
Posted

Full Member
Michael
Posted
Full Member
As promised some up to date pictures of progress, starting with the AA donor battery that supplied the boiler for the coffin tank engine.
The battery was sawn in half, length way's, (if anyone has ever wondered what is inside a modern AA battery,here's a look see . This gave me a suitable tube diameter, but a little short on length, so I reduced the length of the side tanks at the boiler position, leaving the tanks extended beyond the boiler, as though the tank capacity had been extended, so that to work the factory yard, would only require an overnight fill up with a hose pipe to get it through the days shunting duties.

The piece of battery outer case with the dome and the safety valve, and the chimney, which were spares from my scrap box, fitted in position on the case. The case has been positioned and super glued into position on the tank top, negative end at the smoke box end, positive end to the spectacle plate. I might leave the crimped top of the AA battery as it is, as it does look a little like the firebox to the boiler joint, opinions please?? The joint to the spectacle plate will be filled in with Milliput modelling clay, as could the AA battery top crimp?

A better view of the cut down side tanks with the smoke box access door, rescued from my scrap box, glued to the AA battery negative end. The space created by the bowed end of the battery to the flat smoke box door casting will be filled with Milliput. The space below the smoke box door is being filled with Blue Tac, as a malleable filler that can be pushed into place and formed to the contours of the space, much like Children's Plasticine. When finished it will accept paint and be indiscernible from a normal material.


And to finish off this session, here's a selection of my motive power fleet lined up on my dining room window sill.
Left to right is a Small-brook model, petrol engine'd Rail car, bought by the factory management and on semi permanent loan to the "Knottworthy Light Railway Company", whose major share holder is the chairman of the "Knottworthy Shock and Awe Co. Ltd's factory". This was acquired by the factory from the Smallbrook engine company, who took it in as a payment from one of Colonel Stevens failing enterprises in exchange for a Ganger's trolley. After a lick of paint, in Gooseberry Green and Custard, the fitting of a new engine silencer, and replacement of several of the woodworm riddled lats on the passenger saloon's seats, it entered service as Number 1 in the KLRC companies fleet.
Its sole purpose being to carry factory workers on the subsidised journey from the local surroundings to and from the factory, twice daily. The contract for this had been let at such a keen price that it proved to be prohibitively expensive to fulfil by the KLRC using one of their steam loco's and a single carriage. The employee from the KLRC who headed the negotiations has been demoted and now heads the toilet cleaning and engine fire lighting department on permanent night's.
The second loco is an 0-4-0 tank engine in straight Gooseberry Green designated Number 4 in the KLRC's fleet numbering. This was a purchase from the 7mm societies sales stand at one of the shows.
The third loco from the left, Is a Smallbrook Studios resin kit of one their locos built by myself and Painted Black, with red lining, this entered service as number 2 in the fleet.
The fourth loco is yet another Smallbrook 0-4-0 "Thor" resin kit, painted dark Blue, with a fleet number of 3.
All my models are mounted on Hornby "Smoky Joe" chassis, radio controlled and driven be an on board 3.7V Lipo battery.


Right then, back to modelling before an hour of "Shetland", a cracking good TV series.
Regards to all,
BrianT.
Last edit: by gtmspyder
Posted
Full Member
Rule 1 of course.
Posted
Full Member
The loco is now in unlined works grey :).
I thought all my followers had gone on holiday, its been a bit quiet on this thread. :oops:
A bit of smoothing still required to the boiler top where I've added Milliput filler. (I can't say I'm impressed with Milliput two part filler.) I could have got a better finish at first go with some thing like poly filler. :sad:
I am going to have to find another filler material?
The loco has now got cab footplate steps, and two oval tank top fillers, a regulator handle, brake screw down lever and pressure gauge, I can't come up with the two water gauges yet, I can't get a convincing looking sight glass?
I must say, I wouldn't want to be the fireman on that footplate, the firebox hole looks awful large.
Regards,
BrianT.
Posted
Site staff
Be assured, there are plenty of people following along, but they may not have any useful comment to add.
Ed
Posted
Full Member
This is why I enjoy when forums do have "like" buttons, since so often I see something I appreciate but when I attempt speak its praises… my brain fails to wordsThere's no 'like' button on this forum Brian, but you can see how many people are reading the thread by the number of 'views'.
Be assured, there are plenty of people following along, but they may not have any useful comment to add.
Ed
Posted
Full Member
Here are the latest pictures of the loco in unlined workshop Grey.
The Regulator handle and Pressure gauge are only pushed through the spectacle plate temporarily until the final colour is applied.
The radio control gear has still to be fitted and connected to the Hornby "Smoky Joe" chassis.

Still a bit of filling to do evident on the boiler.

Pity the poor fire man with a coal hole that size.

The engine driver insists this is his most photogenic side, Poser that he is.

Things have definitely moved on a bit since this was presented for inspection.
That's all for the moment folks,
Regards,
BrianT.
Posted
Full Member
1 guest and 0 members have just viewed this.