009 Test Layout
Posted

Site staff
More dabbling in different scales/gauges
Thanks Bill.The smaller locos and rolling stock are not proving to be as much of a problem as I thought they might be, and the buildings and scenery is all 4mm/OO gauge anyway.
Ed

Posted
Site staff
My sister, who I live with, has had to undergo major surgery, which was a bit of a shock and totally unexpected.
She’s back home recovering, but most of my time at the moment is taken up with domestic duties.
We have however, decided to free up some space in the spare bedroom so I can bring the layout(s) indoors, or maybe start a new one.
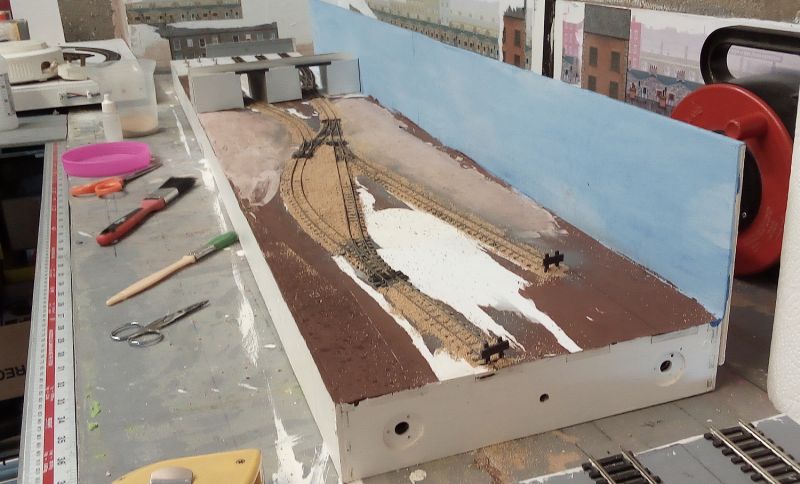
More on that when it happens, meanwhile a couple of pictures of the ballasting I did back in May.

Ed
Posted
Site staff
The bit between the tracks is fine as it will get covered by vegetation, but I think I overdid it with the ballast between the rails and I've had to resort to trying to dig some of it out.
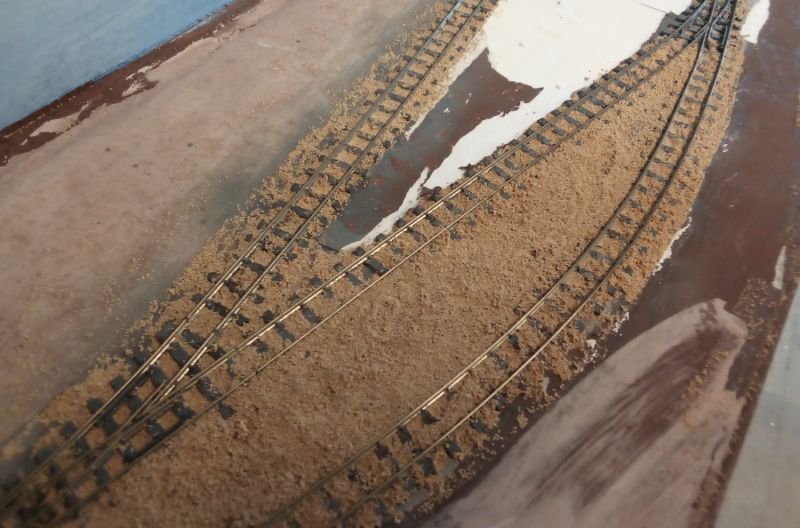
Tried some test running with Skarloey and the loco wheels are still getting caught on some of the ballast.
I've also damaged a y point while cleaning the track. You can't see it very well in the picture, but the switch rail touching the stock rail is a bit bent.
The other switch rail came out of the tie bar, so I had to remove the point and although I've manged to get it back in, I think with the other switch rail slightly bent, the safest thing to do is replace the point.
Beginning to wish I'd not used this ballast, wondering whether to rip it all up and start again.
Ed
 Last edit: by Ed
Posted

Full Member
If you have a powerful Vacuum cleaner, and the good old HENRY springs to mind, it might well shift the sand with a scraping action from the crevice tool??
Regards,
BrianT.
Posted

Full Member
Couple of hours with some dental metal pucks/scrapers or the pointy end of a dart will clean it up. Rails and sleepers. It"s only the inside edge of the rail you have to worry about.
Nigel
©Nigel C. Phillips
Posted
Site staff
Just getting to grips with a new laptop.
Was too hot to do anything at the weekend and now I appear to have picked up a rotten cold, but was just wondering if anyone has use something like Polyfilla rather than ballast to fill in up to the level of the sleepers.
Ed
Posted
Full Member
On my Knottworthy Magna 7mm 0/16.5 layout, I needed a section of level crossing adjacent to and partially including a Peco point off to a cassette spur hidden by a low relief building model with double motorised doors driven by two servo motors.
Are you with me so far. I will be asking questions later
 .
.So I decided to fill in between the rails with Polyfiller :sad:. I did put a slim piece of plasticard along the inside of the rails from sleeper top to rail top to make a flange groove :roll:, and when the polyfiller had dried, I pulled out the plasicard spacer to leave a flange way groove. As you can imagine this groove for the flanges now lay between the inside of the rail and the side of the Polyfiller plaster, and so was vulnerable to damage, which was easily done when rail cleaning.
So, in hindsight :patheada wonderful thing to acquire as early in life as possible, I'm 80 and still learning, :It's a no no , I would put the plastic spacer in place, pre-bend if on a curve either some metal shim of sleeper to rail height, or spare rail and butt upto the plastic spacer and Lil pin, glue or soldered into place for permanence, then infill what space is left with polyfiller. The plastic spacer can be removed when the polyfiller is hard, leaving a flange gap between the two rails, like a check rail. When rail cleaning in future, the rubber will slide across the four rail tops and not disturb the Polyfiller infill :cheers :doublethumb.
Having just splashed all those words of hindsight wisdom across this page, I have just re read your post, and realised you did not want a surface at rail level :oops:, but rather an infill to sleeper height of Polyfiller, (Should have gone to Specsavers Brian).
I have never needed to do this, but were I required to, this is how I would do it:-
Takes a deep breath while sharpening his computer keyboard pencil……………..
Make tool from a suitable scrap piece of plasticard, that has two grooves at the track gauge distance apart, each groove the track width wide, with the tongue between the grooves that will just touch the sleepers as the plasticard is dragged along the sleeper tops, and sliding on the track rail head.
This is your Polyfiller spreading tool.
Lightly oil the top and insides of the rails to be infilled, using a piece of rag or kitchen roll with cooking oil on its surface, dragged between the rails and running along the sleeper tops, to leave a film of the oil.
Mix a slightly runny mix of Polyfiller and pour between the rails requiring the infilling, and using the Plasticard tool, drag the mix along to fill the gaps between the sleepers, and leave to set.
The film of cooking oil will help the dry Poliyfiller rub off the rails and sleeper tops if you want the sleepers to be seen with not too much cleaning away of the unwanted Polyfiller.
I'm going for a lay down now, but i hope that helps. :cheers
Kind regards,
BrianT.
Last edit: by gtmspyder
Posted
Site staff
Posed the same question on NGRM and got a few mainly negative responses, including "I used Polyfilla as infill many years ago and it seemed to react with the nickel silver rail, causing it to turn black and it was a constant battle to keep the track clean as the black coating was non conductive, will never use it again for inset track".
But this is a test layout, so why not, think I'll give it a go.
Just got to wait for this terrible cough to go away.
Ed
Posted
Full Member
If (big if) you are trying to minimize the amount of ballast required and keep it off the rails, chairs and sleepers, try using a piece of wood or plastic slightly lower than the sleeper height and glued in place between the sleepers. Ballast on the top by painting it with PVA then sprinkle ballast over, followed by a light mist with water/IPA after a minute or so. Leave overnight, brush off excess ballast. The ballast will go 4 times further.
If using Brian's technique I would use masking tape over the rails while applying the Polly Filla. You could also use a slurry of ballast and PVA.
Nigel
©Nigel C. Phillips
Posted

Full Member
Staying on the thread Kevin.
Posted
Site staff
Don't wear glasses with it Kevin, it's basically a magnifying glass that happens to fit on your head.Hi Ed. Magnifying Visor ? Depending on whether one wears spectacles or not can these damage ones eyes?On the odd occasion it would seem that a visor could be handy, but, with me it would have to be scratch proof. Do you find that you have to wear a visor more often? Best wishes Kevin
Posted
Full Member
Staying on the thread Kevin.
Posted
Site staff
Perhaps some other members can comment on using a visor for long periods.
Ed
Posted
Full Member
Staying on the thread Kevin.
Posted
Full Member
When I'm on the computer just reading various posts, I have to sit upright to get the right reading lens at the correct distance to be able to read the print on the screen.
As I'm basically a lazy sod, I like to sit back in my chair, but this puts me between my near reading and far viewing lens in my prescription bifocal glasses, the near reading distance having been set at a suitable distance by the opticians, for reading music while I'm murdering my piano.
So I came up with a cunning plan, I did not want to use the visor with a suitable lens in place, because its not the most comfortable of head wear, so I found an old pair of clip on sunglasses which I have to use if I need shades in the sun while driving, and removed the as always scratched tinted plastic lenses, selected one of the visor spare clip in lenses, a few minutes with a small drill and two small setscrews and nuts, and the clear magnifier lens is now fixed to the metal clip-on part of the old sunglasses which I clip in place on my prescription glasses, and I can sit back in my chair and read the beautiful pros displayed on my computer screen through my prescription lens plus the flip down additional magnifying lens.
I do this regularly, and find it does not affect my sight, and if I am modelling, which I do occasionally when I find my roundtuit, which seems to be in a very safe place at the moment, as those that follow my scribings may Have noticed, by the lack of any activity from my computer, I can still use my visor with any of the other four additional lenses clipped in as required.
And all that was typed in just using my prescription lenses, isn't technology a wonderful thing. :roll:
Kind regards,
BrianT.
Posted
Full Member
Staying on the thread Kevin.
Posted
Site staff
A course of antibiotics and steroids, and I feel better than I've felt for months
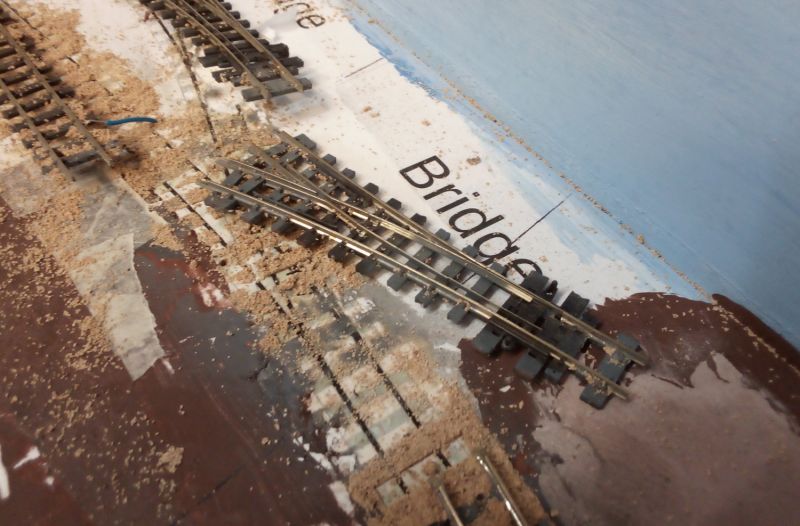
I spent yesterday putting in the new Y point, re-laid the left hand point next to it and put a new piece of track between the Y point and the loop
As with all these things, when you take something out the new one never goes in quite the same, so I've had to carve away the embankment slightly to get the new piece of track to fit

I’ve decided not to rip everything up and start again, but I have managed to remove any bits of ballast that were causing derailments
Test running Skarloey seems ok now, apart from a couple of places where it stalls, but I think it’s just a case of track cleaning.
Considering how long the layout has been sitting in a dirty garage, I was surprised how well most of it worked.
Next job is to paint the new track and (very carefully) ballast it.
Don’t think I’ll be using Woodland Scenics ballast again after this.
Ed
Last edit: by Ed
Posted
Site staff
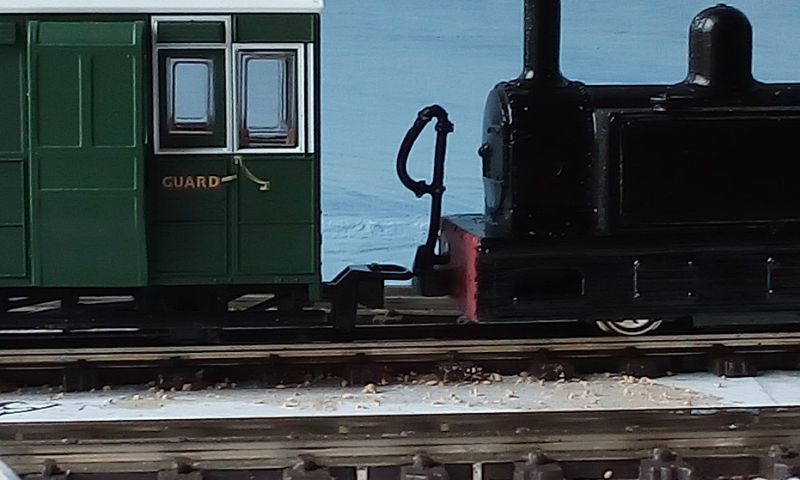
It was only when trying to couple up to some coaches I found that the cwrailways side tank loco has the coupling set too high.
I can't lower the body on the body on the Kato chassis, so the only thing I can think of doing is cut the couplings off (they were attached with superglue), and drill holes for new couplings.
Ed
Posted
Full Member
Staying on the thread Kevin.
Posted
Site staff
Peco are one of the manufacturers, but there are others.
Search Results - PECO
It's two foot three inches in 16mm (OO) scale, but people use it to represent anything between one foot eleven and a half inches (Ffestiniog) and two foot three inch (Talyllyn) gauge railways, or sometimes even bigger gauges up to three foot.
If you think about it, OO gauge 16.5mm track is actually four feet one and a half inches, not four feet eight and a half inches, so it's all modeller's license anyway.
Ed
1 guest and 0 members have just viewed this.