AMTRAK RoadRailers
Posted
#293144
(In Topic #22148)

Full Member
RoadRailer bimodal trailers used for mail
Hi All,Nice to be back, and I thought I would give you an update on the latest project. I now model exclusively in N scale, more fiddly than HO/OO but it keeps the fingers moving. I came across something callsd a RoadRailer renetly. Essentialy a road-going trailer fitted with railroad wheels. Arriving at the transfer station towed by a tractor puller, then lined up over the track, the road wheels raised and the railroad whelels lowered. The later versions did not have rail wheels, but used one separate bogie per 2 trailers, Early versions used 1 2-wheel axle on each trailer, either at the end of the trailer or between the 2 axles of the road wheels. They were used by a number of railroads from the 1950s up until 2024. Initially developed by the Chesapeake & and Ohio railroad (C&O), they were evaluated by BR between London and Edinburgh in the 1960s. Not successfully. There is a You Tube video on them. The Norfolk and Southern railroad (N&S) was the only railroad to use them successfuly in North America, Trains of 100+ trailers were quite common, and ;the trailers were ettered "Triple Crown", a subsidiary of N&S.
My interest is in the RoadRailers used by Amtrak between 1996 and 2004. I now have a reasonable collection of Amtrak trains in N-scale (1:160). AMTRAK used them behind passenger trains for the transport of United States Post Office mail. It was a successful operation, but passenegers objected to long stops at stations to detach and attach the trailers, and a number of freight railroads obected to Amtrak having a freight service.
Deluxe Innovations produced a range of Mk-V roadrailers in N-scale, including ones lettered for Amtrak. The company ceased operating in 2017. Models are available on ebay, usually at exhorbitant prices. Amtrak used 2 different lengths of trailer - 53' long for 3rd and 4th class mail, and 48' long for 2nd and 1st class mail. The 53' long ones were painted white, the 48' ones were painted in Amtrack corp. colors of grey, blue, red. and white. There are no decals/transfers available for tehis. The 48' ones were designed forAmtrak, and had side body doors as well as the end doors. I have some of the Deluxe 53' ones, but nobody makes the 48' ones. Argh! After a few "would you believe it!" and "well I never!" moments I decided to bash a few of my own using 48' road trailers. Plentiful supply of these on ebay, usually around $10-15 each. The bash is not that complicated - move the wheel set towards the middle, add a coupler peg at one end, add a bolster, 4-wheel bogie, anda coupler flange at the other. I was fortunate to obtain some Deluxe Innovations bolsters, wheelsets , and couplers online, but they're hen's teeth scarce. That said, equivelent bogies are commerially available, and it's not that difficult to make the bolsters and coupling flangess from black styrene or brass. I turned the coupling pegs from medium hard brass rod down to the correct diameter.
More details and photos in the next post including how I am going to address the colors cheme. I am waitiing for glue to dry. So rather than sitting there waiting I decided to write this short into.
Nigel
©Nigel C. Phillips

Posted

Site staff
RoadRailers sound interesting, especially in N gauge.
Looking forward to the pictures.
Posted
Full Member
Thanks. I could do the trailers in polystyrene sheet, but commercial models come with the support legs (long and short) and wheel sets, keeps the cost down. And 48' long models are available (as well as 45' and 53').
Picture of the 48' Amtrak RoadRailer. Takem from "Amtrak by the Numbers, V2".
Nigel
©Nigel C. Phillips
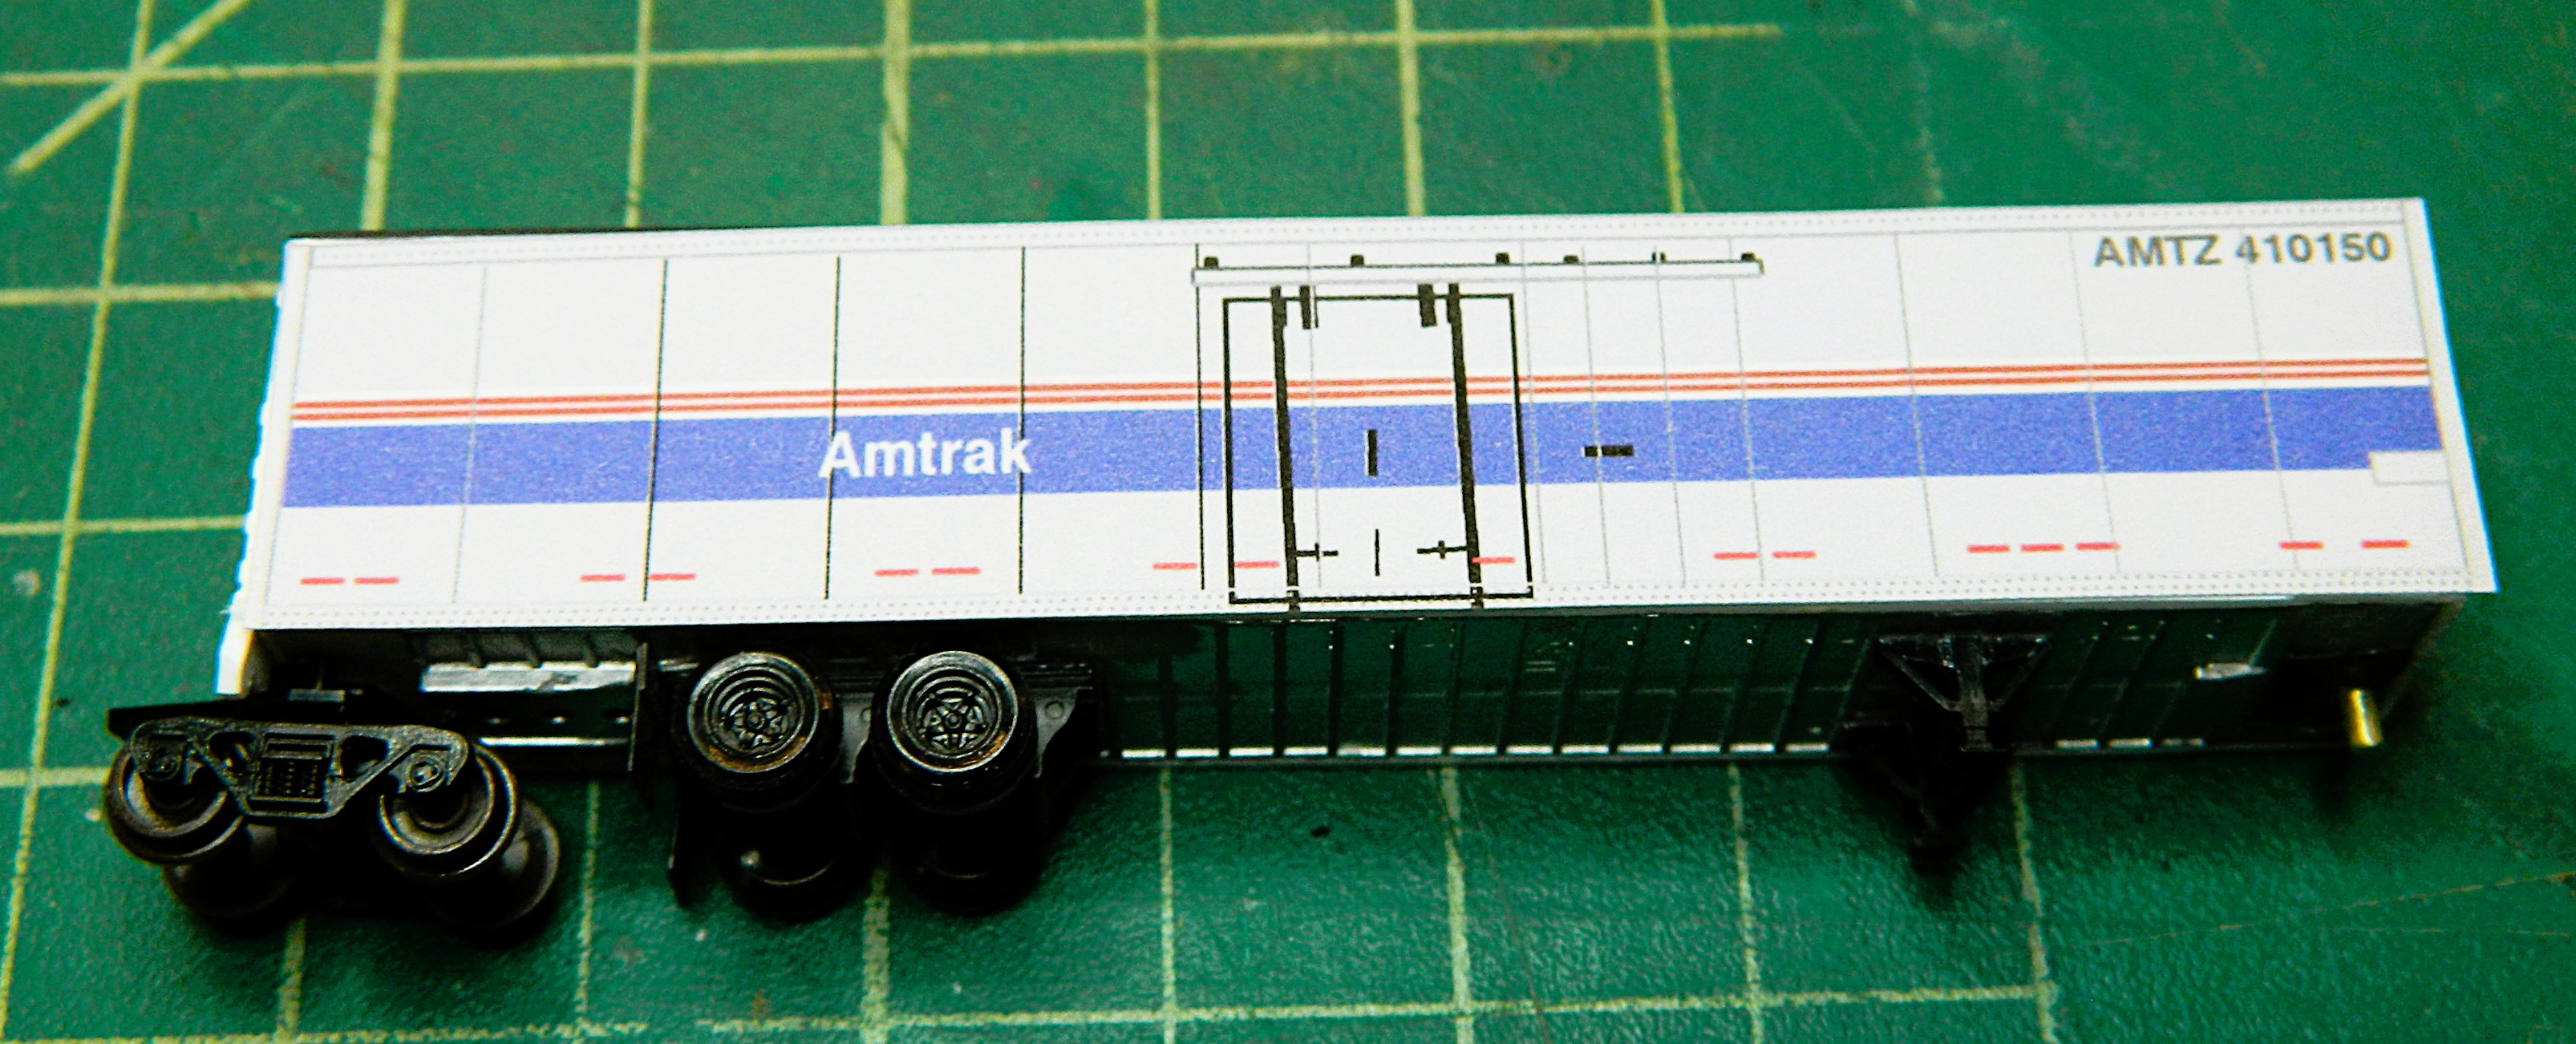
Full Member
The bogie truck is to the left, underneath the white trailer, the coupler truck on the right connects to a locomotive or a passenger car. Amtrak also used them to separate trailers that would be dropped or picked up at different locations along the route. Amtrak liked to run these trucks both ends of the consist, the end one usually had a flashing red warning light (FRED). Body paint was light grey *Harbor Mist) with dark blue, white and red stripes. plus safety reflective red and white rectangles. Note the scrapes from the sliding door on the wide blue stripe. The trailers had side doors to allow loading and unloading from station platforms. Lots of small details - louvered venilators top left and bottom right, red light for road running on middle right, air line from left hans side bogie truck brake to underbody of trailer, roller bearing bogie trucks, and every bogie was indivually numbered. Every bogie and connector truck had its own air bake resevoir.

©Nigel C. Phillips
Posted
Full Member
Materials. 48' trailers in N-scale (Micro-Train Lines or Atlas); spare parts from DeLuxe Innovations - rail bogie, rail bolster, coupler flange (no longer available from DeLuxe); black polystyrene sheet (UV resistant), white polystyrene sheet and strip (small parts and interior only); brass rod; race car derby flexible steel weight strips
I had 3 trailers, 2 from MTL, one from Atlas. They all come with 2 sizes of legs, and the road wheel position is adjustable. After reducing the height by removing material from the floor and drilling a new peg hole the wheel set was glued in place allowing sufficient for the bogie truck to rotate. The bumper was removed, and new pieces added to the body either side of the coupler tongue The 5th wheel peg was removed from the other end. The floors were removed, and white polystyrene sheet was used to stiffen them. Additional material was added at either end for the bogie pin and coupling pin respectively. Suitable holes were drilled for the bogie pin and 5th wheel pin. I used DeLuxe coupler tongues, bolsters and bogies at the double door end, held in place by a friction fit, and a brass rod turned to slightly less than the diameter of the coupling hole in the flange at the other end. This was glued in place with super glue. I matched the position of the wheel axles to that of the DeLuxe RoadRailers. The short legs and wheel set were glued in place with polystyrene cement. I increased the height of the trailers with some black polystyrene glued to the roof after first drilling some outgassing holes in the roof. I added 18gm of weight using some flexible steel weigh strips cut to size that come with attached adhesive strips. Total weight is now 28gm, the same as the DeLuxe models.
I only have a few DeLuxe parts left, probably enough for another 2 RailRoaders. It's feasible to make coupling tongues and bolsters from polystyrene or brass sheet, and bogies trucks are available from MTL, I have located a source of 3D prints of road wheel sets to Deluxe specifications, So I should be OK for a few more. The plan is a minimum of 5 Amtrak 48 footers.
This was an easy bash build, I am now deciding on how to approach dressing the RailRoaders in Amtrak corporate colors.
Build photos to follow.
Nigel
 Last edit: by BCDR
©Nigel C. Phillips
Full Member
DSCN7164 copy.JPG
(Click to enlarge)

Srarting point - a MTL 48' Road trailer with long and short feet.

Deluxe 53' underbody.

48' MTL underbody with installed RoadRailer tongue, bolster, and bogie, the repositioned road wheels, and the brass coupler pin

Added polystyrene roof

DeLuxe Innovations Amtrak 53' RoadRailer in white color scheme. The bumps on the side are hollows inside for D-clamp trapping anchors
Last edit: by BCDR
©Nigel C. Phillips
Posted
Full Member
I now have 3 48' RoadRailers ready for the Amtrak color scheme. The background is Harbor Mist (available as an acrylic airbrush paint), a wide dark blue stripe, above which are red and white stripes. The curved vertical ends, as well as the top and bottom sills, were white. Various lettering and numbers. The 48' trailers were numbered 410000-410165. The Font is proprietary, so it will be the must suitable I can find in CorelDraw. with perhaps some modifications So, how to proceed? So far I have:
1. Custom decal/transfer;
2. Airbrush, which will invole a lot of masking and will need decal.transfer or rub on letters:
3. Adhesive vinyl sides and ends.
Keep in mind this is N-scale, and rivets, etc., can be well represented with flat prints. Wivit counters move on, nothing to see here. As usual. most photographs of the Amtrak RoadRailers were taken at an angle. So I took one and corrected the geometry using the perspective tool so it was face-on and at a 1:160 scale, and started drafting away in CorelDraw. This is a work in progress, lots of details need to be added, but so far after an hours work this what I have:

Note the patch on the rhs over the edge of the blue. I'm happy with the font I'm using. The blue needs some fading, a screen of transparent blue/grey should resolve that, although it's a good match to Amtrak dark glue. Once I have tidied the sides up (only another thousand rivets to go!) I'll do the ends. Initial paper prints actually look fine from a foot, even better from 3 feet. I'll see what a vinyl print looks like. Fingers crossed, it would save a fortune compared to custom decals/transfers and the aurbrush-quality acrylics are getting expensive.
Nigel
Last edit: by BCDR
©Nigel C. Phillips
Posted
Full Member
Nigel
©Nigel C. Phillips
Full Member
©Nigel C. Phillips
Posted
Full Member
©Nigel C. Phillips
Posted

Full Member
- Darius
Posted

Full Member

'Petermac
Posted
Full Member
Peter - N scale is actually easy to work with. Just as expensive (or more so) than the corresponding HO scale. Road Railers in N scale go for around $30 each, in HO scale around $25. Amtrak ones are usually more expensive, not many were made. Soldering needs a bit more care, especially when working with DCC boards. The one thing I won't touch are turnouts. Life is too short, and the modular club I belong to is all about running trains, not operations. There are a couple of 18 track yards, nobody uses them for shunting. I have the jigs, but it's a real battle getting them to go with N-scale track, especially Kato Unitrack (track with integrated ballast). Code 55 rail bends as soon as you look at it. Commercial turnouts are not expensive, look realistic, work out of the box, and for the most part run without modification with DCC. I only run diesel locomotives, Bo-Bo or Co-Co, so messing around with live frogs is not needed. I'm a firm proponent of KISS these days. I'm using Kato Unitrack for the home layout, works well.
©Nigel C. Phillips
1 guest and 0 members have just viewed this.