Waddlemarsh
Posted

Full Member
Somewhere SW of London. Somewhen before today
On the warmest day of the warmest week of the warmest month of the warmest year so far …..….. I can record that all of the platform holes have finally been bored out!!!
Both sets of supports are in the process of test fitting which is taking a little longer than I hoped. It has been a tedious and often hot process but apart from a much smaller number of holes to fit the conductor-rail insulators the "boring" part of this build is now complete.

Posted
Full Member
Allowance has to be made for wider platforms where the waiting shelters will be and also for a footbridge linking the two sides. That bridge will be the good old Hornby R076 kit as it is a close approximation to the metal footbridges used at some prototype locations. Fishersgate Halt came to mind though there are numerous others.
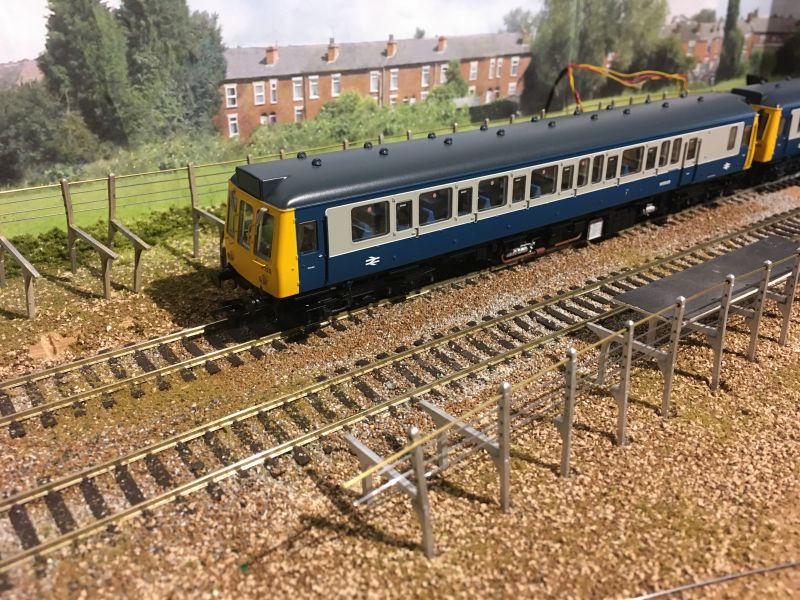
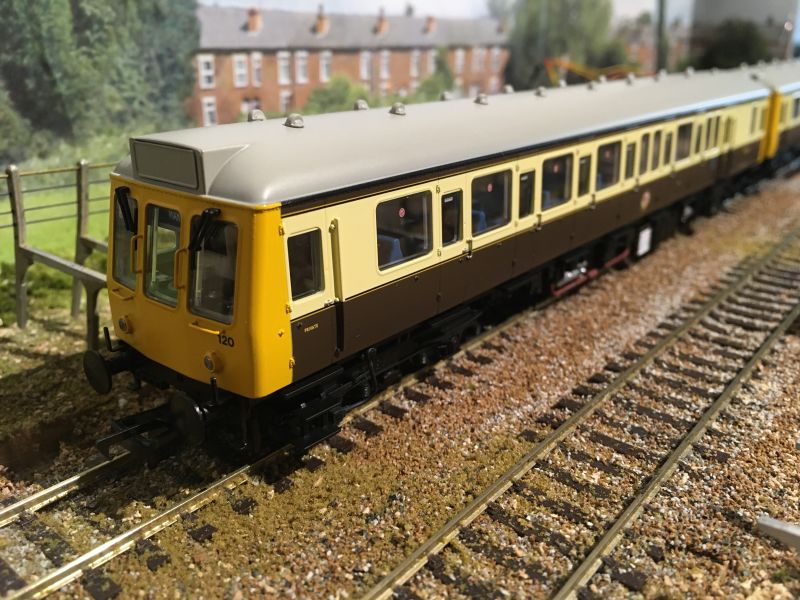
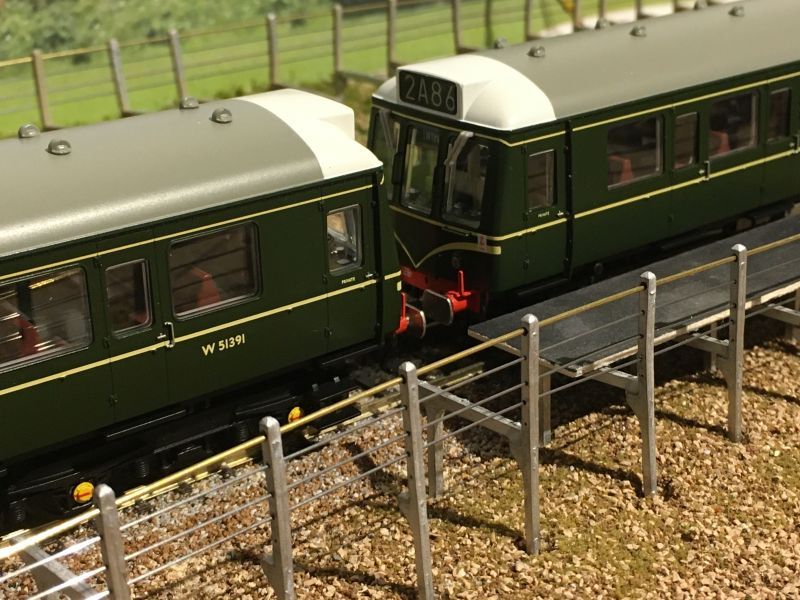
Some here will be aware that I received a very large parcel from our good friends in Camborne during the week. My order for Bachmann's new class 117 and 121 DMU units is here. I am now the happy owner of three 3-car and three single "bubble" car sets. One of each in blue/grey, original DMU green and the GW150 chocolate / cream livery which these carried at the time. Also included was a TPO mailvan with (dummy) collector net, traductor arms and bodyside lights as used when mail was collected and deposited at lineside locations without stopping.
These all look slightly out of place with a part-built SR concrete halt but they were ordered for an earlier layout; I maintained the order anyway. The railcars are superb models. Not cheap but very detailed and with switchable lighting for head / tail / cab / saloon and destination blind lights. The couplers have been commented upon by several modellers; they are multi-pin rather than hook / loop or the older power-bar style which allows DCC users to control everything with a single decoder. That is rather over the top for DC users however and will have added to the cost. They also allow for sound fitting and the 3-car sets have both end cars powered with unobtrusive low-profile units. In operation they are smooth, fairly quiet and reliable and will work well coupled together. The centre trailer can be removed to form a power-twin if required. The green one correctly has no inter-car gangways as these were not fitted until slightly later in their lives.
 Last edit: by Gwiwer
Posted

Legacy Member
Brian
OO gauge DCC ECOS Itrain 4 computer control system
Posted
Full Member
The new layout is an end-to-end which creates other issues. Does one place a driver in each cab so that it looks realistic in both directions? Does one place tail lamps on rolling stock which should have them? What happens when it all comes back the other way? The sort of conundrum many a modeller has faced and most have not fully overcome. As with many things in this hobby I suspect compromise will be the order of the day.
Posted
Full Member
Posted
Full Member
They are going in. A fair number have parted at the glued join which isn't a problem but a mild frustration. Only one has broken beyond repair after being encouraged into its hole with a little too much persuasion :roll:
A near-overhead shot shows that both sides are well under way, both have a gap for the footbridge access and a small building. The piano wire has to have the curve it was supplied with eased out over several days before gluing down which is helped by the placing of the steel rule on top of positioned (but not fixed) supports.
Once I am happy with the general position of the legs I apply superglue to the holes and seat each in turn; they require a few seconds to grab but a minute or so of working time is available allowing a little correction and levelling to take place as required.
Keen eyes might recognise the footbridge as that recovered from Penhayle Bay. This will not be used on the new layout; it is only a guide here. To re-use it would probably be a kit-bash too far for plastic which has sat outdoors for over ten years and isn't in great condition. A new kit has arrived. The colour scheme will be mid-dark green with black supporting legs and detail.


Posted
Full Member

Another day another step forward. Tiny green name signs from Trackside Signs. Tiny etched brass “target†mounting plates were harder to locate than the common “totem†shape but were found at Shire Scenes via Dart Castings.
Last edit: by Gwiwer
Posted
Full Member
All the platform posts are in but some require a bit of levelling and many still require painting. Groundwork has to be done before the platform surface goes down.
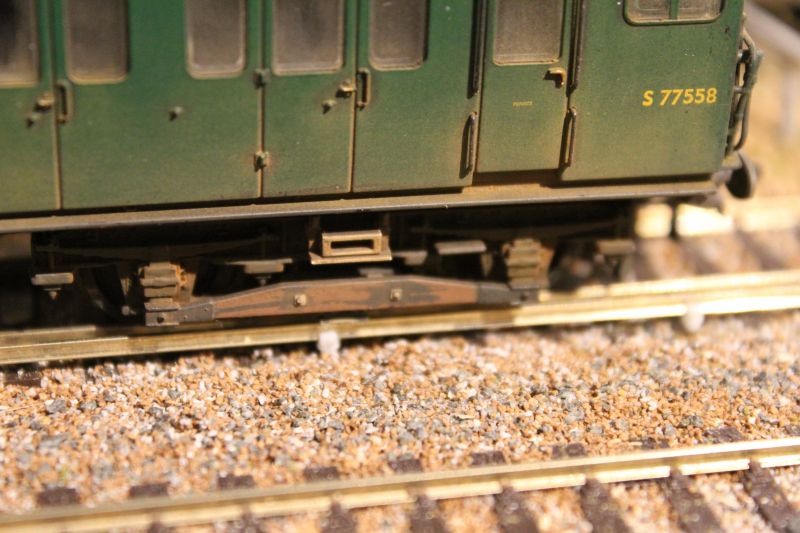
But the first length of conductor rail has been fitted and gauge-tested. The Bachmann stock is a perfect fit with the shoes just skimming the top of the rail. The Dapol class73 has retracted shoes as supplied so won't be a problem and the DJModels 71 rides just clear of the rail. The Hornby 2-Bil units however run with their pick-up shoes outside the juice rail (a known issue and one which is tricky to rectify) and marginally lower than its top. As all lengths of conductor rail end with a run-off or start with a run-on ramp there should not be a problem where a pick-up shoe crosses the line of rail at a junction. Hopefully!!!
Apologies for the fuzzy images but it proved very difficult to get the camera near enough for a close-up view and the phone has issues with rendering images sideways in forums.

Posted

Full Member
It really is impressive. :pathead
'Petermac
Posted
Full Member
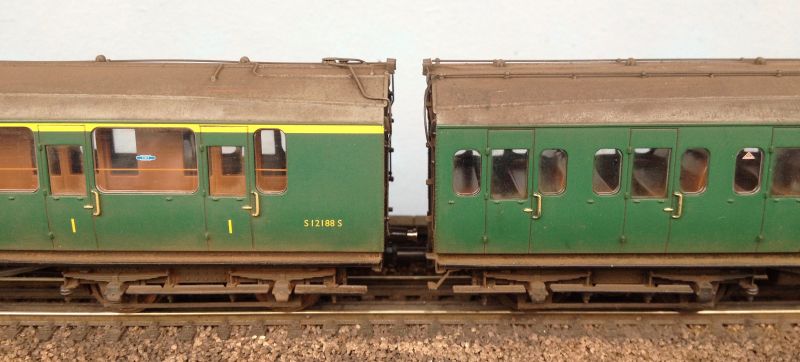
The unit was purchased from Lord & Butler who weather items under the brand "Dirty Boy". The unit came with grey weathering including the accurately-represented roof details but I added the distinctive "brake-dust brown" which was more characteristic of Southern Region units at the time.
I have another very similar unit bought pristine which I shall weather myself and present in due course. The two form a 4-car train and will run nicely together on this layout.
I can do similar effects on the roof with powders (the unit shown has air-brushed acrylic on the roof) and here are a couple of pictures to prove it.

Last edit: by Gwiwer
Posted
Full Member
If that's down to you, then well done Sir.
Weren't Lord and Butler at our Kernow show all those years ago - friends of Jeff Chicks if I remember rightly ?
'Petermac
Posted
Full Member
Posted

Full Member
The differences in pick up shoes is another reason I keep the top of third rail below the running rail level. All of my Lima/Hornby class 73s had to have their heavy moulded sand pipes cut off flush with the bottom of the bogies because they fouled the third rail.
Junctions pose problems if you aren't careful. I leave larger gaps than would be usual on the in the interests of reliable running. There are a number of different treatments of third rail at junctions on the real thing, but I have chosen to do only the type where a gap is left where the lines converge. Other styles include having a continuous rail with a small ramp leading up from the side in the direction of the convergence/divergence. The latter is too hard to deal with in model form without consistent pick up shoe settings.
Jeff Lynn,
Amateur layabout, Professional Lurker, Thread hijacker extraordinaire
Amateur layabout, Professional Lurker, Thread hijacker extraordinaire
Posted

Full Member
research = asking a bloke who knows a bloke who said something vaguely similar to what I wanted to hear! - Tony (aka the Phat Controller)
Posted
Full Member
More decisions have been made and acted upon as regards the final appearance of the halt. The R076 footbridge kit which was to link the platforms has been abandoned. It is basically a train-set kit and somewhat over-scale. It required lowering which isn't too much trouble but the span also required shortening which was fussy and required a good deal of filing and rubbing down to get a good centre join and match up the cross-braced "ironwork". The trouble then being that the smaller the actual model became the more it showed up as being over-scale. The step treads were visibly too wide and it appeared squat and rather silly.
I have a Bachmann Scenecraft concrete footbridge which is almost a perfect span and near ideal height. It only required a little resin cutting to trim the bottom couple of steps off which protrude beyond the sidewalls. That too has been painted with the gesso / paint mix and has had a mix of fine Peco scenic products added. These are a grey and a pale buff "ash" which are allowed to grab onto the wet paint. When dry most of that is brushed off to leave a textured effect resembling concrete. That will be weathered down in due course. Many of the SR halts had a lattice-iron footbridge which the R076 closely resembles but working in a small space the scale of that kit was simply wrong.
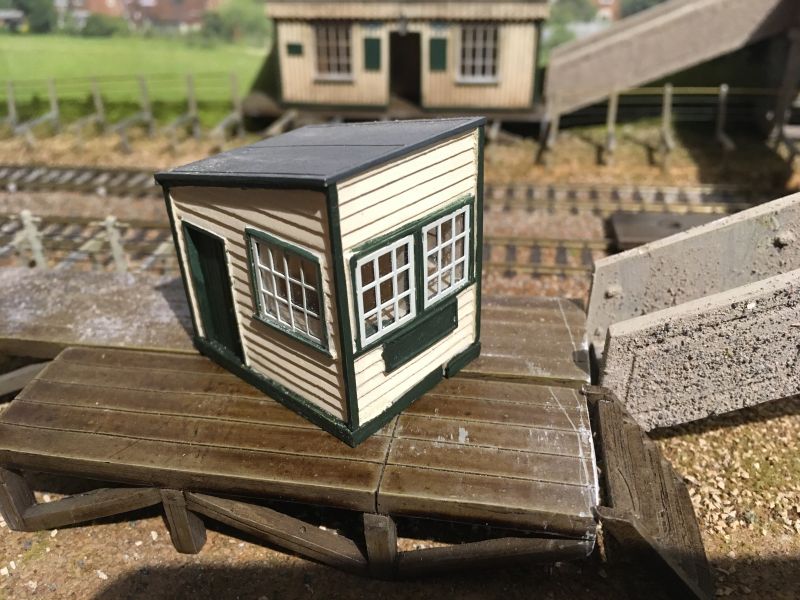
The Down side platform building has also been sourced. This is a Bachmann / Kernow MRC "Boscarne ground frame" signal cabin. The brick base has been rubbed smooth and painted green to match the wooden base of its opposite number, the Shillingstone shelter on the Up platform. The small gap at the front of the building, which is for point rodding and signal wires, has been filled with an offcut of resin from the footbridge which almost precisely fills the space; once the paint went on no filling was necessary. I found Jo Sonja's Forest Green Background was a perfect match for the SR green of the model which I had disturbed whilst rubbing down the brickwork base
I'll try to arrange the pictures so that they display correctly but yet again they only show sideways as soon as I try to post them.
Posted
Full Member

Posted
Full Member
'Petermac
Posted
Full Member
Thank you Peter. Concrete is so often represented with just paint. Limitations of scale make textured finishes harder to achieve without looking over-scale but I think the ash mix I am using just about passes muster.looks very nice Rick - the concrete has come out particularly well. :thumbs
Posted
Full Member
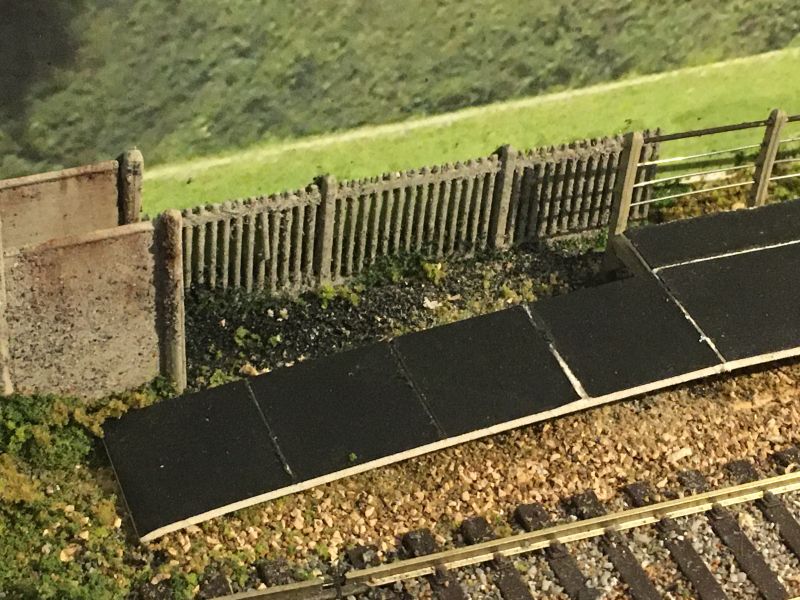
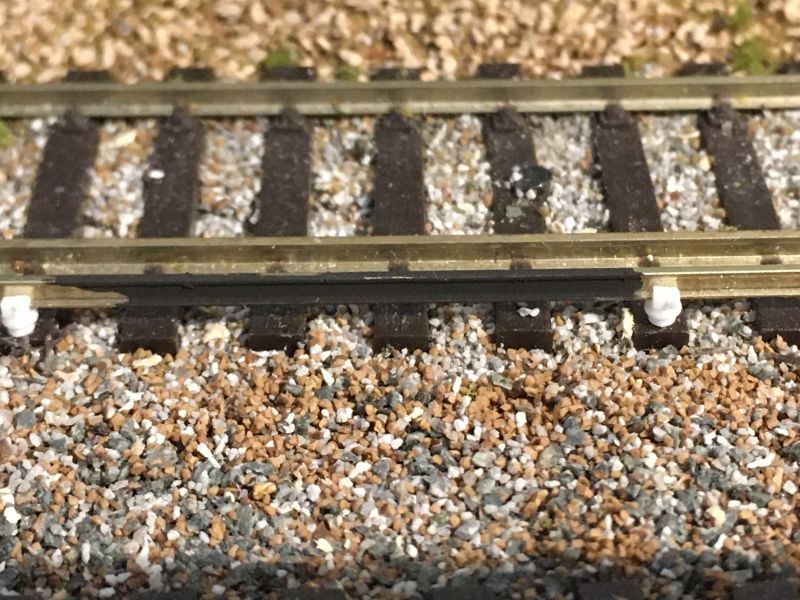
Placing the card onto the "concrete" supports has shown up a problem; the joins should line up with the supports. They don't. I am not about to uproot all those posts and reset them and shall have to live with this. My error, my problem. The posts should have been set 18mm apart but checking the jig I used to measure up they are more like 22mm apart. Facepalm. Blue air moment.
Also shown is the first test-painting of the conductor rail which needs to end up looking dull black in the web and shiny on top.


Posted
Full Member
Do you employ wheel-tappers ? There's a chasm in this rail so I forsee a few cracked wheels. :shock: :lol:
'Petermac
1 guest and 0 members have just viewed this.