The Weston, Clevedon & Portishead Railway Company
Posted

Full Member
Now to some fun building Coaches - Ratio GWR Kit Bashing
Hi Colin. I alas, purchased the Hornby Terrier. Which I am certain was advertised as DCC ready, and I have been threating about should I bother with the conversion. Or even purchase the Dapol version. Best wishes Kevin
 Last edit: by Passed Driver
Staying on the thread Kevin.

Posted

Full Member
Kevin,Hi Colin. I alas, purchased the Hornby Terrier. Which I am certain was advertised as DCC ready, and I have been threatening about should I bother with the conversion. Or even purchase the Dapol version. Best wishes Kevin
If you bought the new Hornby Terrier it is DCC ready with an easily accessible socket for a 6 pin chip. It should say so on the box with details on the product sheet. Access inside is very easy so you should have no issues.
Colin
Posted
Full Member
Staying on the thread Kevin.
Posted
Full Member
Last edit: by Passed Driver
Staying on the thread Kevin.
Posted

Full Member
This looks great! The thought that "it is not as good as the Hattons/Hornby offering" is misguided. You can be proud of this and will have to go a long way to find a layout running another one.
:doublethumb
Barry
Shed dweller, Softie Southerner and Meglomaniac
Posted
Full Member
Hi Kevin,Hi Colin. I looked at the Terrier box and leaflet , it stated that the Loco was DCC ready, consult an expert.That is all very well, and now I am consulting an expert. Would you please advise me on what I have to purchase? Best wishes Kevin
Re DCC, the data sheet rather bluntly refers the purchaser to "your specialist Dealer" but then later, in a somewhat more supportive tone, shows you how to do the job (Fig 4, page 3) including the suitable Hornby part you can install. It's a simple job to remove the blanking plug and plug in the DCC chip.
There are of course other DCC 6 pin options, e.g. Bachmann sell one which is I believe made by ZIMO. That's something you need to sort out via your dealer because I direct wired mine to the loco and so can't help you regarding which chips will fit the Hornby 6 pin socket.
If beyond this you require further help, perhaps open a new Topic which should gain you a wider readership and input.
Best wishes
Colin
Posted
Full Member
Staying on the thread Kevin.
Posted
Full Member
Staying on the thread Kevin.
Posted
Full Member
I'm sure it'll turn up, must be hiding.
TBH the Hornby is probably your best bet and it is DCC ready as mentioned. The other option is the Rails Dapol model which is a good 40-50 quid dearer and has had issues reported which have put me right off.
One option for you is to buy whichever model with DCC fitted by the supplier, Hattons and I'm sure other suppliers will do this service for you.
Colin
Last edit: by Colin W
Posted
Full Member
Staying on the thread Kevin.
Posted
Full Member
A "mixed bag", GWR, Private Owners and company stock pulled by #4 on yet another fine late winter's day.
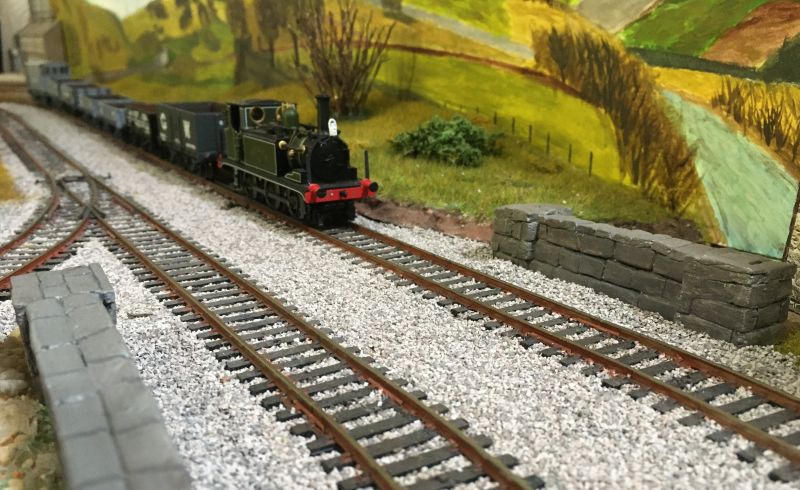
The observant will note missing vacuum, steam and Westinghouse gear from the loco, a little job that got lost while fun was being had with the new Terrier in the sheds.
Posted
Full Member
Staying on the thread Kevin.
Posted
Full Member
Thanks Kevin,Hi Colin. Very nice, and I do like the rusty metals . I thought that the DCC current needs really clean track, but yours doesn’t look very shiny on top. Best wishes Kevin
correct, very clean tops but below can be how you want them to look.
Colin
Posted

Full Member
Presumably you did the layout scenics after the backscene was in place….. :roll:
Regarding the missing vacuum steam and Westinghouse gear - I was about to comment on that until I realised I didn't even know what it should look like of where it should be …… :???:
'Petermac
Posted

Site staff
That's a lovely shot Colin. Clever blending of the backscene into the layout. :thumbs
I'll second that :thumbs
Ed
Posted

Full Member
[user=6]Petermac[/user] wrote:That's a lovely shot Colin. Clever blending of the backscene into the layout. :thumbs
I'll second that :thumbs
Ed
And so will I, as I didn't even notice until it was mentioned!
Michael
Posted
Full Member
Thank you Peter, Ed, Headmaster,That's a lovely shot Colin. Clever blending of the backscene into the layout. :thumbs
Presumably you did the layout scenics after the backscene was in place….. :roll:
Regarding the missing vacuum steam and Westinghouse gear - I was about to comment on that until I realised I didn't even know what it should look like of where it should be …… :???:
Kind words, but not quite as you suggest though! The scenics were built first for multiple seasons and the backscene then painted to match the perspective as best I could. The attached shows how I did it, first time as a summer setting. To get back to this view this morning, the main winter back-scene overlay was slid out and leafy hawthorn inserted, turnaround 30sec. (the 2nd section of overlay left in winter mode can be seen in place at the rear)

Then about 18 months ago I got some help from granddaughters C&S with a new winter overlay (see Westown Topic), that was the view which you were presented in the earlier post and repeated here! With added experience and the help, the winter version came out better and is my favourite. The overlay was created by tracing the horizon line and cutting the overlay to shape, leaving the original sky in situ as Heathfield is a permanently sunny spot!.
POTM Feb views this same back-scene / embankment but from the other end of the track. TBH I hadn't appreciated how well the two went together until that photo. John Dew reminded me something about Eric Morecombe "not seeing the join!". Further on this continues on the main W-H Topic.
WC&PR #4 is a welcome guest, getting a run on the Westown-Heathfield layout in these shots.
Last edit: by Colin W
Posted
Full Member
Returning to the second coach, Ratio (Parkside) seating has been assembled, with suitably shaved backs to reduce the combined width of the pairs' backs and cut down to correct height following Longchap's advice.
The seat pairs each form a neat recess for a 5g wheel weight so 25g of the required 35g are now "on board" including 2.5g under each end seat. All is set to complete the rest of the assembly and detailing, this weekend should see it done!
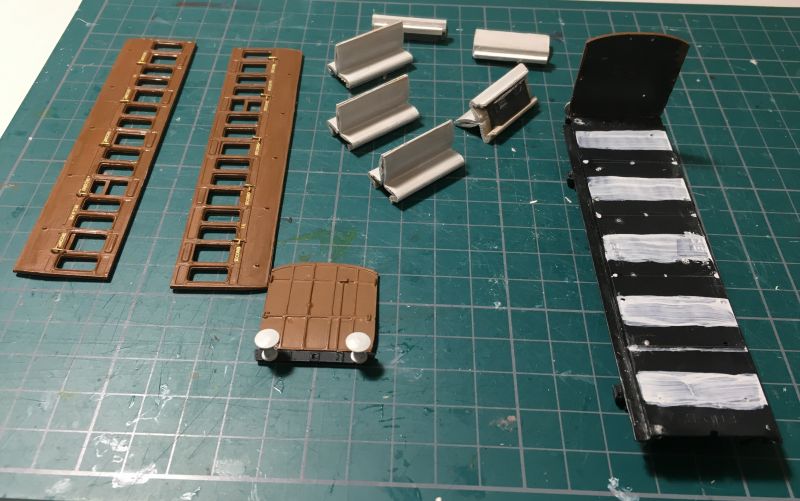
The seat modifications; cut down height = 16mm seat back width = 3.2mm:
Last edit: by Colin W
Posted
Full Member
Staying on the thread Kevin.
Posted

Full Member
Best,
Bill
At 6'4'', Bill is a tall chap, then again, when horizontal he is rather long and people often used to trip over him! . . . and so a nickname was born :)
1 guest and 0 members have just viewed this.