The Weston, Clevedon & Portishead Railway Company
Posted

Full Member
Now to some fun building Coaches - Ratio GWR Kit Bashing
Great start on #15 Colin, the large saloon windows will make a big difference to the usual appearance of 4-wheeled stock, giving a rare prototype model.Shirescenes produce brass etches for the coach ends, as well as seats and are on the Dart Castings website and refreshingly, offer reasonable shipping rates, well to France at least! https://www.dartcastings.co.uk/shire.php
Have fun with the rest of the build, which I’m following with interest.
Bill
At 6'4'', Bill is a tall chap, then again, when horizontal he is rather long and people often used to trip over him! . . . and so a nickname was born :)

Posted

Full Member
Thx for the feedback.
I had a quick look at the Shirescenes offerings and was left with head spinning after reading all the GWR variants catered for by their products. Short answer is I'll stick with the Ratio ends and roof partly because the GWR kits are my proxy for broadly similar LSWR coaches heavily modified during their long life.
I'm hopeful they'll all go together to give something that at least looks like the prototypes by the time I'm finished. The WC&PR in its own inimitable style modified the ends of at least the Guard Brake Coach (adding an end window) so the Ratio end is a convenient place to start.
If I ever want GWR coaches of the era I'll take a serious look at the Hattons Genesis when they are released.
Colin
 Last edit: by Colin W
Posted

Full Member
Posted
Full Member
Various steps since the last update.
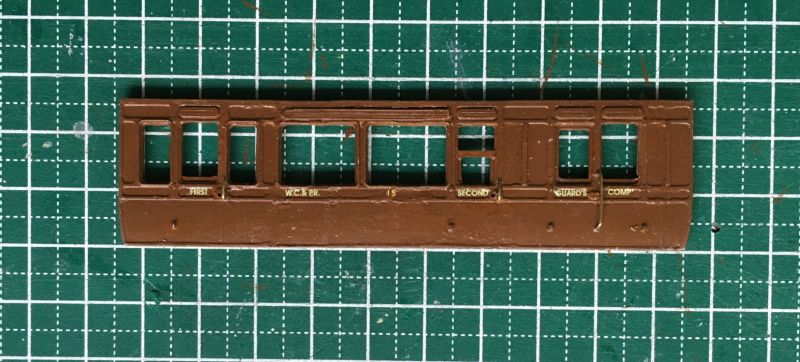
- Structural elements of the sides completed. Ventilators, Saloon windows etc.
- Sash window positions set up. Photos of WC&PR coaches in operation invariably show them with several windows open partially or fully. Either the occupants wanted to get all the bracing Atlantic fresh air they could (and I can tell you there's plenty of it in those parts), or the famed compartment heating was too effective. Either way, I'm capturing the three coaches with windows as per SOP.
- Gaps and uneven areas shaved / filled with milliput and sanded etc.
- Hand rail and door knob reliefs shaved back
- Brass hand rails fitted, holes for brass door handles drilled
- Gloss coat to seal and for transfers
- Transfers applied
Posted
Full Member
Posted
Full Member
Posted
Full Member
There's been an interruption to normal modelling activities since the end of COVID restrictions here and we've been freed up to be "doing things". Clearly modelling does not fall into that ill-defined category!
I'm joking as fine warm weather and lots of overdue gardening activities also played their part in keeping me otherwise fully occupied. Amazingly, COVID now has been formally banished from our fair State with no local cases for 30+ days and the main hurdle ahead is the 30+K expats keen to get back home to Oz. Seeing them all thru quarantine without breakouts is the challenge ahead.
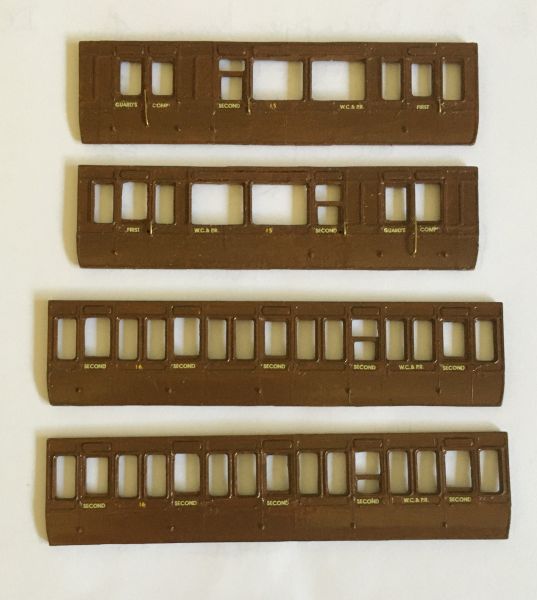
Returning to the task of completing the three WC&PR coaches, #16 sides now have their transfers, 5 * 2nd class compartments all duly labelled much as for #15.
Working on the logistics of assembly from here I realised that a variety of purchases, door handles, ventilators, lamp tops, buffers, seating, passengers etc. were all required for this and other projects, to be sourced from various suppliers. Research done, significant orders now are in place to Eileens, Dart, Wizard and Rails but several weeks away.
Meanwhile to the seating. #16 all Second Class (ex- LSWR 3rds) is easy in principle as the Ratio seat units are fine for this job, but delays to PECO's production mean I've ended up sourcing one here one there, depleting suppliers existing stocks.
#15 and #17 with their Saloons and 1st Class (#15) needed custom seating so that's been the priority.
There are some useful historical photos of seating in LSWR coaches of the era and a floor plan of a Saloon from 1876 which shows the seating there was a "U" shape around three sides ending at the two doors. Some old ABS PC remnants and PS kit sprues provided the raw materials, colours as per Peter Strange's reference; Red / Black moquette for 2nd and Blue cloth for 1st.
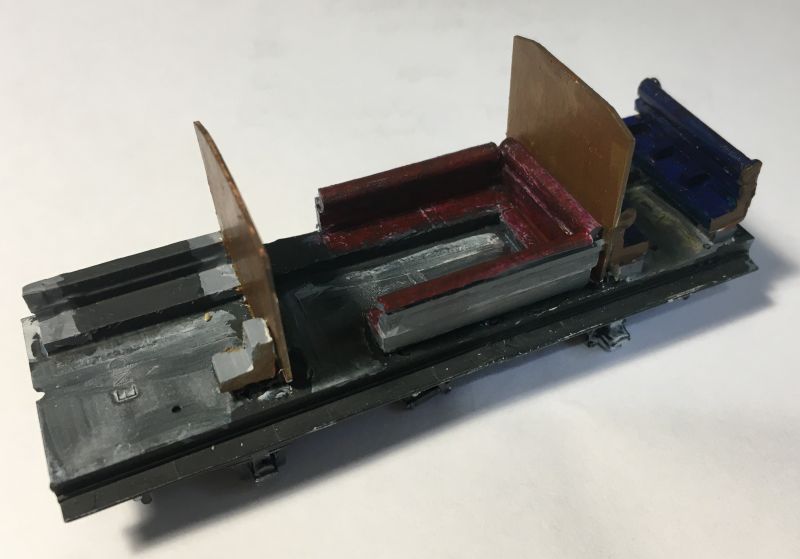
After the "cut and shut" operation I needed a brace to keep the two halves of the base dead even. It runs along one side and doubles as part of the seating in the passenger areas but won't be visible in the guard's compartment.
Progress of a sort but I can now see that the three coaches will take until well into the New Year to complete.
Posted

Full Member
Great looking seating and brilliant colouring - I certainly remember that dark, almost plum, velvet seat material although probably not from as far back as your coaches …………………… :roll:
What did you paint the sides with ? It really does look like heavily painted wood. :thumbs
'Petermac
Posted
Full Member
Thanks Peter,Great looking seating and brilliant colouring - I certainly remember that dark, almost plum, velvet seat material although probably not from as far back as your coaches …………………… :roll:
What did you paint the sides with ? It really does look like heavily painted wood. :thumbs
everything is hand painted, I used Vallejo acrylics, this time the shade was "Beasty Brown" 72.043 from their Game Color range, an orange based brown shade. I always wet my brushes with diluted Vallejo "Retarder Medium" (5% in water) then remove excess before painting. Then I mix in one drop of diluted retarder per 10 of the paint in a small glass jar before applying. This is also a handy technique if you are creating blends of Vallejo acrylics because you can mix enough for your needs but it doesn't go off as quickly as the raw paint. I've kept mine overnight that way to no detriment.
With this technique the acrylic flows better and doesn't dry as quickly so you get a better finish. Vallejo suggest you can brush the surface first with the extender mix and I've found that to be very effective on larger surfaces like roofing. As I'm working more slowly with a finer brush on the detailed sides I find the wet brush method is better (as long as you wipe / dry off the majority of the wetter first!)
At present the sides sport a finish of Humbrol Gloss Cote to take the transfers and to seal the delicate paint surfaces, especially high points and edges. A matt spray coat is planned to finish. (PS.I noticed that the bottom coach side in the photo has a lighting artifact which appears like a long smear across the right of the side, nothing there in reality, phew!).
The Red/ Black moquette was produced after some trial and error by laying down a solid mid grey then over-painting with rose-carmine. Then I used a "dry brushing" of acrylic black applied very thin and then a final dry brushing of rose -carmine
Posted
Full Member
However did you arrive at your method for the moquette ? It really does look like the real thing from here.
'Petermac
Posted
Full Member
1. be careful about mixing brands of paint. My model shop told me that I could use the extender with brands other than Vallejo but that proved not to be the case. Vallejo acrylics are purely water based, others with different formulations may contain an alcohol of some sort - do not like the extender and coagulate instantly!….. - I've copied your paint mix for future reference. I have a few bottles of Vallejo acrylics in my paint box but thus far, have tended to use Jo Sonjas. I'll try your mix and see how I get on when I next needs to paint something ……………. :thumbs
However did you arrive at your method for the moquette ? It really does look like the real thing from here.
2. Purely trial and error! "I know what I want when I see what I don't want!"
Posted
Full Member
……………..
2. Purely trial and error! "I know what I want when I see what I don't want!"
Last edit: by spurno
'Petermac
Posted
Full Member
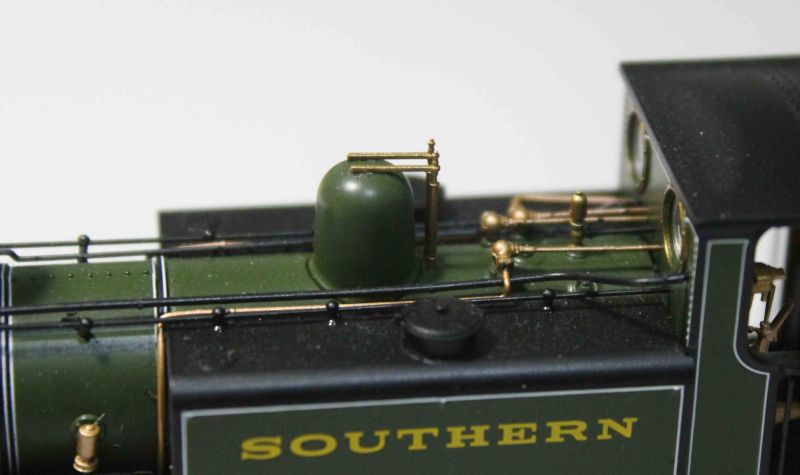
Returning to WC&PR No 4 I've been tidying up with the detailing and some other unfinished jobs. The move of the Salter Valves' positions left two holes requiring filling and painting. I don't have a suitable paint match pot for this loco so needed a home spun solution. Note it is not the same shade as SR Olive green and anyway there is also overlaid the actual choice of colour used by Hornby (say no more)
These are the steps I took as they may be helpful to others needing to match an unusual colour.
A good photo taken in neutral light (4000K LED Cool White) allowed me to record the colour characteristics of the loco's paint using Paint Shop Pro.
Putting the RGB color info from PSP info into "RGB Color Picker" (just google that phrase to find it) gave me the top image with lots of useful information. The circle marks the required colour from the RGB inputs; top right is the underlying colour and the arrows show the effects of adding black, white and grey to that starting point.
It turns out top right corner corresponds to Cyan 50% Magenta 0% Yellow 100% which is a CMY tertiary colour Chartreuse and luckily I had some hanging around. A judicious blending with some Black and White quickly gave me my paint match as shown in the bottom photo, even in this close up its hard to see the join!
An important takeaway from this is the vast array of colours originating from the base shade which are achievable by just adding black and white in appropriate amounts. This time I was lucky to have the base colour to hand but if the CMY info were different an additional first step is to blend in a primary (CMY) to achieve the required starting point.

Last edit: by Colin W
Posted
Full Member
Having worked thru a diverse and bizarre range of engines in its first 30 years, by the 1930s Stroudley Terriers had become the key locomotive power operating on the WC≺ Portishead (ex #43 Gipsyhill) and WC&PR no 4 (ex #54 Ashtead)
A third Terrier, SR 2662 only features in my alternative world view of WC&PR operations but having acquired one, the details of the new Hornby model may still be of interest to others. After all what's not to like about those cute little engines?
The new Hornby set of releases (2019-20) was an interesting move after having lived for far too long off the old 1980s tooling acquired from Dapol . Plans for a new series of models must have been well advanced by early 2019 because on hearing of Dapol / Rails the new release, Hornby beat them to market and at a significantly lower price. Opinions on the relative merits of the two releases are divided and it is not an easy choice. Having now had R3783 (SR 2662) apart then up and running I'm more than happy with this latest small loco Hornby release.
If reviews are to be believed, detailing is not quite as fine as on the new Dapol but certain design features important to operations appear to have been better managed on the Hornby. Out of the box, my model ran very well on DCC even without any help from a Stay Alive. The wiper design appears robust.
One interesting feature is the detailing of the buffer beam. A kit of "extras" is supplied and helpfully the mounting points for these bits have been put beneath the beam, the three little sockets shown here. Aside from the vacuum pipe being installed on the wrong side of the beam, easily fixed by a drop of acetone on the socket, adding extras was simplicity.

Here the vacuum has been relocated to the left and the Westinghouse pipe added on the right with steam hanging below.
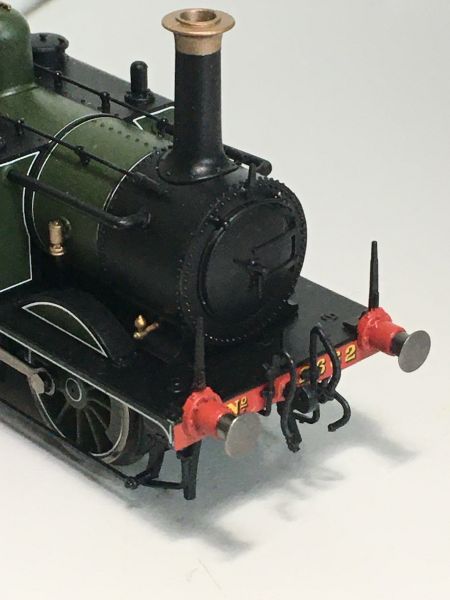
Very tidy indeed. Finally some more fine detail on another of the latest Hornby Releases
Last edit: by Colin W
Posted
Full Member
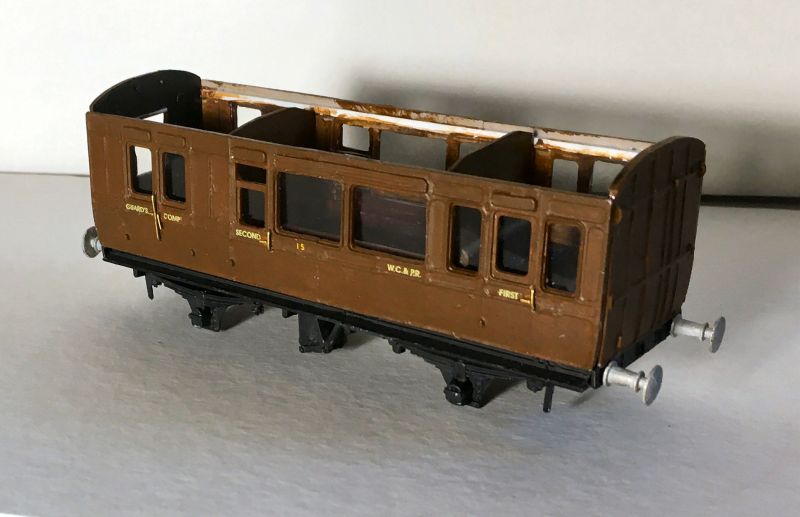
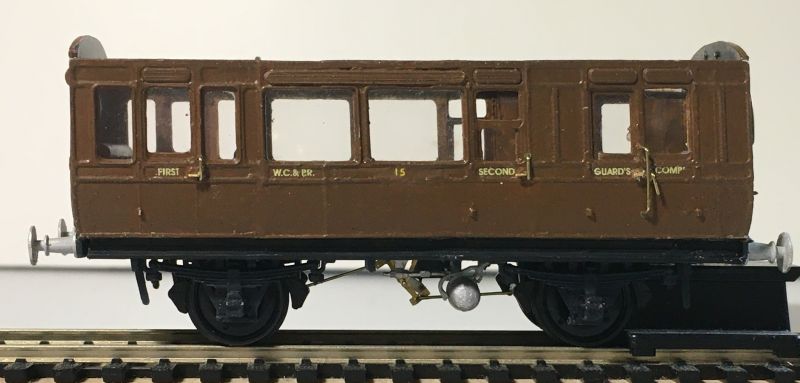
My progress has been very slow on the coaches with various distractions but now I'm back to finishing off #15 and #17. With the arrival of various bits and bobs for detailing, the coach ends have been completed and today for #15 they were all put together; well almost!
All went well with first the Guards end and then the two sides. With sides and chassis assembled / cut down to the size required for this coach I thought I had created the correct and matching lengths. However, it's only when you do a glued assembly that you can visualise exactly how the parts come together, ends fitting snugly inside the sides except the 2nd end didn't!
Fortunately the error was with the chassis, 1.5mm too long so a careful razor sawing and some trimming of the coach floor had it all coming together correctly. Shown here while the epoxy sets.
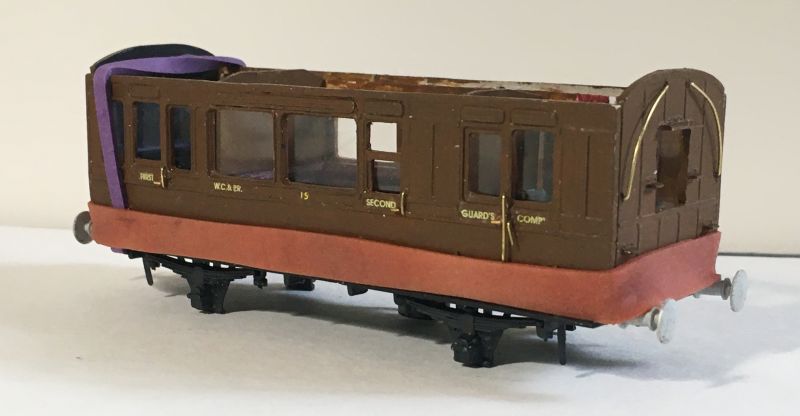
Detailing includes white-metal buffers, T handles and the specific set of grab rails and long handle to the Guard's Compartment's twin doors.
From this angle there's a good view of the 2nd Class Saloon with its spacious seating and great views through the large windows. This compartment is often seen (as modeled here) with the door windows pulled down. Perhaps the Saloon tended to get too warm with Somerset sunshine streaming in.
Edit: Glue now set, viewed from other side
Last edit: by Colin W
Posted
Full Member
I'm always impressed by your research and attention to detail - who'd have worried about making sure the guards door handle was extra long ? :shock:
I take my hat off to the patience required to achieve this level of accuracy - patience has bever been my strong point ……
'Petermac
Posted
Full Member
Plan A had me using the under floor detail parts from the Ratio Kit, after all who looks underneath? However a visit to Dart Models for some detailing parts which I did need, pipes, ventilators, lamps etc. set me off in another direction altogether.
I'd recalled Dart had a detailing kit for the GWR Autocoach so I thought I'd just take a peek. What a slippery slope awaited! While their kit is comprehensive, it was way too much for my needs and I settled on buying some of the critical and visible parts. Then I realised these would be perfect as well on the WC&PR coaches and here I am.
#15 is documented as having a dynamo and it can be clearly seen on the left side to the left of the middle door. However no battery box is visible from either side so I haven't bothered to add one!
The Dart dynamo is a neat 3 part white-metal kit easily assembled and shown here along with the added V hangers and brake control rodding. While I've no details of the setting of this, the helpful 3D graphics of the new Genesis coaching stock provided me with a very good idea of how it could well have been configured.
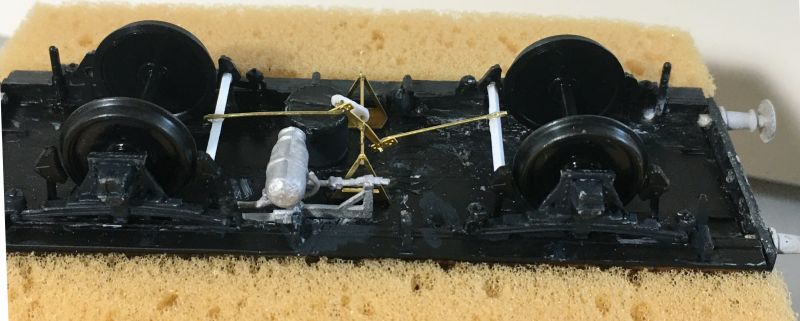
Then from the side, the dynamo sits very clearly as per the prototype. All that remains is to add a strip of aluminium as the belt, one I'm happy everything is of and all the painting is done.
Last edit: by Colin W
Posted
Full Member
The later stages seem to have taken ages, all the fiddly bits including 4 sets of hand built steps but now it's together its starting to look the part.
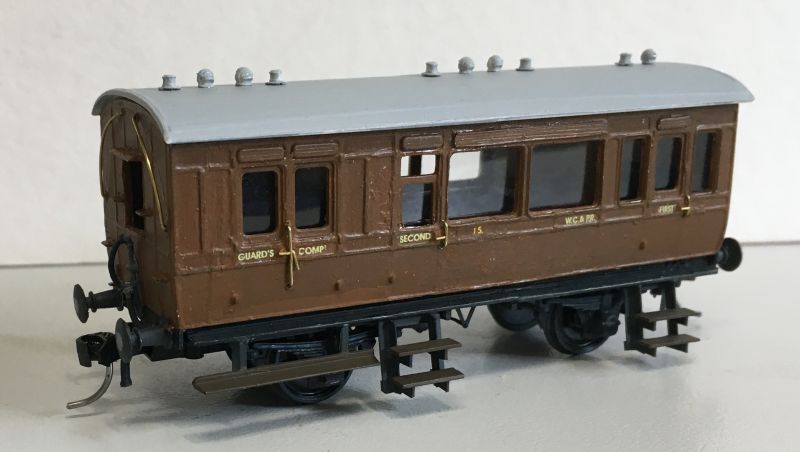
It still needs a final coat of matt acrylic as the touch up spots on the bodywork show up in this photo in a lighter shade. Then there's grab rails on the roof plus the passengers but I think I'll leave them and get on with building #16 and 17 first.
What strikes me now it's made is the individuality of the WC&PR coaches with their saloon compartments and steps when compared to the various mainstream offerings of this era coming thru from Hattons and Hornby. My quality of finish mightn't match theirs but that's OK, I'm happy.
Last edit: by Colin W
Posted

Full Member
cheers,John.B.:thumbs
Posted
Full Member
Hi John,Only just caught up with this thread following the picture of the terrier to look at the layout.Some fantastic modelling going on here Colin,you can be sure I'll be watching future developments!
cheers,John.B.:thumbs
Thanks for the feedback,
Colin
1 guest and 0 members have just viewed this.