The Weston, Clevedon & Portishead Railway Company
Posted

Full Member
Now to some fun building Coaches - Ratio GWR Kit Bashing
WC&PR #17Sibling #16 sits in front under my monitor to remind me of my unfinished business in the coach building department. TBH I needed a break and suitable diversions were many but some quiet time has me returning to the third WC&PR coach build. This is nearer to the #15 assembly requiring multiple cut/shuts to get from a compartment coach to the saloon configuration. Hopefully lessons learnt etc……..
First step - a plan. Following in others' footsteps is a great help especially when they share their resources. So I have Diagrams of the LSWR saloon (1869- remodelled 1889) and a 4 compartment coach both in the 24' 6" length of #17.
Ratio 612 (a Diag. U4; 26' 10" composite) is a suitable starting point, the main issues being to shed the extra width of the First Compartments and create the central saloon. Unlike #15 where saloon had its own entrance and no thoroughfare, #17 had access from the compartments at each end as per #1520 on the Bluebell Railway
LSWR 1520
This shows the assembly plan.
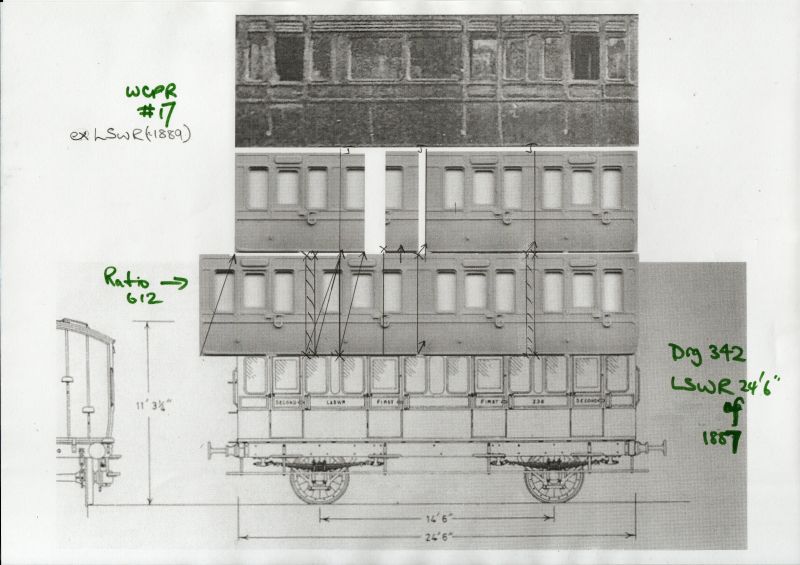
For anyone wondering how to assemble such a composite working image, using PSP, I bring in my reference image, here the drawing and at 100% measure the scaling factor. Then for any other image viewed at 100% I measure its size and calculate the amount to "Resize" the image to match my reference image before cutting and pasting into the working image. Three separate images were brought together in this plan.

Posted
Full Member
This time I've decided to capture each of the assembly steps as I go along. It'll be a useful reference for the next one I do and may be of interest although there's nothing really new.
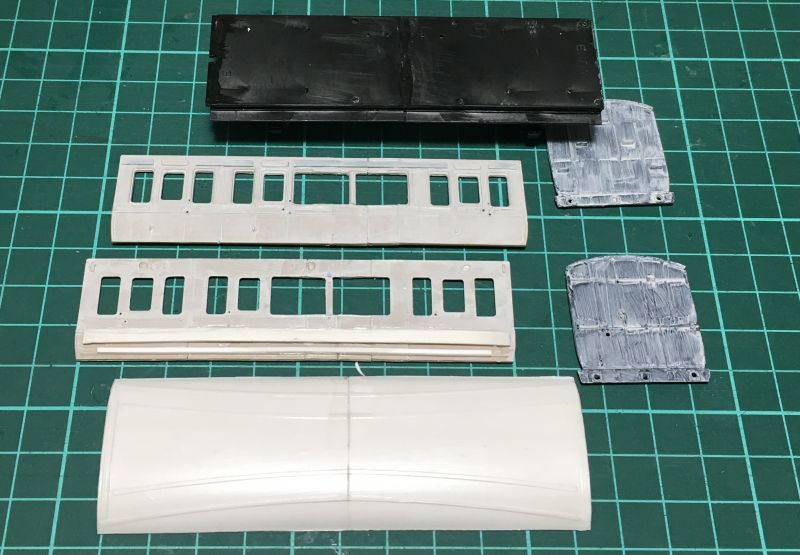
Following on from the blueprint, the first step is to carefully cleanup the surplus items on the moldings, in my case the door knobs and grab rails as well as some flash. This is shown below with just one more door's fixings to be trimmed.
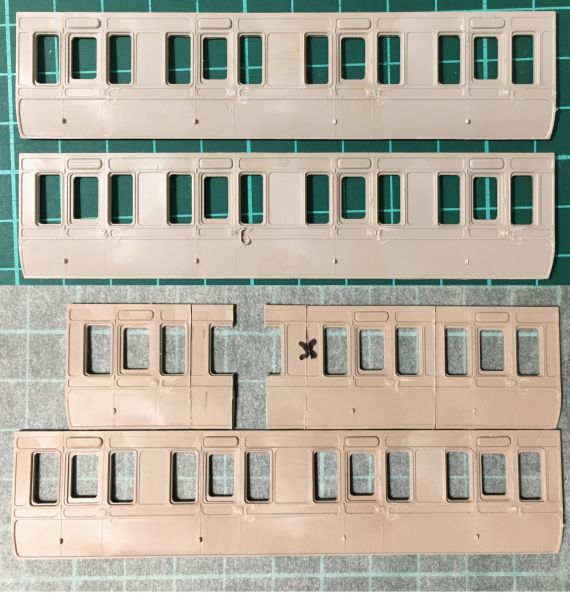
The bottom pair shows side 1 after all the required cuts and several joins have been made. The "X" marks where the other Saloon window will be created by cutting away the current panel area. Minor off-cut inserts are still required to complete the first saloon window frame.The as yet uncut other side is shown for comparison, 9mm longer than the end product.
Compared to my other cut 'n shut on #15 this is relatively easy because all the side components are from the same source. #15 used sections from 2 different Ratio Kits which were a poor match and caused a lot of issues.
Posted

Full Member
Not only have you worked out all the cuts but the shuts are brilliant. It begs the question - how do you manage to make the joins disappear so convincingly ? Whenever I try to join anything, I need at least 2 large tubes of filler to hand ….. :oops:
'Petermac
Posted
Full Member
Simple!This is amazing stuff Colin !
Not only have you worked out all the cuts but the shuts are brilliant. It begs the question - how do you manage to make the joins disappear so convincingly ? Whenever I try to join anything, I need at least 2 large tubes of filler to hand ….. :oops:
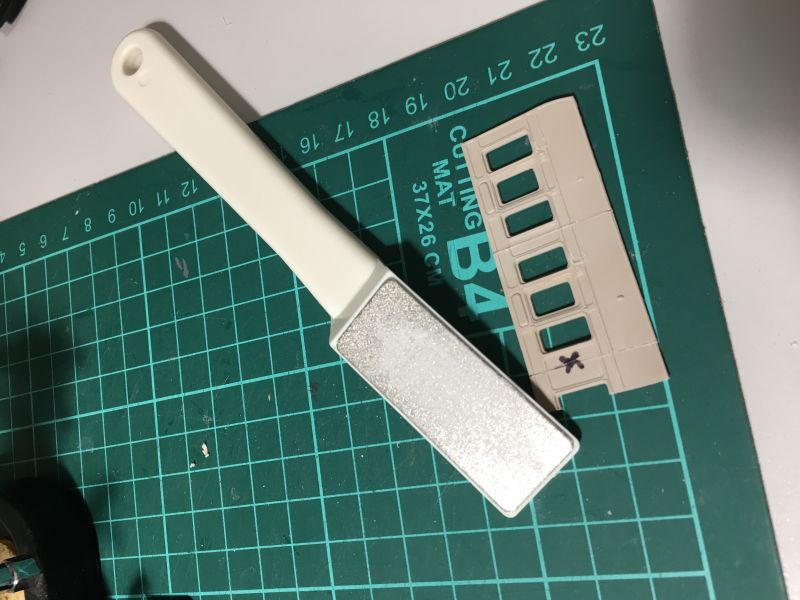
This marvelous tool. A large flat diamond file from DAISO; very fine and big enough area to make leveling cut surfaces a breeze.
DAISO is my go-to store for all manner of things modelling and around the house and even SWMBO has become a convert! Nearly everything is A$2.80 but unlike your standard Dollar store, quality (Japanese style) is very good for the price. I must post a photo of the large number of acquisitions in my tool kit. Superglue is top quality as well, when elsewhere its easy to buy rubbish or pay top $$$.
I forgot to repeat the method I used on #15, viz. score the plastic deeply and fold back. This was recommended by the experts (see earlier posts on #15 for references) and works very well with the Ratio kits, giving a straight clean cut after minor trimming of the inside edge.
 Last edit: by Colin W
Posted
Full Member
I have a set of those Colin - not Daiso supplied of course but nevertheless, a very good make and quite large. I originally bought them to put an extremely sharp edge on Tormex ground wood chisels and various router bits. They're brilliant for that.
I haven't considered them for plastic - doesn't that clog the 'bite" very quickly. I know plastic isn't good news for normal files …..
Also interesting that you use the "score and snap" method of cutting rather than a razor saw ……. :roll:
'Petermac
Posted
Full Member
Back Dating Ratio GWR Coaches
the particular mix is quite soft, "cheesy" was the term used, and best scored and snapped. May not be true of others' PS moldings. As to filing, it surprised me as well but if files easily. May be a feature of using a diamond cutting surface? Whatever, it makes for very clean, almost seamless joins with care.
Out of interest I finished off side #2 making cuts with the razor saw and that worked very well. I was worried about cutting losses and accuracy when we're taking in mm but as it happens the final section is filled by difference as you can build from both ends rather than a linear sequence.
Last edit: by Colin W
Posted
Full Member
I may have to give my diamond files a new purpose in their lives ……..
'Petermac
Posted
Full Member
Another useful reminder to self, when assembling side #2, mirror it along side the first by inverting as shown here:

Particularly helpful when the sides are asymmetric as in this case otherwise it's hard to visualise the reverse assembly order for the second side. Here side #2 just needs the missing piece of the jigsaw puzzle to be cut to fit.
Posted
Full Member
The remaining tasks are now done, the spaces for the two saloon windows each side were cut out completely and a new upright for between the two panes cut from the surplus stock to hand. These are best fixed in place with a thick paste made from surplus sprue and limonene, about the consistency of toothpaste. This has a good combination of features - gap filling, high tack but enough give to enable careful positioning.
I'm lucky to have one decent photo of #17 showing that after refitting for WC&PR service the ventilators ran the full length of this coach, unlike the others. Some fairly soft 0.5mm PS sheet was perfect for this job, easy to score at close separation. The insides of the coach walls were reinforced with a 0.5 * 3mm strip of more rigid PS.
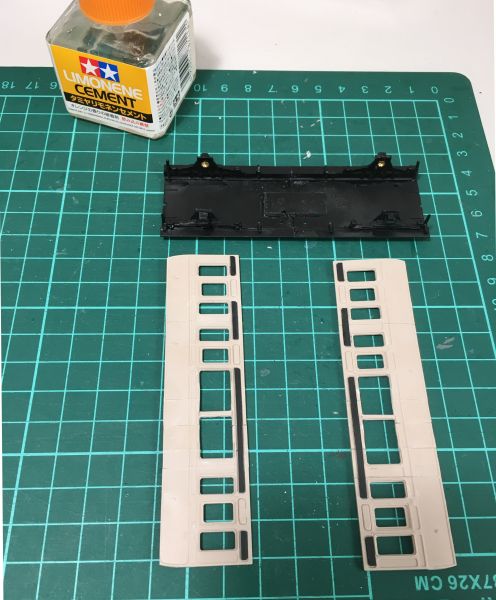
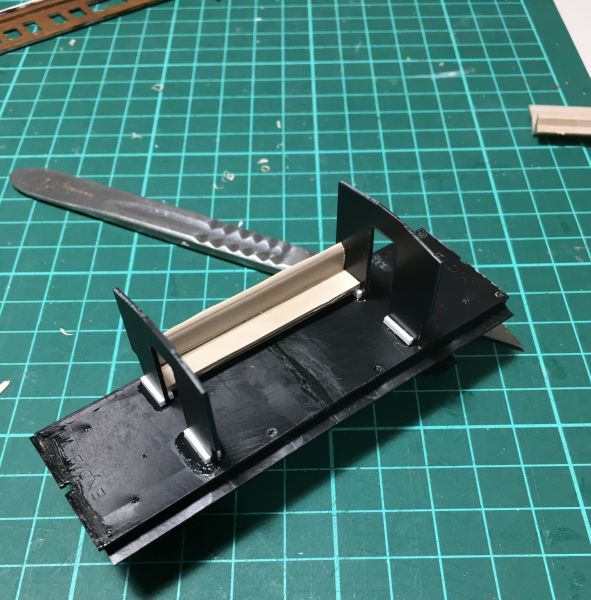
Finally the Sub chassis was cut. I settled for two square cuts, having struggled to get a good match with angled cuts on #15. The floor is reinforced with the offcut laid perpendicular and "welded" down with limonene. The end result was a nicely square and robust base for the model.
Posted

Full Member
Filing away for reference as one day I plan on making some GWR clerestory coaches…. in N!:shock:
Following along.
Posted
Full Member
I have an unopened bottle of it somewhere, bought specifically for fixing windows to plasticard - I was told is was less agressive than MEK.
Also, interested in hearing the recipe for your styrene "sludge" - do you just keep adding the sprue until you have the consistency you want ?
'Petermac
Posted
Full Member
I think Limomene and MEK (aka Butanone) each have their place. For instant tack and hold, MEK will be best as it is much more volatile (bp 80C) vs Limonene (bp 176C) which evaporates slowly. All the same, limonene welds two parts together very quickly, I suspect because the solvent continues to advance into the plastic away from the surface. Gluing the two sections of the chassis together I had less than 1 minute to get positioning set but at that point the joint would not be at all strong and must be left.Do you prefer limonene to MEK or the likes Colin ?
I have an unopened bottle of it somewhere, bought specifically for fixing windows to plasticard - I was told is was less agressive than MEK.
Also, interested in hearing the recipe for your styrene "sludge" - do you just keep adding the sprue until you have the consistency you want ?
In one sense it's not less aggressive than MEK, you need just as much care to avoid excess or overflow as it very quickly damages any PS surface it's applied to. I prefer it because SWMBO is VERY sensitive to solvent smells from just about any source.
Styrene sludge I make from PS shavings cut off a sprue and dissolving them in limonene. It takes overnight to fully blend together and even then a stir is necessary. Better to add less solvent first then more later to get to the desired consistency, but it's impossible for me to estimate the ratio needed.
When just needing a drop, I brushed some limomene on a sprue end and waited while it dissolved in, gentle mixing with a small screwdriver helped speed the process.
Posted
Full Member
All major components have been reshaped to the required sizes and just a few notes here for future reference.
Sides: An omission in my #15 assembly was to add additional material to the ~1mm flooring attachment strip. Here a second 1mm * 1mm PS strip has been glued on top as this gives a very positive surface to glue the side to the floor. It can be seen below the 3mm strengthening strip I'd added earlier.
All door furniture holes were pre-drilled before priming
Sub-chassis However carefully measured out it's an immutable law of nature (in my universe anyway!) that it won't be perfect. I think my cutting + filing are to blame for leaving the floor 1mm short after gluing back together. This is only obvious when put together alongside the cut down sides. No matter, a simple 1 * 1 mm PS strip was glued on one end to make up the shortfall. Some kits can have variances of this magnitude # and it's always worth checking before gluing!
Ends: faux handrails were trimmed away. This is tricky as they are barely 0.3mm above the surface, best erring on side of underdone and then errors spotted when priming than gouging too deeply (note to self) which is hard to repair
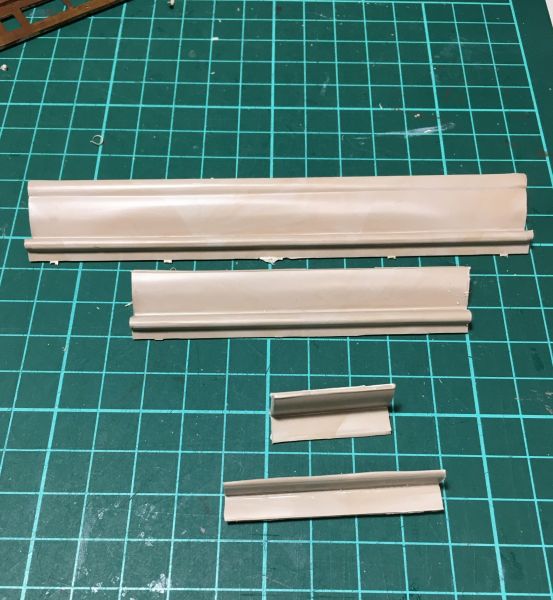
Roof: even with 9mm cut out, no need to rework the roof lining bars as the match was fine (don't know their proper name but they steer rain off the roof in a controlled manner). Priming shows up any minor gap filling needed at the join.
# Slaters MR 4027 springs to mind.
Posted
Full Member
Along with the Brake Composite #15, this coach has the interesting feature of a central saloon compartment with large windows. Unlike #15 where the compartment had its own access door, #17 was modified from its original LSWR Saloon design. Peter Strange describes the interior as having access doors from each end compartment and seats along the sides. Quite revolutionary I think for the era, if not quite as cosy as #15's with its exclusive exterior door access.
From the limited photos of the coach it can be seen that these Saloon seats must have been low backed, not reaching above the window line. We have further resources thanks to the Bluebell railway who have / are refurbishing a range of ex LSWR Coaches. While not a Saloon, LSWR 1520 had lavatories accessed from compartments so this gives us a view of what #17's end compartment internal doors must have looked like.
LSWR 1520
They weren't exactly traveling rough down in 3rd in those days, better off than Economy Air travel you might argue. Certainly more legroom!
The final issue which had puzzled me before researching #17 was the lack of footstep access to the middle doors of the coach. Clearly this door was closed off from use with the side seating installed along the Saloon. Now to building.
Last edit: by Colin W
Posted
Full Member
I'm pretty sure they are simply called Rain Strips - Marty
Roof: even with 9mm cut out, no need to rework the roof lining bars as the match was fine (don't know their proper name but they steer rain off the roof in a controlled manner). Priming shows up any minor gap filling needed at the join.
# Slaters MR 4027 springs to mind.
Last edit: by spurno
Posted
Full Member
Last time on #16 I had a bit of a go at cutting back the oversized the Ratio seating strips (PA433). This time for the bench seating I did a right proper job with the saw and knife. Not that flash I'm afraid as they're inside but this shows the amount cut away to give the bench seats (bottom).
Then as they're to be installed between the two compartment walls.
PS I haven't decided if there should be doors, my guess is "yes". Any thoughts?
PPS Thx Marty. Of course, how could I forget?? :roll:
Last edit: by Colin W
1 guest and 0 members have just viewed this.