The Weston, Clevedon & Portishead Railway Company
Posted

Full Member
Now to some fun building Coaches - Ratio GWR Kit Bashing
#16 Coming together, almostSides and seats are in place but I've not quite delivered on my weekend completion target for #16. I blame a TV "Blitz" with SWMBO to finish off "Endeavour Series 7" last evening which extended way beyond a reasonable hour (for me anyway).
My now standard routine for getting the Red and Black Moquette came up well on the Ratio seats, I'm glad now I documented the sequence of painting last time, made it easy this time around.
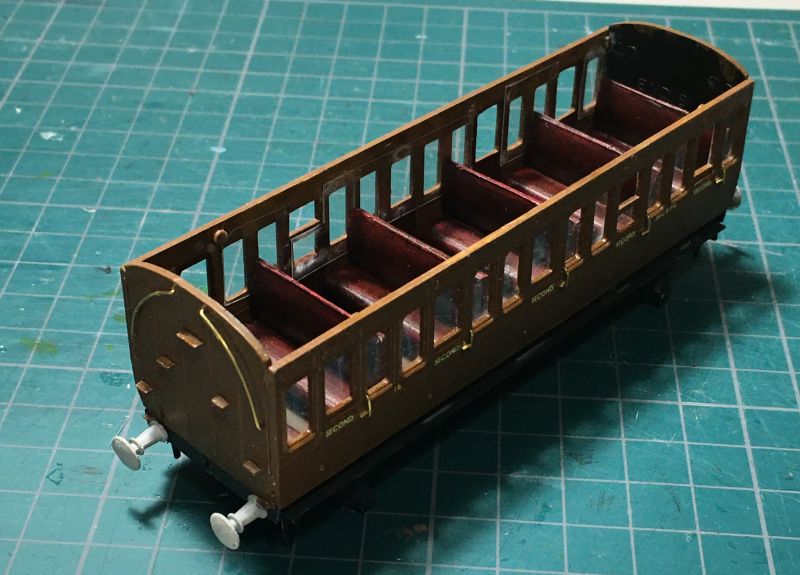
Even with just 25g added ballast the coach feels to be a good weight and I still have passengers, fittings, couplings etc. to add to the project.

Posted

Full Member
Staying on the thread Kevin.
Posted

Full Member
I could go back to see but do you get them from tyre depots or buy them new ?
Dinky little coaches and looking very good too. :thumbs
'Petermac
Posted
Full Member
Peter,Do you re-cast the wheel weights Colin - they don't look like the type on my car …………………… :hmm
I could go back to see but do you get them from tyre depots or buy them new ?
Dinky little coaches and looking very good too. :thumbs
If you look closely in Post #98 you can see the under-seat view of the 5g weight and lower down the cross section view.
They come in strips typically a 5-10-5g combination 18mm wide about 2.8mm thick. I'd describe them as flat rectangular "lozenges" with thin sections between the individual weight units so they can be cut.
The backs have a tacky polymer of some nature so they're designed to be glued flat, presumably on "mag" type of wheel rims. My local tyre shop is a handy source but being lead they're getting harder to find these days.
When they run out I've a big lump of lead, is that soft enough that I could take a razor saw to it to cut off tranches?
Colin
Posted
Full Member
'Petermac
Posted
Full Member
Posted
Full Member
'Petermac
Posted
Full Member
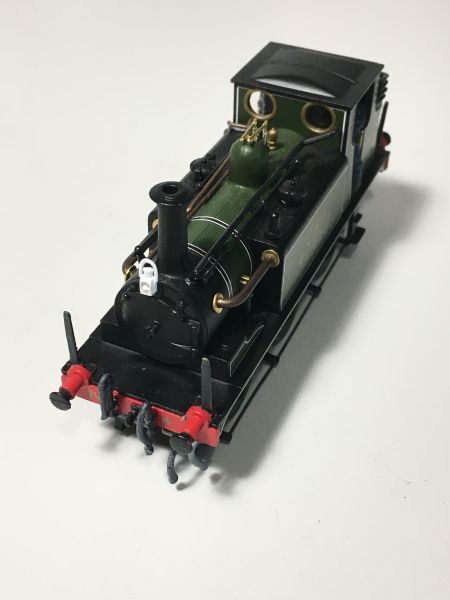
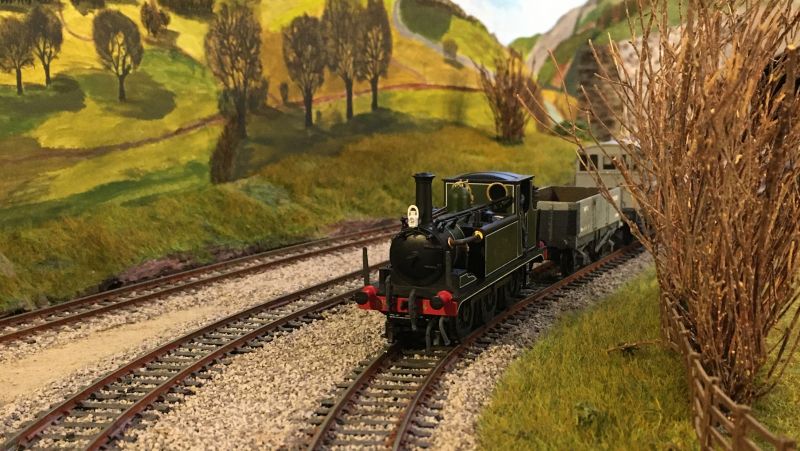
It's been 6 months since my last update on #4, in more recent times my attention has been on building the Railway's Goods and Passenger stock. Back in September my Hornby Terrier project was very near completion but needing some minor parts ex UK and so slipped into the "forgettery" when the shipments were delayed.
The remaining jobs are mostly fine detailing. I need to add all the various front / rear braking / heating pipes of which there were several and then there's the grossly oversized brake rodding of #4 which had escaped my attention until recently. On inspecting the rodding underneath it was clear I had an additional job to complete, my new wipers needed a little work to improve alignment.
This pic shows both jobs:
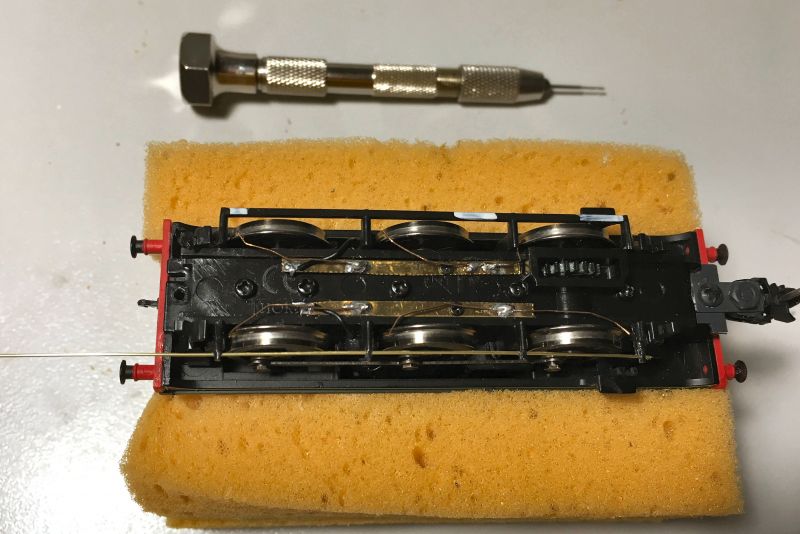
Two wipers have been reinstalled to seat them on the contact strip with better alignment for constant rim contact. The improvement in running over my insulfrog points was immediately noticeable.
I've highlighted the chunky old 1.5mm square molded brake rod. This was carefully cut away leaving the four supports in place, each of which then was drilled out to 0.55mm to take the replacement rod. Hopefully tomorrow I can get all the piping installed and the project fully complete.
 Last edit: by Colin W
Posted

Full Member
Posted
Full Member
How did you drill those half mill holes through 3 units and still keep it in a straight line ? Did you remove the moulding before drilling it ?
'Petermac
Posted
Full Member
What are the wire wipers made from Colin?
Phosphor Bronze wire, 30 SWG or 0.315mm from Wizard Models.
I've posted various items here on the locos to which I've added wipers including a video or two over on my W-H Topic,
http://yourmodelrailway.net/view_topic.php?id=16111&forum_id=21&page=8#p293671
The approach is determined by the easy of access under the keeperplate. Wherever possible, I've tried to connect the exterior brass strips to the interior ones which carry the integrated wipers as supplied on the RTR (and which may have failed / lost spring tension with age). Sometimes this can be done easily via the mounting screws thru the keeperplate or may require entire new wiring to convenient connection points as in the case of #4, black leads can be seen near the front axle.
Last edit: by Colin W
Posted
Full Member
Carefully in situ, after cutting out the old rodding and then flattening the sides of the cross bars slightly with a file. The support points are already aligned as part of the molding.How did you drill those half mill holes through 3 units and still keep it in a straight line ? Did you remove the moulding before drilling it ?
I thought about taking the entire molding off but that would require a lot more drilling to reattach it to the sub-chassis with supporting pins afterwards. Seen from the side it's not perfectly aligned at present but once blackened that'll be less obvious (I hope).
When done and installed if I'm unhappy, I can rework it by taking off rod supports and reattaching them. Easy enough as one was already broken!
Posted
Full Member
Thank you[user=19]Marty[/user] wrote:What are the wire wipers made from Colin?
Phosphor Bronze wire, 30 SWG or 0.315mm from Wizard Models.
I've posted various items here on the locos to which I've added wipers including a video or two over on my W-H Topic,
http://yourmodelrailway.net/view_topic.php?id=16111&forum_id=21&page=8#p293671
The approach is determined by the easy of access under the keeperplate. Wherever possible, I've tried to connect the exterior brass strips to the interior ones which carry the integrated wipers as supplied on the RTR (and which may have failed / lost spring tension with age). Sometimes this can be done easily via the mounting screws thru the keeperplate or may require entire new wiring to convenient connection points as in the case of #4, black leads can be seen near the front axle.
Last edit: by spurno
Posted
Full Member
It's been a long journey since I decided to make the best I could out of the (now) very old Terrier model by Hornby (for reasons explained earlier). This is a model which is little changed over 40 years with perhaps the exception of the motor. It's showing its age, molded from bulky heavy duty Low Density Polythene because that was the best there was in those days. Now many better polymers permit much finer detailing on injection molded RTR rolling stock so that left me a lot of scope for "improvements" on mine.
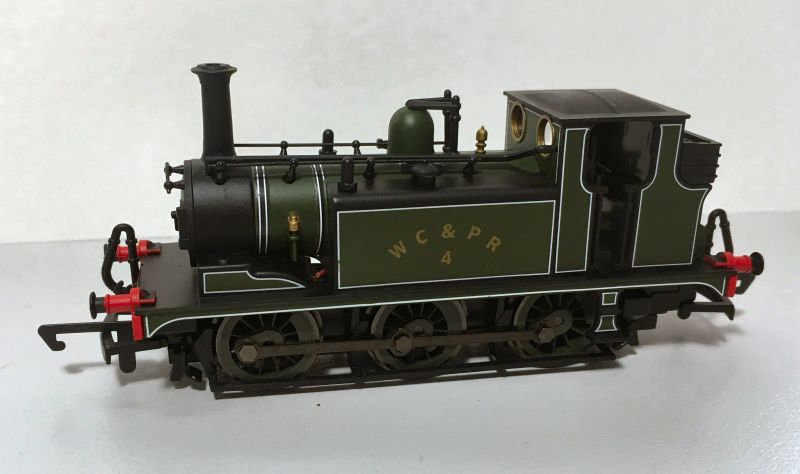
External Piping
While the likes of the A4 Class were reaching the heights of streamlined style, the little Terrier was at the other end of the scale, covered with external pipes above and below the buffer beams. A modeller's paradise which has been a great learning process for me. The upper piping has been covered already. The final pipe additions I needed are those for brakes and heating. Most Terriers still sported their Westinghouse air brake kit in addition to vacuum braking. These plus steam pipes make for a busy front end.

Viewed from the right, the hallmark bucket is in situ on the rear lamp iron .
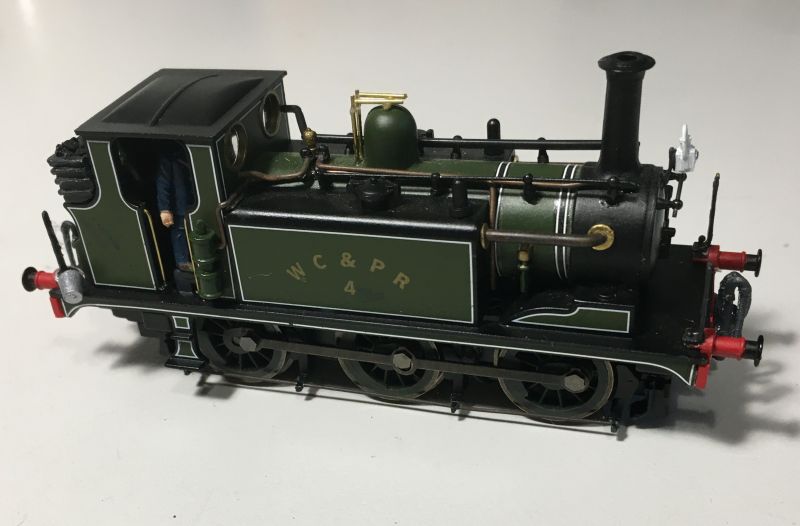
Improved Brake rods
These photos also show the installed blackened rods, about 40% of the original monsters' diameter.
Blackening the brass was an interesting exercise in kitchen chemistry. Earlier when copper plating the boiler rods I'd noticed that I was getting a poor result if I applied too high an over-voltage. For my needs I turned this around to an advantage. Using Copper Sulphate and Citric Acid electrolyte I first dissolved a few rusty old steel nails, hoping the carbon and sulphur might add to my black deposits on the rods.
At 4.5V, well above the required voltage, there is vigorous bubbling and the rods soon get their coating of copper followed a very fine black deposit. Carefully dried, the rods were given a Matt Cote protective coating and I had my blackened rods without any need to use the nasty chemicals in standard Blackening agents (and no cost)
Last edit: by Colin W
Posted

Site staff
Great stuff !
Cheers
Matt
Wasnie me, a big boy did it and ran away
"Why did you volunteer ? I didn't Sir, the other three stepped backwards"
"Why did you volunteer ? I didn't Sir, the other three stepped backwards"
Posted

Full Member
Barry
Shed dweller, Softie Southerner and Meglomaniac
Posted
Full Member
Staying on the thread Kevin.
Posted
Full Member
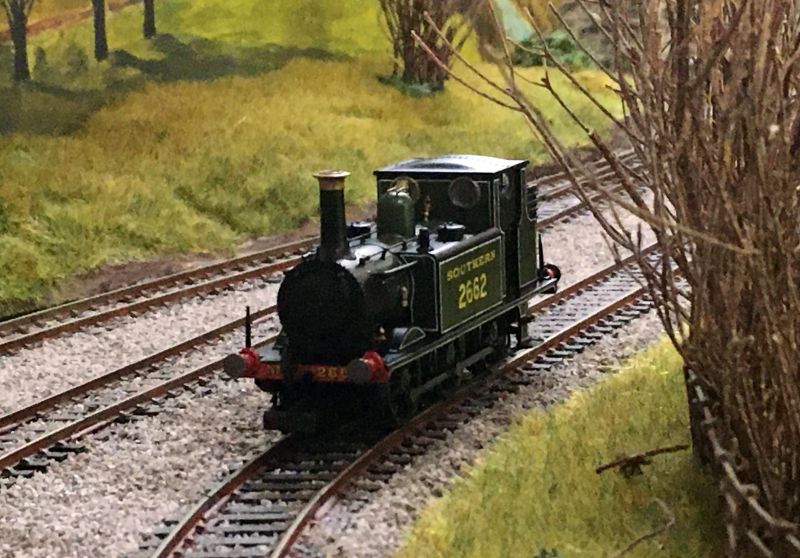
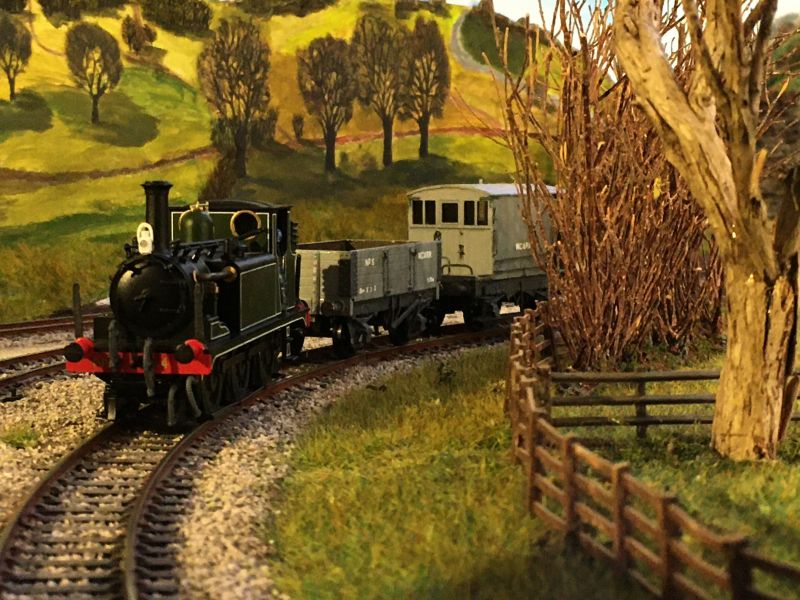
The goods component of this train were mostly PO wagons of various motley types plus #18 ex GWR Taff Valley Railway 4 wheeled Coach
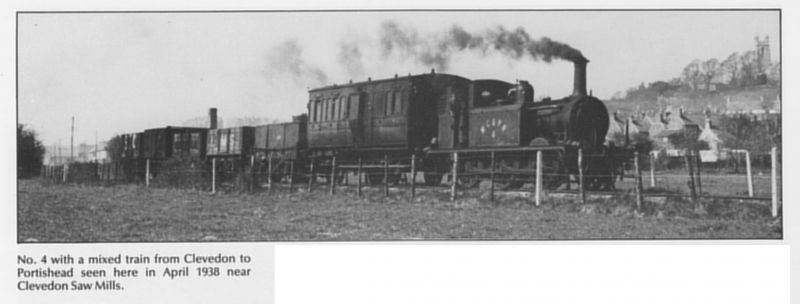
Below, #4 passing trough the centre of Clevedon with the ex LSWR close coupled #15-17.
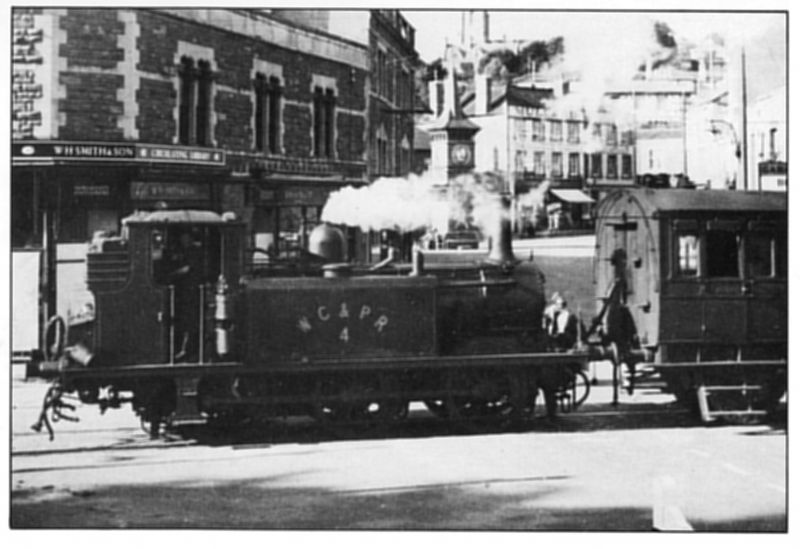
Looking back through P Strange's book makes me realise what a little gem was lost with the closing of this railway.
Photos reproduced from the out of print “Weston, Clevedon & Portishead Railway", by Peter Strange ISBN 0906294 19 3 Published 1989 by Twelveheads Press, with the approval of the publisher.
Last edit: by Colin W
Posted
Full Member
Last edit: by Colin W
Posted
Full Member
'Petermac
1 guest and 0 members have just viewed this.