OO Gauge - Latton Fields
Posted

Banned
Branch Line - Roundy, roundy with some shunting
Is that going to be the new GWR green Ed ??If so, don't foget the little orange stripe along the top and the big chrome GWR on the side…
Cheers, Gary.
 Last edit: by spurno

Posted

Inactive Member
All I can do is agree with the other guys. What you are doing looks great. It takes a long time to get through it but get through it you will and then the time spent seems less important.
:cheers Gormo
Last edit: by spurno
"Anyone who claims to have never made a mistake, never made anything!!"
https://sites.google.com/site/greatchesterfordmodelrailway/home
https://sites.google.com/site/greatchesterfordmodelrailway/home
Posted

Site staff
Now you've mentioned it, the BR blue colour the Class 31 comes in isn't that far off garter blue :hmm
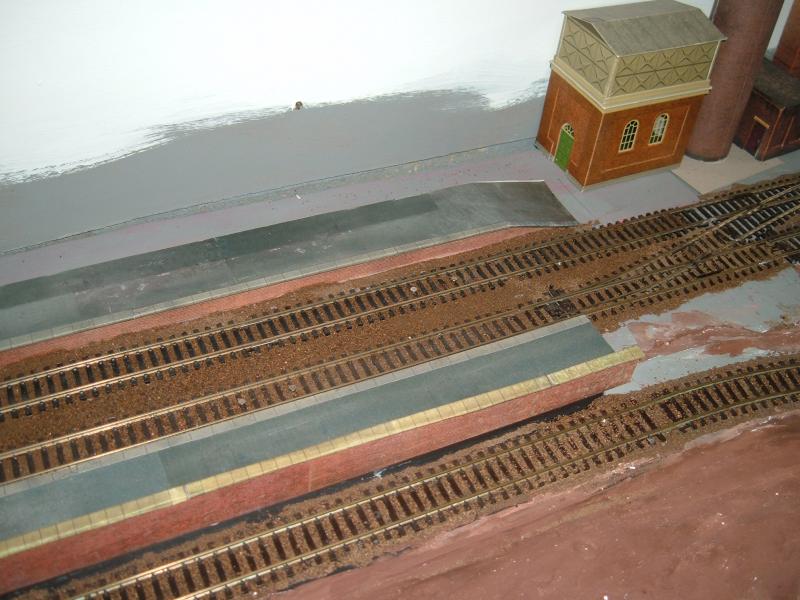
Thanks Gormo, I've actually done a bit more than is in the last picture and I'm now working on the platforms ramps, so it is beginning to look like I've actually covered some bit of base board with something resembling scenery.
Ed
Posted
Site staff
http://yourmodelrailway.net/view_topic.php?id=11121&forum_id=21&jump_to=249681#p249669
This is the original set-up at the beginning of August with just one magnet each side for uncoupling, stuck to the top of the sleepers.
Now replaced with three magnets each side of the gap, slightly off-set.


(Towards bottom left of the above picture, you can see the magnets still stuck to sleeper tops on platform 2.)
Just need to clean it up a bit and tidy up the ballast.
This works a treat and it's now much easier to find the uncouple spot, thanks Gormo :thumbs:thumbs:thumbs
Ed
PS Was going to do a short video but my batteries have dried up (story of my life
 )
)
Posted
Guest user
Get them charged.
sounding encouraging though. I'll need to wait until I get back home to see if these can work with Kadee's. I'm hoping so as it will be easier to install these wherever required.Let the playing commence.
Cheers
Toto
Posted
Inactive Member
You`ve cracked it !!
I see you`ve left a gap between the two banks of magnets. That should work OK, because in effect, you`ve expanded the total uncoupling area. I have no gap on my system. You must keep me up to date and let me know how it goes with some further testing.
Well you`ve done the hard part now…..you`ve made it work….brilliant.!!!!
All that may be necessary now may be some fine tuning with the staples. You may find when setting up a wagon or a loco that it works perfectly well when facing in one direction. Pick it up and rotate it 180 degrees and check it running in the other direction and sometimes possibly one or both couplings don`t work as well. It`s just a matter of a slight adjustment downwards on the staple and usually that`s it. If it works well in the second direction it should still be quite OK in the first direction. These are subtle changes and quite easy to do.
I have also thought that some sort of jig may be helpful to line up the magnets, so that they are all consistent. It could be as simple as a length of card that will fit between the rail and the magnet so that the magnet will always sit at the same distance from the rail.
I`ll leave that with you……you may already have a sytem…..if you do, please let me know and if I come up with something I`ll let you know.
Well once again, I`m very pleased that you`ve got this thing to work. It`s a good system and I`m sure it will give you many hours of fun.
:cheers Gormo
"Anyone who claims to have never made a mistake, never made anything!!"
https://sites.google.com/site/greatchesterfordmodelrailway/home
https://sites.google.com/site/greatchesterfordmodelrailway/home
Posted
Site staff

Just been doing some more testing Gormo and three magnets is definitely better than two. It still works with two, but it's much more difficult to get the wagons/loco in exactly the right place.
I'm just positioning the magnets by eye. Drill a hole for (in my case) the screw, in about the right place and as the head of the screw is very slightly a larger diameter than the magnet you can move the magnet about a bit. Now they're in the right place I just need to re-apply the ballast to hold everything firm.
On the ballast front, I had a problem with one of the points in the goods yard gradually getting stiffer until finally it wouldn't move via the slide switch.
It can only be where I'd ballasted the goods yard and the PVA mix was drying out, it was shrinking and squeezing the GEM Mercontrol wire in tube system so that the wire was too tight in the tube :thud
I dug up the ground cover where the tube ran like a narrow trench (looked a bit like road works), re-stuck the tube and then covered the 'trench' with card.
I've now covered the card, the point now works and yet again I'm waiting for the glue to dry.
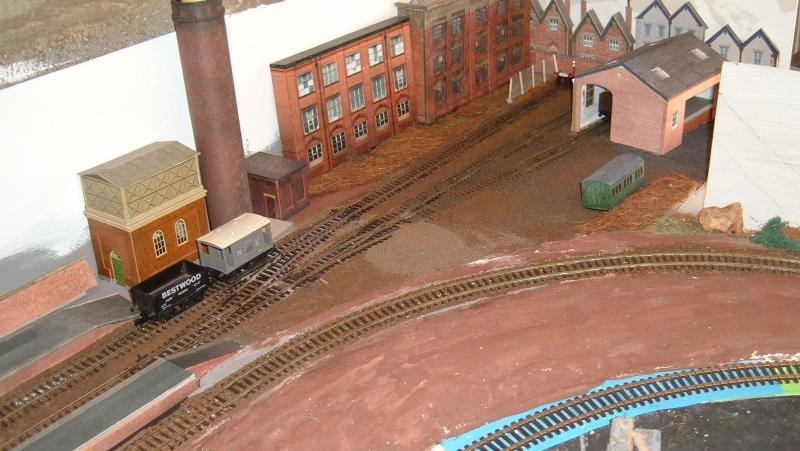
Also temporarily stuck a piece of very roughly made chain link fencing between the warehouse back and head shunt to see what it looks like.
Ed
Posted
Inactive Member
Sounds like you`re on top of the magnet set up. When you get a moment you should try the closer spacing (3 + 3 no gap in the middle ) on your test track. Like this but obviously using the new method with screws etc.
I think it allows a reasonable range of movement backwards and forwards for a wagon over the sweet spot in the middle and guarantees that you don`t have to be exactly in the right position every time to uncouple. The gap in the middle you`ve set up seems to me to be a small dead zone, however I have not tried it that way and your testing shows that it works……so maybe I`m talking rubbish???
Anyway I`m sorry you`ve had to re-visit some areas to free up points and tubes etc…but just remember it`s all new, nobody has built your railway before, so you learn as you go and sometimes you have to go back and fix things. We all do that mate!!
Keep up the good work…..it`s coming along very nicely.
:cheers Gormo
Last edit: by spurno
"Anyone who claims to have never made a mistake, never made anything!!"
https://sites.google.com/site/greatchesterfordmodelrailway/home
https://sites.google.com/site/greatchesterfordmodelrailway/home
Posted
Site staff
Just taken delivery of some No 2 x 6mm screws so I'll try leaving the gap out.
I'm not sure it will improve uncoupling as you really want the magnet to be pulling on the tail of the staple and preferably not on the end of the staple where it's attached to the bar part of the uncoupling hook.
Only one way to find out.
Ed
Posted
Inactive Member
I think with the no gap method……and you might disagree here???…..that if both wagons are over the very centre of the uncoupling zone, you are able to move the wagons a good distance either North or South of the centre before the coupling hook drops down.
Now you may prove me totally wrong here and if you do I`ll have to re-arrange my magnets and try your method……either way……it`s a win, win situation.
:doublethumb
:cheers Gormo
Last edit: by spurno
"Anyone who claims to have never made a mistake, never made anything!!"
https://sites.google.com/site/greatchesterfordmodelrailway/home
https://sites.google.com/site/greatchesterfordmodelrailway/home
Posted
Site staff
Bit of a nightmare exclam:
My test track is the steel track that came with the Hachette coach (waste not, want not), so the magnets keep wanting to attach to the rails.
On top of that the screws I've just bought are so small that the magnet doesn't hold too well and wants to jump to the rails again or the adjacent magnet.
I used another couple of nails finally in the test track and found that I need a gap of four sleepers between magnets for opposing coupling hooks to rise on these particular trucks.
This is where they are/need to be on my platform uncoupling section.
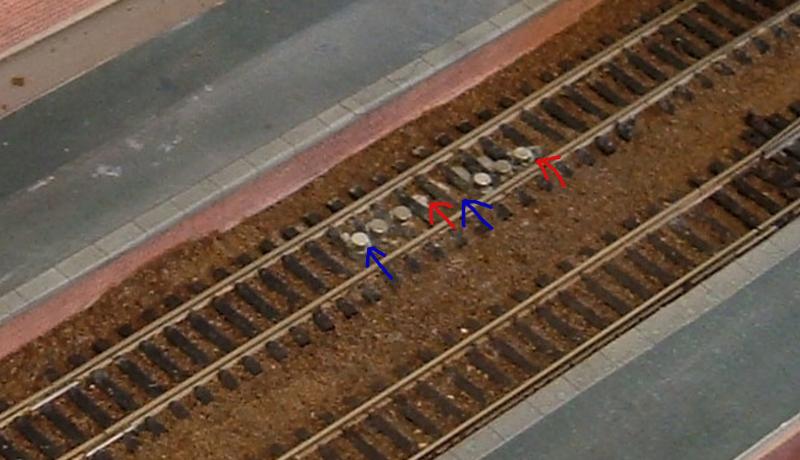
The red and blue arrows indicate where the magnets need to be for both staples to be pulled down and the hooks up, as the staple reaches the first magnet in each direction.
So you're quite right, there shouldn't be a gap in the middle but you probably need four magnets otherwise one hook will always raise before the other.
Hope that makes sense.
I'm going to start adding staples to other rolling stock such as coaches, to check this still works as it's obviously dependant on the length of the couplings.
I also now need to source some more screws as I can't use nails on the layout because they'll stick through the 6mm MDF base board.
Ed
Posted
Inactive Member
Ok…..I think the test track having steel rails may distort the magnetic fields and possibly give you a compromised result. So I wouldn`t rely on the test track for this testing.
Four magnets each way is a good bet. It would help to overcome issues with the coupling bars raising at the right time. When you paint these magnets ballast colour or rail or sleeper colour or whatever, they will practically disappear, so numbers are not too important visually.
There is something else you should try( not on the test track) and we`re back to the staples again.
Just take one wagon and roll it backwards and forwards over one set of three or four magnets to see how it performs.
The coupling bar should raise once it hits the magnets and then go down once it has passed over them, as we all well know. Then roll it backwards and the coupling bar should raise again when it reaches the magnets and drop down when it clears the magnets.
In other words it should perform pretty much the same in both directions.
If it doesn`t you may need a slight adjustment to the staple.
Rotate the wagon 180 degrees and check the other coupling.
If the coupling bars raise properly in both directions, as suggested above, then the staples must be in the correct position.
You would think logically if it works properly in one direction then it should work exactly the same in reverse, but this is not always the case, so it`s worth checking. How do I know this….Hhmmm???
Anyway….good luck with it…..keep me posted….perseverance will win the day.
:cheers Gormo
Last edit: by spurno
"Anyone who claims to have never made a mistake, never made anything!!"
https://sites.google.com/site/greatchesterfordmodelrailway/home
https://sites.google.com/site/greatchesterfordmodelrailway/home
Posted
Site staff
I used the screws to add the two magnets needed in the uncoupling area and super glued the magnets to the screw heads. I've also replaced the ballast so everything is now solid, just need to paint the magnets.
With a bit of staple adjustment, all uncoupling with no problems on the magnets at the platform end.
Even managed to stick a Bachmann coupling to some old Lima open wagons with a styrene shim/spacer to get the height right.

(Must get around to finish painting these :oops: )
I've got a Bachmann ventilated van which has NEM pockets and the bent tail of the staple was hitting the pocket and stopping the hook coming fully down. Trimming a couple of millimetres off the end of the staple and a bit of bending fixed it.
In theory since I'm removing the hooks from my locos, anywhere where I'm just uncoupling a loco from a train in only one direction, I only need magnets on one side and probably only one or two.
Ed
Posted
Inactive Member
Good to hear you`re getting there….I knew you would!!!……it`s a joy when these gizmos are working well and you know you made it happen…!!!
The wagon looks greatly improved with the replacement coupling. It`s amazing how bulky the old types were / are. They worked fine but looked way to big.
Anyway well done old son!!!!…..:thumbs:thumbs:thumbs:thumbs
:cheers Gormo
"Anyone who claims to have never made a mistake, never made anything!!"
https://sites.google.com/site/greatchesterfordmodelrailway/home
https://sites.google.com/site/greatchesterfordmodelrailway/home
Posted
Site staff
Not surprising then, that now I appear to have 'cracked' the magnetic uncoupling problem some of the points are giving problems.
The point that gradually got stiffer to operate in the goods yard and that I assumed had a problem with the GEM Mercontrol tube squeezing on the wire, so I dug it up and recovered it last week, became stiff again :thud
After much digging up again (including part of the embankment), I found that on gently pulling on the tube there was a gap. I probably used more than one piece of tubing initially which was fine when butted up together and stuck down, but where I've been moving things around the gap had opened up. (Apologies for the reddish pic).

So I re-routed a new wire over the embankment.
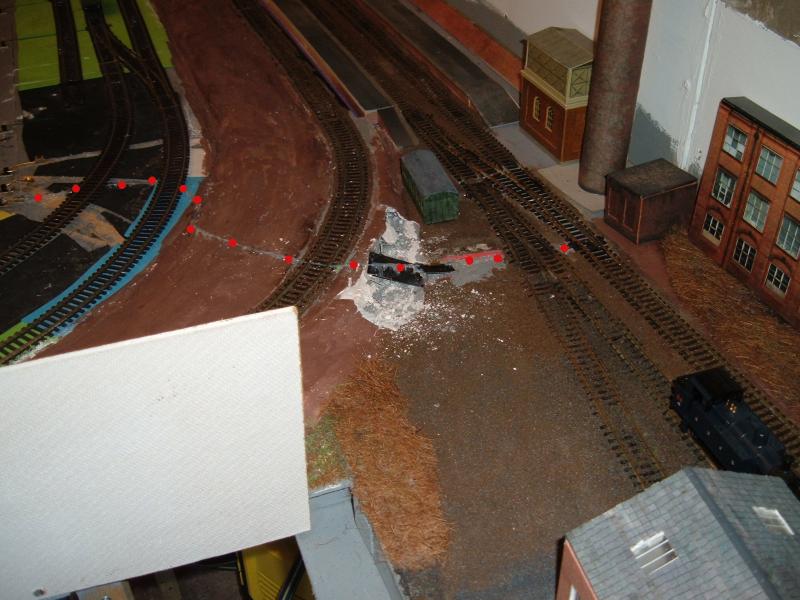
Red dots show the path of the wire and I know it can be covered with scenery, but it's 'orrible and still a bit stiff to operate.
The point next to it leading to the goods shed and siding will only allow the Jinty sitting in the siding to cross without stalling if it's absolutely 100% clean. Not easy in a garage environment and I can't clean the track every time I want to use it.
At the other end of the station, the crossover of two insulfrog points that haven't had my additional wiring added, won't allow the Jinty, N2 or any other 0-4-0 or 0-6-0 to cross without stalling, however clean they are. (Jinty at the stall point).
The J11 with it's extra pick ups and the Class 31 can both traverse all the points no problem at all.
So, I could try and pull up the crossover insulfrogs without damaging the platforms and the dodgy one in the goods yard, and replace them with electrofrogs (now £9.50 each from Hattons), or I could stop running any 0-4-0s and 0-6-0s through the station.
However, if I pull up the dodgy point in the goods yard, I might as well replace the other two insulfrogs as well.
So we're now talking five points at £9.50, and I've still got to sort out the wire-in-tube over the embankment.
I could also of course rip it all up and start again, or forget it and take up stamp collecting :hmm
Ed
Last edit: by Ed
Posted
Guest user
I'm not surprised the wire in tube is stiff if it's going up and down the embankments.
Don't rip it up. t worst, maybe a bit more cosmetic surgery than you would like but no more than that. Far to much time and effort put in now Ed and it looks the part.
Just a setback …….. Take it from the king of setbacks.
Carry on Sir. :thumbs
C'mon the Latton Fields.
Toto.
Posted
Site staff
Can't go under the baseboard with the wire in tube for various reasons and I really don't feel like demolishing the embankment.
There's also the points problem, so I'm undecided what to do.
Ed
Posted
Guest user
Stand back for a while, then go back to it with a more optimistic approach. You could still make careful alterations to the embankment. Not demolishing it. The good think is that any carefully executed " surgery " could be hidden by filling and covering with plaster and scatter. Keep with it. I'm sure some of the more qualified can suggest exact courses of action and will be along shortly.
Keep your chin up
Cheers
Toto
Posted
Guest user
) and take a fresh look. On keeping your layout dust free, go to the garden centre and buy some of that garden fleece stuff , you can buy it by the MTR its really light weight and you can drape it over the layout when not in use to keep dust off and are you using Isopropyl to clean your track ? It seams to help with oxidation on the rails so less cleaning required.not trying to teach granny to suck eggs mate , just lobbing in some ideas
Cheers
Matt
Posted
Site staff
I've decided I'm not replacing any points (well not yet anyway), as that is admitting defeat.
Took the body of the Jinty and cleaned and checked the contacts and it still didn't like the siding or the point, until I cleaned it yet again with IPA. Now it's OK, but how long for I don't know.
It's not really dust I'm getting a problem with, it's just general tarnishing of the rails due to the atmosphere. There is a gap between the top of the garage door and the lintel covered by an off-set fascia board. You can't see through the gap with the door shut, but obviously the garage is open to the outside air. (Probably built like that to stop people gassing themselves with car fumes). It's almost like having a garden railway, but without the flowers and rain.
Been looking at point motors and also Bowden cables. It might be that Toto's idea of under the baseboard could be a possibility with this particular point.
I've removed the wire in tube from over the embankment and will now continue to cogitate
Ed
1 guest and 0 members have just viewed this.