OO Gauge - Latton Fields
Posted

Inactive Member
Branch Line - Roundy, roundy with some shunting
Ok,Well I agree about running some colour along the edge of the paper. Felt tip is fine but can bleed, however there are other alternatives such as crayon, colour pencil, water colour pencil which might be worth a go too.
There is a method that was used for splicing old audio tapes that gives a very accurate join.If you have parts A and B to join, overlap them at the join and make sure they are laying in a straight line along their length. It might be good to butt the two pieces of paper up to a straight edge to make sure they stay in line. Then lay a straight edge over the overlap at an angle, a diagonal if you like. Cut through the two layers of paper. Now the two pieces should slide together to form a perfect join. I would suggest a glue that allows a bit of slip for perfect alignment.
I think the diagonal join may even be less obvious to the eye or the camera.??
I would try it out on some plain paper before sacrificing your Scalescenes paper, just to make sure it works OK.
:cheers Gormo
 Last edit: by spurno
"Anyone who claims to have never made a mistake, never made anything!!"
https://sites.google.com/site/greatchesterfordmodelrailway/home
https://sites.google.com/site/greatchesterfordmodelrailway/home

Posted

Site staff
Might have been better to have used the paving slab type of surface as opposed to tarmac, as it's probably easier to disguise the joins between the sheets.
I went for tarmac as that's what appears to have been used on Great Eastern station platforms around here, since the layout is (very) loosely based on GER.
Ed
Posted
Inactive Member
Well if the tarmac doesn`t work out in the end…….use artistic licence and go for what does work for you…….your railway……your rules…
By the way the platforms are looking good and also the low relief buildings.!!!
:cheers Gormo
Last edit: by spurno
"Anyone who claims to have never made a mistake, never made anything!!"
https://sites.google.com/site/greatchesterfordmodelrailway/home
https://sites.google.com/site/greatchesterfordmodelrailway/home
Posted
Site staff

The platform bases are bits I've cut from an old shoe rack that was being thrown out.
With the card platform surface they work out at just the right height.
(Your practise of not throwing things out and recycling must be rubbing off.)
The buildings are just a couple of cheap kits to mark where the actual building will be, as I'm going to attempt building something from plastikard (styrene) eventually.
Ed
Posted

Full Member
You need to tear away from the printed side so that you don't have the white tear edge on the printed side.
Hope this makes sense
Cheers
Andy
Andy
Posted
Site staff
I've another platform to do anyway, but I've got side-tracked with more changes to the goods yard layout (as you do :oops:)
Ed
Posted
Site staff
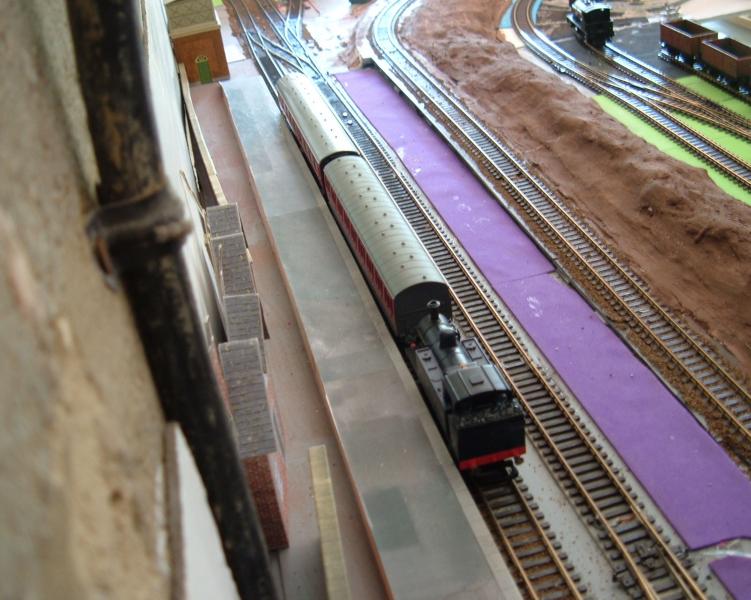
The joins in the platform surface paper don't actually look too bad from a distance.
Once I've done a station building added some platform 'furniture' and the odd person I might get away with that.
Apologies for the large wire in the foreground, (it's the mains supply to to the house), but I've found my small digital camera is invaluable for taking pictures to check clearances etc. in places I could never get my head.
Platform 2 is next and I'll try cutting the surface paper at an angle or tearing it this time, as has been suggested.
Ed
PS The only reason I'm doing these now, is because the Superquick and Dapol ones I had as markers kept moving every time I cleaned the track, which is quite often in my garage environment.
Last edit: by Ed
Posted
Guest user
Looking very good. The whole layout is filling out now and is looking very busy. I like the embankments.
Good stuff
Toto
Posted
Site staff
Think I'd get a lot more done if I didn't keep swapping tasks though.
I was originally practising making dumb buffers out of Milliput for my pug conversion, on an old Hornby 4 wheel coach chassis.
Then I decided the goods yard didn't look right and re-arranged some of the track work, at the same time starting to re-cover the Goods Shed roof with some Scalescenes tile paper.
Then I cleaned the track to get a train to run and the old platforms moved yet again, so I started putting fixed platforms in.
Now I'm building a quick (cheap eBay) warehouse kit to replace the factory opposite the Goods Shed.
I'll try and get platform 2 done after that, but the nameplates for the pug conversion turned up yesterday, so I ought really to be getting on with that :thud
Ed
Posted

Full Member
Cheers
Ron
Proper Preparation makes for Perfect Performance!!
http://yourmodelrailway.net/view_topic.php?id=13331&forum_id=21
http://yourmodelrailway.net/view_topic.php?id=13331&forum_id=21
Posted
Site staff
Posted
Guest user
Posted

Banned
I suspected that you would be out in the street having a beer, a song and a dance after listening to the cricket… :thud
Cheers, Gary.
Posted
Site staff
Anyway, there's another four matches to go yet and it does rather make the whitewash we got eighteen months ago a bit more bearable.
Talking of beer, it's 1:00pm here, Sunday lunchtime. That's a good idea :thumbs
Ed
Posted
Full Member
Cheers
Ron
Proper Preparation makes for Perfect Performance!!
http://yourmodelrailway.net/view_topic.php?id=13331&forum_id=21
http://yourmodelrailway.net/view_topic.php?id=13331&forum_id=21
Posted

Full Member
In truth I dont think it matters that much. Blacktop/ tarmac is rarely, if ever, perfect. Its usually littered with retro patches etc. As it happens I have been forced to replace some of mine which got exposed to too much sunshine:oops: and I made a virtue of necessity by patching rather than attempting a perfect fit.
Platform clutter and passengers artfully positioned will hopefully conceal anything too horrible
Kind Regards
John
Posted
Inactive Member
That platform looks Ok to me. As has been said, when you populate the area, the joins won't be noticeable.
Lookin' good!.
Cheers
Gormo
"Anyone who claims to have never made a mistake, never made anything!!"
https://sites.google.com/site/greatchesterfordmodelrailway/home
https://sites.google.com/site/greatchesterfordmodelrailway/home
Posted
Site staff
Friendly rivalry Ron.Didn't reckon on an Aussie to mention the cricket! (That we won!!)
Cheers
Ron
http://yourmodelrailway.net/view_topic.php?id=12139&forum_id=75&highlight=cricket
Thanks John and Gormo, I might just be being too self critical.
I'm sure your right and it will look better once populated.
Meanwhile back to platform two which now looks too low, although it's exactly level with platform one :???:
I think it's because I've had to leave a slightly bigger gap between the edge and coach sides, to allow for the coach overhang as they enter the loop.
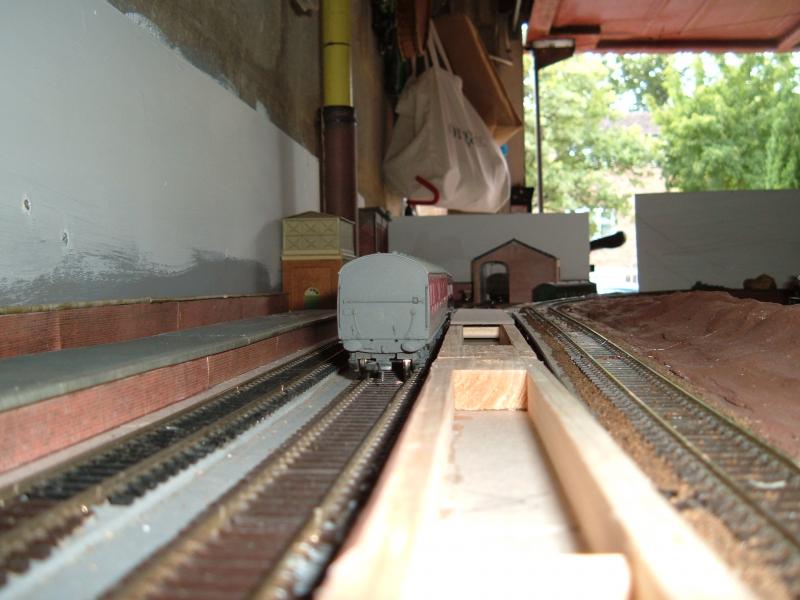
I've tested by adding some off-cuts of 1mm card under the platform surface to raise it and it looks a bit better, so today's job is cut some proper lengths to glue between the frame and the top.
Ed
(PS Not so worried about the visible joins in the brick paper on the platform face of platform one, as strategically placed weeds etc. should cure that problem.)
Posted
Guest user
good idea with the weeds. Don't forget cable trays or even just hanging cables. I've seen that on many an occasion. They do look good though. Nice work.
toto
Posted
Site staff
Cable trays are going to be too modern, so it looks like cable hanging on clips or possibly concrete trunking (conduit) half buried in the ballast.
Then there's the telegraph poles to consider :pedal
Ed
1 guest and 0 members have just viewed this.