OO Gauge - Bidley Terminus
Posted
#149948
(In Topic #8302)

Inactive Member
BR Green Diesel - Computer Control
I started constructing this layout, constructing benchwork and laying track around the turn of the century (at least I think it was this century.)
A track plan based on a Cyril Freezer Terminus layout was developed and drawn in track planning software. The plans were printed out full size on A0 sheets and the lines transfered to baseboards using carbon paper. If I were doing it again I think would have just stuck the sheets onto the board and built on top of them. It was certainly a lot of time tracing over lines.
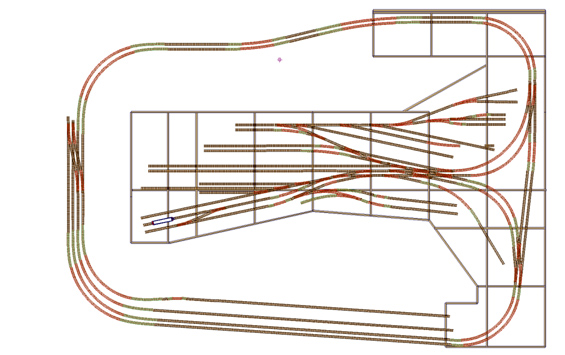
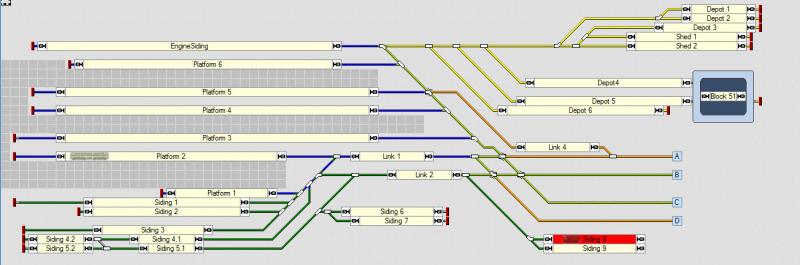
Above is the plan of the upper level.
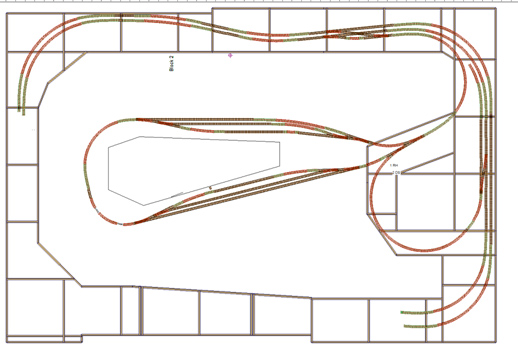
The lower level originally just contained a reverse loop, but is now being extended to contain concealed sidings / fiddle yard under the terminus.
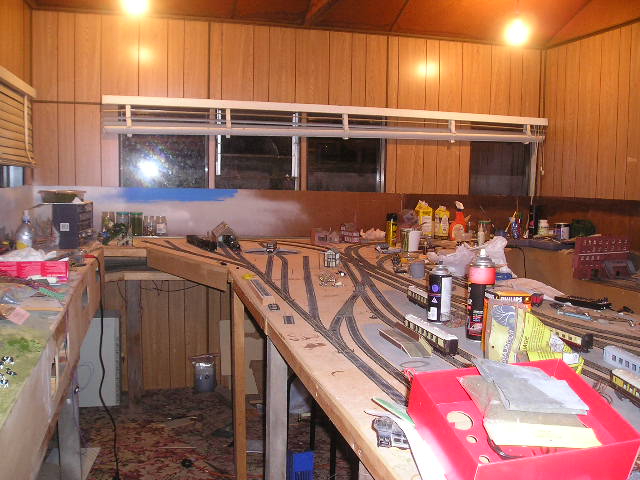
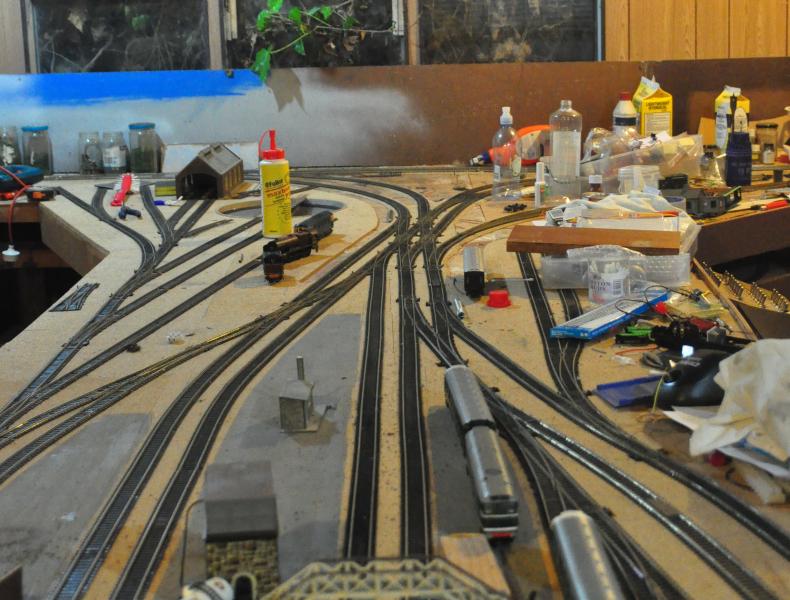
The picture below of the main terminus was taken at the end of 2004. Progress has been somewhat spasmodic.

Not too much visible progress by 2005; although the mess has diffused to different locations.
Most of the spare time through this period spent on the layout was trying to construct a diode matrix to set routes through the pointwork. It was too problematic trying to do this by eye (especially through the double slips). Unexpected derailments were so frequent that they were actually expected.
There was quite a long pause after this time where I worked out how I would control the layout and aquired the necessary bits and pieces and software to make this a reality.
This was always intended to be a layout that focussed on operation rather than modelling fidelity. In short I always wanted to make something that was complex.
Having settled on Railroad & Co, Train Controller as the software, I developed my switchboards in the software. (two linked boards, one for the terminus and one for the main line)
This is the mainline switchboard
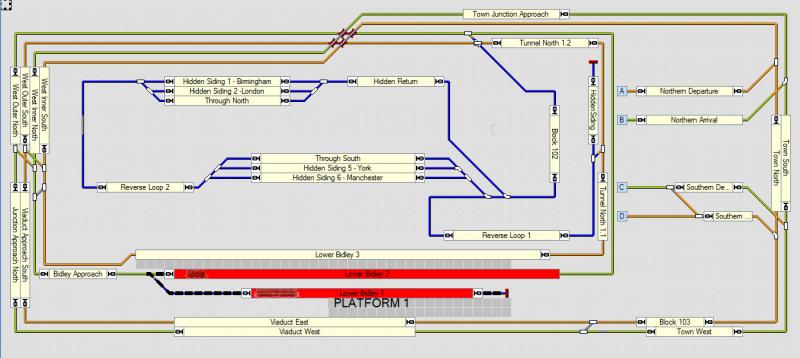
And this is the terminus switchboard. The connectors A,B,C & D link the two switchboards.
From the outset the layout was Digitrax DCC; even when I was blowing up CDU's with my diode matrix route control experiments, so at least I didn't have to splash out on a command station when I plunged into computer control. I opted for current sensing occupancy detectors and a Tower Controller from RR Cirkits, with a mixture of Lenz and Digitrax accessory decoders for point control.
All the original wiring was removed and has now been rewired with a proper power bus. I had each section wired back to on off switches on the control panel originally. This was great for fault finding because I could turn all the sections off and switch each one back on one at a time, until the shorting section was identified. However this was hopeless for block occupancy sensors. Bundles of power cables created cross talk with phantom detection of trains occurring constantly,
Installation of wiring for power, occupancy detection and point control has taken place through the last part of 2012 and will be completed in the next couple of months after I receive my second Tower Controller (I'm now past 64 blocks) and three more DS64's for the hidden fiddle yard points.
Testing has shown me that with reliable rolling stock the system and the layout can handle multi train control perfectly. My Bachmann Class 47 glides through the complex pointwork and will stop inch perfect at it's intended destination. My old Hornby Jinty is another story all together.
I haven't taken any pictures of progress for some time; but as the wiring is nearly completed I will soon be moving back on to buildings and scenery, In the meantime here is a picture of part of the mainline. More pictures will follow in time.


Posted

Inactive Member
Have you upgraded to V 8?
Max
Port Elderley
Port Elderley
Posted

Banned
That is some layout you have. DCC is something I'm still learning, but it seems like you have it all worked out ! Can't wait to see more pics of the layout.
Cheers, Gary.
Posted
Inactive Member
Yes I have upgraded to V8. Still not really got to grips with the subtle improvements. Being a Digitrax user I have to re-profile all my engines to make them behave as intended again. Only 2 done so far.
Posted
Inactive Member
I lost all of my Trainanimator pictues, so I'll have to basically start from scratch. I upgraded my TC laptop and somehow lost my Track Plans and Schedules.
Still it will be fun starting from scratch - again. :roll:
Max
Port Elderley
Port Elderley
Posted
Inactive Member
It's encouraging to see another TC user's layout. Mine is nowhere near as ambitious as yours and I am tending to concentrate on signalling.
Regards,
Brian
ECoS, Laptop, TrainController Gold v8
Brian
ECoS, Laptop, TrainController Gold v8
Posted
Inactive Member
Hi Peter,
It's encouraging to see another TC user's layout. Mine is nowhere near as ambitious as yours and I am tending to concentrate on signalling.
I have a digitrax SE8C signal decoder in the cupboard, but I haven't really decided how I'll use it yet.
It was this section of track at the entrance to my station that convinced me I needed the computer to control my points. Surprisingly most things manage to negotiate the large rail gaps you can see between the double slips. I intend to fill the gap with plasticard before ballasting.

The picture below shows this junction in the overall context. I can't for the life of me think how I'll signal this bit so I'll probably just have platform starters and place some signals on the main line.
I now realise that my layout looks better from the underneath than it does on top. I'll soon have to do something about that! The ivy growing in the window is quite attractive though.
This crossover on the mainline probaly lends itself to some proper signalling. This is the point where the figure 8 meets , i.e the double track going down reaches the same level as the double track going up. You can use this crossover to keep a train going on the round and round baon the lower level without it coming up to interfere with the main station entry junction.

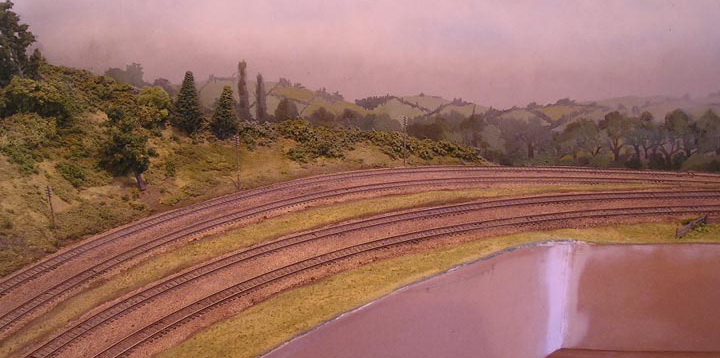
The back scene painting uses my patent technique. Splash some paint on to represent fields trees and sky and then fade it all out by overspraying with a spray can of grey car body primer. I think the whole thing took less than an hour. The unkind might say that it looks like it took less than an hour. The picture below makes it look very pink, but in reality it is more of a pale blue. You can see the blue I used before "fading" it on the unpainted hardboard panels a couple of pictures above. I didn't want to have anything too defined in the background, but I've now seen how other people are making such good use of digital photographs to create stunning backgrounds that blend with the scene; so I may revisit that. But probably not this year.
Peter
From Auckland, New Zealand modelling a little bit of England
Posted
Inactive Member
I am beginning to appreciate the complexity of your layout: It has taken me 15min or so to match the photos and the switchboards and run my finger around the possible routes, counting the blocks as I go. I see what you mean about the signalling.
I think the backscenes are very effective. I will find some scrap hardboard and give it a trial.
Regards,
Brian
ECoS, Laptop, TrainController Gold v8
Brian
ECoS, Laptop, TrainController Gold v8
Posted
Inactive Member
I agree with Brian, back scene looks great, I must have go on my plain white boards.
Kim
 Last edit: by SoundandDirty
Posted
Inactive Member
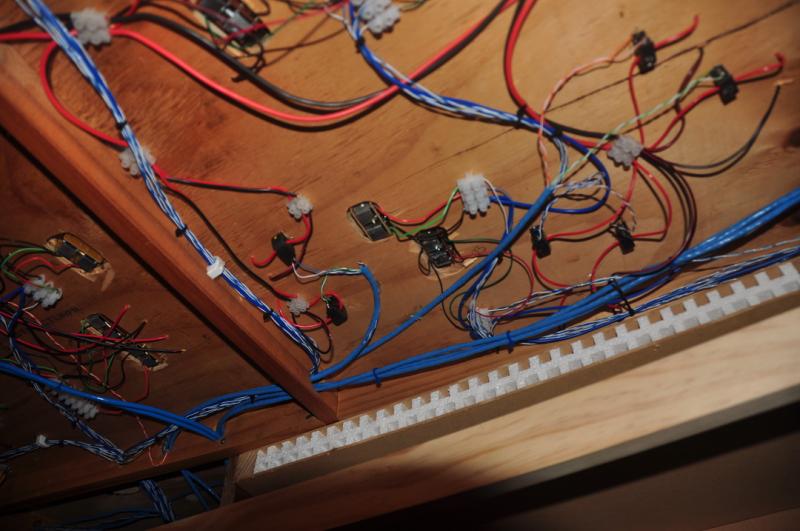
Much more colourful. Blue CAT5 cable to the current sensing coils for occupancy detection, red a black DCC power (thick red and black is the main DCC power bus) and blue and white twisted pairs to the point motors.
This is the main distribution panel that is fixed verically to a couple of the table support legs.

A Digitrax Command station, an RR Cirkits Tower controller and its' BOD 8 occupancy detector boards and a mixture of Digitrax DS64 and Lenz LS150 point decoders. Most of the wiring is fed in from the back,
This is the back side of the panel. A removable panel with ventilation grilles will hide this wiring when the wiring is complete.
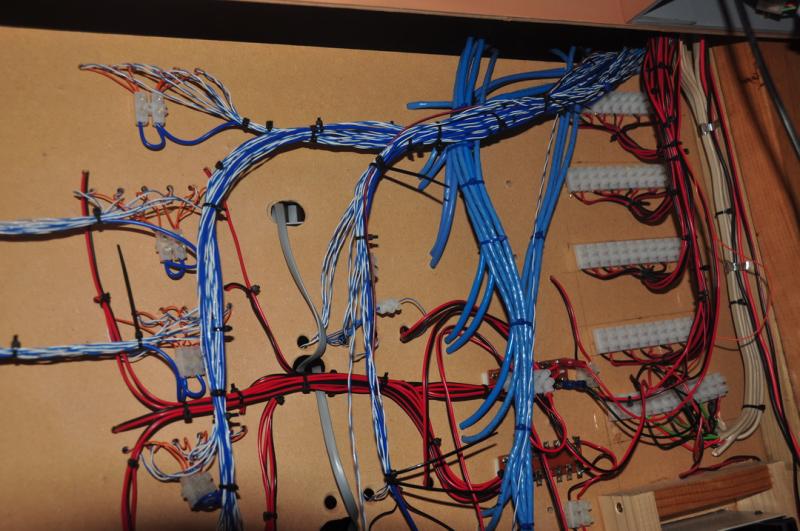
The red and black wiring to the chocolate block connectors on the right hand side is all redundant. My original idea was to switch power at the consol to 24 separate sections of the layout. I thought this would be great for fault isolation. Turned out to be a very bad idea if you are using current sensing coils. I may use the switches and connection points for layout lighting, if I don't hand lighting over to the computer to control as well.
The redundant switches can be seen on the control panel beyond the PC. Only four of the switches actually do anything now.

I still have to install a second Tower Controller ( the first one is maxed out) and three more DS64's. Then I can start thinking about signalling and layout lighting.
Posted

Full Member
Cheers
Ted
Ted
Posted

Legacy Member
Posted
Inactive Member
Posted
Inactive Member
The last week or so I have been distracted with playing with coach lighting. I bought 6 1970's hornby coaches of the internet a while back and thought I would use them to practice weathering, lighting etc before attempting it anything more valuable.
I discovered that white LED's on a roll of tape were very affordable. NZ$1.90 per 3 LED module. You cut them off the roll, either in a group of 3, which can then be wired direct to 12V DC (the required resistors are pre-wired into the tape, or individually, when you then need to add your own resistor.


This is the first attempt. I started with a 10K resistor. This looked very realistic in the dark, but in normal room lighting conditions you couldn't tell there were any lights installed. As I wanted to see the benefit of my labour, I reduced the resistor to 1K. The LED's are now too bright. This is especially noticeable in photographs, where you can see red glowing carriage sides and the silhouette of the seats. It doesn't really show to the eye so I will leave this coach as it is and increase the resistor to reduce the brightness on the next one.
Peter
Posted
Inactive Member
Lighting has been installed using the same technique I used in my previous post.
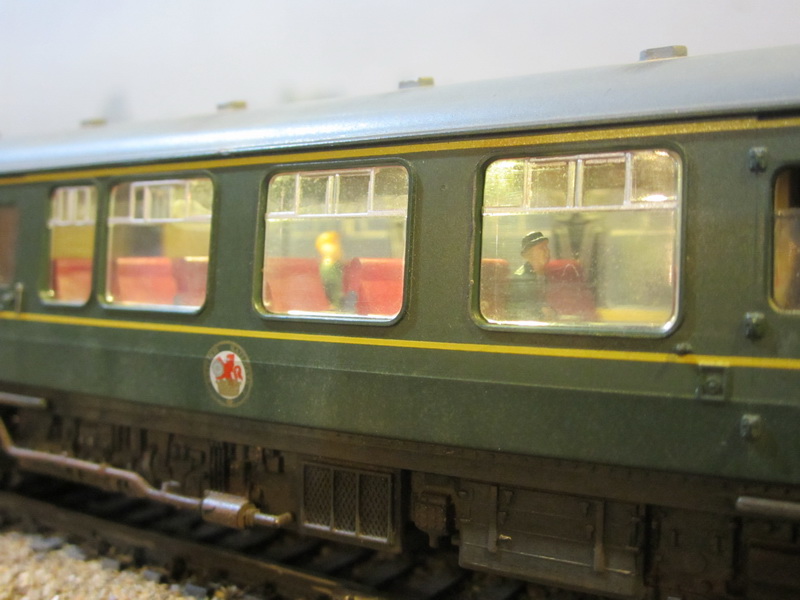
The cream plastic molded interior has been painted, with my guess on an interior colour scheme. If anyone has any colour pictures of the interior of a 110 DMU please point me to them.
I've added a few passengers to the interior. These were Bachmann HO seated passengers, although I had to overpaint some of the clothing colours. Why would they think we would want a man in a bright blue suit with a silver hat??? He is now soberly dressed in grey.
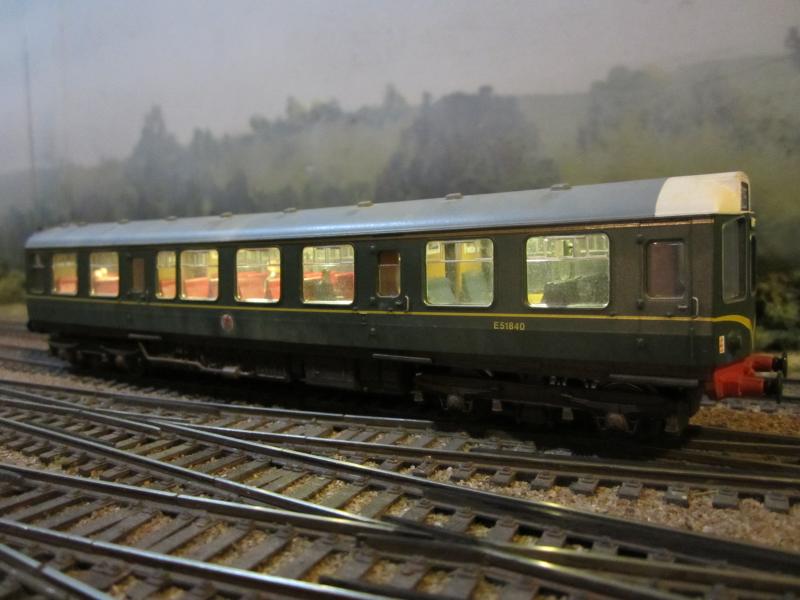
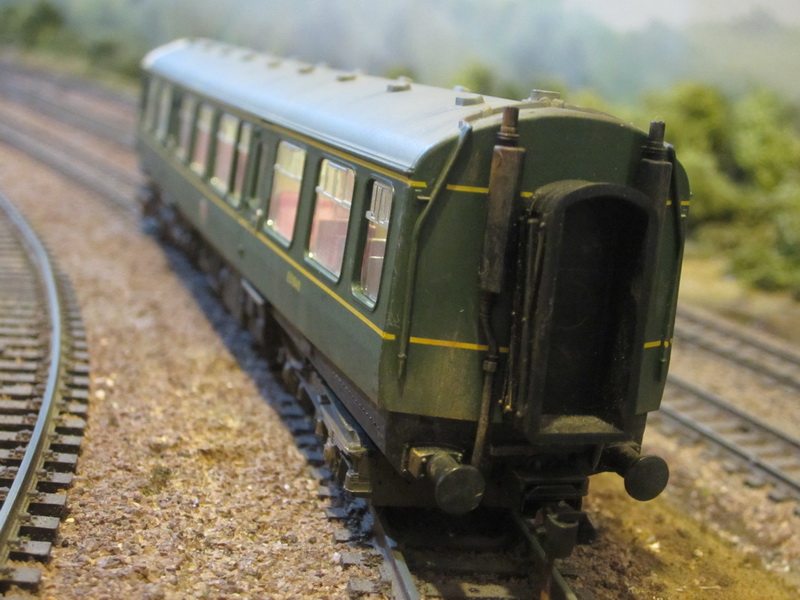
The exterior was given a bit of weathering to make it look less plasticky.
This time I don't get the glowing plastic effect I had in my previoous attempt at lighting.
I put some BR advertising pictures on the walls. You can see them if you look carefully, but at that size you can't really make out what they are.

Belive it or not, I masked the windows before doing the weathering. I must find a way of giving them a clean up.
Well one done, 5 more to go. Hopefully it should get quicker.
I must also fix that cracked buffer. I hadn't even noticed it before I saw it on the photo.

When function only decoders drop in price I will put a decoder in the toilet compartment (thats where the resistor and diode are currently hidden) thenm I will be able to turn the lights on and off and install some directional front/rear lights. At the moment it's just too expensive.
Peter
Last edit: by Wizmacnz
Posted
Inactive Member
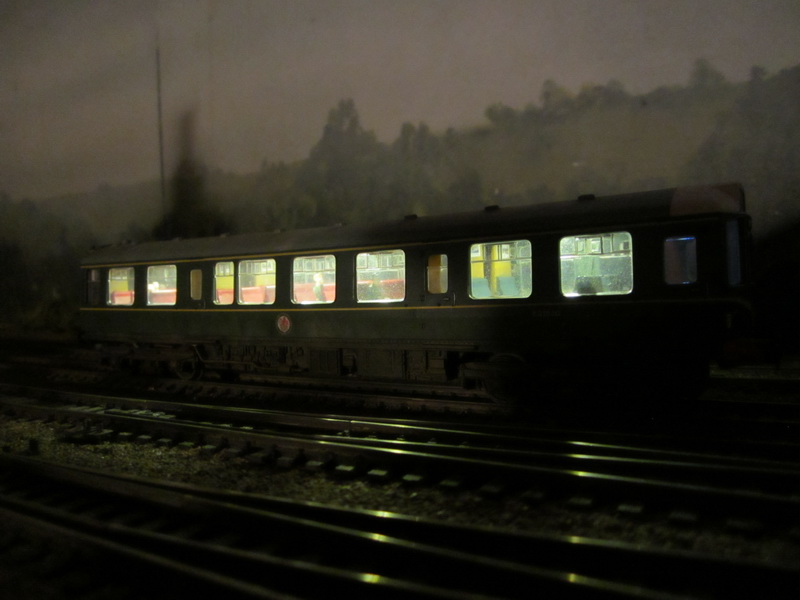
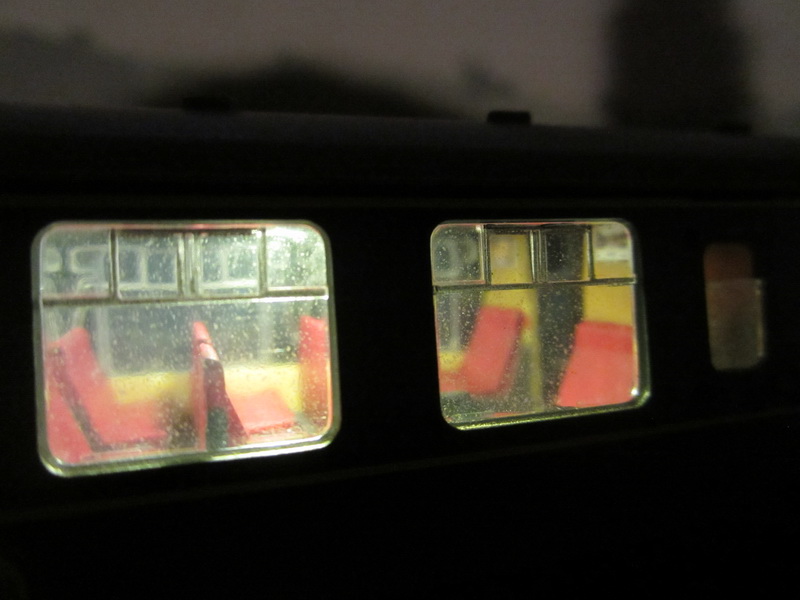
Believe it or not the window cleaners have been.
The camera can be very cruel.

I think it looks passable from a normal viewing distance and less like a plastic toy. Or is this just wishful thinking?
Peter
Posted

Full Member
Just come across this thread and love the layout. I would have loved to have built this plan but just don't have enough space.
More pics of the layout please !
Regards
Rhiwderin_Ray
Rhiwderin_Ray
Posted
Inactive Member
I was taking a look at your wiring and I am in awe!
Thanks also for your advice on that lenz return loop module.
regards,
Derek
Posted

Full Member
Posted

Site staff
I think your 110 looks really good.
Seem to remember when I traveled on Southern Region EMUs in the '60s the windows quite often looked more like the ones in your photo before you cleaned them.
Ed
1 guest and 0 members have just viewed this.