Newton Regis, it'll never be finished, hopefully!
Posted

Full Member
A GWR journey through the 1920s and 30s
Thank you John, the painting on this one was really easy, aided by its diminutive size and as the plastic was nice and shiny, the diluted off-white acrylic paint travelled speedily along the mortar joints via capillary attraction. I used a flat brush which left a slight chalky coating over the surface, which provided a subdued undercoat for the blue and brown brick pigments, the latter being dry brushed.I've just found a CooperCraft platlayer hut which will go near the signal box (also to finish), but I really need to stop enjoying myself so much with the buildings and finish the electrics!
Bill :cheers
At 6'4'', Bill is a tall chap, then again, when horizontal he is rather long and people often used to trip over him! . . . and so a nickname was born :)

Posted
Full Member
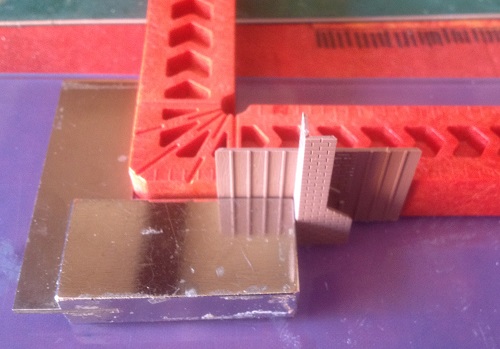
Spot on Marty, called haunching and Ratio got it right before me, although I did run the emery board over it and around the corners a bit. I also tried to add stepped paper flashings (from a Mr Wiffen kit) to the chimney, but the small size had me beat, so just ran some grey paint over the joint which will just about pass the three foot rule!The angled chimney top is to allow for water runoff, perfectly prototypical ;-)
Best,
Bill :cheers
At 6'4'', Bill is a tall chap, then again, when horizontal he is rather long and people often used to trip over him! . . . and so a nickname was born :)
Posted

Full Member
'Petermac
Posted
Full Member
Best,
Bill
At 6'4'', Bill is a tall chap, then again, when horizontal he is rather long and people often used to trip over him! . . . and so a nickname was born :)
Posted
Full Member


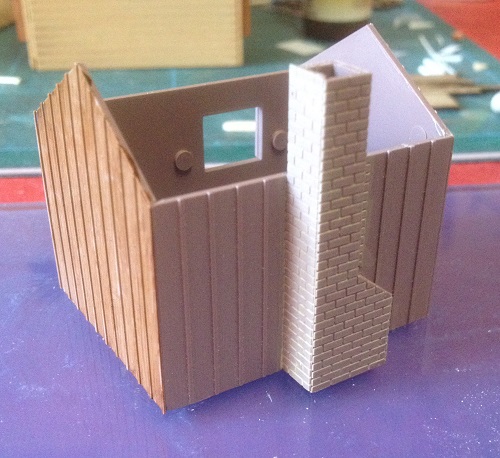

Another small kit which assembled very easily, just as I remember CooperCraft kits always did, just as the last time I built one back in the 1980s and this old kit had a complete absence of flash and also detailed instructions, including interesting prototype history notes.
A joy to build and finish, it will be sited near the already started signal box, which will now join the almost completed goods shed on the workbench.
More in the pipeline, as I'm experimenting with gutters and downpipes for the goods shed. They are far from equal and some look improbable, but I'll let you see some results soon.
If anyone has rainwater goods advice, I'll be pleased to receive it.
Best,
Bill
 Last edit: by Longchap
At 6'4'', Bill is a tall chap, then again, when horizontal he is rather long and people often used to trip over him! . . . and so a nickname was born :)
Posted
Full Member
'Petermac
Posted

Full Member
Michael
Posted
Full Member
Terry
Posted
Full Member
Thanks Peter,Good job Bill and some interesting jigs you have there ……… :hmm
I always build on a sheet of plate glass, otherwise what you are building is unlikely to be truly square and to complete the set-up, there’s the jigs, these being two complimentary sized try square devices, which can be set in a variety of ways to support component parts squarely while gluing.
Simple and effective, although I also keep a blob of blue-tac on the glass should a third hand be needed.
Bill
:cheers
At 6'4'', Bill is a tall chap, then again, when horizontal he is rather long and people often used to trip over him! . . . and so a nickname was born :)
Posted
Full Member
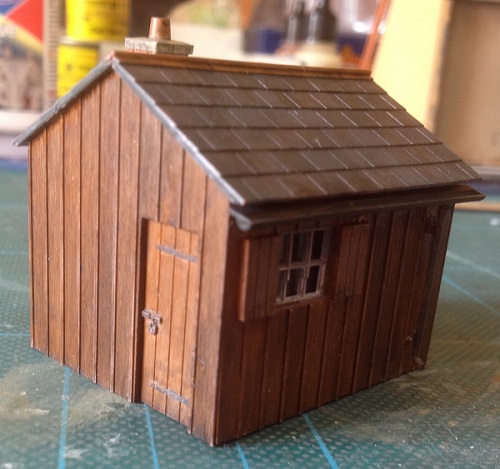
Thank you Michael,That is a lovely little kit, put together perfectly. I love the wood finish too - very authentic. The roof tile colour and the features picked out on the door just add to the realism. It may only be a little building, but it is a very fine one.
Michael
I’m a big fan of these old Cooper Craft kits and have a good stock, including a few of their road vehicles to make up. Their quality help considerably in achieving a good fit and finish.
After blending the colours, I finished with a dark grey wash, built up in darkening the sleeper walls. I’ll use some powders when finally sited to blend it with others.
Bill :)
Last edit: by Longchap
At 6'4'', Bill is a tall chap, then again, when horizontal he is rather long and people often used to trip over him! . . . and so a nickname was born :)
Posted
Full Member
Thank you Terry and it’s very much appreciated.Lovely job Bill. :thumbs
Terry
I try my best to get even the smallest things as good as I can, in the belief I may not make a complete Horlicks of the more complicated ones.
I just hope it works!
Best,
Bill
Last edit: by Longchap
At 6'4'', Bill is a tall chap, then again, when horizontal he is rather long and people often used to trip over him! . . . and so a nickname was born :)
Posted

Full Member
Its a shame that Coopercraft changed hands and the tooling got damaged/wore out. Like you I have had a lot of pleasure building their models over the years
Posted
Inactive Member
Cheers
Evan
Posted
Full Member
Thanks John,Super job Bill. You are such a neat painter, the door furniture is exquisite.
Its a shame that Coopercraft changed hands and the tooling got damaged/wore out. Like you I have had a lot of pleasure building their models over the years
I find a small rigger brush (long soft thin bristles) is best for placing just a little paint onto the smallest details, whereas a flat brush with a square cut top is just the job for the flat surfaces and is good for easy cutting up against edges of contrasting colour.
I’ve a CooperCraft platelayer's trolly which should look good outside the hut, being prepped to go along the branch before the next train arrives.
Bill
Last edit: by Longchap
At 6'4'', Bill is a tall chap, then again, when horizontal he is rather long and people often used to trip over him! . . . and so a nickname was born :)
Posted
Full Member
Most kind of you Evan and CooperCraft kits were so well designed and produced, that the assembly is easy, provided everything is glued on straight.Lovely kit and very well put together. The timber walls are a great result
Cheers
Evan
The base colour was Vallejo mahogany with some coats of grey wash over.
Bill
At 6'4'', Bill is a tall chap, then again, when horizontal he is rather long and people often used to trip over him! . . . and so a nickname was born :)
Posted
Full Member
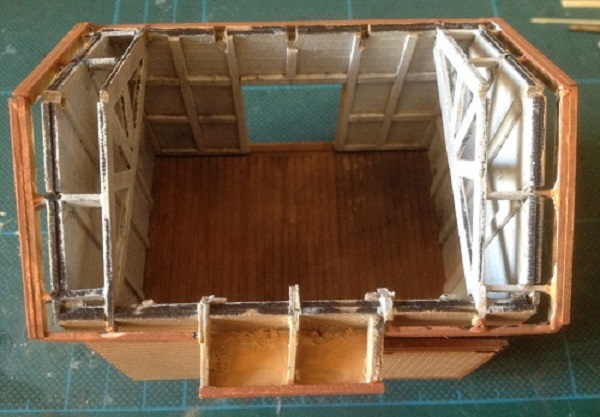
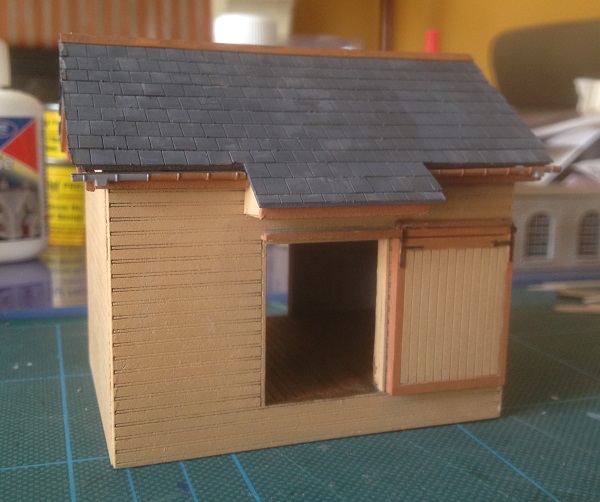
Once the primer hardened overnight, it was lightly sanded, then on with the face mask to brush two coats of GWR Tint No.2 Light stone enamel, thinned with white spirit, to all wall areas, it serving as finish colour to general timber cladding and undercoat to those parts then painted in No.3 Medium Stone.
With the doors painted, it was time for what I assumed would be the fiddliest part of the build, having earlier seen the size and fragility of the door hangers, i.e. the iron straps which bolt to the top of the doors and hang off the track on rollers. This was a correct assumption, made even more frustrating when not only had I lost both spare sliding rollers, but also one of the four remaining ones, then lost it again, once found! Yes, they are too small to be easily seen on workbench or floor when they regularly go AWOL and they were superglued into the track before escaping again.

Two MDF sections make up into L shaped overhead door runners, which contain the rollers, which in turn are glued to a bearer, which is glued to the two hangers. This arrangement enables the doors to be posed in any position along the track in 7mm scale and theoretically in 4mm. Well I tried several times and at this scale, as intimated by the instructions, it was best to finally glue the parts in place with the doors in a fixed position, having checked against prototype photographs to get the correct handing of the railside door (it’s the same end of the building as the roadside elevation shown in the instructions).
Some adjustment was made to the verge overhang of the roof boarding to better accommodate the barge boards using the ever useful wooden coffee stirrers.

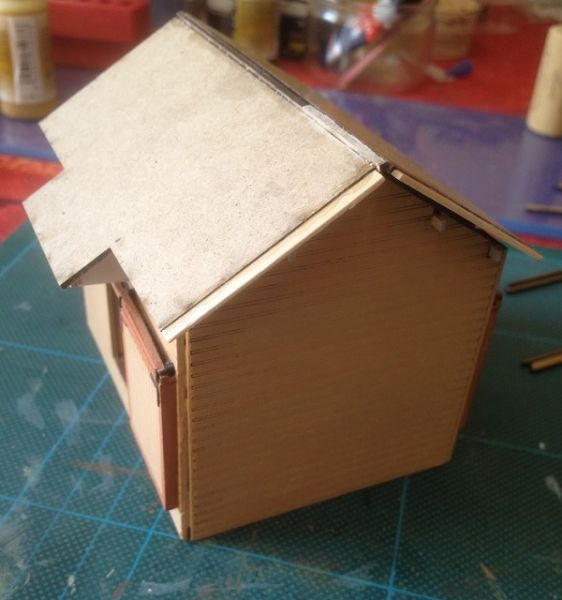
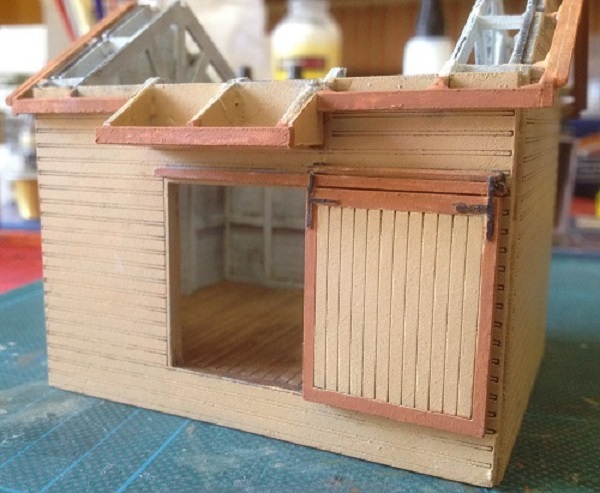
Having corrected a slight misalignment of the rear slopping roof boarding (my error) with yet another strip of coffee stirrer, followed by the satisfying task of running round the roof perimeter, fettling and fitting fascia and barge boards to eaves and verges and then priming and painting mid-stone. This almost completes the roofless building, save for the rainwater goods. The parts included in the kit for these are a tad over scale, plus the gutters are solid half round sections without a gutter channel, so a visit to the ‘assorted building bits’ box was necessary.
I’ve been trying to find effective representations of rainwater goods for some time now but not really found the one, so ordered a selection from several other manufacturers, including those from an ambitious range from Modelu. I’ll not distract from the shed build by straying into rainwater goods territory, but may post some observations later.

Blue tack again was most useful to hold the gutters in place for gluing. Unfortunately, the clearest photos I found of the prototype were from the 1950s, by which time the rainwater arrangements had been bodged beyond original recognition, so I relied on logic to place them where they realistically would have hung out.
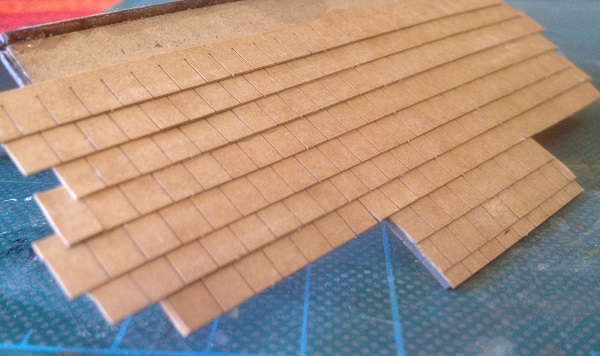
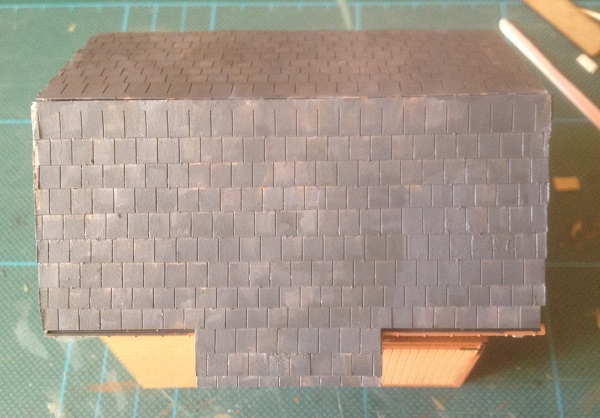
The roof slates were added using Scale Model Scenery’s laser cut strips glued to the roof with a 2mm overlap and painted first with an overall light grey wash, then all slates individually coloured with subtle shades mixed from a complimentary colour pallet of white grey, tire black and blue grey, until the roof was covered, then finished with a thin mid colour wash from the above pallet to bring everything together.
I now need to construct the loading dock before I fix the rainwater downpipes and unfortunately find myself somewhat frustrated with the normally efficient postal service having brought my package of essential parts to chez nous when we were out for a few hours getting covid vaccinations. Having been brought to our gate, it now seems to be missing from our village post office, so I need to extend the search further afield to locate the parcel, so cannot complete the finishing touches until Part 3 of this 2 part build!
So please stay tuned for part 3 of 2 to see how it’s going to turn out!
Best,
Bill
Last edit: by Longchap
At 6'4'', Bill is a tall chap, then again, when horizontal he is rather long and people often used to trip over him! . . . and so a nickname was born :)
Posted
Full Member
Now there is another coincidence, Regis was the name of the Art and Picture Framing stores we used to run.
You probably have finalised your rainwater furniture by now but if you havent Ratio used to sell quite a useful sprue of pipes and gutters……..Langley also offer quite a nice range ….albeit much more expensive.
Posted

Full Member
Great shed colours too….
….
But then I would say that wouldn't I?
Posted

Full Member
Enjoying watching this all develop.
Cheers,John.B.:thumbs
Posted
Full Member
I see Scale Model Scenery appears once again. I was delighted with my bow string bridge so may well have a look at their other offerings. Certainly your roof looks great. :thumbs
'Petermac
1 guest and 0 members have just viewed this.