Newton Regis, it'll never be finished, hopefully!
Posted

Full Member
A GWR journey through the 1920s and 30s
Hi Colin,Thanks for bringing this conversation home where it belongs and please accept my apologies for inadvertently sowing seeds of confusion in my hurry to post an update to the station refurb. Yes the structure's walls are generally 12 mm thick, as necessitated to support the large canopy, combined with RTP resin buildings having to withstand some of the rigors of our younger fine scale modellers to be, so they need to be robust! Most of the perforations made to my example were through 3mm sections, where if one so chose, a small drill bit in a pin vice would have done the job, all be it rather slowly.
As I said, I’m sorry for the confusion and thank you for letting me know. The principle however of using the right tool for the job was still the message I was highlighting, due to my delight with the surprising advances in coreless drill technology and the cordless enabled safe and rapid completion of forming all perforations.
I’ve since made new doors for the booking hall platform elevation and have used my pin vice to make the holes for these and other door knobs from track pins (thanks Doug).
However, today is a gardening one and I need to get back to work before the bride returns from a reprovisioning run.
Take care and be safe.
Best,
Bill
 Last edit: by Longchap
At 6'4'', Bill is a tall chap, then again, when horizontal he is rather long and people often used to trip over him! . . . and so a nickname was born :)

Posted
Full Member
Whilst researching the stables, I discovered a 1960s colour photograph of Morton-in-Marsh’s then still surviving stable building and with the interesting decoration to the external walls of blue and red facing bricks in alternating stripes. I can’t post the photo here for copyright reasons, but here’s the link to an interesting illustrated article by Model Rail’s Chris Leigh:
https://www.model-rail.co.uk/online-features/chris-leigh-blog/moreton-in-marsh-memories/
Given a good enough reason, that would be cool to model and when I read the accompanying blurb to the photo, it mentioned that Morton-in-Marsh’s station building was the prototype for Oxford Rail’s resin station building. I thought, “that’s a good enough for me†as I could match Newton Regis’ station and stables to the same prototype location. Fortunately, Morton’s stables were the right small size for my space, so we had a plan.
Thanks to standardisation, I was able to determine the dimensions for the stables from my principal reference book, Janet Russell’s ‘Great Western Horse Power’ and produced a basic drawing to transfer to brick embossed card to the correct 9†thick English Bond pattern plasticard, which I think I recall seeing in the stock box a year or so ago!
I need to develop a method for producing better louvres as the stable features them prominently (see post 293), ventilation being really essential in an environment rich in the production of what does the roses good.
So while I ponder further on louvres, I'll finish off the station.
Keep being safe,
Bill
Last edit: by Longchap
At 6'4'', Bill is a tall chap, then again, when horizontal he is rather long and people often used to trip over him! . . . and so a nickname was born :)
Posted

Full Member
So it was a great surprise when we moved into our home here in Melbourne (1977), to be woken at 4am by the clip, clod of horses hooves from the milk float! Milk deliveries can only have lasted a year or two, "Milk Bars" dotted around the suburbs lasted much longer as the primary source to buy milk. The odd mummified one can still be spotted, surprisingly not demolished for new houses during any of the last 3 building cycles :roll: I must take a photo of our local before it too disappears. An arcane corner of Melbourne's history indeed.
see this retrospective from the Grauniad: Melbourne's Milk Bars
Colin
Last edit: by Colin W
Posted
Full Member
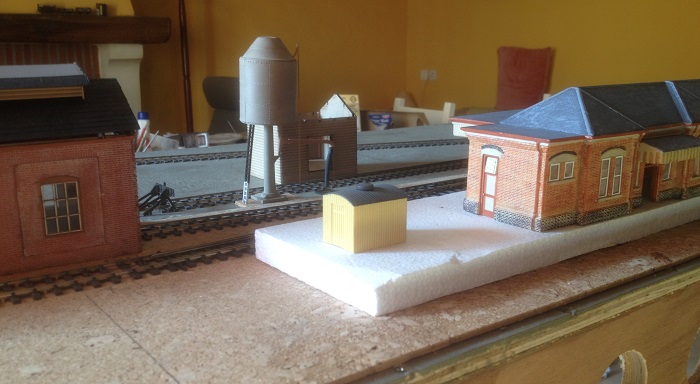
To continue planning the facilities at Newton Regis, I turned my attention to goods handling and have started constructing the goods shed. I wanted a shed to represent brisk traffic, yet maintain the feel of a spacious yard, so opted for a small shed, but with an adjoining loading platform and crane. Even medium sheds seemed too large, so when I came across the small but perfectly formed Chudleigh branch shed and then found Rail Model's laser cut kit, I thought this would suit the space well enough. I’ll feature the build in a separate post once it’s progressed into final construction stages.
I also unexpectantly found an old Cooper Craft kit tucked away today for a GWR platelayer’s hut, complete with an array of tools which will look good near the signal box, this Ratio kit having been started 40 years ago, so it’s about time I finished it!

The above photo shows the latest view of the branch with the walls of the goods shed carefully posed in place, to give an indication of how the yard is going to look. The space to the left of the engine shed will feature the stable, yard road vehicle access and weighbridge. I wonder if weighbridges were used with horse drawn traffic? I must investigate, although any comments will be gratefully received. The left hand siding will feature coal traffic, so will have suitable facilities, including the merchant’s office.
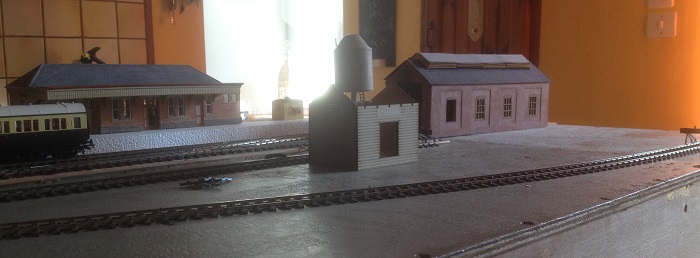
Hopefully this image captures the feeling of space I hoped to represent and I’ll enjoy bringing it to life as detail and some cameos are added.
This last scene taken from the rear of the layout will be seldom seen, due to the backscene running along the rear of the station, but shows the station approach road, with the cheeky alley to reach the cattle dock.
See you later,
Bill
Last edit: by Longchap
At 6'4'', Bill is a tall chap, then again, when horizontal he is rather long and people often used to trip over him! . . . and so a nickname was born :)
Posted

Full Member
I can relate to your 40 year build time for a Ratio kit - I don't like to rush things either ……
 :cheers
'Petermac
Posted

Full Member
Posted
Full Member
A big thank you to you too Marty for your kind words. It took a day or two to get to grips with such finescale track and it will look even better once painted, ballasted and weathered. The Hakko turned out to be a great choice of iron and I'm very satisfied with it, as it seems to do everything I've asked of it very well, although I've not yet tackled some of the loco kits I have waiting.
Best,
Bill
Last edit: by Longchap
At 6'4'', Bill is a tall chap, then again, when horizontal he is rather long and people often used to trip over him! . . . and so a nickname was born :)
Posted
Full Member
I wanted a shed to represent brisk to busy goods traffic, yet maintain the feel of a spacious yard, so opted for a small goods shed with adjoining loading platform. So thought of a laser cut MDF kit and the Chudleigh shed from Rail Model fitted the bill well enough.
This is a straightforward kit, provided with concise instructions, but fortunately also a good set of build photographs to keep you on the right track.
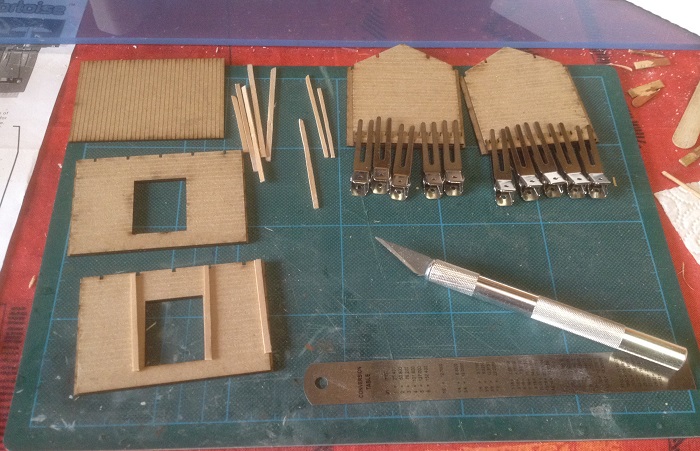
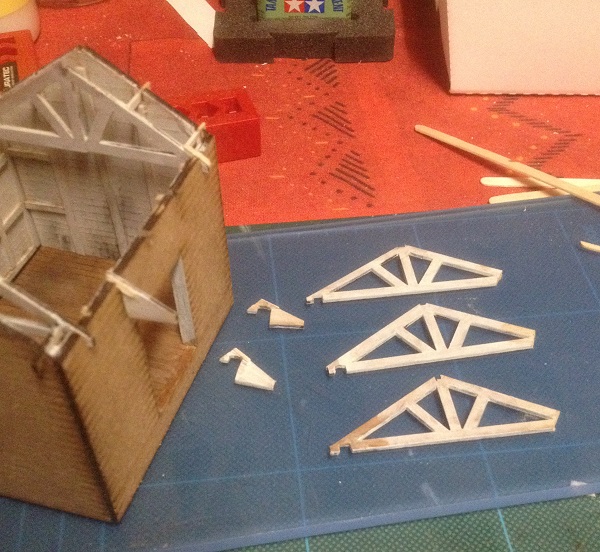
This photo shows the previously laminated walls, with clamps holding the floor joist dwarf support walls in place while the PVA glue dries (EDIT I admit to a bit of overkill with the clamps, but I’m still using normal PVA at this stage and wanted to keep the pressure on). The construction manager in me sighs with joists running the long, rather than the short span, but as I didn’t use them and you couldn’t see them under the floor anyway, I shouldn’t complain. There are 11 floor joists, which really is overkill for this small area, so I used the 2 end supports and 2 of the joists on the two other sides to support the floor and gained 9 useful joists for the spares box. I am sure that they will be used before too long.
My piece of glass seen in the background is used to build everything on, which is an easy way to help ensure square and level structures and rolling stock and the wall structure is assembled on this, with the floor dropped in and a couple of try squares to ensure alignment.
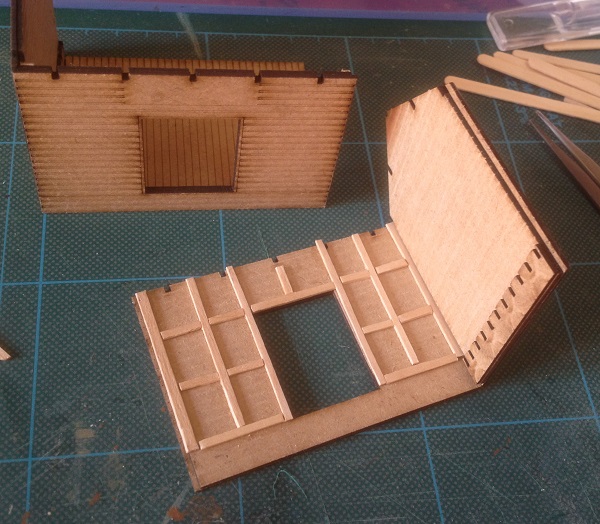
The kit will be built with rail and roadside doors fully open, enabling the interior to be detailed. Beside the roof trusses and floor planks, no internal detail is modelled in the kit, so I scribed the internal wall boarding and you can see coffee stirrer sticks cut down to size and waiting their turn to provide the timber framework for the external cladding.

Although I read the instructions, I never like gluing up a four sided structure in one go, so used my tried and tested method of assembling the walls as two sub-assemblies, with the corners held firmly between two engineered right angled devices, using Rocket card glue with its precision application nozzle. I’ve found this quick drying glue so versatile and easy to use, that I keep a bottle handy on the work bench and usually a couple in reserve. To get the longest life from them, always keep the nozzle clean and the cap on tight between applications.
“It’s a game of two halves, know wot I mean Johnâ€
Adding the timber frame to the cladding boards was straightforward, although cutting and fettling the coffee stirrers to scale size took a while, but absolutely worth it.
Before permanently joining the two halves together, they were painted and weathered, including the floor.

As you can’t view the layout from the rear, the interior is mainly detailed where you see it through the front loading door and bearing in mind the viewing height is pretty much eye level, a reasonable view should be possible, although. I think it may be a bit dark in there, so may need some interior lighting.
I thought I’d better make the roof removable to facilitate any future lighting, so the two end roof trusses were glued to the structure with their purlins, while the three central trusses glued to the roof boarding. A simple plan, but one needing plenty of patience and some additional support framing for the truss / rafter joints to enable them to be carefully lined up before each truss was in turned glued to the roof boarding. The build would have been a whole day quicker if I installed the roof as designed, but sometimes it’s fun to do complicated.
I next laminated and fixed the sliding door tracks to the walls and then it was ready for priming. I’d started using Tamiya fine surface primer for a couple of white metal kits and were pleased with the results, but before spraying the MDF shed, I tested it on a couple of MDF privacy screen panels for the station as a test piece and it was fine, so we went outside to a windless sunny day and soon had the shed primmed from the rattle can.
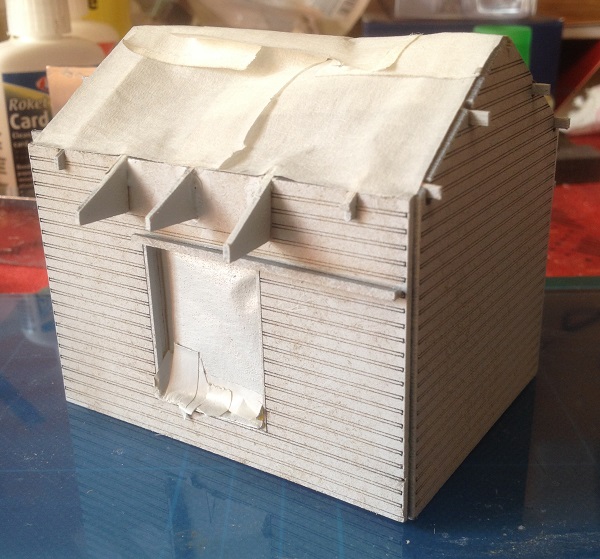
I know the canopy bearers look wonky, but the top inclined faces all line up and the projecting lengths will be trimmed to be equal, as they support the fascia board and what lies within will never be seen . . .unless I take a cheeky low level photo when all is done!
I put the second coat of Precision Paints GWR Tint No.2 on the external walls today, but that’s for Part 2 . . . .
Best,
Bill
Last edit: by Longchap
At 6'4'', Bill is a tall chap, then again, when horizontal he is rather long and people often used to trip over him! . . . and so a nickname was born :)
Posted

Full Member
Michael
Posted
Full Member
I'm wondering how you scribed MDF so well - it's pretty unforgiving stuff but you've made a great job of it. Any tips please ?
Also, looking at the trusses, are they laminated ? This shot suggests they could be………..
'Petermac
Posted
Full Member
Thank you for your kind words and I'm looking forward to part two too!
Bill
Last edit: by Longchap
At 6'4'', Bill is a tall chap, then again, when horizontal he is rather long and people often used to trip over him! . . . and so a nickname was born :)
Posted
Full Member
That's a brilliant looking structure Bill.
I'm wondering how you scribed MDF so well - it's pretty unforgiving stuff but you've made a great job of it. Any tips please ?
Also, looking at the trusses, are they laminated ? This shot suggests they could be………..
That's quite some image code Peter. I find a simple copy and paste from the thread into a new post works just fine.
I use a fine pointed stainless steel scribe on MDF (found in the garden and now a useful modelling tool), then gently rubbed with a well used sanding board to remove displaced fibres, before painting.
Unfortunately not sure which photo you were referring to, but no, they're not laminated, just loosely painted with grey/white with some darker original colour peeping through, perhaps suggesting laminations.
Hope you get you photos sorted. Are you using PC, laptop or tablet?
Cheers,
Bill
Last edit: by Longchap
At 6'4'', Bill is a tall chap, then again, when horizontal he is rather long and people often used to trip over him! . . . and so a nickname was born :)
Posted

Site staff
Cheers
Matt
Wasnie me, a big boy did it and ran away
"Why did you volunteer ? I didn't Sir, the other three stepped backwards"
"Why did you volunteer ? I didn't Sir, the other three stepped backwards"
Posted
Full Member
Good luck,
Bill
At 6'4'', Bill is a tall chap, then again, when horizontal he is rather long and people often used to trip over him! . . . and so a nickname was born :)
Posted
Site staff
cheers
Matt
Wasnie me, a big boy did it and ran away
"Why did you volunteer ? I didn't Sir, the other three stepped backwards"
"Why did you volunteer ? I didn't Sir, the other three stepped backwards"
Posted
Full Member
That was a simple "copy and paste" on the same tablet that got carried away last time …………… No idea how or why it did it but I won't use it again on here - I'm now on a laptop.
I did try to delete it myself but couldn't find the end of the code nor an edit button. Where was the button Matt - in Scotland ?
Your explanation of the trusses having been painted but maybe the original darker colour showing answers my question Bill - that's exactly what it was ……………….I won't try to post the photo again - just in case …. :cool wink
'Petermac
Posted
Site staff
Cheers
Matt
Wasnie me, a big boy did it and ran away
"Why did you volunteer ? I didn't Sir, the other three stepped backwards"
"Why did you volunteer ? I didn't Sir, the other three stepped backwards"
Posted
Full Member

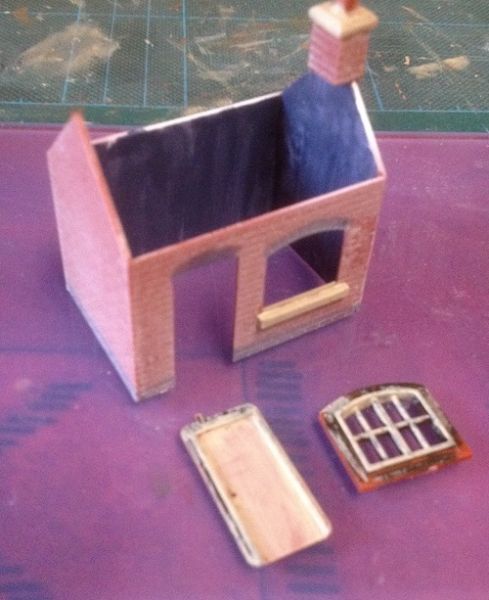
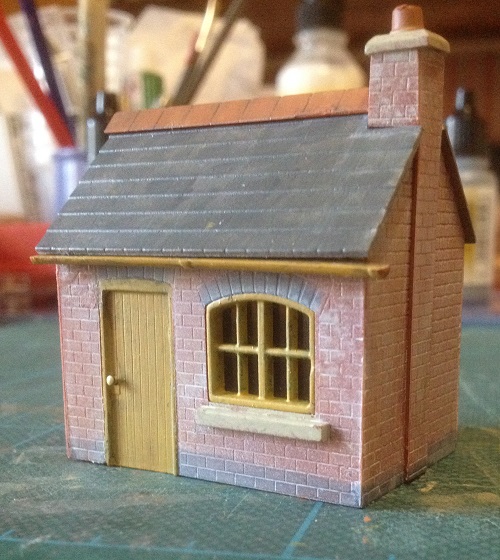
A simple build of a small yard hut to be used by coal merchants, Regis Coal. If I found the blue tack in time, I would have used it to hold the tiny chimney parts together to get it glued straighter than it was. Fortunately, I found it in time for the gutters and downpipes.
The only mishap was almost dropping the hut after taking photo 3 and in grabbing it, squished the front and rear façades, necessitating robust, if scary manipulation, overnight clamping and supplemental internal bracing. It reminded me of one of Mr Chubber’s stamp tests!
No doubt, coal dust will find its way into the nooks and crannies once the merchants take up residence.
Bill
Last edit: by Longchap
At 6'4'', Bill is a tall chap, then again, when horizontal he is rather long and people often used to trip over him! . . . and so a nickname was born :)
Posted

Full Member
Posted
Full Member
1 guest and 0 members have just viewed this.