Newton Regis, it'll never be finished, hopefully!
Posted

Full Member
A GWR journey through the 1920s and 30s
Promising start Bill……..I like the Cotswold stone look you have achieved so far.I could be quite wrong here but I tend to associate engineers blue brick with platform retaining walls and the base courses of buildings, I have never thought of them being used as pavers…….I will try and check my rather limited library later…..from an aesthetic view point I think weathered red brick would look more pleaseing
Keep safe

Posted

Full Member
Engineering brick for cattle dock paviours makes good sense, as they are very durable, water resistant and also come in colours other than blue!
However, following further research this morning, I went with weathered red/brown brick and will go for an almost cleaned look following recent livestock transit.
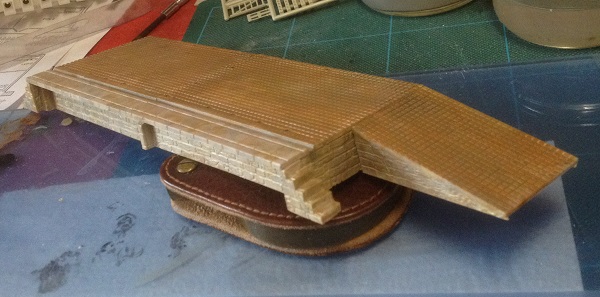
Powders still required, but only following installation of the fencing and gates, while the platform face will receive more treatment in conjunction with the brick track-bed pavings.
I better do more wiring next!
Stay safe,
Bill
At 6'4'', Bill is a tall chap, then again, when horizontal he is rather long and people often used to trip over him! . . . and so a nickname was born :)
Posted

Full Member
I've been trying to think back to what the cattle docks looked like when I was a nipper. I think, even in those days, most of the surface area was concrete. Stable yards etc. used a square "stone" sett - a sort of blue/purple colour and very hard so I'd guess engineering brick type of manufacture. Obviously the constant muck/wash cycle would discolour whatever was used and I have seen surface areas dark navy blue to black/blue when setts were used although concrete tended to go a deep brown/bronze colour when "weathered". They'd be far more heavcily weathered where the cattle stood with the edges remaining almost "new colour". The ammonia and acids deposited by the cattle would severely discolour whatever material was used for the surface.
'Petermac
Posted
Full Member

I’ve fitted most of the fencing and am gradually adding more whitewash to the concrete posts and am thinking to have one pen in the process of being populated, as I have a GWR white metal cattle truck kit that should look good backed up to the ramp, discourging beasts.
I wonder how local farmers got their livestock to market before cattle trucks came along? If close to the station, I suppose drovers could drive them on foot / hoof and if further away, probably the same!
This side-track of the pens has been a welcome distraction and it’s great having the modelling table next to the layout to easily switch between modelling and electrics.
I'll let platform construction be the next distraction and that will mean building a station, for which I have a cunning plan ;-)
Be safe and have fun,
Bill
 Last edit: by Longchap
At 6'4'', Bill is a tall chap, then again, when horizontal he is rather long and people often used to trip over him! . . . and so a nickname was born :)
Posted

Full Member
Michael
Posted
Full Member
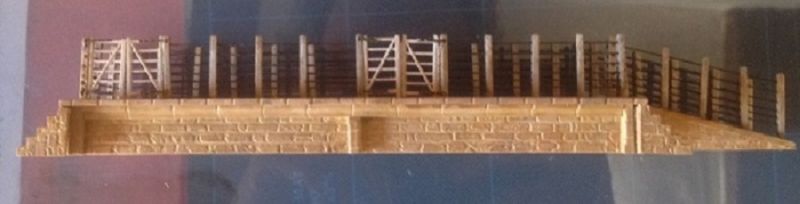
There’s still two pair of gates to glue in position, but I need to review the contents of the livestock drawer to see how many walking / standing cattle are available and decide if the gates will be posed open or shut.
Meanwhile the electrics continue at a slow pace, as the modelling bench calls and the next group of items for attention will be the platform, station building and approach road, which needs elevating to the station floor level.
Time to clear the workspace and survey the station approach.
Be safe,
Bill
Last edit: by Longchap
At 6'4'', Bill is a tall chap, then again, when horizontal he is rather long and people often used to trip over him! . . . and so a nickname was born :)
Posted
Full Member
Regarding your earlier query I think it was not uncommon for cattle and sheep to be herded to rural stations on the hoof.
Keep well
Posted

Full Member
Phil
Posted
Full Member
Best,
Bill
At 6'4'', Bill is a tall chap, then again, when horizontal he is rather long and people often used to trip over him! . . . and so a nickname was born :)
Posted
Full Member
Excellent job Sir - looking forward to it being stocked.
As others have said, livestock would be walked there in the pre-cattle wagon days. The old retainers were often used as drovers but usually, not much more than 5 or 6 miles. Otherwise, out in the sticks, fatstock would be bought by local butchers but still walked there. Rememberm in those dsys, everything was much more "local" before the railways made travel further afield more accessible.
'Petermac
Posted
Full Member
Posted
Full Member
Really useful information also regarding livestock handling Peter and the farmer or butcher driving stock to the station absolutely needs to be modeled.
For painting the wall sections, I selected a photo from the net of the finished Cotswold stonework I liked for reference purposes during painting. The photo had slightly varying creamy honey Cotswold tones, together with occasional veins of contrasting grey / blue, so I had a range of very similar colours to replicate this, all from my go-to Vallejo acrylics range.
I use a flat brush and put down an overall thin coat of Portland Stone, then with several similar shades, picked out random stones with an almost dry brush and when the wall was covered, went back in and dry brushed the painted stones with a different colour, not forgetting some darker and grey tones. This left the Portland Stone showing through as mortar joints which were touched up with a small detail brush where needed. You can keep going with additional dry brush highlights to get closer to your reference image.
For the flagstones, I used a base of light mud brown, as pavings retain little original mortar colour due to traffic. Then using a similar palette and the flat brush, applied thinned coats, as before, but not dry brushed, just small quantities of wet paint quickly applied to individual flags and pulled across the surface to merge the colours together. This is done quickly to allow the paint to merge and is much easier to do than describe and is not at all difficult.
Hope this helps Peter, just have a go and you’ll be surprised how easy it is with just a bit of practice.
Be well,
Bill
At 6'4'', Bill is a tall chap, then again, when horizontal he is rather long and people often used to trip over him! . . . and so a nickname was born :)
Posted
Full Member
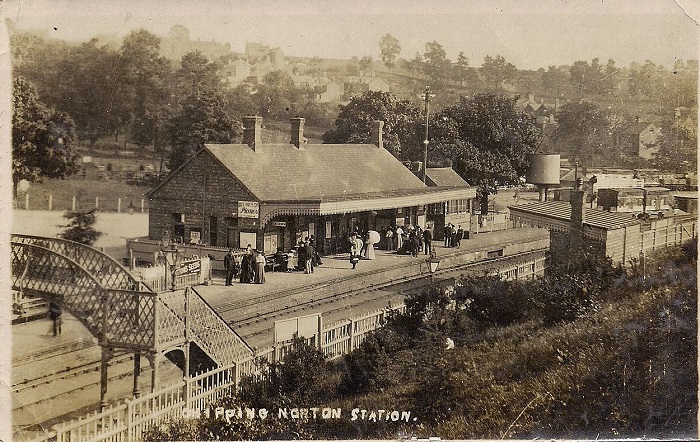
The ‘cunning plan’ mentioned in a recent post is now reconfigured, taking on a resemblance of Chipping Norton and I’m liking it just as much. Here are the plan’s main constituents, starting with this wonderful slice of period life portrayed in the hundred year old photograph. Doesn’t it have a lot people about! The thing which struck me about Chipping Norton was the absence of a rising station approach, with the road side of the station building being at rail height with a flight of stairs bringing passengers between road and station floor / platform levels. This means I can fabricate a platform to include the footprint of the station building with unseen steps on the outside the station entrance and a fenced pedestrian access round the side for the parcels office.
Now to the model itself. Other than a printed cardboard Superquick kit, I’ve never attempted a station before and don’t want to mess it up, so my thoughts first turned to a kit, drifting towards one of those splendid detailed kits from Timber Tracks or Model Rail. The results look impressive, but kits on the wrong side of £100 seemed rather high, although in reality, no more than a new loco and decoder. I'm not brave enough yet to scratch build a station, then scrolling down a mixed range of railway items on the internet, came across this little treasure for less than two twenty pound notes.
It’s an Oxford Rail resin GWR station, which came to the market last year, but now seems rare to find, as it appears to have been repackaged as a Hornby item, with a scandalous ten pounds plus added to the price tag. Fortunately, an Oxford one found its way into my post box from Hattons and will be detailed to suit.
The overall form of the building is pleasing, but the grey and featureless roof bizarrely lacks chimneys and the smooth surface finish to what should be a slate roof and the flat asphalted canopy roof is boring, particularly as most of these models will be seen from above. Just as well the recovery plan is still a cunning one and fortunately includes chimneys.
The joy of the building however is with the elevations and as my viewing eyeline is a low one, the façades will be what is seen most. After the chimney fiasco, the lack of canopy supports was no surprise, but my cunning rescue plan includes suitable fancy cast iron bracketry, well laser cut MDF, but you’ll never know the difference.
So much for the taster menu, I need to lock myself away in the kitchen now and get cooking.
Keep well,
Bill
Last edit: by Longchap
At 6'4'', Bill is a tall chap, then again, when horizontal he is rather long and people often used to trip over him! . . . and so a nickname was born :)
Posted
Full Member
Lovely photo of Chipping Norton……perfect reference for your branch station.
The Oxford building will be a good ready to plonk base on which you can work your magic. It should be very therapeutic repainting the awning in alternating light and dark stone :lol:
Keep well
Posted
Full Member
Unfortunately, I’m not a fan of GWR’s two tone canopy awning colour scheme, although not difficult to do and as you say, therapeutic! I’ll take this under consideration and may relent if I find the idea growing on me, as refurbishment and detailing progress.
In the meantime, all I’ve done is drilled out the tiny holes in the awning where a heavy handed PRC citizen’s paint brush had lingered more than necessary, as I’ve been ambushed by HMRC paperwork today, but hope to get some decent modelling time in tomorrow.
Looking forward to seeing your ‘Palm Court’ reveal in due course.
Best,
Bill
At 6'4'', Bill is a tall chap, then again, when horizontal he is rather long and people often used to trip over him! . . . and so a nickname was born :)
Posted
Full Member
The extent of the work to be carried out on the Oxford resin building first needed to be established, as if I wanted to, weeks or months could be spent altering and refinishing every possible aspect of the building to make it as realistic as possible. While time is not a major issue, I want to use it wisely on the things which matter most in building a worthwhile railway which best pleases me. For example, the rear public access to the building is very close to the backscene and will never be seen, not even by me, so while normally worthy of refinement, it will not be touched. Well almost, as I will be opening up the public entrance doors, giving a through view from the platform.
The basic order of attack will be to carry out all messy cutting of the resin structure first and then begin the fun stuff, starting from the underside of the canopy and working down the facades to platform level, finally dealing with the roof surfaces. Additionally there will be accessories like platform seating, privacy screen for the gentlemen’s lavatory, etc to add when the platform is built.
So, to begin . . .

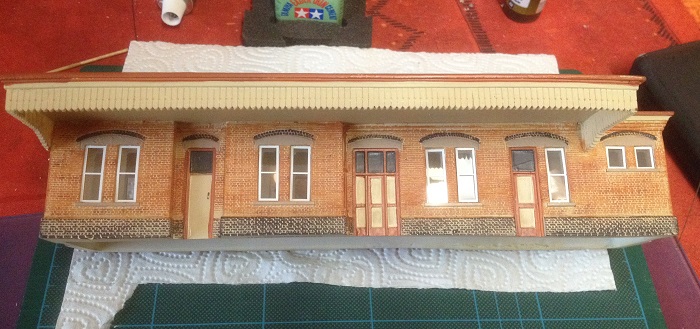
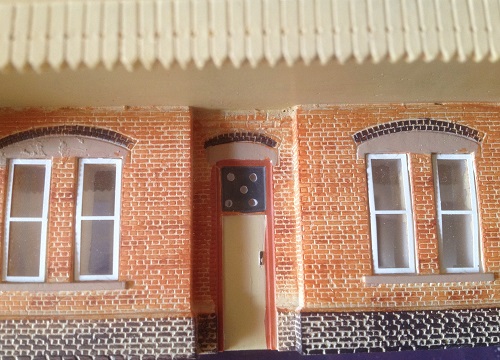
The above photo shows the condition of the building right out of the box. The black painted panels over the doors represent glazed fanlights to provide interior daylight, as the station was built before modern electric lighting. The fanlights will be upgraded to proper glazing. The doors from left to right are parcels office, booking hall and ladies waiting room, which has a convenience, while the two high level windows on the far right are the gentlemen’s lavatory.
Now the destruction, as we play with power tools and turn the cutting mat into a demolition site:


I wasn’t sure how resistant the resin was going to be to drilling and cutting, so I didn’t mess about and put a tiny 2mm drill into the big new Dewalt cordless and thanks to its remarkable slow speed capability, easily put a close pattern of holes through the fan lights, followed up with one larger drill in the middle and I then used needle files to make the opening ready for painting and glazing.
By this stage, I remembered I had a hot date with the bride, involving a well chilled bottle of champagne and a packet of posh crisps, so had a quick tidy up and repaired to the barn for wine waiter duties.
I’ll finish the cutting work tomorrow with opening up the front and rear booking hall doors and then start reconstruction work from the underside of the canopy downwards.
More soon, be safe,
Bill
Last edit: by Longchap
At 6'4'', Bill is a tall chap, then again, when horizontal he is rather long and people often used to trip over him! . . . and so a nickname was born :)
Posted
Full Member
Michael
Posted
Full Member
All remaining openings through the resin structure were completed this morning, resulting in a lot of resin chippings and fine dust in the holiday cottage, so I need to vacuum up the debris before the bride sees what a mess this semi-trained boy can still make even after 44 years of her training!
The fine dust had coated the station building inside and out, including the glazing, so I gave it a thorough rinse under the tap, followed by a quick dunk in a bowl of lukewarm water to clear the dust from the internal glazing and it was good again.

The 'too white' windows needed removing for repainting and as I was drying the building, a window dropped out. The water soluble glue was so weak that the short dunking had dissolved it and in just seconds and I had all the windows out with the help of a pointed craft blade. A good result, as the repainting will be much easier. The window frames are stamped out of thin aluminium sheet and painted brilliant white on one side. I can see the sense in cutting costs, but rather fancy the weak glue might soon degrade sufficiently for Oxford Structures / Hornby building windows to fall out, so be prepared to glue them back in again, should you have any of their resin buildings.
Anyway, with the windows out, I’ll touch up the brickwork and repaint the stone lintels before re-installation.
That’s it for now, so back to the model room, hoover in hand, oh and thank you for your kind words Michael.
Bill
Post hoovering edit:
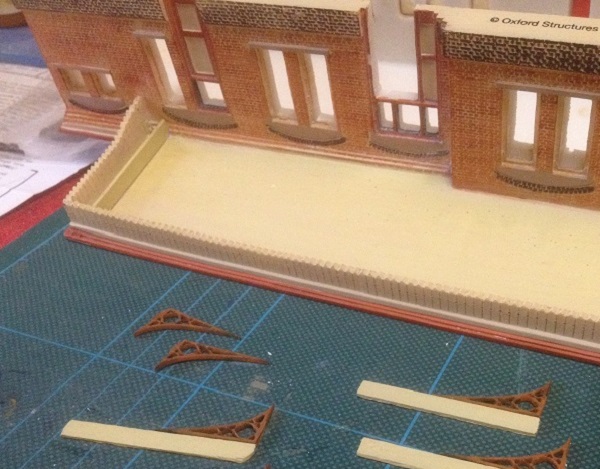
Thought I’d make up some canopy joists (coffee stirrers) and brackets (Scale Model Scenery) which will start to put more GWR into the building.
Last edit: by Longchap
At 6'4'', Bill is a tall chap, then again, when horizontal he is rather long and people often used to trip over him! . . . and so a nickname was born :)
Posted

Full Member
Cheers,John.B.:thumbs
Posted
Full Member
Hello John and thank you for your kind comments. I’m happy with chopping up plastics and kit bashing generally and was reasonably certain that if taken slowly, the resin casting would be kind to me and so it proved, being well cast and cured with consistent density and was easy to drill and file, with care.
Before fitting the delicate canopy brackets, I thought I’d deal with the facades, to limit intervention from the big hands in the sky knocking carefully glued bracketry off. The factory finished façades needed work, due to production line speed having triumphed over accuracy, but repainting in between the lines was straightforward and the brickwork responded well to dry brushing colour onto thin and missing colour. I then mixed up a GWR interior distemper and sloshed it around the internals, including window reveals, then painted the windows a grey white and popped them back in with glue and glaze, applied with a toothpick.

I still need to made up some window louvres from micro-strip for the gentlemen’s lavatory, but as they are not adjacent to the canopy supports, these were fitted next. I’ve found that Rocket Card Glue works really well with card and thin MDF alike and dries quickly and clear. I might do some research to find what accelerator can be added to PVA in order to make my own version of Rocket, as it’s not that easy to obtain over here.
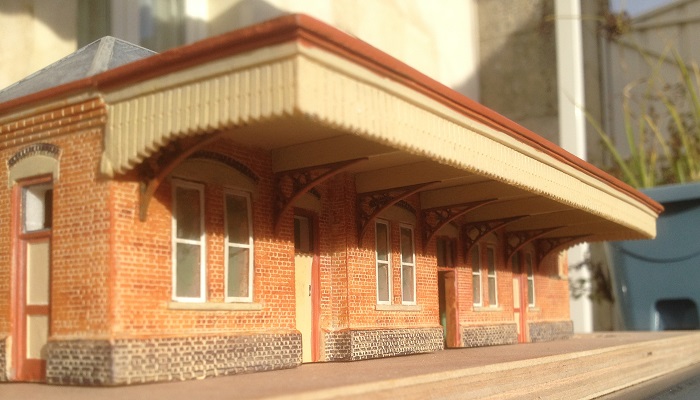
As today was the hottest of the year, a balmy 14 deg and sunny, I took the station outside for a shot in the spring sunshine.
Doors, fanlights and window louvres next, then my attention will be on the roofs and making some fancy chimneys.
Keep well,
Bill
Last edit: by Longchap
At 6'4'', Bill is a tall chap, then again, when horizontal he is rather long and people often used to trip over him! . . . and so a nickname was born :)
1 guest and 0 members have just viewed this.