Newton Regis, it'll never be finished, hopefully!
Posted

Full Member
A GWR journey through the 1920s and 30s
DG couplings Bill - I've seen them in action and also heard very good reports of them. I'll bet they are fiddly blighters - is it a "bend up" fret ?Those rail joins should be good and solid - I used the same system on Maxmill Mk1 without any problems. Are you having some kind of latch mechanism for the lift up flap ?
'Petermac

Posted
Full Member
DG couplings Bill - I've seen them in action and also heard very good reports of them. I'll bet they are fiddly blighters - is it a "bend up" fret ?
Those rail joins should be good and solid - I used the same system on Maxmill Mk1 without any problems. Are you having some kind of latch mechanism for the board joint ?
'Petermac
Posted

Full Member
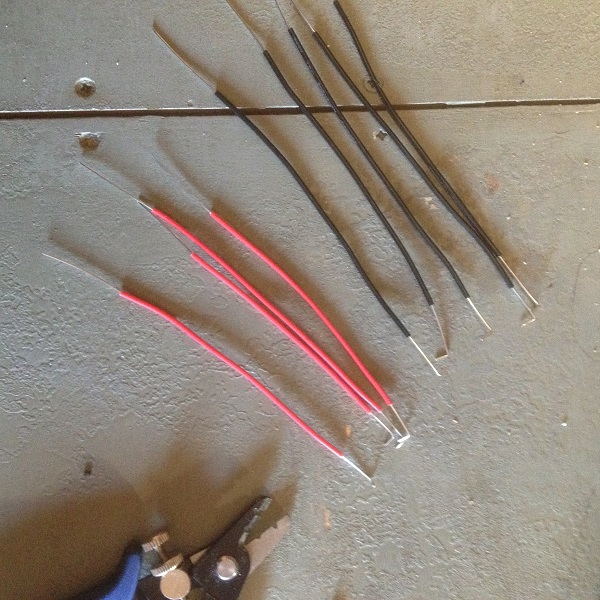
Each coupling comprises a main brass coupling, requiring a just a few bends with a pair of pliers, together with a small brass delayed uncoupling latch which receives a simple bend and is slotted through the coupling and pinched into place. Soft steel wire is then bent around a jig to form the coupling loop and dropper which actuates the uncoupling via an undertrack electro-magnet. The phosphor bronze wire in the photo will be used for loco handrails and pick-up wipers, as it’s too stiff to form consistent acceptable loops, so the well known hack of forming the coupling loop, integral with the dropper will be adopted. I'll need to make a height jig after I've looked at much RTR and kit build built stock to determine the optimum height.
As for the lift up section, after much research over a couple of years, I’ll adopt the system adapted from yet another modeller and explained in good detail on https://www.rmweb.co.uk/community/index.php?/topic/94350-mid-cornwall-lines-1950s-western-region-in-00/ starting on 19/04/2015.
Regarding the module edges, I’ve used the tried and well tested door hinges across the side joint with a quick release pin (big screw), although when I want to play, I’ll put the original hinge pins in the drill press and slim them down with emery paper, then file a flat along one side to take a hole through the pin for a securing wire.
Bill
 Last edit: by Longchap
At 6'4'', Bill is a tall chap, then again, when horizontal he is rather long and people often used to trip over him! . . . and so a nickname was born :)
Posted
Full Member
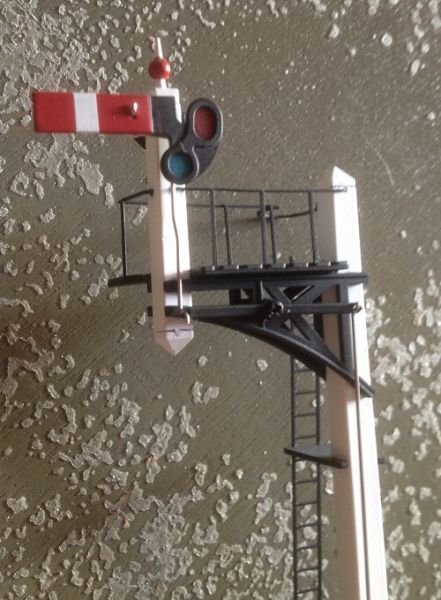
It came complete with mountings, control box and switch and is also illuminated. Well done Dapol and I'll hook it up after the point motors. I'll be looking to find a suitable 4mm chap with a bucket and rag to get up that ladder and clean the lenses and change the lamp. I wonder which member of staff would actually do this? Surely not the signalman, but why not, there would have been time, but due the degree of danger, the task may have been delegated to a lesser trained GWR employee. Porter, where are you hiding ? !
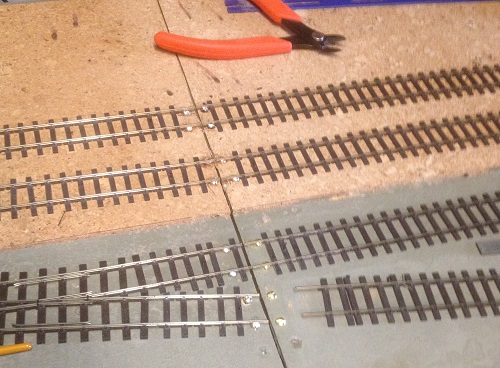
A little time with the layout today saw the track ends almost soldered to the baseboard and I’ll try and find time tomorrow to finish that last piece and sort out the sleeper spacings and that’s probably it on the modelling front before a very quiet Christmas, with just the two cats and their staff!
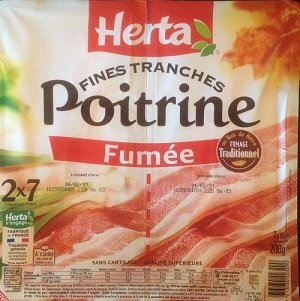
We will continue our newly found treat of hot bacon butties on Boxing Day and we stocked up with our favourite French bacon today, so here’s a photo of what to look out for Peter, next time you or Liz go shopping:
All the best everyone for a very restful, happy and safe Christmas.
Very best wishes to all,
Bill
:cheers m'dears
Last edit: by Longchap
At 6'4'', Bill is a tall chap, then again, when horizontal he is rather long and people often used to trip over him! . . . and so a nickname was born :)
Posted

Full Member
The lamp man would re-fill spare lamps and carry a number of them to the signals hanging from a long wooden carrier fitted with a handle.
If a Signalman received word from a driver that a lamp was out, he/she would be expected to climb the signal and attempt to relight it. In windy weather this would probably involve bringing it to ground level.
On the two occasions when the crossing gate lamps went out at Staverton crossing, it was due to the wick needing trimming, the 1/8" of hard burnt wick not vapourising sufficient oil to keep the flame alive.
Douglas
'You may share the labours of the great, but you will not share the spoil…' Aesop's Fables
"Beer is proof that God loves us and wants us to be happy" - Benjamin Franklin
In the land of the slap-dash and implausible, mediocrity is king
"Beer is proof that God loves us and wants us to be happy" - Benjamin Franklin
In the land of the slap-dash and implausible, mediocrity is king
Posted
Full Member
Look forward to seeing the signal operating Bill - good looking joints you've created and thanks for the shot of the bacon. Liz looked in our local Super U the other day but sadly, didn't find it. I have to go into Marmande again this week so will look again.
'Petermac
Posted
Full Member
Thank you Doug for your kind and wonderfully worded explanation of signal lamp maintenance, a job most certainly to be endured than enjoyed during winter months. Your description of the lamp man with his yoke of serviced lamps brought back the memory of a photograph seen in one of my books of a heavily muffled chap setting out on his rounds with hopefully his distant posts not too far from base. I have a couple of preserved huts from my old layout, which will be positioned appropriately in due course.
I actually have one more road to do Peter, for the cattle dock, once I settle on the configuration with reference to a Ratio kit, which will be bashed to fit the available space. I think I’ll accept the cattle dock diversion in order to get this road in, before pressing on with the electrics, including the signal.
I managed a couple of hours in the train room on Christmas Day when the bride and her sister in Australia had a few hours chin wag and having finished the last goods road track soldering, which was just about perfect, I went back to the first one I did, which had less than a half a mill height difference, but it had to be de-soldered and corrected, otherwise I would never have been happy with it. It’s always the way with these repetitive tasks never been tackled before (well in my case, not for 40 years), as they always get better with practice. In similar fashion, I’ll make sure the first of the 6 point motors to install will be the easiest one to get to!
Keep warm and dry all,
Bill
At 6'4'', Bill is a tall chap, then again, when horizontal he is rather long and people often used to trip over him! . . . and so a nickname was born :)
Posted
Full Member
Part 1, Droppers
The essence of the dropper is very simple; a power feed from under the baseboard to the track. Just 2 wires to hook you up. Okay, I’ve now counted the droppers using the prehistoric man’s counting methodology. It has been said that early man had a much smaller brain and was not that bright, so counting numbers larger than two was very difficult, if not impossible, so he simplified the process of counting to just “1, 2, many †and it worked! This ancient method is brilliant and like simple prehistoric man, (or just man, as the bride sometimes reminds me) you can count any number of anything very quickly, from dinosaurs to droppers. I counted all my droppers in no time and there are definitely “ many â€.
Having rejected the just 2 wires theory, I’ve spent a few days just cutting and fitting droppers, lots of them, as in true DCC fashion, every piece of track, even the little infill ones, now has its own 0.7mm2 colour coded solid core power feeds. In my naivety, I imagined this simple task would be knocked off comfortably in a day, but clearly had not considered how long the sum of all the individual processes of this basic task would take.
The quick bit was making up batches of red and black droppers using those wire cutters / strippers were you lock in the wire size with a setting screw for effortless stripping. This process always gives me a strange pleasure when I remember what a pain all my old strippers used to be. Once cut from the reel, ends stripped, rail end bent and then with a drip of flux, tinned, they can be set aside while you mark all the dropper positions and drill holes through the baseboards, avoiding cross braces, point motors and any heat sensitive parts of points where the soldering iron should not go. Then the time consuming part I’d underestimated; cutting the plastic track web out from under the rails to enable soldering the droppers to the underside (not the side, as I don’t want to see the droppers, any remaining trace of which, will be hidden under paint and ballast. I used two small pointed blades on this, it not being something you can pre-cut on the workbench before laying the track, since you’ll not know where the feeds are required until you come to do them with the track down.

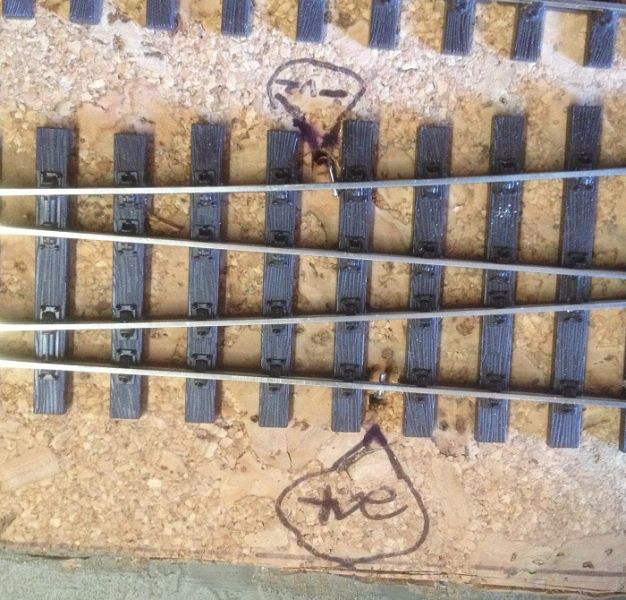
I just need to get out the multi-meter now to test the continuity of the dropper connections and resolder any if necessary, before moving on to the next exciting electrical task under the baseboard.
More soon,
Bill
Last edit: by Longchap
At 6'4'', Bill is a tall chap, then again, when horizontal he is rather long and people often used to trip over him! . . . and so a nickname was born :)
Posted
Full Member
I'm a Philistine in that I solder my droppers to the rail sides once the track is laid - for exactly the reason you're having difficulties cutting the web - it's difficult to get in there once the track is down. I don't know exactly where the droppers will go through the baseboard so can't pre-drill the holes either.
I too use 0.7mm2 wire but stranded rather than solid core - it bends more easily and, unlike solid core, it won't break if flexed too violently……………….
I strip a good length of insulation back, tin the bared end, bend just the tip to roughly a right angle and solder it to the outside of the track web keeping the angle low - my track is either Code 100 or Code 75. A hole is drilled almost between the sleeper ends and the wire pulled through tucked in tight to the rails. The ideal result is a very short length of visible wire - only just longer than the sleeper ends, heading from the web straight down to the baseboard level. I don't always achieve the "ideal" but usually I'm not too far off. How it would work on bullhead rail, I have no idea !
My reckoning is that, once it's ballasted and weathered, it will hardly be seen from normal viewing distance.
When I do solder to the bottom of the rail - usually where I can't sensibly access the rear rail, I pre-join the rail and wires with the track flipped upside down before fixing it down. In this position, cutting the web is an absolute doddle. Similarly, the holes are then drilled as tight to, and usually between, the sleeper ends as I can get.
Almost none of my track is yet ballasted so I can't guarantee the finished look but I doubt it (the wire) will be very evident unless I've put a huge blob of solder on the rail web. Once weathered, that too will, I hope, be virtually invisible ……..
When joining lengths of track, I also remove the last couple of sleepers to fit the joiners rather than trying to undercut the chairs, which I find a pain and potentially dangerous !! Once I'm happy with everything, I glue loose sleepers in the gaps and again, it becomes virtually invisible.
I'm all for the easy option ………………………. :roll: :roll: :roll:
'Petermac
Posted
Full Member
Unlike flat bottom rail, bullhead rail sits just a tad above the webs, so with use of a fine pointy and very sharp blade, it’s just possible to carefully slip the pointy bit between web and rail and snip, snip. Job done.
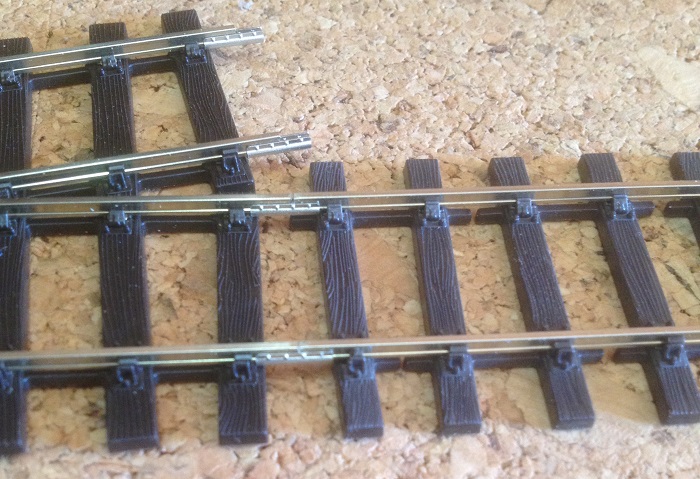
The photo shows just how small the gap is, but it does mean that soldering droppers to the underside of the rail is now possible once track is laid.
Once ready to solder the dropper, flux is applied with a paintbrush to the underside of the rail only, the pre-tinned dropper fed through the hole in the baseboard right next to the rail from above and twisted round so the tinned bent bit to be soldered is under the rail. This is where the use of solid core droppers helps push them up from below to make good contract with the rail bottom while heat is applied by the iron up above to the side of the rail for just a second (450 Deg), with the dropper still held in place for another few seconds until the joint cools.
I considered that the solid droppers were never going to flex in normal use of the railway and any movement of baseboards should never be sudden ones.
Apart from this slight divergence due to using bullhead rail, our approach to dropper installation is just the same.
Best,
Bill
At 6'4'', Bill is a tall chap, then again, when horizontal he is rather long and people often used to trip over him! . . . and so a nickname was born :)
Posted

Site staff
Ron
NCE DCC ; 00 scale UK outline.
NCE DCC ; 00 scale UK outline.
Posted
Full Member
Best,
Bill
At 6'4'', Bill is a tall chap, then again, when horizontal he is rather long and people often used to trip over him! . . . and so a nickname was born :)
Posted
Full Member
I had just one more road to put in at the rear of the layout for the cattle dock and as the dock needed kit bashing to get it to fit the available space, I first had to build it’s base to make completely sure it would fit satisfactorily. The basic construction was built, but in my haste, I ignored one of my cardinal rules and built it on the cutting mat, rather than on the glass plate to ensure all would be square. Fortunately I have no photograph to embarrass me further than necessary, but it rocked rather alarmingly when sat on the level baseboard, so out came the glass plate, as I immersed the dock in almost boiling water for a few minutes, before it sat overnight on the glass with several books weighing it down as it cooled.
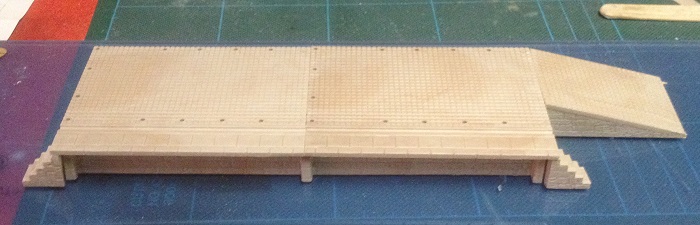
All fine and level the next morning and a trial fit in the final position meant I could position the track accordingly and the use of curved track laying profiles resulted in a pleasing curve from running line to cattle dock.


The track was then pinned, cut and soldered down at the edges of the baseboards, temporary power hooked up and a Collet Goods trundled around smooth and steadily as the first to run on Newton Regis’ metals. A happy result.

Cheers for now,
Bill
Last edit: by Longchap
At 6'4'', Bill is a tall chap, then again, when horizontal he is rather long and people often used to trip over him! . . . and so a nickname was born :)
Posted
Full Member
Grumpy old man rant almost over, as I went to Passion 132 in France where the paints all cost 2,20€ a pot, satisfyingly cheaper than Amazon and cheap as chips postage. Result!
https://www.passion132.com/gb/1472-acrylique#/availability-in_stock/manufacturer-vallejo
I know that only Peter is likely to benefit from Passion besides me, but thought I deserved a little rant!
Be goodish and keep safe,
Bill
At 6'4'', Bill is a tall chap, then again, when horizontal he is rather long and people often used to trip over him! . . . and so a nickname was born :)
Posted

Full Member
Interesting avenue you've opened up here Bill!I know that only Peter is likely to benefit from Passion besides me, …….
Bill

Is this thread turning in a direction that Admin will be happy to support????
"Intrigued" (aka Colin)
Posted
Full Member
Thanks for the link to "Passion" Bill - certainly sounds exciting………
Now, anyone know where I might buy paints in France ? :cool wink
'Petermac
Posted

Posted
Full Member
Without passion, there is boredom, so do all you are able, but do it with passion and you will forever be a smiley person :) !!!!
Best,
Bill :cheers
At 6'4'', Bill is a tall chap, then again, when horizontal he is rather long and people often used to trip over him! . . . and so a nickname was born :)
Posted

Site staff
:cheers :cheers :cheers
Wasnie me, a big boy did it and ran away
"Why did you volunteer ? I didn't Sir, the other three stepped backwards"
"Why did you volunteer ? I didn't Sir, the other three stepped backwards"
Posted
Full Member
The ramp was amended as above to allow it to squeeze into a narrower space and I set to with my new colours on the stonework to resemble Cotswold stone with reference to photos.

I first applied a thinned coat of ‘Portland stone’ colour as a basic mortar colour and then started building up numerous colours by dry brushing, referring to my reference photo for realism.
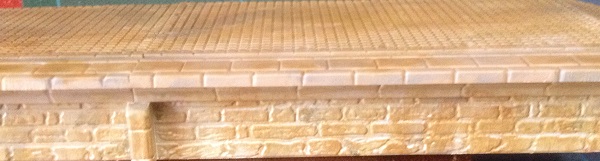
Not finished yet, but in turning to the top surface, which I assume are brick paviours, I was wondering what colour they would have been. Any ideas please, as I have not found a definitive answer?
They could have started as blue brick for strength and would of course, despite regular hosing down, attained an obvious patina and I’ll represent this appropriately, but I want to find the right look for a dock originally built in the late 19th century, now serving it’s community in the early to mid-20th. By my modelling period (Mid-20s to mid-30s), the GWR had ceased using lime wash to sanitise cattle facilities, so it will appear in darker tones than the work in progress above.
To be continued . . .
Bill
Last edit: by Longchap
At 6'4'', Bill is a tall chap, then again, when horizontal he is rather long and people often used to trip over him! . . . and so a nickname was born :)
1 guest and 0 members have just viewed this.