N Gauge - Newcastle Emlyn****
Posted

Full Member
I'd forgotten about fibre optics, Dave of WCML fame did some neat stuff with fibre optics.
Mmmm… might work with the light over the running in board.
Good thoughts… keep 'em coming.
A strip of 10 yellow SMDs bought today at Altronics anyway… might break out the soldering station tonight and have a play.
cheers
Marty

Posted

Full Member
Thanks Toto.
Who'd a thought building a halt would be such a marathon….?!
Painting is ongoing… still working on the deck and the railings need painting…
A Pannier with a B-set pauses at the halt on the way up to Pencader.

cheers
Marty
Hi Marty
I've just been catching up. I remember the very early shots of the bridge and thought it was going to make a great scene. I was wrong! It is a masterpiece.
You must be really pleased with how it has turned out mate :thumbs
Posted
Full Member
Very pleased, still got the water to put in the river below and things like telegraph poles, lineside hut and a signal but it's getting there.
Marty
Posted
Full Member
Up to the paint shop for undercoat primer grey….
and then with the colour that I'm going to use as my "light stone"… and after all of the photos that I've looked at with the variations in "light stone" colour due to local mixing, lighting conditions, weathering, etc I'm not going to get bent out of shape if it doesn't look right to some… it's my railway and my paint shop.
(… and it comes in a rattle can readily available from my hardware store.)
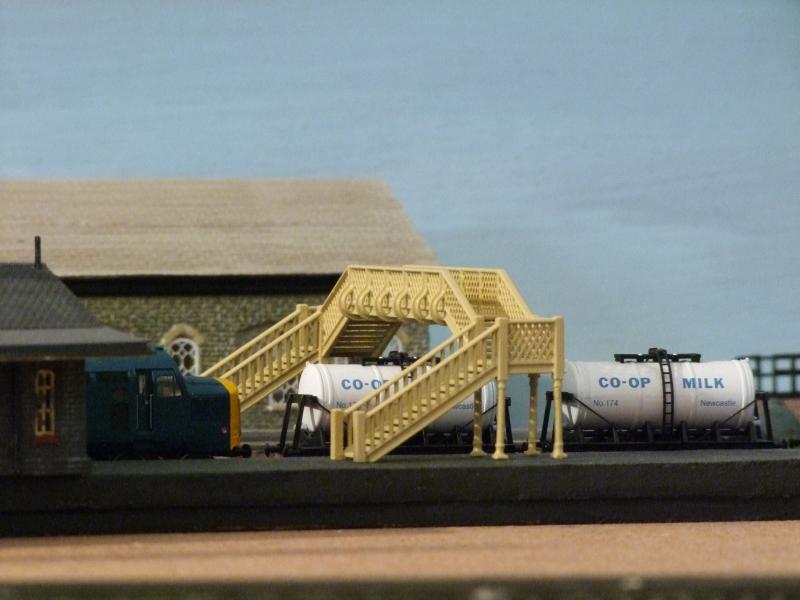
Once the "dark stone" is painted on it should look close enough.
Marty
Posted
Full Member
The plank
Isn't straight forward…. but then things never are…. are they?
On the left hand end the gap between the baseboard joist and the underside of the sleepers is 38mm
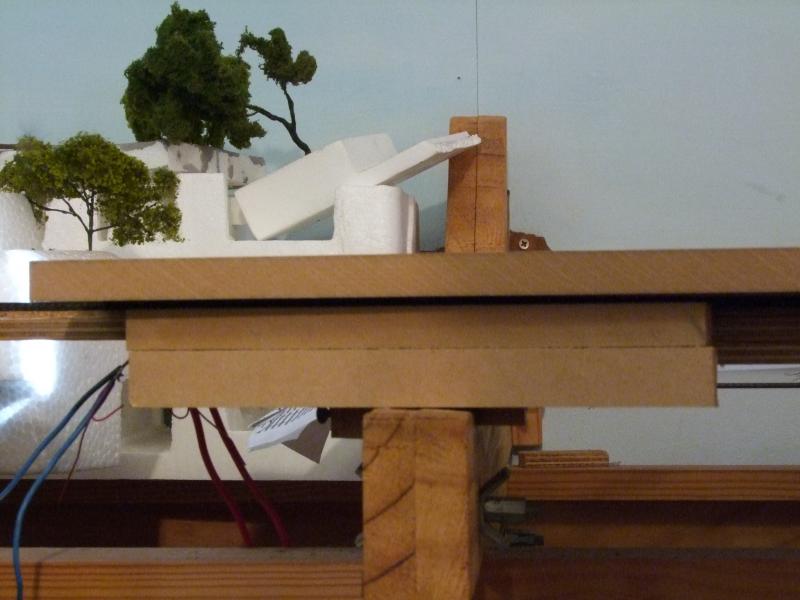
at the right hand end the same gap between the baseboard joist and the underside of the sleepers is 46mm
and yet… it's actually pretty level….

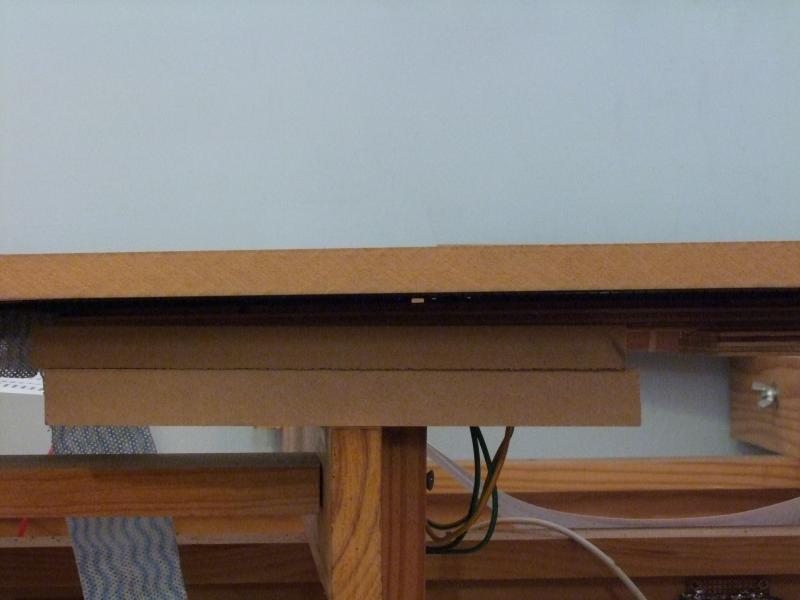
The plan is to make it removable as a single module to make it easier to work on, especially the electrics underneath and as such a frame is to be used to stiffen the plank (yes, I know… 16mm MDF is not likely to bend, but I'm a belt and braces man). There is also the need to have it sit flat on the workbench with all of the electrical gubbins protected while work is done on the top.
So…. the current plan is to make the frame square and shim the higher end somehow or other to get the height right. Thinking cap on.
Marty
Posted

Banned
Something like this…

Cheers, Gary.
Posted
Guest user
It's all looking good Marty. Nice and solid. Removable modules……excellent for maintenance but a lot more work initially……..especially the electric. I don't envy your work ahead but it will be worth it I'm sure.
I'm sure the solution to the above will be on the table before the day is through.
Cheers
Toto
Posted
Full Member
Gary's got it nailed… err… screwed… umm.. whatever.
Great idea Gary, many thanks.
Marty
Posted
Legacy Member
:thumbs;-):cool:
 Last edit: by Silver foxx
my webcam link http://86.19.184.67:8080
Posted
Full Member
I feel like I'm making some progress at last. Glad you are enjoying it.
Looking at the wiring for the points on Llandyfriog Junction at the moment.
I want the SEEP point motors to change the points, change the polarity of the frog and change LED indicators on the control panel… doh… only one accessory circuit.
Remembering that I'm DC only a distant voice (probably Sol's if the truth be told) reminded me of relays.
This is a possible wiring diagram… any thoughts anyone?

cheers
Marty
Posted
Full Member
Sol has confirmed the schematic via email suggesting that I use the S4442 relay which is rated for 12 volts and a 12 volt accessory bus.
Now to work out the resistors and wattage.
So… here's a story….
Married a few years ago (been together for 16 or so by then but I had to be sure), we honeymooned for a couple of weeks in Broome. Fantastic time, great place, saw and did heaps, ate and drank far too much but… I just couldn't bring myself to take a novel to while away those lazy afternoons by the pool. (As I said, we'd been together for 16 years ;-) ).
Instead a note pad, pencil, calculator and The Guide to understanding Electronics and Electricity found their way into my bags…. and yes, every afternoon by the pool I'd work through the exercises calculating resistance, power usage, current draw etc. Terrific book and by the end of the two weeks electronics were making a lot more sense.
SWMBO? Well she was reading a novel of course….
Well, that was over 4 years ago now and there has been little revision in that time ( there has been some but not much) but leafing through the book again the concepts returned and the formulae were relatively easy and I think that I've worked it out.
Tomorrow I'll buy the resistors that I think I need (and maybe a couple a bit stronger and weaker either side ;-) ) and further progress can be made.
This is the relay, cute little guy… it's got a red LED that lights up to tell you that the coil has been activated… I might need that :roll:
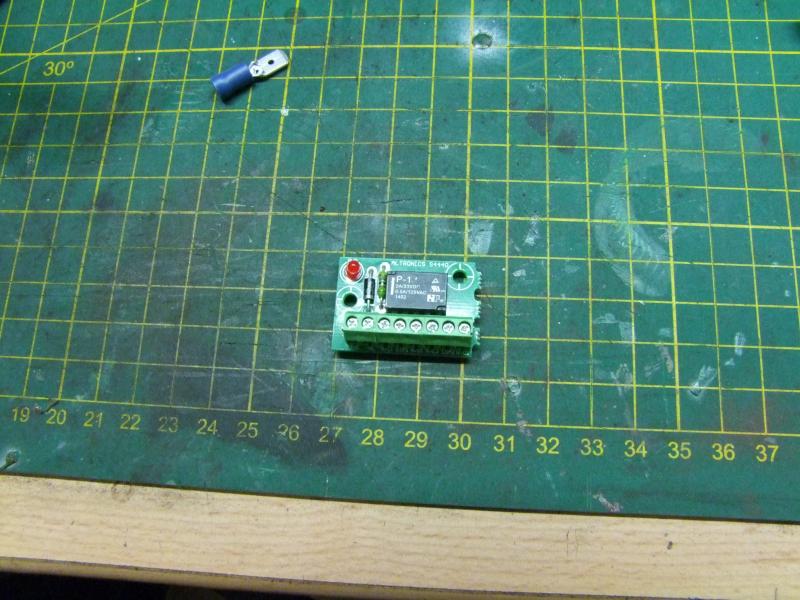
Fun to be had… and yes, I'm avoiding painting the fine dark stone lines on the foot bridge :oops:
cheers
Marty
Posted

Inactive Member
Ken
'It don't mean a thing if it ain't got that Swing'
Posted
Full Member
I've made a start at wiring up my first point frog for polarity… The sleeper plastic is surprisingly resilient, I had to use my razor saw to cut down to the rail level. Then chiselled the remainder out with the xActo knife.
The victim is a large radius code 55 straight. The plastic sleeper sits around the rail with code 55 in the lower part. I've decided to leave it rather than try and hack it off as getting to the sides of the rail is going to be tricky.
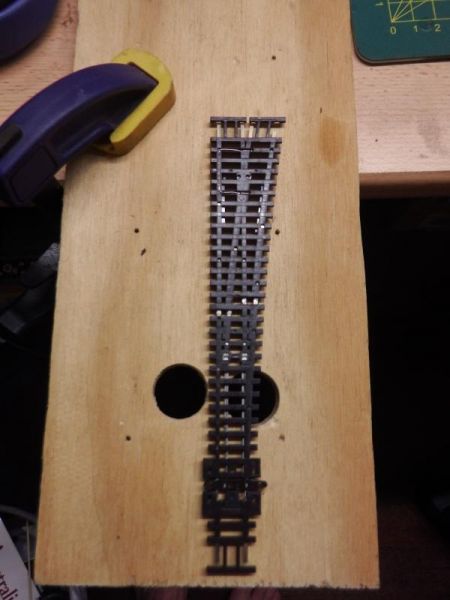
I'll use some heatsinks/shunts and if I'm quick shouldn't mix melted plastic with melted solder… we shall see.
The 10 mm ply soldering/cutting board with 20 mm holes spaced at 25 mm centres has been suggested to me as the easiest and most stable working space for this exercise by another N scale modeller who has kindly posted a tutorial on another forum.
A piercing saw and 32 teeth per inch blades have been purchased too… all I need now is time! It's a work night and it's time for bed.
Probably just as well, if I push on I'll be bound to make mistakes from fatigue.
cheers
Marty
Posted

Full Member
Cheers MIKE
I'm like my avatar - a local ruin!
I'm like my avatar - a local ruin!
Posted
Full Member
The razor saw, while a little slower, was much more controllable :cool: :lol:
Posted
Full Member
I normally solder to the side of track joins, then slide one or more loose sleepers in, the wire goes down through the board between sleepers and after ballasting and track weathering there's nothing to see. I fail to see why there is so much fuss, and as for soldering droppers to the underside of rail joiners, definitely overkill.
(why isn't there an emoticon for putting a cat among pigeons?)
Last edit: by Dorsetmike
Cheers MIKE
I'm like my avatar - a local ruin!
I'm like my avatar - a local ruin!
Posted

Site staff


Ed
Posted
Full Member
Although I will admit I'm a side of the rail web solder man myself too. Once upon a time it was the bottom of the rail joiners but rail joiners can lose connectivity with the rails over time and reduce the effectiveness of the power connection.
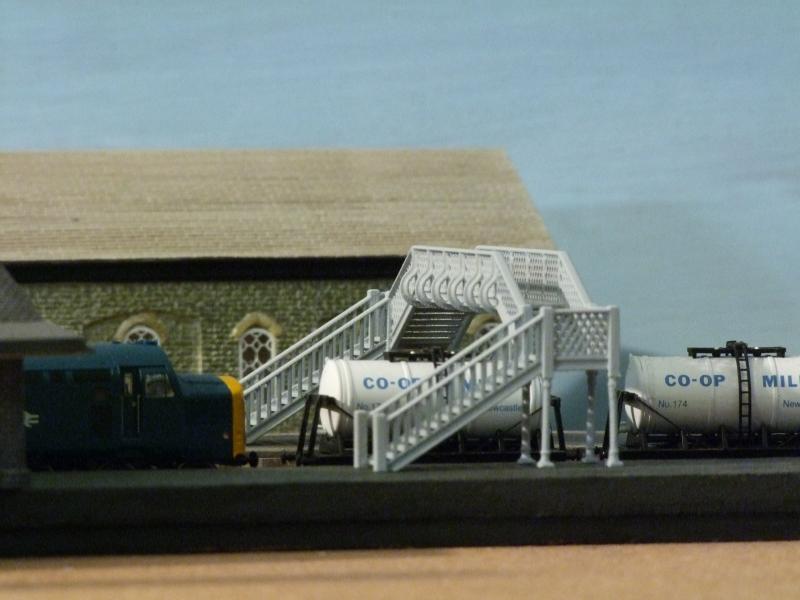
The painting crew have just about finished the foot bridge… and a platform shelter that got a repaint at the same time. The station master has complained that the painters missed a bit and they'll be back to touch up some of the over paints in the not to distant future.
Stairs and wooden planks on the walkway have been weathered and in due course the centre span will receive some smoke/ash weathering.
Very pleased with the result, for about $32 Aussie delivered (about 3-4 weeks - it WAS Christmas) it has saved me considerable time, challenge and effort to have scratch built it.
The fact that Henllan station never had a foot bridge in reality is neither here nor there… on my railway the branch line has become far more important that it ever was and rail traffic volumes dictated that crossing the line by the barrow crossing was no longer a safe or viable option. :lol::lol::lol:
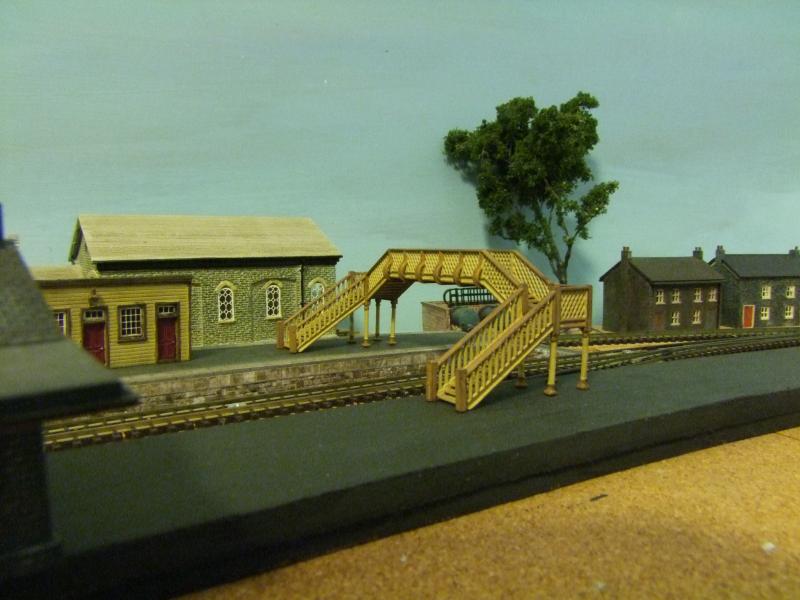
So pleased in fact that I will probably get another for Newcastle Emlyn.
cheers
Marty
Posted
Guest user
Similar story,
SWMBO and I have been together 21 years this year ………. Still not married …….. Don't like to rush things …….. Try before you buy. However ….. Now …… The warranty has ran out.:roll:
Cheers
Toto
Posted
Full Member
1 guest and 0 members have just viewed this.