N Gauge - Newcastle Emlyn****
Posted

Full Member
It's not pretty, multiplied the dimensions by 10 and marked them out on a bit of brass sheet.
Scribed the angle and then, with the brass held in the vice carefully cut the slot with a fine disc on the dremel tool.
This will allow me to churn out standard cross braces in no time.
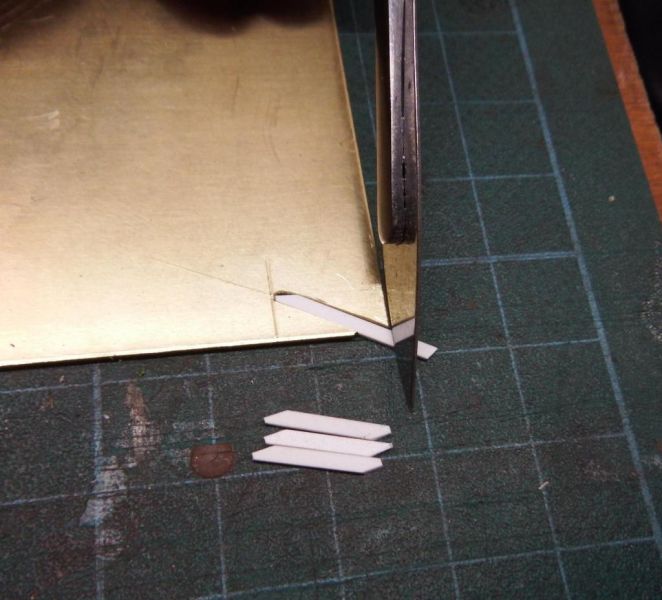
For the record the squares are 10mm x 10mm.
cheers
Marty

Posted
Full Member
A template was modeled up in CAD in 3D and has been sent off to the laser cutter to manufacture out of 1mm stainless steel plate…
It looks like this in plan view…

The laser cutter does work for a mate in the industry… when it comes back (thinking positive here) the build will continue.
In the meantime….
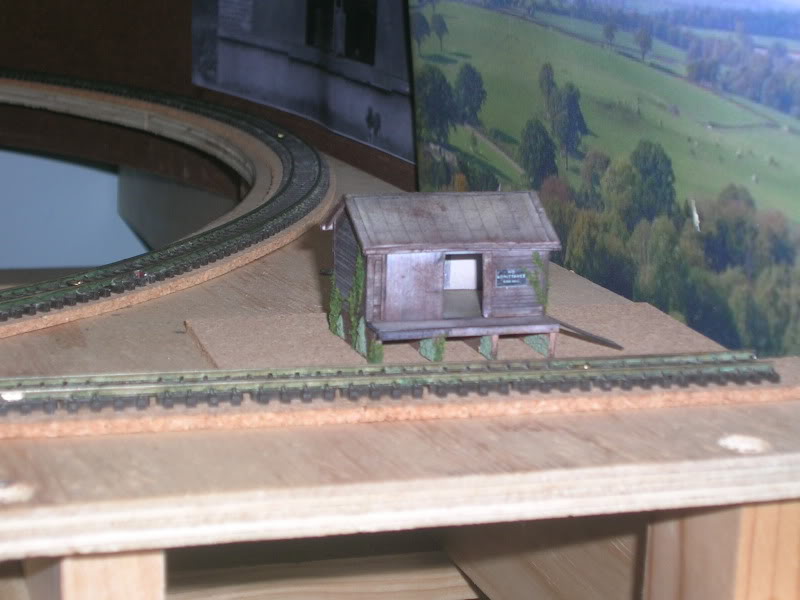
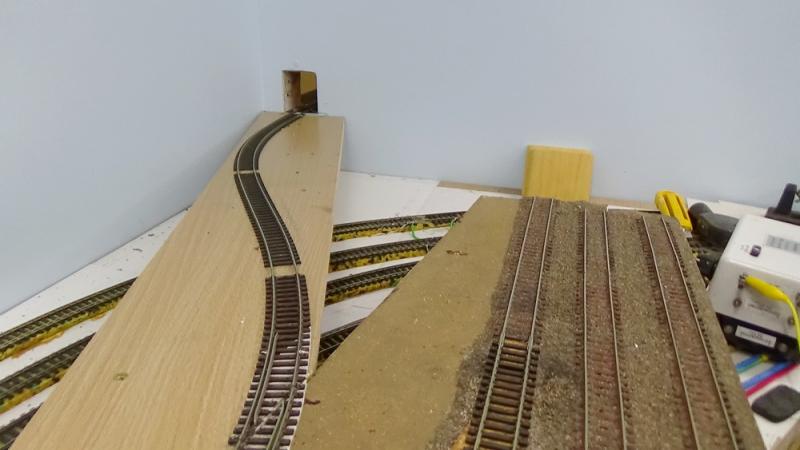
There are no photos of the incident because none of you like to see a grown man cry but…. there is a section of curved flexi-track, eventually to be hidden at the back of the layout, where two pieces of flexi are joined. Up until the delivery of the Ixion Manors, it was fine, everything negotiated the curve without any problems.
Not so the Manors, manufactured to finescale standards the leading pony truck would derail at anything but the slowest crawl… with expected results…
You can see the curve behind the shed in this photo, and yes, the cut out goes all the way to the floor….
The definition of madness is doing the same thing over and over again expecting something to change, or so the saying goes.
Yup, as a March Hare.
So, after picking up 4 MK I coaches and counting the number of buffers that need replacing (the loco was caught thankfully) a DIFFERENT course of action was taken.
This time the guide screws used to align the track were loosened off, the section "tweaked" to provide better contact between the rail ends and solder applied, still derailed :shock:, plasticard shim slid under the outside rail to put in a bit of superelevation… still derailed….
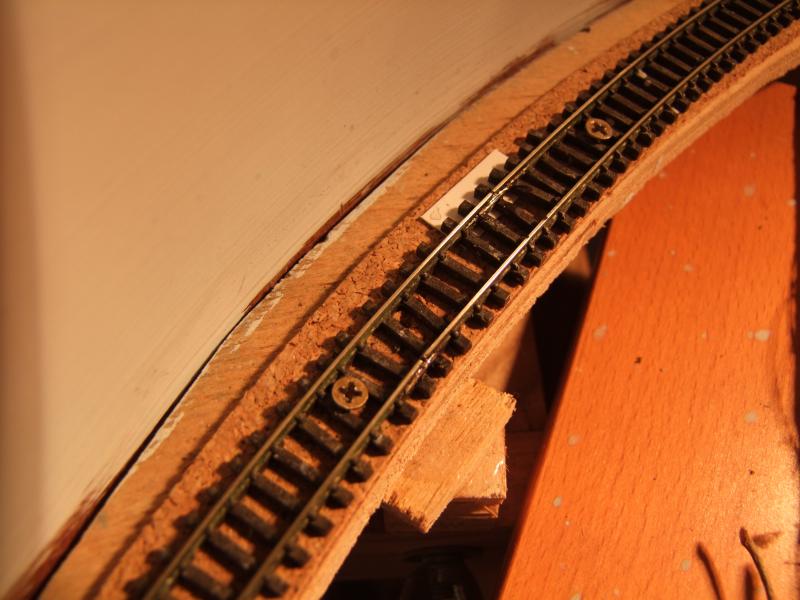
Watching very carefully, with a hand ready to catch, it became obvious that the gauge was out and the pony truck was falling in between the rails. The flexi track was from a previous layout and it can be seen that the plastic chairs are non-existent towards the end of the section… Out came the roller gauges….

The solder was reheated and reset with the roller gauges in place and the Manor and 5 coaches now run smoothly through the curve.
Thanks to those hand building track… your trials and tribulations have helped tremendously in this instance.
cheers
Marty
Posted

Banned
Cheers, Gary.
Posted
Full Member
There will be a removable crash barrier up there shortly, another positive step with something different. :???:
cheersMarty
Posted

Site staff
OUCH!
Been there, done that

Didn't check the hinged section was locked down properly and, (not watching) coach derailed and toppled on to the concrete.
Now got low walls along the section.
Do like the way you staggered the joints on the flexi track, wish I'd done that :thud
Ed
Posted
Full Member
Yes, been there done that, and as Gary says, an expensive inattention to track laying.
I'm planning to do something about a retaining wall very soon too.
The staggered join is was meant to stop the whole out of gauge issue, by cutting the track staggered you can thread the rail through the chairs on the other bit of flexi tracks sleepers. Doesn't help that the chairs were pretty much knackered on that bit of track anyway! I've used it in other places and it's worked fine.
Belt and braces from now on for curves… staggered joins, soldered joins and track roller gauges. As many have said before, attention to getting the track perfect and testing, testing, testing early in the build will reduce the unwanted retro-fixes later on. Sigh… There are a couple of other places that need attention too… mostly on baseboard joins…. must do better…. can do better…. WILL do better.
cheers
Marty
 Last edit: by Marty
Posted
Legacy Member
:thumbs;-):cool:
my webcam link http://86.19.184.67:8080
Posted

Inactive Member
Ken
'It don't mean a thing if it ain't got that Swing'
Posted

Full Member
I've not looked in for a while (been busy wiring up the 2nd half of Market Havering) and was sorry to hear of your mishap !!!. Glad to see you've got it sorted out now, though the cost, in terms of damaged stock, is a cautionary lesson for us all. As regards staggering joints, I tried doing that but found that it was nigh on impossible with Code 55 track as the rail is embedded in a a plastic carrier over its full length. Only time will tell if I have managed to cross the lift-up board joints without the rails going out of gauge. :hmm
Regards,
Trevor
Trevor
Posted
Full Member
well at least you got that great feelling when it was all sorted and running again,:doublethumb
:thumbs;-):cool:
It WAS a bit of a Hallelujah moment Owen. Especially as after all the troubles, the result was so smooth, the whole train just floated through… Just like it was on rails.. Oh … Umm…. Right. I'll get my hat.
Seriously though, if I'd known how to dance a jig I would have! Delighted and all that!
Last edit: by Marty
Posted
Full Member
The staggered joints are a very good concept Marty and I'll be doing this when I extend my layout with a return loop.  As usual your experimentation helps all of us, particularly the N gaugers!
Ken
Sharing the knowledge is what it's all about and If any of my ramblings help another modeller, so much the better. After all, I'm just passing on what I've learnt from others.
A loop line eh? Awesome. Has planning permission been granted?
Marty
Last edit: by Marty
Posted
Full Member
Hi Marty,
I've not looked in for a while (been busy wiring up the 2nd half of Market Havering) and was sorry to hear of your mishap !!!. Glad to see you've got it sorted out now, though the cost, in terms of damaged stock, is a cautionary lesson for us all. As regards staggering joints, I tried doing that but found that it was nigh on impossible with Code 55 track as the rail is embedded in a a plastic carrier over its full length. Only time will tell if I have managed to cross the lift-up board joints without the rails going out of gauge. :hmm
Pffhhttt!
If YOUR precisely engineered track goes out of gauge I'm giving up!
Nice tip about the code 55 though, useful to know.
I'm stuck on the higher stuff, what is it, code 80? Because that's what I had left over from the first aborted attempt of a layout.
The trouble is, the longer I go on modelling and the more prototype pictures I see the more I notice the difference. It doesn't bother me yet but I hope I don't suddenly, some time in the future, decide that it just won't do any longer!
Posted
Inactive Member
Glad you sorted things :).Hand laid fine scale track Marty is for us masochists.If you ever join the band of pain might as well go 2mm fine scale :twisted:.
cheers,
Derek.
Posted
Full Member
I do plan on hand laying to this scale one day but 2mm finescale, with all of the fettling of chassis and wheels that goes with it is just a bridge too far.
Lead me not down that path of temptation by your wicked example of flowing curves and crossings. :-)
Posted
Inactive Member
I don't know about awesome but it will double up my track and baseboard length into an L shape. All ok permissionwise once I can think of where to put the two chairs that back against the wall! :roll: ;-)[user=34]Ken[/user] wrote:
………..The staggered joints are a very good concept Marty and I'll be doing this when I extend my layout with a return loop.[user=19]Marty[/user] wrote:
A loop line eh? Awesome. Has planning permission been granted?
Ken
Last edit: by Ken
'It don't mean a thing if it ain't got that Swing'
Posted

Full Member
Bob
Posted

Inactive Member
I have enough trouble working with OO so I take my hat off to you when you can sort issues in N.
I guess if we were laying real life size track we would see these problems quite easily, but when you move into the small scales, the slightest glitch can play havoc with the stock……..been there done that!!.
It seems to me that curves bring up more problems than straights, because the bending can easily put the rails out of gauge or alignment. Copper clad sleepers are good for sorting those problems and also check rails.
I had a problem with a pony truck derailing on Little Bardfield at the board join on a curve…..one loco only……so I fitted some check rails either side of the join and the problem was sorted. You can see them in the pic below.
:cheers Gormo
"Anyone who claims to have never made a mistake, never made anything!!"
https://sites.google.com/site/greatchesterfordmodelrailway/home
https://sites.google.com/site/greatchesterfordmodelrailway/home
Posted

Full Member
If I go 009 I'll have all this to come, I suppose but at least the buffers won't be as small if I have to find them to put them back on!
Doug
Last edit: by Chubber
'You may share the labours of the great, but you will not share the spoil…' Aesop's Fables
"Beer is proof that God loves us and wants us to be happy" - Benjamin Franklin
In the land of the slap-dash and implausible, mediocrity is king
"Beer is proof that God loves us and wants us to be happy" - Benjamin Franklin
In the land of the slap-dash and implausible, mediocrity is king
Posted
Inactive Member
With rail joins I find if you use your dremel with a carbo disk.Just grind a slight bevel on the rail ends to get rid of sharp rail edge,s.This gets rid of that slight snag effect where the two rail ends join.Stops that bump effect.
Cheers,
Derek.
PS:If you don't own a dremel a small file will work.
Posted
Full Member
How did you fix those check rails Gormo? Cyano?Well Done Marty,
I have enough trouble working with OO so I take my hat off to you when you can sort issues in N.
I guess if we were laying real life size track we would see these problems quite easily, but when you move into the small scales, the slightest glitch can play havoc with the stock……..been there done that!!.
It seems to me that curves bring up more problems than straights, because the bending can easily put the rails out of gauge or alignment. Copper clad sleepers are good for sorting those problems and also check rails.
I had a problem with a pony truck derailing on Little Bardfield at the board join on a curve…..one loco only……so I fitted some check rails either side of the join and the problem was sorted. You can see them in the pic below.
:cheers Gormo
Doug,
The roller gauges have a second grove for the check rail spacing… should be a doddle :shock: :lol:
Marty
1 guest and 0 members have just viewed this.