Highbridge Sidings
Posted
Guest user
Off at a tangent once more.
Now he tells me, :thud
Posted
Guest user
Posted
Guest user
Tomorrow is ripping up track on Highbridge, renewing track bed, reinstalling magnets and Gluing track down ……… Yes ……. Gluing.
When I was testing the 08 I discovered a couple of dips in places. Pis doubly when pinning down. I want that track perfectly flat.
I'm also ripping out the point in tube stuff and reverting back to Cobalts. I've sent away for a switch 8 for my points. It will have spare capacity but there will be other items that can be switched that could use the capacity up.
Fingers crossed the weather holds out as I could do with getting the layout on the picnic table. I want to fire in about it. This is taking far too long with the usual set backs. Now I know how the magnets work, I am going to take the opportunity with the track coming up to reposition the magnets to how Gary suggested…….. Between the the opposing points. I don't require them on all three sidings due to the ability to push back with the Kadee shuffle.
This is going to be the quickest, most intensive rebuild you have ever seen.
You can be the camera man ( amongst other things )

Cheers
Toto
Posted

Full Member
.If you need a 12V power supply, have a look for an old (or new) PC ATX power supply.
These will give a +12V, +5V, +3.3V, -5V & -12V.
for example
500w ATX Black PC Power Supply 500Watt PSU with 12cm Silent Fan 2 x Sata Support | eBay
Can be used for servo's (5V), LED's (any of the outputs with a resistor added), Grain of wheat bulbs (12V) etc etc.
Paul

Posted
Guest user
I have a Cobalt PSU 2 power supply.
It gives a dual supply of 9 volts DC and 18 volt regulated DC.
Check it out and see what you think.
My other is a Gaugemaster unit but I think that could be a 16 volt AC version from memory. I'll double check. If I do need another , I'll have another look at what you posted but if either of the two I have is suitable then I'll obviously use what I have.
Cheers
Toto
Posted

Banned
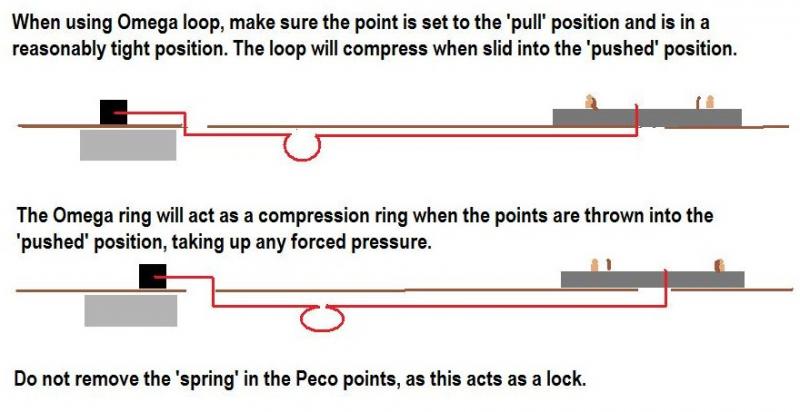
I personally avoid the 'omega loop' and use stiff wire in the form of 1mm diameter welding rod. I have never had a problem. If you are using the omega loop, install it as I have shown in the diagram above. Perhaps you could reinstall the wire without the loop in the length off wire. Cheaper than Cobalts.
Cheers, Gary.
Posted
Guest user
Cobalts ain't a problem. I have about 2 and a half dozen that are for Rosebuddy when it re commences.
I'll see where tomorrow takes me.
Cheers
Toto
Posted
Full Member
16V ac is easily useable 4 diodes to form a bridge rectifier, LM7812 12V voltage regulator, a big - ish capacitor to smooooth the output and you have a pretty reliable, stable 12V dc supply.
Just back from Joe le Taxi - again
Paul
Posted
Guest user
Posted
Legacy Member
reg
Posted
Full Member
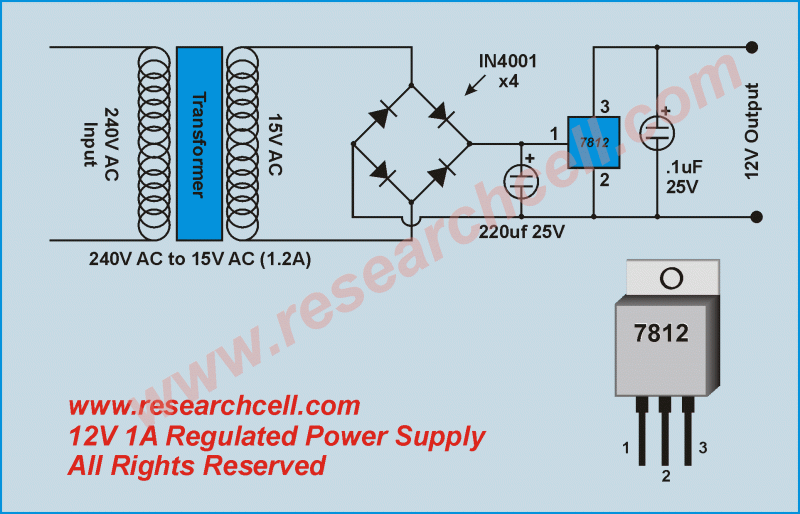
Replace the 7812 with a 7805 and you have a 5V supply
Paul
Posted
Legacy Member
reg
Posted
Guest user
Posted
Guest user
See you sometime after 11
Cheers.
Matt
Posted
Full Member
If your going to glue the track down, drill a 8mm hole under the centre of the tie bar - for your cobalt, and put a piece of insulation tape over the area where the tie bar assembly will be. Spread the glue (thin coat), then remove the tape before lsying the point. This should help keep the glue out of the mechanism.
I usually place a flat board over the track then apply weight then walk away, give it a good 12 hours or more to dry.
Enjoy
Paul
Posted

Site staff
Just a thought.
Ed
Posted
Guest user
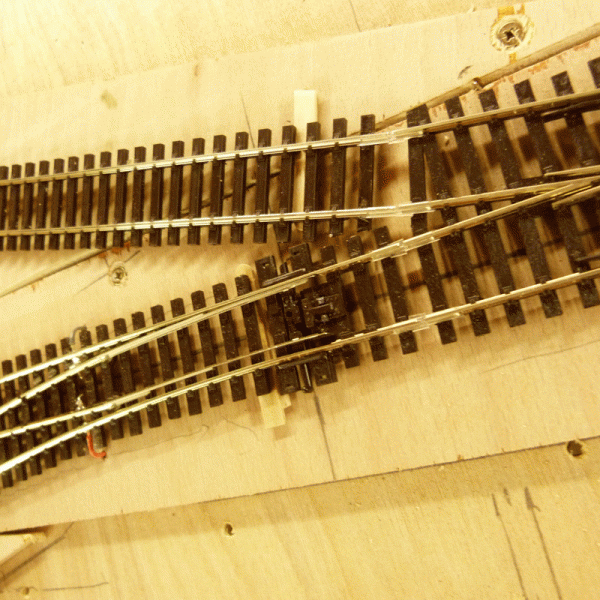
A great days work done on Highbridge today. The existing track and 9 mm track bed ripped out. All the wiring cut out, magnets out and the board taken back to basics.
A new 3 mm track bed put back in. Magnets reinstalled albite only two and in different positions. ( a new strategy ). All new track and points wired and the baseboard drilled to take wiring. All track back in place. The track is perfectly flat and I have confidence that the magnets will work perfectly once a little weight is added.
So, the track is currently lying in test position. I'nn nip back out tonight and raise the track and lay a bed of neat PVA, lower track back in position for its final laying.
Photos will follow later tonight. Really delighted with the result. Good decision to start it again. Points will be Cobalts as mentioned earlier.
Cheers for now,
Toto
Posted
Full Member
Well done those men :pathead:pathead
Still waiting for the piccies - and Matt starting his thread :hmm
Paul
Posted
Guest user
Where have you been …….. Matt started his thread already !
And as for the photo's ……… here they are. I have been out and glued it down. I only glued it at certain points because when I lay the ballast etc, that will also hold things in as well.
anyway, here we are, started off by stripping everything out and relaying the track bed.

Its only 3mm ply this time.

Started sinking in the two magnets.

another

and one more,

and the track is down

The magnets work fine but wagons still need weight added. Much better than previously though.

I then propped it up on packers as I am going to squirt some PVA under the track for gluing down,
and again,
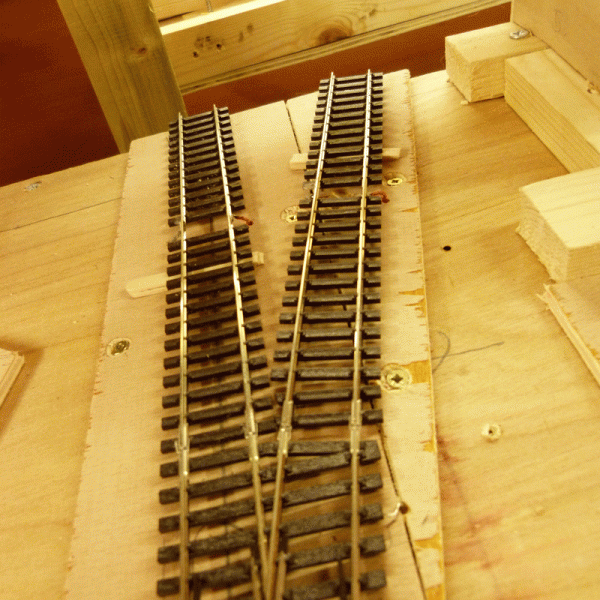
Then the glue goes in and the packers come out.

and an other,

and weighing it all down until it dries out.

and so it is done for the day. Tomorrow it will be installing the low level walls again and soldering the track feeds under the baseboard. I am awaiting the delivery of a switch 8 which will be here for me coming back next weekend. I'll get it fitted along with the Cobalts and hopefully be shunting by the end of next weekend. its looking good.
I've run wagons by over the track by hand and they are running perfectly. No dips etc and the points are running flawlessly with their neighbouring tracks. good stuff. the magnets are working a treat but the wagons will require more weight as previously. Stripping it back has turned out to be a good move and keeping clear of track pins.
that's it for now.
cheers
toto.
Posted
Guest user
) but the end results are looking good mate !:thumbs
1 guest and 0 members have just viewed this.