Highbridge Sidings
Posted
Guest user
Off at a tangent once more.
Nipped on to Hattons website.5 Zen 6 pin direct decoders with stay alive £100.00. That's not bad is it. 2 x Zen 8 pin direct decoders with stay alive £ 25.00 each.
That'll cover my 2 class 08's and most of my 03's. That's Highbridge taken care of. Just have to fit the little blighters now.
Cheers
Toto
Posted
Guest user
I have tomorrow night at home as my car is in for an MZoT tomorrow. I don't think there will be much going on with Highbridge until I get my stay alive decoders. I can maybe give the track a good going over with a track rubber but that's about it. I want to see the difference that stay alive makes to the running of the loco's.
Apart from that I will be looking at possibly building in an omega loop into the point rods as I am not convinced that the switch travel us as Gould as it should be. To be decided yet.
I may also use tomorrow night to give the shed a good clean up as it's like a tip at the moment. It feels far to disorganised. It will be next weekend when I get home on the Friday before I will have sight of the decoders so I'll fit them out next Friday evening. I'm busy with SWMBO all next Saturday so at the earliest it will be Saturday evening before I find out what further tweaks Highbridge needs in terms of track etc to enable me to get back on to the scenics. However, I don't mind too much as things are at least moving again.
Cheers
Toto
Posted

Inactive Member
If the omega loop doesn`t give you enough travel you can always fit a pivoting lever along the line somewhere. Imagine a straight flat bar with three holes drilled. The centre hole is the pivot. The hole on the right? connects the switch to the lever. The hole on the left? connects to the point.
Now if the pivot hole is off centre and closer to the switch connection hole, the amount of travel at the switch will be increased at the lever and therefore give you more travel at the point end.
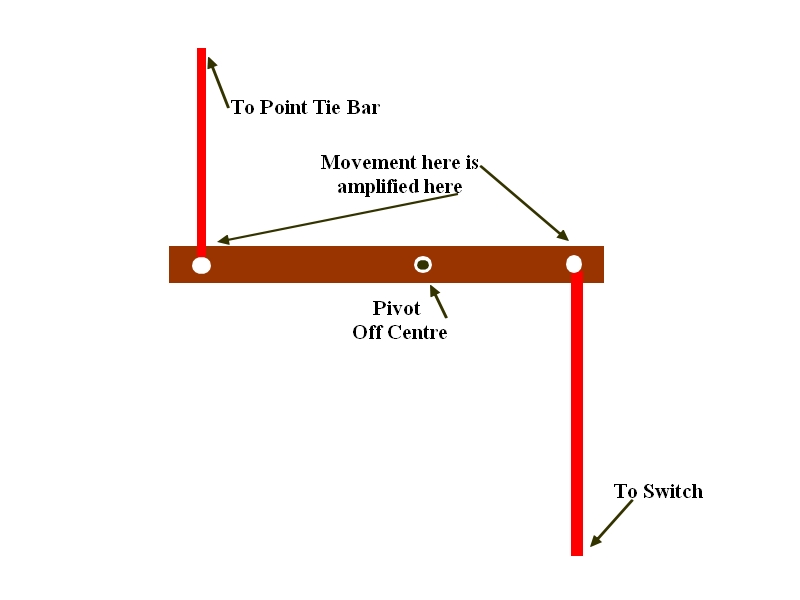
It`s very much a trial and error system but there`s no reason why you couldn`t drill several pivot holes along the bar and try them to see which gives the best result.
You could still incorporate the omega loop in the line somewhere to buffer the impact of the throw at the tie bar.
The other thing too is that this lever arrangement reverses the movement at the tie bar. If you move the switch forward towards the points, the point blades will move backwards towards the switch. No big deal, but you should consider that.
:cheers Gormo
"Anyone who claims to have never made a mistake, never made anything!!"
https://sites.google.com/site/greatchesterfordmodelrailway/home
https://sites.google.com/site/greatchesterfordmodelrailway/home

Posted
Guest user
As you say a bit trial and error but just the job. I'll have to have a look around to see what I could use. I don't have a meccano box

I'll find something.
Cheers
Toto
Posted
Inactive Member
It only has to be light and not too long…..30mm in length would be a good starting point, but longer would be fine also????
Whatever works!!
I should have mentioned the critical element is freedom of movement at the pivot point. You don`t want it wobbling all over the place, but a nice easy, free movement would be ideal. Possibly a small flat washer between the bar and the board to facilitate free movement and give you some clearance for the connecting cables or rods.
Once you start trying it out, it`ll fall into place fairly quickly.
:cheers Gormo
"Anyone who claims to have never made a mistake, never made anything!!"
https://sites.google.com/site/greatchesterfordmodelrailway/home
https://sites.google.com/site/greatchesterfordmodelrailway/home
Posted
Guest user
I'll have a dig around and see what I can come up with. A large servo arm would have been ideal but I don't have such a thing. Anyway, I'll get something, just needs a bit thought.
Cheers
Toto
Posted
Inactive Member
The copper clad is pretty strong actually. It will do, to get the dimensions and hole positions sorted and probably will last quite well. Eventually you could replace it with something else if you needed to, but I think initially it`s a good way to start.
The first one is the hardest but from there on you could turn them out like little sausages.
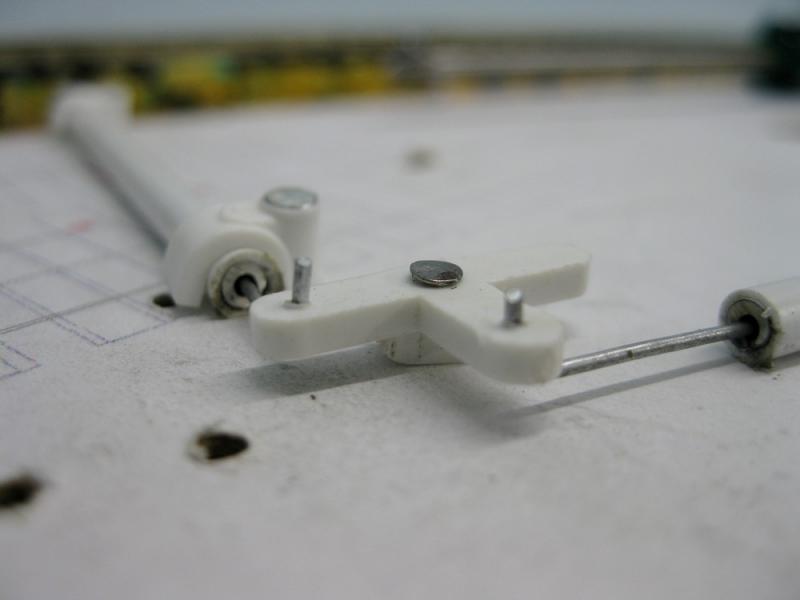
Just as an example Toto……this is an old pic of a tile spacer which I use as a bell crank. The pivot pin is a track pin or small flat head nail and the spacer under the bell crank is one arm that was cut off the tile spacer. You can see the wire is just bent and pushed up through holes in the bellcrank. These parts have been working without fault for around about two years I think.
There is no reason why you could not do the same and use tile spacers. Just cut off two arms to give you a straight length.
They are as cheap as chips for a bag of a 100 at the hardware store.
:cheers Gormo
"Anyone who claims to have never made a mistake, never made anything!!"
https://sites.google.com/site/greatchesterfordmodelrailway/home
https://sites.google.com/site/greatchesterfordmodelrailway/home
Posted

Full Member
Hope it works for you too Toto,
Bill :)
At 6'4'', Bill is a tall chap, then again, when horizontal he is rather long and people often used to trip over him! . . . and so a nickname was born :)
Posted
Guest user
My rods are quite thick but regardless of the material, the principle is the same so I'll get looking.
If I reinforce the baseboard under the area where the pivot will be, maybe a nail can be used if it's driven in deep enough it won't move or slacken easily.
I'll work on it.
Cheers
Toto
Posted
Guest user
The neighbour was tossing out a couple of old bicycle wheels. Not before I grabbed the spokes he wasn't.
. I've got a couple of dozen. That'll be enough for now.A freebie for a change.
Cheers
Toto
Posted
Inactive Member
Join the ranks of the recyclers.!!!:thumbs:thumbs:thumbs:thumbs
Bicycle spokes are excellent if you can use them, because they are extremely strong and rigid. Totally different properties to wire. I still have about thirty of them waiting for a project……they`re just too good to throw away.!!
:cheers Gormo
"Anyone who claims to have never made a mistake, never made anything!!"
https://sites.google.com/site/greatchesterfordmodelrailway/home
https://sites.google.com/site/greatchesterfordmodelrailway/home
Posted
Guest user
Thought you would approve of that one. Couldn't let them go. :)
Posted
Inactive Member
"Anyone who claims to have never made a mistake, never made anything!!"
https://sites.google.com/site/greatchesterfordmodelrailway/home
https://sites.google.com/site/greatchesterfordmodelrailway/home
Posted

Banned
Bicycle spokes are excellent if you can use them, because they are extremely strong and rigid. Totally different properties to wire. I still have about thirty of them waiting for a project……they`re just too good to throw away.!!
Project eh ?? I can sense a 'plank' by Gormo coming on ! ;-)
Cheers, Gary.
 Last edit: by Gary
Posted
Inactive Member
:cheers Gormo
"Anyone who claims to have never made a mistake, never made anything!!"
https://sites.google.com/site/greatchesterfordmodelrailway/home
https://sites.google.com/site/greatchesterfordmodelrailway/home
Posted

Inactive Member
Max
Port Elderley
Port Elderley
Posted
Inactive Member
:cheers:cheers:cheers:cheers:cheers:cheers:cheers Gormo
"Anyone who claims to have never made a mistake, never made anything!!"
https://sites.google.com/site/greatchesterfordmodelrailway/home
https://sites.google.com/site/greatchesterfordmodelrailway/home
Posted

Full Member
Cheers MIKE
I'm like my avatar - a local ruin!
I'm like my avatar - a local ruin!
Posted

Full Member
I've purchased the Kadee 321 between the rails uncoupler, and some #18 couplings. Perfect height for the Bachmann 7 & 8 plank wagons and the conflat, miles out for the Hornby 20T brake van.
Installed the #321 magne-matic (code 100) magnet on my test track - code 100 steel track. The couplings barely flinch, and no effect on the axels. Move the magnet to the layout - code 100 nickel silver track, and the couplings now move, and the axels are effected by the magnet. This may also explain my difficulties with the neodium magnets on my test track.
Paul
Posted
Inactive Member
Are you suggesting that the steel rails somehow absorb the magnetic effect.?????
I guess if the rails become partially magnetized near the magnet they may cancel out the direct pull of the magnet itself by spreading the magnetic field too wide instead of it being focused under the coupling???
Interesting…
 hmm……whereas Nickel Silver rails have no magnetic properties therefore no problem.
 :cheers Gormo
"Anyone who claims to have never made a mistake, never made anything!!"
https://sites.google.com/site/greatchesterfordmodelrailway/home
https://sites.google.com/site/greatchesterfordmodelrailway/home
1 guest and 0 members have just viewed this.