Highbridge Sidings
Posted
#203930
(In Topic #11221)
Guest user
Off at a tangent once more.
Well,No sooner had I set the tasks for today then I was off committing myself to more grief. The R & GLR is moving along nicely. Breadalbane is progressing, currently in the midst of a technical design period prior to baseboards being built and construction beginning …….. But I still have a craving to do some scenics and the like so ……… As if there wasn't enough on the go, welcome to my quick practice ground plank.
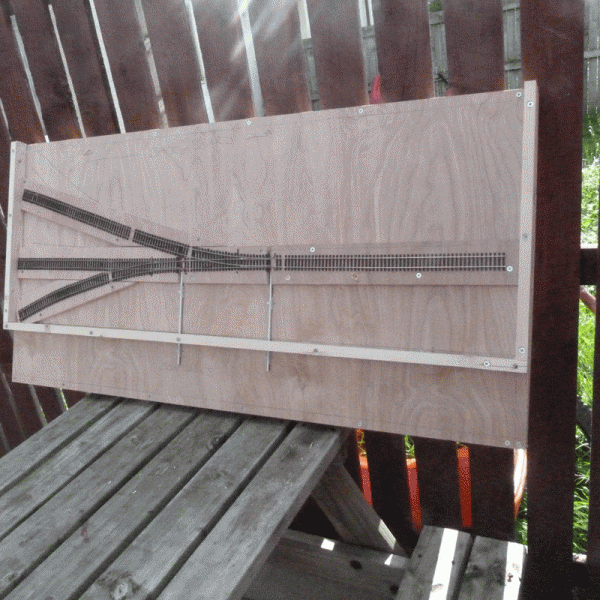
I went armed with some cash to B & Q this morning and bought a plywood sheet 1200 x 600 with which to make a start. The actual operating dimensions will be 1200 x 450 mm. However, I am not cutting the board down any. I am going to use the remaining 150 mm strip to locate switches / controls etc. ( sort of control shelf ).
This will be based on a inglenook shunting layout but may not strictly adhere to the rules. As well as the head shunt and three sidings, I will have a kick back for an engine siding.
All the points will be wire in tube, electrofrog, polarity and point switching done via slider switches. It will be DCC with no complicated wiring. Just track feeds and some lighting. The landscape which will be slightly raised to give some kind of form will be created using wire mesh and plaster bandage.
The theme is not 100 % decided yet but may be along the scrap yard theme. Although some suggestions ( something original and a bit different ) would be considered.
I have everything I need to get going so without any further ado……….. I'm off.
Any comments / suggestions apart from the obvious " I am off my head one " are more than welcome as usual ……….. See you all at the other side.
Toto
Posted

Full Member
Marty

Posted
Guest user
made a start and got the baseboards done.

A sheet of 6mm plywood marked out for supports.
Trying out some bits of track and the two points.

Lay a raised track bed and make room for the wire in the tube point controls.

C'mon ……. lets get the track bed down and the track laid.
That's better. the tube is about 4mm aluminium tube which has a smaller inner bore. Ideal.
the track wiring was already attached so just another couple of track feeders and its done.

A close up of the point tubes.

And that's it for today. I am going for a beer tonight as my dad gave me a call. Its not often he does so I'll go and enjoy a beer and a natter.
I'll be back into it tomorrow where I'll install the slider switches and may make a start of the landform around the track edges. Not sure what I am doing yet as a theme ……. possibly a scrap yard but was hoping for suggestions. I want to model a slight hill side cutting at one end of the layout leaving the other end for a structure that will be theme related ….. maybe a scrap shed or whateverit turns out to be.
What do you think so far ……….RUBBISH !!!!!!!!!!!!!!
 7
7cheers
toto
Posted
Guest user
Posted
Guest user
I needed to do this as I am itching to get my hands dirty with the scenic side of things. I may live to regret it as it could totally show me up.
but I'm going to have a go.It's a bit worrying as I have fired off ( in time honoured tradition ) without even really knowing what I want to do. However, I though , just do it and see where it goes. It's not meant to be a time consuming masterpiece, just something simple but that will give me opportunities to experiment a bit and see what I can ( or can't ) do.
I can't see the setting yet but hope that between tonight and tomorrow I came up with one as I won't be stopping to think too much.
all I know is I'm having a go with the plaster bandage ………. Messy …….. Brilliant. I'll do the track bed in a coat of brown emulsion just to give it a base coat from which to start the ground cover. I'll build on that.So …… Scrap yard mmmmmm. Or maybe a cattle dock scene or whatever. Get your thinking cap on.
Cheers
Toto
Posted
Guest user
cheers
Matt
Posted
Guest user
Posted
Guest user
…think again
Posted
Guest user
Oh well
Posted

Full Member
Cheers MIKE
I'm like my avatar - a local ruin!
I'm like my avatar - a local ruin!
Posted

Inactive Member
Max
Port Elderley
Port Elderley
Posted

Inactive Member
You`re off again.
Marty said Tuesday fortnight you`ll be finished…….nah!!!…..Tuesday fortnight you`ll be fitting the extension to this board…
.Matt …..I thought you were keeping an eye on Toto??…..he`s managed to slip out to B&Q while you were having your tea break and then he`s knocked up a baseboard and started laying track???
Anyway mate ….it`s good to be trying new ideas…..good on you…..and now you`ve taken up manual point control???……..welcome to my church brother.!!!
:cheers Gormo
"Anyone who claims to have never made a mistake, never made anything!!"
https://sites.google.com/site/greatchesterfordmodelrailway/home
https://sites.google.com/site/greatchesterfordmodelrailway/home
Posted

Full Member
I thought my little N-gauge effort was a quick build. This one's going to be finished, exhibited and back in the van by next weekend!!! :lol::cool:
Posted

Banned
You have chosen some of the time honoured techniques here and I'm watching very closely… :hmm
Now you have to scratchbuild some structures, a cattle dock, a crane for the scrapyard, or perhaps an engineering plant where they install larger turbos or superchargers for the locos that run on the R&GLR ! Just think, a Class 08 that does 150mph ! :mrgreen:
Don't foget you'll need another PCP (Power Cab Panel) for the NCE handset and power supply. ;-)
Cheers, Gary.
Posted
Guest user
Just shows what a minute of madness can do.
still struggling for a theme. I will show a couple of bits and bobs that I may try and work into the scene once I get them photographed. I have a couple of ideas. Meanwhile any suggestions ……. Feel free to chip in.Cheers
Toto
Posted
Inactive Member
Well actually it`s more of a question than a suggestion,but depending on the answer could turn into a suggestion.
Have you inserted the wire into the tubes and made the appropriate connections to the tie bars.?????
If " Yes " then well and good and Bravo my good chap !!!….however if the answer is " No " you may have to lift your tubes again, insert said wire and try and slip it up and under the tie bars.
Your pictures above seem to indicate there are no wires present……correct me if I`m wrong.
It`s actually easier when laying the point to bring the wire up under and into the tie bar then pin the point down then secure the wire in tube.
How do I know??????…….you guessed it :cool wink
:cheers Gormo
"Anyone who claims to have never made a mistake, never made anything!!"
https://sites.google.com/site/greatchesterfordmodelrailway/home
https://sites.google.com/site/greatchesterfordmodelrailway/home
Posted

Site staff
How do I know??????…….you guessed it :cool wink
:cheers Gormo
Me too :oops::oops::oops:
Ed
Posted
Guest user
You are correct ……. Said wires are not installed yet. I will take the tubes out and do the wires first. One of today's tasks.
I was also thinking about my original idea of a kick back for a short shunter siding. I have held back on that idea though until I determine what the layout is going to be. I am now thinking of a warehousing area rather than a scrap yard. This will give me the opportunity to try some buildings etc. still trying to decide but I'll need to make the decision soon.
I am going to use some copper earth wire for my point control. It's solid and stable enough for these short lengths. ( I don't have any wire coat hangers or they would gave been first choice ).
The plaster bandage may have to wait a bit longer if the theme turns to an urban one. Never mind. The narrower strip along the front may be built up using polystyrene and topped of with something depending on the final surface finish required. Still a lot of if's so some quick decisions to be made.
As I said at the start, I don't want to procrastinate over anything. Just go where it takes my fancy at the time or it will turn in to another monster.
Maybe I'll model a Broth …… No maybe not. It's a family show.
Cheers
Toto
Posted

Legacy Member
An Inglenook with a difference.
 Last edit: by John Flann
Posted
Banned
 I would recommend the use of 'piano wire', which is avalable through most good hobby shops, especially those who sell radio controlled planes etc. Ask your local hobby shop to get it in for you. :thumbs
This stuff : http://modelshop.co.uk/Shop/Strip-Shape/Circular-Rod/Piano-wire/Item/Piano-wire/ITM1982
Cheers, Gary.
1 guest and 0 members have just viewed this.