H0 Scale - South Shore Line
Posted

Full Member
Wayne are you planning on having submerged rocks, or rocks at the water's edge? If so you'll probably want to get them located beforehand.
Also - what colour/s are you going to paint on the lake bed?
Mike,
I am currently working on a pier that will have rocks all around it, and yes I will put the pier and the rocks in place before pouring the resin. I may also put in a boat, but at this point, I don't have one to put in. If I really want one, it will be a time before you will be seeing the resin poured!
As far as submerged rocks along the shore line goes, not a bad idea. I need to do something because, just water and shore line, don't seem to get it. I might need a pretty good sized rock for one in the water. I have some talus that will work great for around the pier, but they are not that large for a boulder in the water.
Brian,
There are already about 50 miles of contaminated shore line in Florida, albeit up in the northern panhandle. I fear that it will only be a matter of time before we have tar balls all along the shores of the west coast.
Wayne
 Last edit: by Wayne Williams

Posted
Full Member
Forgot to answer your question on the colors for the lake bed.
Good question!!!!! I have been searching the web for pictures of Lake Michigan and have found several. Everyone of them a different color! I don't think I'm going to win this am I?
There are several pictures where the lake is a brilliant blue and many others where it's actually a light green. Aerial pictures show more of a grey with light brown near the shores.
Any suggestions?
Wayne
Posted
Guest user
If you're after clear water with a sandy bottom, you could go with some green that's not too pretty and with sufficient yellow in it so that it doesn't look bitter. Much safer though, I think, to merge some browns into it, particularly around any rocks and the pylons of the pier.
I got away with purple! brown and green in my first New England river.
You could try mixing some paint into the resin[?] you're using too. I haven't used the Woodland Scenics product but I'm 99% certain that you can mix acrylic paint with it too. It's probably the same stuff as the resin I use anyway.
Coloured resin is great at muting the base colours.
Just some suggestions - I don't think there are any hard and fast rules here!
Mike
P.S. I think your best bet is to be guided by aerial photos. The last thing you want is for it to be blue from above.
Posted
Full Member
Mike, I used only 1 drop of blue in that cup of water and you can see the results of that, will the resin react the same way? Which color would be the best to add to the resin, green, brown or what?
One more item I have been thinking on and it's weeds. There are plenty of weeds in lakes. Most from my perspective seems a muted green with some browns in them. I was wondering if I were to place some paint in the resin to remove SOME of the clearness of it, and then glue some Woodland Scenics ground foam (sparsely) on the "lake bottom", would it look like weeds at a depth?
I am only working with 1/8" total here so the weeds or grasses that I use would have to be the "Fine" variety.
Has anyone out there tried doing this?
I'm thinking like I might have to do a test run?
Wayne
Posted
Guest user
As for the best colour to add to the resin, I couldn't decide that either, which is why I've gone with multiple pours for the last two jobs - river on the old layout, and tidal estuary/channel on the new. I figure that nearest the bottom is where you'll have some suspended sediment, so I started with brown. I reckoned the middle layers should carry some green [which serves to mute the brown a little] as well as giving it a nice 'living' colour, and the uppermost layer can take a hint of blue to aid the 'outdoors under the sky' look in the form of blue-green. It seems like a lot of trouble to go to, and the effects are only subtle, but if I ever do another I'll be doing it in layers!
It's hard to say how much paint you'll need because it depends on the volume of resin you're pouring. I got a bit reckless and added too much brown last time, which I ended up not even using. It's important you add just a tiny amount at a time, and remember that if you're mixing it in a pot that's smaller in surface area than your lake, which is normal, the resin will look quite a bit paler when you spread it on the lake.
I also found that if you let water get into the resin it can go quite milky [see my old New England thread] so be careful to avoid it.
I would advise against using any Pthalo [Thalo] green because it's very potent and far too vivid. I've used cheap "forest green" type colours. Sap green would be good, as would Hooker's. I've always added some red or red oxide to them to tame them down somewhat too, but that can depend on your own location. You might want a cleaner look.
I've never tried adding foliage for weed beds. I don't see why it wouldn't work though. For Swanhurst's Pinchbeck River I painted some weedbeds in and they were ok I think.
I hope that's some help. For me it's always a bit hit-and-miss, and quite an adventure

Mike
P.S. adding paint to the resin will give you a very good guide as to when the stuff is properly mixed
Posted
Full Member
I have just re-read the instruction on the bottle, it may be a good idea for me to pass some of them along to everyone.
Product: Realistic Water, made by Woodland Scenics, product number: C1211
1. It is water soluble and non-toxic.
2. There is only one bottle, no mixing required.
3. Some shrinkage may occur.
4. Will not crack.
5. Do not shake the bottle.
6. It says to paint the sealed water cavity with Earth colors liquid pigment.
7. Do not pour more than 1/8", if cavity is deeper, pour in 1/8" increments.
8. Do not brush.
9. Use a toothpick to gently flow product into tight areas.
Well that is basically the instructions on the bottle. The material looks like a clear liquid.
I think tomorrow I will do a test pour with a touch of paint stirred in, to see if it will cure properly.
Wayne
Posted
Full Member
This is a bottom from a dixie cup cut 1/8" tall. I dipped one end of a tooth pick into some green paint and ended up wiping off most of it. The toothpick was only colored with the paint, and it did this.
Look closely and you can see the green pigments that just would not mix in. Maybe I did not mix the paint enough first.


When this is totally cured, I will cut off the dixie cup and then we can all see what it actually looks like without that white cup.
Wayne
Posted

Inactive Member
That way I could just pour the resin in on top and it looked "right." No need to put any colours in the resin at all. I have a photo or two somewhere if interested?
Is that something that would work for you, Wayne?
Max
Port Elderley
Port Elderley
Posted
Full Member
I think that is sort of where I am headed. I was planning to paint the lake bed and then use very subtle tinting in the resin to subdue the colors on the bottom.
Wayne
Posted
Full Member
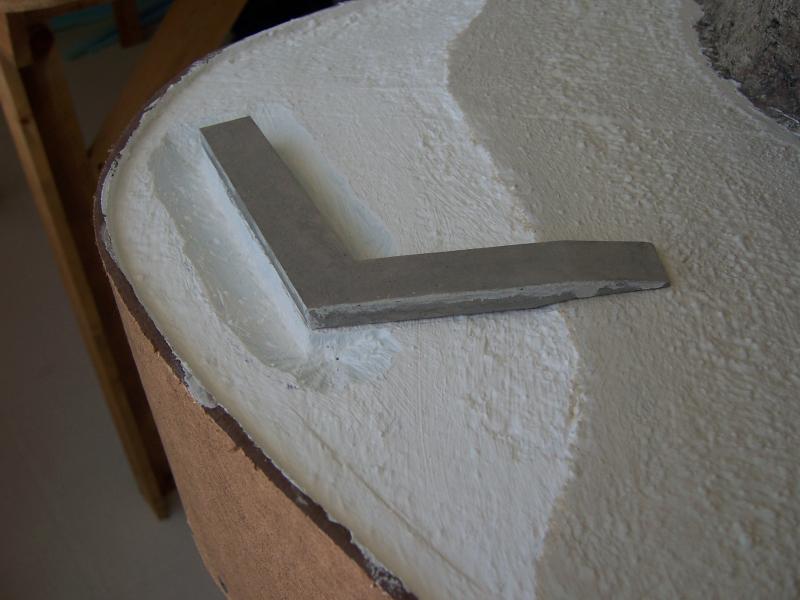
I decided that just a sand beach and some water was too simple looking, so I am adding a fishing pier. It is copied from several that are on Lake Michigan. The piers are concrete with hugh boulders lined around the edges. You can crawl out on the boulders and sit down and fish.
That said, now I needed to make a space for some boulders around the pier. The pier was fairly simple and only took a few minutes to construct. At the last minute I decided that I didn't like the joint on the edges of the pier, so I filled them in with some putty, it now needs some touching up.

Once the pier was made, I laid it in place and traced around the edges, then cut out some of the foam on a slope to allow room for the boulders. I also painted the sand beach a color similar to the N gauge ballast that I intend to use for the sand. It is still wet in this picture, hopefully it will dry a little lighter for a better match.
Now that I am over 1/8" deep, I will have to do multiple pours to fill the lake bed.
Another change is the weeds, most weeds in Lake Michigan, along the shores, are more reed like. The problem became, how do I get weeds to stand up?
While pondering that question my wife went out to get the mail, guess what was in there? Yep, a catalogue from Micro-Mark, and inside was the Noch Grass Master on sale for the summer.
Should be here in 5 business days! :Happy
The goal now is to get the grasses to stand up in the water, should be interesting.
Wayne
Posted

Full Member
On the Pentrecourt Halt diorama the reeds are sisal kitchen string, dyed green, untwisted to get individual strands and then glued to the riverbed/bank with pva glue.
Once dry, the resin "water" poured into the river and then teased into place around the clumps of reeds with the pointy end of a bamboo cocktail stick.
Seemed to work out OK for me… and N gauge too.
Posted
Full Member
I fairly confident that I can work out the air from the reeds, but the weeds, well that will make for good forum content!

Wayne
Posted
Full Member
I too had the flecks of paint in the resin on one of my early test batches. Tried a couple of different manufacturers of acrylic paint until I did find one that mixed into the resin nicely.
That was for the two part resin that Mike and I use, might not work for the Woodland scenics stuff though.
And be really sparing with the paint, unless you want a murky river like the Pentrecourt Halt diorama! No more than a drop or two, then mix it in and see what it looks like, you can always add more.
Mind you, add too much and you won't have to worry about air bubbles amongst the weeds, 'cause you won't be able to see the weeds.
HTH
Posted
Full Member
In between pouring the lake I have been building the tunnel portal that is located next to the S-curve going into New Carlisle. It is in three individual pieces. I had to build my own, versus buying one, because of the separation, and elevation differences of the two tracks. All double portals that are for sale, the two tracks are on the same level.
I'm not sure exactly how these pieces will actually attach to the layout. The center and R/H ones are against a removable section, while the L/H one is stationary, but I'll work it out.
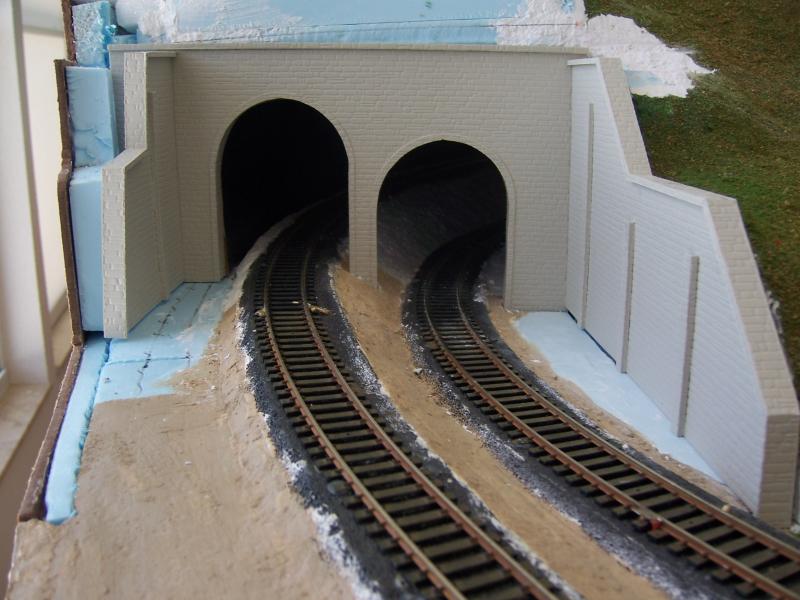
I chose to use the O gauge Plastruct styrene sheets. I just didn't like the HO sizing, it seemed to small to me.
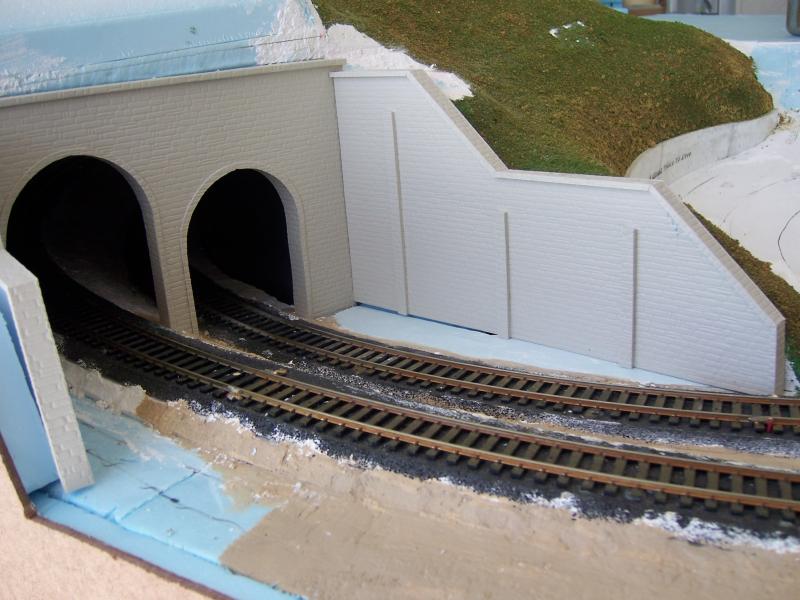

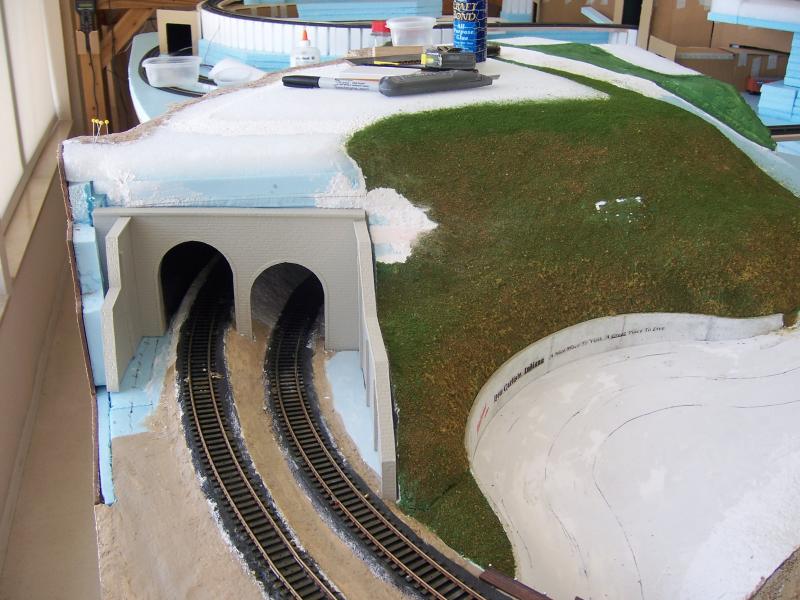
You can see where I had to do some construction on the hill side at the top right of the portal. The shape of the hill just did not fit the portal. No big surprise though, I figured I'd have to do some modifications somewhere when I built the hill.
Betty and I will be traveling up north again for the next couple of months. We are leaving next week. I will have limited access to the internet during that time, so you may not here from me for awhile. Should be back here sometime after Labor Day (first Monday in Sept.).
Wayne
Posted

Full Member
Hope you have a great time "up north". At least there's not much risk of BP spoiling things up there. :cheers:cheers
'Petermac
Posted
Full Member
At least there's not much risk of BP spoiling things up there.
I'm not worried about "Up There", it's what will I find when I return "Down Here"!

Wayne
Posted
Full Member
'Petermac
Posted
Full Member
I have opted to place this here because if I opened a new thread, the title would give it away.
Here is a puzzle for all of you. Can anyone tell me what I am scratchbuilding here?
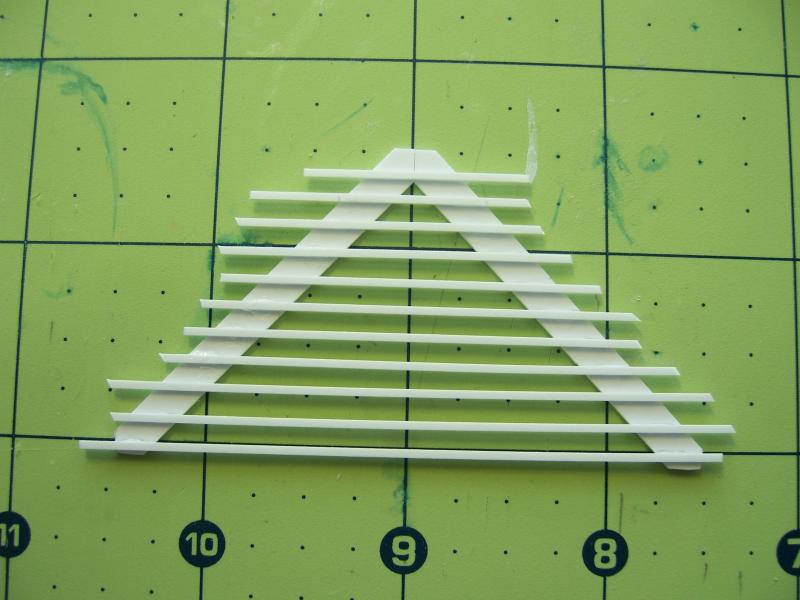
If you look closely there are clues in the picture.
Wayne
Posted
Guest user
Brian
Posted
Inactive Member
Max
Port Elderley
Port Elderley
1 guest and 0 members have just viewed this.