Granby Junction 1948 N. Wales
Posted
Full Member
GWR/LMS OO Gauge DCC RR&Co
John Dew I have spent a most enjoyable day reading your thread from start to end. Thank you very much. I live a few mile down the road from your layout area. You have inspired me to keep going on my own layout. Thanks Brian
Posted

Full Member
Thanks Alan thats very kind of you:cheers Modelling alone, as I do, I enjoy writing about Granby and enjoy even more getting feed back……..not too many folk in North Vancouver too interested in the paint used on an engine shed in North Wales 90 years ago:roll:45+ pages John,no problem.I read your thread from start to finish some time ago now and it's a modeller's right of passage to read it.You should be extremely proud of what you have achieved.:cheers
Brian1951 wrote:
Thanks for this Brian….I am so glad you have enjoyed the thread. Over the years I have found this forum a constant source of advice,information and wonderful humour……..I am sure you will find the sameJohn Dew I have spent a most enjoyable day reading your thread from start to end. Thank you very much. I live a few mile down the road from your layout area. You have inspired me to keep going on my own layout. Thanks Brian
Posted
Full Member
Indeed…. the rather delicate GWR light stone is actually a mixture of White Lead and Iron Oxide………dark stone?…….add more iron oxide (on site I believe)…….Add in the time period between repaints and its no wonder there are so many different interpretations one sees……certainly its my excuse for the different shades on Granby.Now if you want to be really authentic lead paint!
Fond memories of its use on the water pipes in my old primary school. Health & Safety would have had a stroke.
regards,
Derek.
Which leads me neatly into LNWR paint shades
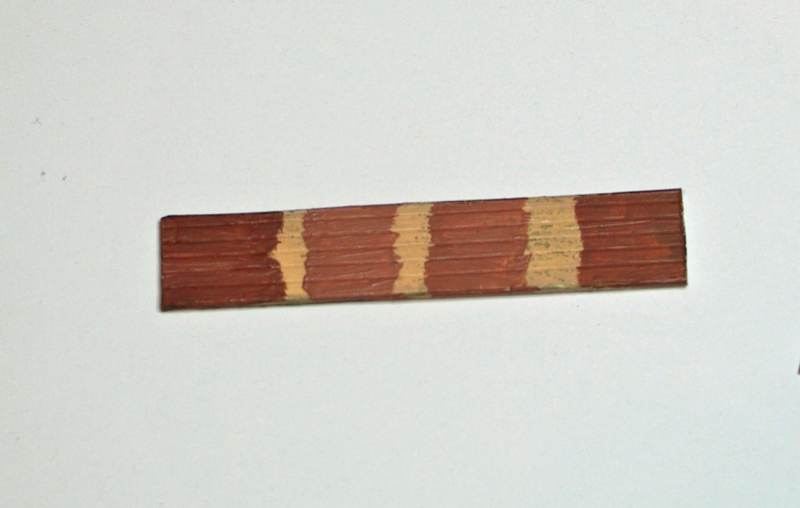
Not having any White Lead I mixed Red Oxide with Umber (Burnt or Raw cant remember which …..I am not a great BBQ Chef)
The centre ones had white added in attempt to create a faded effect……I picked this up from Larry Goddard of Carriage and Loco Painting fame writing as Coachman in the "other place"
What do you think Derek (and anyone else)? My instinct is to go with the RH sample and add some dirty wash……do tell me if it is totally wrong.
I need a decision quickly because I want to paint and install the doors before fixing the office/store annexe to the shed
This is a mock up
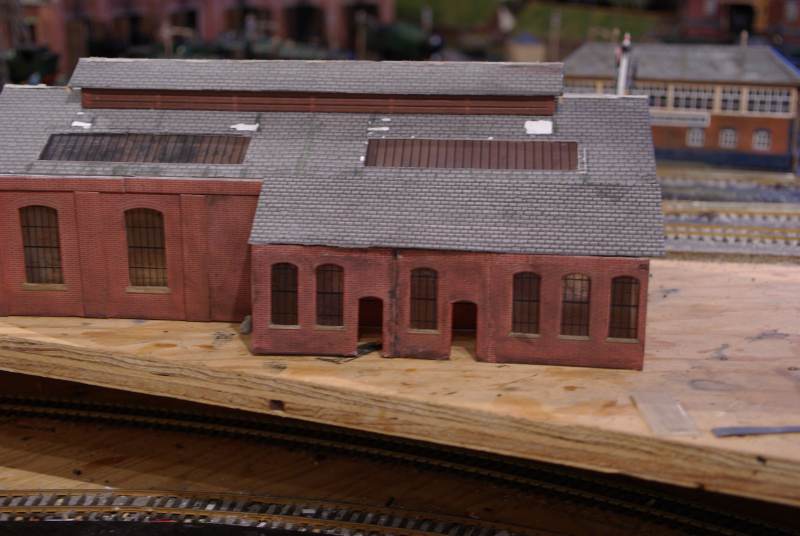
If nothing else it shows the cunning plan to conceal at least half of the cut short roof
One of the vertical joins is particularly bad……I am hoping to conceal both joins with a drain pipe (albeit in the wrong place) or a stand pipe failing that I guess I will have to be creative with some timber?
Next decision…….I ripped out the Metcalfe windows before Derek told me the LNWR always finished Office windows in Coach White!!

I guess I could weather the Metcalfe glazing and re install it?………………..Decisions
Correction: I originally described this Annexe as Offices/Mess Room……It may have started like that but in 1948 it was Stores and an Office with maybe the original latrine.
An old Midland (?) celestory coach was downloaded as a Mess hut just before WWII

Next job the vents
Regular readers will be aware of the 24 vents I built for the Roundhouse.The Scalescene sheet included interior vents which I didnt bother making……dont model what cannot be seen
So I have a lot of off cuts
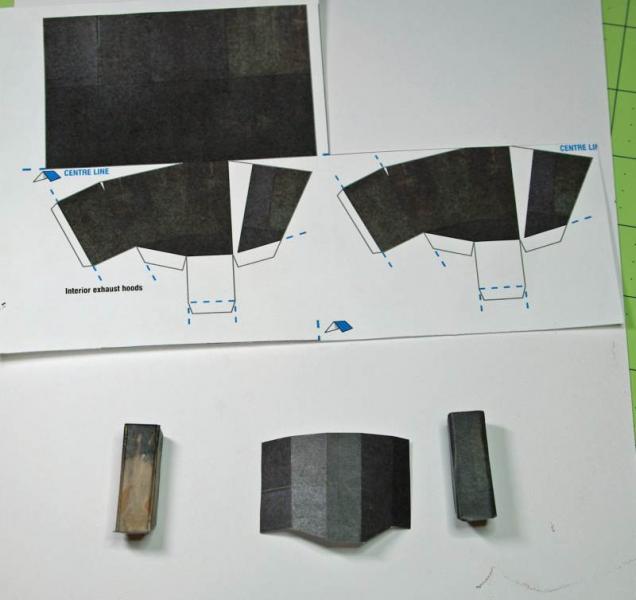
The original vent is on the left……I cut the cladding from the off cut and scribed the underside of the bend lines with a darning needle (a Dooferdog tip) ……..the result is on the right……the corners are not as crisp as I would have wished…..the cladding followed the rounded corners of the Metcalfe Unit……I may be better to make my own units
On the other hand this was a first attempt (destined for the least visible part of the roof) I have another 7 to make so practice may make perfect
Next the curved cowling that Derek referred to
I laminated a strip of off cut (slightly wider than the vent) to some thin card……cut a couple of 1/8" notches and moulded it round the handle of a scalpel before glueing to the vent.
Its actually quite similar to the ones John Wiffen designed for the Roundhouse.
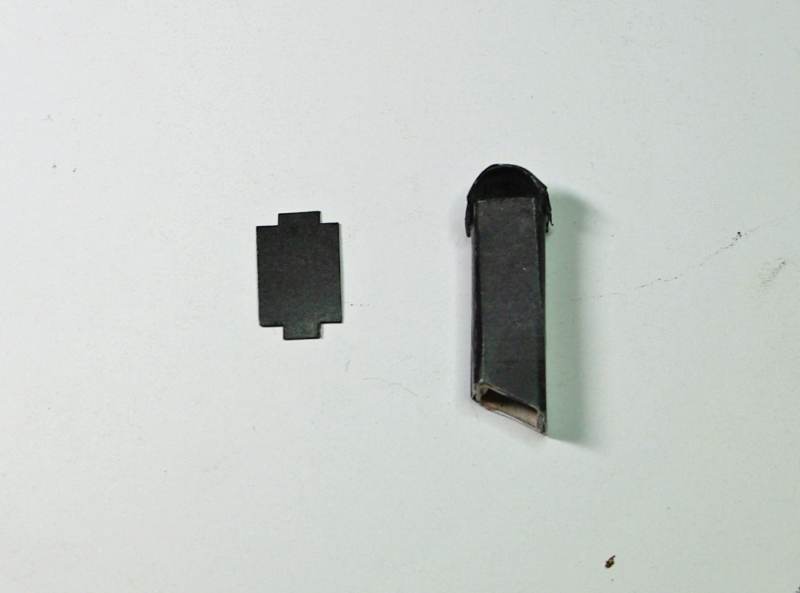
Here it is plonked on the roof with an original alongside for comparison
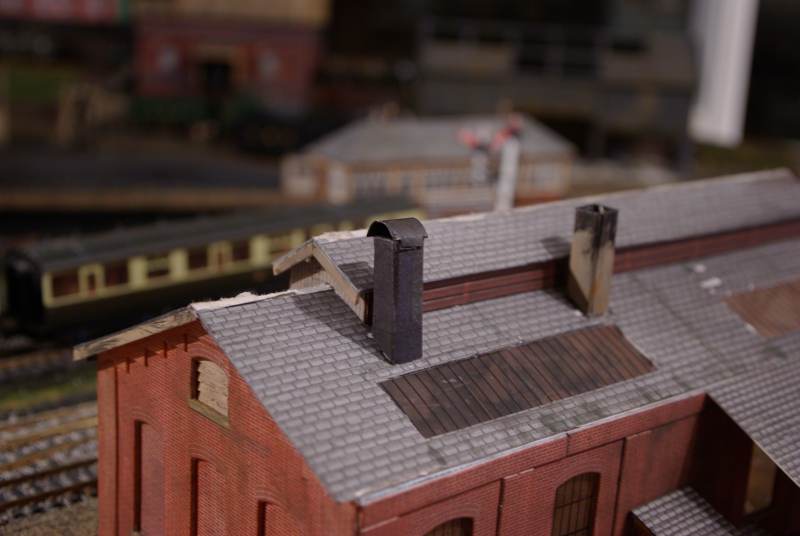
Is that the right shape/ direction?
Lots of questions…..need a few answers:cheers
Posted

Full Member
Regarding the paint - I think you're probably right to go with the right hand example although, as with "match pots", it's difficult to tell because lighting and final surface area play a big part.
The two centre examples look a little anaemic to me but I can see what Larry Goddard was trying to do. Of course, if the shed is going to sit in deep shadow on Granby, then the two darker examples may be too dark and the "whitened" ones would come into their own.
In other words, it's your choice Mr Dew ……………….
 :cheers
The vents are a big improvement on the Metcalfe ones. I don't have any photos of sheds but I'm wondering if that was actually the type of cowl used …………..
 hmm They seem to me to be more "domestic" than. I was thinking more along the lines of the cowls used on ventilation shafts of ships - can't for the life of me, remember what their proper name is but they were like the old ear trumpet - and, on passenger ships, often painted red on the inside. On industrial buildings, they had a big "fin" on the top to keep them facing away from the wind. I'm sure you can picture the type I mean …………:roll::roll:
If, in fact, I'm talking out of the top of my head and those upturned "U" shaped cowls are the right thing, then I wonder if they'd have been turned through 90 deg from the one you show? The wind would ride up the roof slope, through the "hoop" on the vent, which would act like a mini-venturi and smoke and fumes would be "sucked" up the ventilator.
As I said, I may well be talking out of the top of my head and look forward to a barrage of photographic evidence from the membership to tell me to go back to my hole and leave it all to the experts…………………………:lol::lol::lol::cool wink
On edit - I note you've already said that yours is similar to that on John Wiffen's roundhouse and who am I to question John Wiffen ….:oops::oops::oops:
'Petermac
Posted
Inactive Member
You have been busy.
The right end side of your red paint looks fine.
Now regarding cowls, The curved shape is about right.
The cowl overlapped the sides and ends of the vent.
Here is the difference. The cowl was supported by iron legs and stood proud of the vent top.
Looking at photos I would say the iron legs raised the cowl a good 12 to 18 inches above the vent top.
The cowl itself overlapped the vent edge,s I am thinking about 6 inches from what I can gather.
Also the vent,s had a rim around the top edge.
Here is a rough drawing to give you an idea I hope?
regards, Derek.

 Last edit: by shunter1
Posted
Full Member

Thanks for setting me straight Derek. :cheers
'Petermac
Posted
Full Member
Thanks Derek and Peter for the swift reply…….glad the overall shade is deemed correct…….the challenge now will be to repeat the proportions that I used:shock::shock:Regarding the paint - I think you're probably right to go with the right hand example although, as with "match pots", it's difficult to tell because lighting and final surface area play a big part.
The two centre examples look a little anaemic to me but I can see what Larry Goddard was trying to do. Of course, if the shed is going to sit in deep shadow on Granby, then the two darker examples may be too dark and the "whitened" ones would come into their own.
At least we have established that the shades would vary on a site according to location and repainting cycle
shunter1 wrote:
Thanks Derek that drawing is very helpful…..although for a hamfist like me it presents a challenge…..raise the Cowl 4mm and have a 2mm overhang………all of a sudden 0 Gauge looks rather attractive:roll::lol:Now regarding cowls, The curved shape is about right.
The cowl overlapped the sides and ends of the vent.
Here is the difference. The cowl was supported by iron legs and stood proud of the vent top.
Looking at photos I would say the iron legs raised the cowl a good 12 to 18 inches above the vent top.
The cowl itself overlapped the vent edge,s I am thinking about 6 inches from what I can gather.
Also the vent,s had a rim around the top edge.
Here is a rough drawing to give you an idea I hope?
regards, Derek.
One last question regarding Peter's point
I have placed the sample so the Cowl opening is in line with the building…….is this correct should they be at right angles?If, in fact, I'm talking out of the top of my head and those upturned "U" shaped cowls are the right thing, then I wonder if they'd have been turned through 90 deg from the one you show? The wind would ride up the roof slope, through the "hoop" on the vent, which would act like a mini-venturi and smoke and fumes would be "sucked" up the ventilator.
There are air intake louvres on the gable at each end but think the main intakes are the louvres on the structure on top of the main roof louvres…….the brown strips you can see behind the 2 chimney vents…… which leads me to think the cowl opening should be at right angles to the building line ie I put the cowl on facing the wrong way
ayAny thoughts??
Posted
Inactive Member
regards,
Derek.
Posted

Site staff
Regards
Alan
Born beside the mighty GWR.
Alan
Born beside the mighty GWR.
Posted

Banned
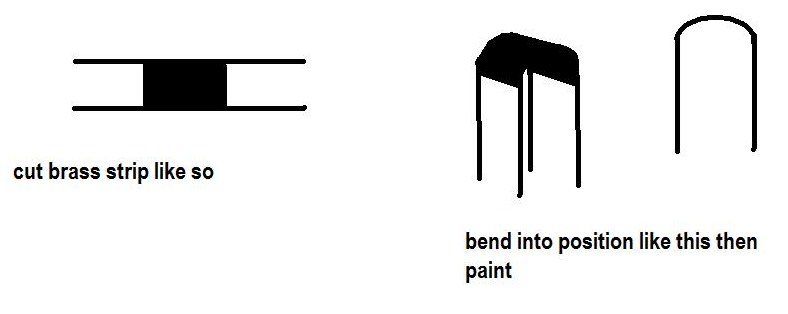
Looks as if you will have to go down the bent brass wire method. If the wire is fine enough, maybe you could drill some pilot holes in the top edge of the chimneys for the wire to protrude. Paint it all black/grey after installation then glue on the cowls.
Cheers, Gary.
Posted
Full Member
Just painted a load of Doors,Guttering and Barge boards in what I hope is a match for the RH colour :roll:Definitely the R/H colour John.It looks the most natural by far.
Gary wrote:
Hi John,
Looks as if you will have to go down the bent brass wire method. If the wire is fine enough, maybe you could drill some pilot holes in the top edge of the chimneys for the wire to protrude. Paint it all black/grey after installation then glue on the cowls.
Cheers, Gary.
Hi Gary
I think you are probably correct…..2 inverted U Shapes per vent…….the concern is getting wire that looks the right gauge to support the weight of the cowl
One plus is Derek telling me about the overhang….I can glue some 2mm square plastic strip around the top of each vent and that will either give me a good mounting base or more likely hide the fact the supports are fixed inside the vent
The other option for the supports is to use some of the 2mm square plastic although that might look too clunky…….I have some L profile that I am using for the skylights that might work…..I will make a couple of samples in a day or so
Having done the painting I can get on with the tiling tomorrow
Cheers
Posted
Inactive Member
Just a thought on the cowl support material.
Some flat metal strip might do the job.
The supports were not round or square.
Most likely they used 3inch x 1 inch flat iron.
This might be easier to fabricate and to bend for the cowl fixing.
Lucky also they fixed the support,s inside the vent,s.
Hence that reinforcing band around the vent tops.
regards Derek from a vey windy and wet Kilkenny.
Posted
Full Member
So all I need is 32 1 mm metal strips 4mm high………no problemo :shock::shock:
I sense the bar rising at a rapid pace
I am having major concerns about your next post which will probably suggest that I should:
Buy a lathe and convert everything to EM (or should it be P4?)
Cheers from a damp and misty Vancouver
Posted
Legacy Member
Good luck with it John.:thumbs
reg
Posted
Banned
You could cut up some brass sheet in the required shape and bend to position..
Cheers, Gary.
Posted
Inactive Member
Hi Derek
So all I need is 32 1 mm metal strips 4mm high………no problemo :shock::shock:
I sense the bar rising at a rapid pace
I am having major concerns about your next post which will probably suggest that I should:
Buy a lathe and convert everything to EM (or should it be P4?)
Cheers from a damp and misty Vancouver
:lol: Hello John.
First you need longer lengths than 4mm.
The support material has to fit inside the vent plus you need to bend a bit at the top to fix to the cowl.
I would not dream of being too picky, If it looks right its okay.Metal strip would be stronger than plastic.
Or some nice strong copper wire could be bashed flat.(Sparky) No you don't need to buy an anvil
Plus its easy to bend for fixing to the cowl. And can be cut to length with a pair of plier,s.
If you have masochist tendency,s by all means go P4. EM is borderline!

Buy a lathe, Well it can be fun although a milling machine would be nice too.
Christmas 2014 Hint to the ladies John. :cheers
Looking forward to that building paint job :pathead
regards,
Derek.
Last edit: by shunter1
Posted
Full Member
I rummaged through my box of unfinished kits and found a brass carriage kit (guess why it was unfinished) and I may have found enough strips to do the job without too much cutting.
Meantime back to the tiling!
Regards
Posted
Full Member
Most of my time has been spent re-tiling the roof with Scalescene strips
This is a printout from the Small Engine Shed Kit but you can get them as a stand alone option in the Scratchbuilders section.
Initially I used to apply the sheets direct just cutting to size but although cutting out individual strips is extremely time consuming I think it is definitely worth the effort
The overall effect is more realistic and in addition you can conceal construction errors more effectively
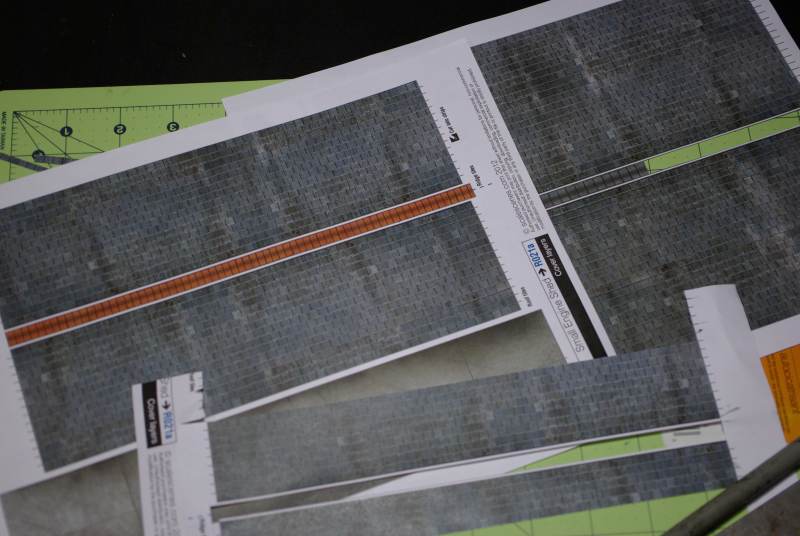
Here for example I am able to hide the Metcalfe fold line far more effectively than my weathering effort
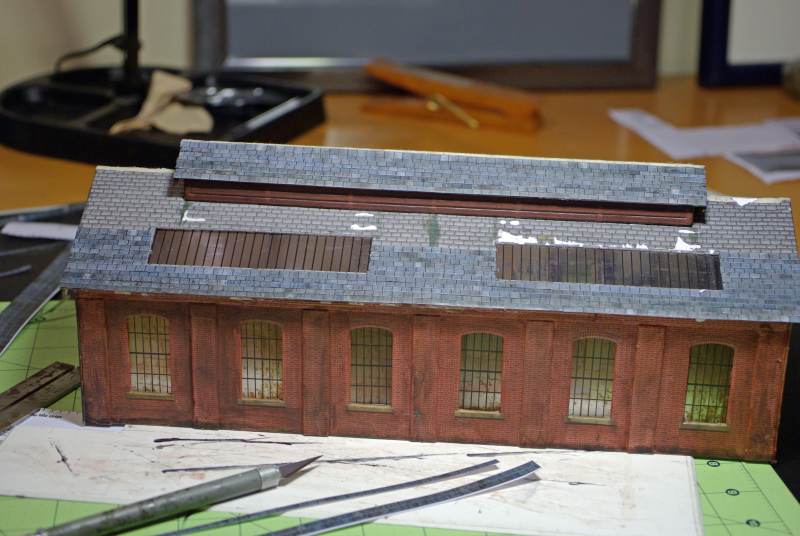
Here is a shot of this side of the roof almost finished …….I just have to add the coping tiles and trim round the skylights

I have added guttering and drain pipes using the Ratio Kit…….there is an unintentional sag in the gutter but I will put that down to the age of the building!
Indeed I need to do a bit more weathering on the walls, dust the roof a bit with powder and maybe do a bit with the paintwork ……its not really faded enough although in truth it is barely visible when in situ
The other side is a different matter…..it is highly visible and has the cut back roof edge ……..part of which I hope to conceal by adding an office/store extension
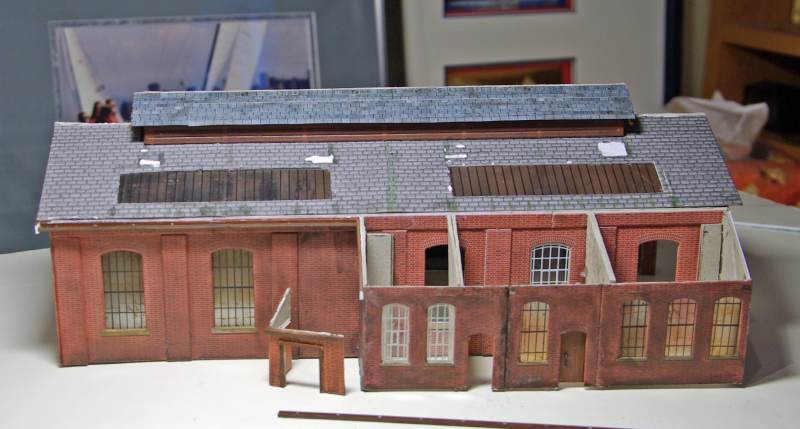
I reversed the normal order of construction and added the guttering to the Shed Wall to give me a datum point for the barge boards on the Office/Stores then I added the guttering to them so that I could cut the new roof sheet which as I suspected was not exactly square!

I used very thin card to ease the transition…..there is a slight ripple effect…….but again its an old building
I hand scribed the tile guide lines……the plan being that the last tile strip on the Office Stores will then continue on…. resting on the barge board/gutter and concealing the fore shortened edge
Derek, my LNWR guru, told me that they used to paint office window frames off white…even in MPDs. So I rubbed some pastel into the original Mercalfe windows and put them back in their original place…….it looks a bit odd but I guess its authentic.
The doors are just Wills planking with a track pin making a slightly oversize door knob and a bit of black plastic strip to suggest the lock.
The join between the office and store is pretty gross……I think I will have to put a drain pipe there rather than the more normal position at the end
So now all I have to do is start tiling………………and make the vents:roll:
Posted
Inactive Member
Those roofs and windows look excellent.
Oh I may be able to save you a headache?
Not all LNWR small sheds had seperate smoke vents.
You can just use the centre long vent and end wall vents.
It will still be authentic.:)
Up to you John on that score.
regards,
Derek.
PS: That LNWR Brown paint looks right. Shows up well on those office doors.
The off white window frames also look right.
Last edit: by shunter1
Posted
Full Member
I am going to have a go with the vents they are all covered and the cowls are made……just have to be fitted to the support strips:shock:
At least I have a fall back position if they all turn pear shaped!
Thanks again for all the feedback
1 guest and 0 members have just viewed this.