Granby Junction 1948 N. Wales
Posted

Full Member
GWR/LMS OO Gauge DCC RR&Co
Thanks for the comments guys……..I am embarrassed that it has taken me a month to acknowledged them.I am afraid I have spent the last 4 weeks testing (playing?) with RR&Co routines…….I guess I must eventually post a video to convince you that it is more testing than playing.
Unless I get cracking I very much doubt if I will achieve my self imposed deadline of finishing the shed area by Christmas.
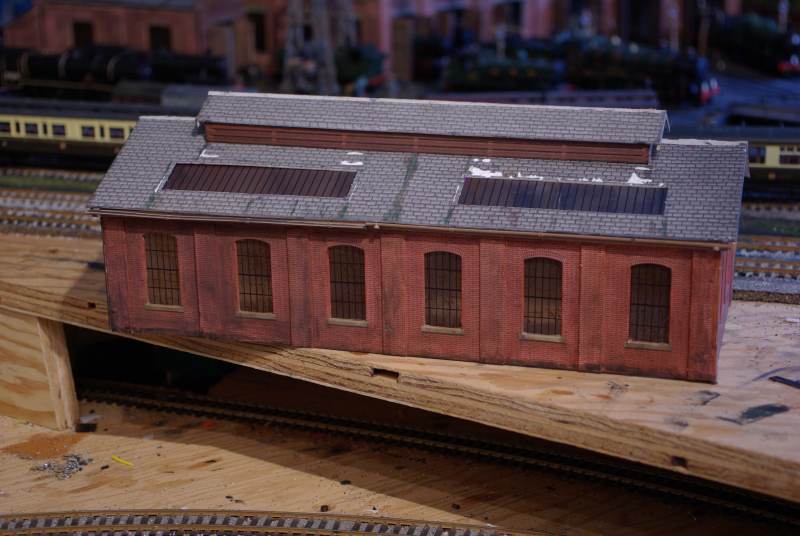
Here is the Metcalfe Shed that I hope to upgrade so that it sits comfortably with the Scalescene roundhouse.

Its a nice enough Kit and 7 years ago I was quite proud of it…….but plonk it alongside the Scalescene units and there are some glaring differences
This side of the shed is perhaps an unfair comparison. On Granby II I had 3 of these units joined together to create a 6 road shed. I rescued the best of the three……but as you can see it was the centre unit….hence the unweathered brick and the buttresses with uncoloured sides……and perhaps worst of all the cut back roof edge
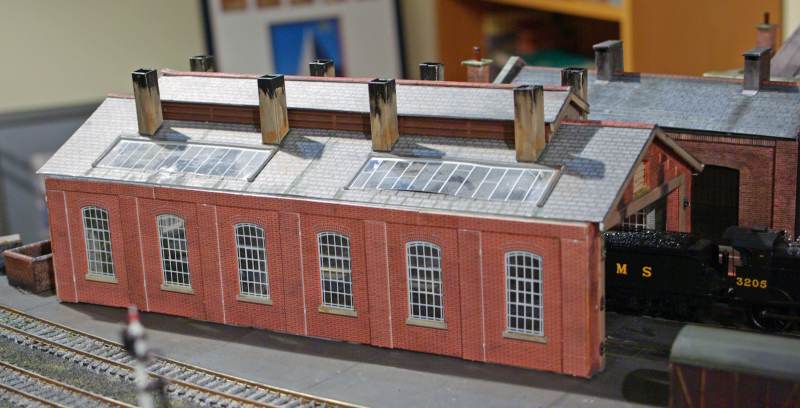
To me the windows are far too pristine and shout "Model"……..the sky lights are particularly unrealistic
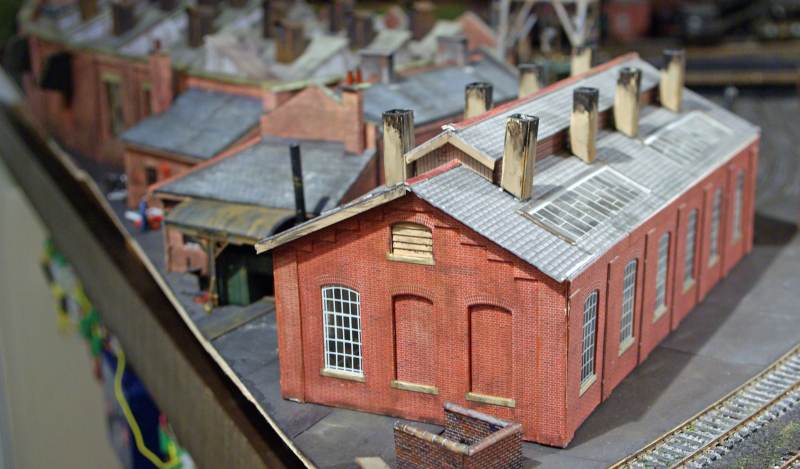
The model has been bashed about a bit …..hence the drunken vents and missing bargeboard……but these can be easily rectified……………but the vents themselves dont look right…..the corner joins are far too obvious and I am uncertain about the colouring
The roof itself is made up of two units with printed tiles……and despite my attempts at weathering……it shows
Nor do I like the colouring of the roof coping stones
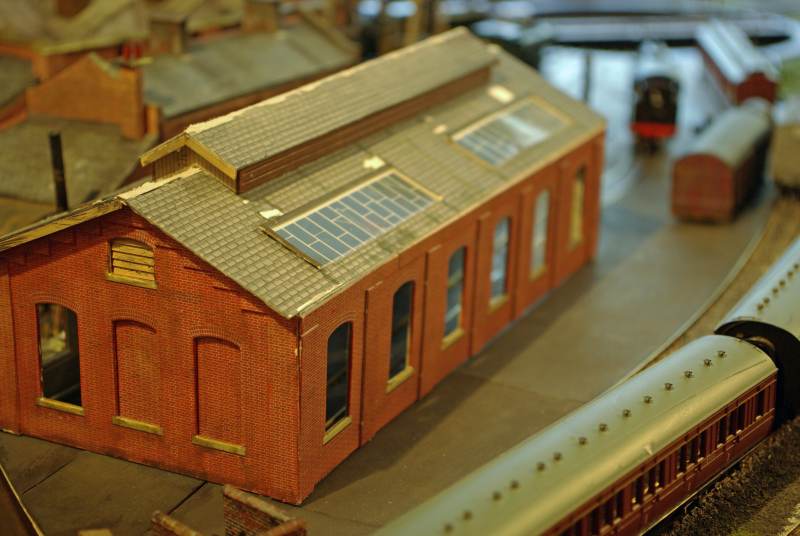
So one of the first jobs will be to re tile the roof using Scalescene strips
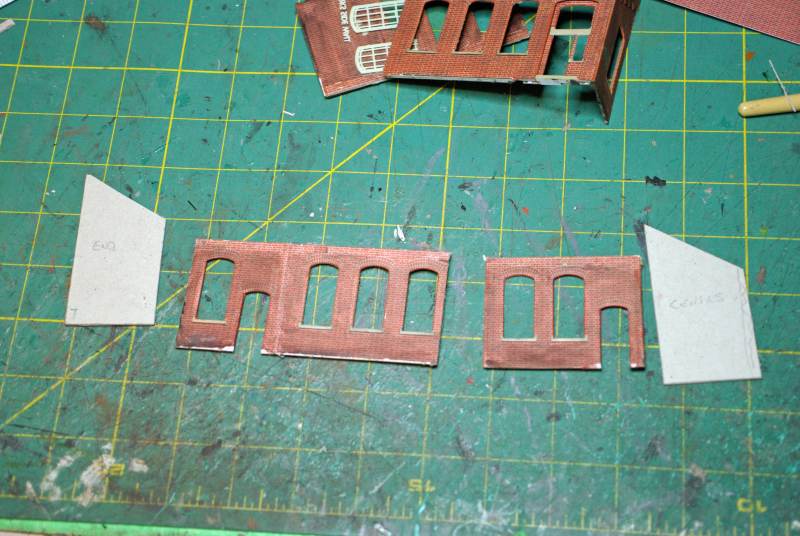
I have at least made a start in stripping down to the bare, but stable, carcass
Vents and roof coping stones removed. The windows were trickier because they were embedded between the inner and outer walls so I had to carve them out with a scalpel
The time period for Granby is early 1948 . When I looked at the photo above I thought that it would be perfect if I was modelling 15 years later………just before it was totally demolished to become a car park for Tesco!
So the first job tomorrow is to build some offices/stores to attach to the wall above

Posted
Inactive Member
Drunken vents, Not uncommon they tended to decay fairly quickly.
Coal smoke and acid really put those buildings under pressure.Roof trusses tended to suffer a fair bit as well. A nice gale and you ended up with a leaning vent.
Barge board valence rotted and fell off. All very protoype John;-) Plus the L.M.S. were a bit shy with the paint for many years.
Thanks for the update. I am enjoying mild weather in county Kilkenny for the past few days.
Derek.
Posted
Full Member
I may have asked you this before…..in which case my apologies (old age no longer creeps…..it advances at a gallop:oops:)
From what I have read it seems unlikely that the LMS would have bothered to repaint such a minor shed as the one at Granby in LMS colours? I tend to think that it would basically have remained with pre grouping (LNWR) colours albeit much faded…..local maintenance would take place with what paint the staff had available?
I believe the LNWR used a sort of reddish brown for engine sheds but not combined with the contrasting cream shade used on Stations and Signal Boxes? After WWI they acquired a load of surplus Royal Navy Dark Grey paint and this was used a lot on metal work…..water cranes and Yard Lamps etc .
So my current plan is to use a mixture of Dark Grey and Faded reddish brown………….any comments/advice that you and anyone else may have would be much appreciated
True to my word …..not a loco moved on Granby today…..I just cracked on with the shed
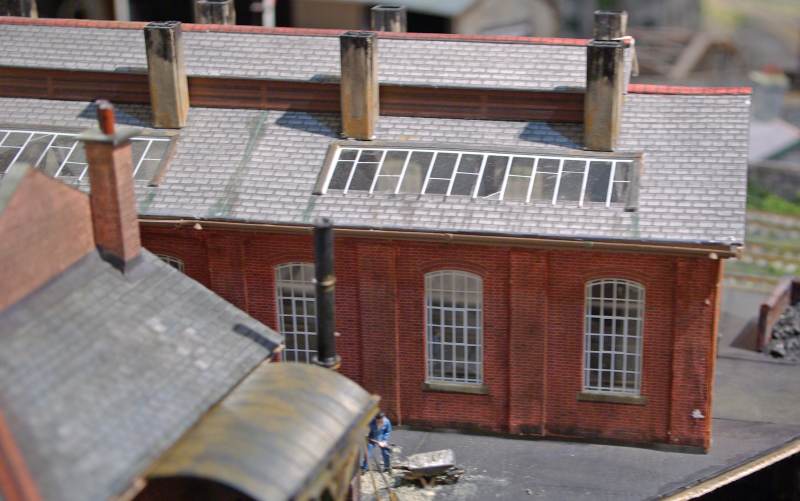
The window frames were touched up with brick coloured pastel to disguise the exposed inner wall and the sills had dirty stone applied then I just fixed surplus Scalescene windows
The windows on the Scalescene shed had a slightly different shape and dont quite align but I think the overall effect is much better
I left one Metcalfe window in on the other side so you can see the difference

New skylights have been installed (Scalescene surplus again…this time from the overall roof) . Once I have re tiled the roof I have some l profile plastic strip which should clean up the apertures
Incidentally the ventilators are Metcalfes original print but the colour is the shade I was contemplating using for reddish brown
This shot also demonstrates the difference weathering makes. The right hand sections havent been weathered or re glazed because I am going to add a Messroom/Office
The Metcalfe shed comes with a small office/workshop

At one stage I thought of using it as shown above……but somehow it just didnt look right. It seemed quite out of scale with the Signal Box behind……..so the current plan is to convert bits to make a lean to building alongside the shed……a pretty common ocurrence at Steam Sheds……Didcot and Carnforth spring to mind
So out came the wreckers ball:
Hopefully more tomorrow
Posted

Full Member
What a difference the windows and weathering make ……:shock::shock::shock:
'Petermac
Posted
Full Member
………..you are either in Australia (but I thought that was Liz's domain) or up amazingly early 5am? or maybe 6am I guess the French pride themselves on being different or so I am told
Posted
Full Member
'Petermac
Posted

Banned
The engine shed is coming along quite nicely. I was thinking that you were possibly going to re-skin the shed with Scalescenes brick paper. Although what you have done looks very good. :thumbs I will be interested on how you will tackle the roof.
Cheers, Gary.
ps. Petermac, Is a 'Rotary do' the same thing as spinning yourself around on one spot…??

 Last edit: by Gary
Posted

Site staff
Got to agree, those Scalescene windows certainly make a difference, as does the weathering.
Quite amazing what changing a few parts can do.
So far I have made a freebie platform shelter as a test and I found that difficult enough, what with the limited instructions and getting things to stick, let alone carving up existing kits to make different models.
Well done :thumbs
Ed
Posted

Full Member
cheersMarty
Posted
Full Member
……………………………………….
ps. Petermac, Is a 'Rotary do' the same thing as spinning yourself around on one spot…??
No Gary - that would be a "Whirling Dervish"………..
My "Rotary do" is where they run round in circles like headless chickens, doing nothing useful ………………:roll::roll::roll::roll: I, on the other hand, have to give an update on the current planning for a Burns Night Supper we're holding in January. I'm currently refreshing my memory on the "poem", half of which I've forgotten since last year ……….;-)
'Petermac
Posted

Full Member
"And there's a hand, my trusty fiere!
And gie's a hand o' thine!
And we'll tak' a right guid-willie waught,
For auld lang syne. "
I admit I looked it up.
John
And gie's a hand o' thine!
And we'll tak' a right guid-willie waught,
For auld lang syne. "
I admit I looked it up.
John
John
Posted

Full Member
I liked what I saw so much I wanted to do your thread justice.
So yes I have just spent a few days reading it from the very start and I must say ……… Well done this is truly fantastic and the sort of layout you could spend a week looking at and still miss some of the great details.
Well done fantastic
Posted
Full Member
The haggis is imported from Scotland John and "the poem" is the address thereto ……………"Fair fa ye honest sonsie face" ………etc.Someone will have to do the dreaded haggis won't they? Bet you don't find that in the local shops. It's probably illegal in France."And there's a hand, my trusty fiere!
And gie's a hand o' thine!
And we'll tak' a right guid-willie waught,
For auld lang syne. "
I admit I looked it up.
John
Sorry John (D) - back to you. :cheers
'Petermac
Posted
Guest user
And grand it is too. Tatties and neeps along wi a wee Goldie.
It's a sair fecht.
Mctoto
Posted
Inactive Member
Nice update with those window,s.
LNWR sheds can be a little tricky.
Your shed has a bright red brick which would be correct.
Many sheds used the LNWR own bricks produced at their brickworks at Crewe. These bricks had a notable bright red colour.
Of course things varied for small shed,s which tended to use building material sourced locally. Many were brick, some used stone in the more rugged area,s.
The LNWR did not use corrugated sheets as they did not approve of this material.
Window frames on shed sides could be dark red/ brown or grey or even black on the roof skylights.
White or light cream/stone could be used on the office window frames to set them apart.
Smoke vents where used would have curved cowls fitted to there tops using iron brackets.
So to sum things up.
You can use your dark red/brown, Royal naval grey, black, white or light cream/stone in your colour schemes and be accurate.
Oh in some of the larger sheds the smoke vents were made of brick and coweled.
Of course by late L.M.S. days original paint jobs would be much faded or patched up.
Another thing the LNWR used were iron railings bolted across low window apertures to prevent access by unwanted guests, These could be seen around station/goods yards and MPD area,s. From photo,s these were either painted dark red/ brown or grey?
Best I can do for the moment John.
regards,
Derek.
Last edit: by shunter1
Posted
Legacy Member
reg
Posted
Full Member
Some specific replies
Gary wrote:
Thanks Gary…….I did think of that as an option but then realised that I may as well rebuild the entire thing but that would have been very time consuming. There are some disadvantages to this shortcut…..some blemishes will need a lot of camouflage and the corners will always look a bit crude.Hi John,
The engine shed is coming along quite nicely. I was thinking that you were possibly going to re-skin the shed with Scalescenes brick paper. Although what you have done looks very good. :thumbs I will be interested on how you will tackle the roof.
Cheers, Gary.
I am going to use Scalescene tiles cut in strips for the roof….I have done it a couple of times now….its fiddly and time consuming but I think worth the effort.
Ed wrote:
Thanks EdHi John
Got to agree, those Scalescene windows certainly make a difference, as does the weathering.
Quite amazing what changing a few parts can do.
So far I have made a freebie platform shelter as a test and I found that difficult enough, what with the limited instructions and getting things to stick, let alone carving up existing kits to make different models.
I do agree that John's instructions can sometimes be a bit ambiguous. I would encourage you to keep going though…..the more you do the easier it is to interpret them. As I said elsewhere I started on a Freebie (having been encouraged/bullied by Doug Dooferdog)….I made a complete hash of it and its now buried somewhere in my bits box…..it took me a while to pluck up courage/enthusiasm to start a proper project ……but with the right tools (a ruthless no expense spared approach to blade changing) and right materials it worked out ok and gave me confidence to start some of the scratch building
jimmy styles wrote:
Thank you Jimmy:thumbsI have been a member on here for a while now but somehow only just discovered your thread.
I liked what I saw so much I wanted to do your thread justice.
So yes I have just spent a few days reading it from the very start and I must say ……… Well done this is truly fantastic and the sort of layout you could spend a week looking at and still miss some of the great details.
I do worry that it has become so big and cumbersome at 45+ pages that it puts members off from commenting or even reading.
I am so glad that you enjoyed ploughing through it
Best wishes from a slushy Vancouver
Last edit: by John Dew
Posted

Site staff
Regards
Alan
Born beside the mighty GWR.
Alan
Born beside the mighty GWR.
Posted
Full Member
Thank you so much for taking the time to write such a detailed and informative response…..its exactly what I was looking for
[user=477]shunter1[/user] wrote:
Hi John,
Nice update with those window,s.
LNWR sheds can be a little tricky.
Your shed has a bright red brick which would be correct.
Many sheds used the LNWR own bricks produced at their brickworks at Crewe. These bricks had a notable bright red colour.
Of course things varied for small shed,s which tended to use building material sourced locally. Many were brick, some used stone in the more rugged area,s.
The LNWR did not use corrugated sheets as they did not approve of this material.
Glad you mentioned that….I was going to build a corrugate shed at the rear…..back to the drawing board!
Window frames on shed sides could be dark red/ brown or grey or even black on the roof skylights.
White or light cream/stone could be used on the office window frames to set them apart.
Hmm…..maybe I had better re instate the Metcalfe office windows I just took out
Smoke vents where used would have curved cowls fitted to there tops using iron brackets.
Thats very helpful……The Metcalfe vents look like chimneys. They are very robust but the joins are obvious and they are open at top
I am going to clad them with Scalescene Metal Paper but I was uncertain what to with the tops….I will make a couple of mockups for you to check over
So to sum things up.
You can use your dark red/brown, Royal naval grey, black, white or light cream/stone in your colour schemes and be accurate.
Oh in some of the larger sheds the smoke vents were made of brick and coweled.
Of course by late L.M.S. days original paint jobs would be much faded or patched up.
Another thing the LNWR used were iron railings bolted across low window apertures to prevent access by unwanted guests, These could be seen around station/goods yards and MPD area,s. From photo,s these were either painted dark red/ brown or grey?
I may try this on the office….thanks again Derek…..that was brilliant
Best I can do for the moment John.
regards,
Derek.
Posted
Inactive Member
Oh that dark red/brown could well of been very similar to the purple/lake colour used on LNWR coach sides.
Guessing here but it might tailor into company policy.
Now if you want to be really authentic lead paint!
Fond memories of its use on the water pipes in my old primary school. Health & Safety would have had a stroke.
regards,
Derek.
PS: The white paint used on window frames by the LNWR was named coach white.
Last edit: by shunter1
1 guest and 0 members have just viewed this.