Granby Junction 1948 N. Wales
Posted
Full Member
GWR/LMS OO Gauge DCC RR&Co
Hi John, what great progress you are making in this corner. I am very jealous because I have much to do myself but have just not found any time for the railway room for several months now. In fact, although I manage to dip into the forum to read some of it, I have not even found the time to add any meaningful comments. (My wife retired at the end of August - I wonder if that is just a coincidence :???:)I am watching your installation of the Heljan with great interest. As you know, I have one installed (the non-DCC version), but mechanically exactly the same. Incidentally, I have no problem having mine powered up without the bridge in place - must be the difference of the DCC control circuit board, I guess.
As you say, although tedious to set up, the indexing repeats precisely every time once set. It is also easy to change/trim if things move a little whilst the track is "settling in". I found that once I had ballasted, it was best to take the plunge and IPA the rail ends to the table outer rim. That keeps everything in place, yet it is not impossible to move the rails if really necessary with the aid of a little water - yes, I have tried it!!
One word of warning, it is absolutely essential to keep the "gear" track in the well spotlessly clean. Any tiny speck of dust causes my bridge to stall and then the indexing system gets lost until I remove the bridge, clean up and reset the zero point. I have found that the only really successful way of keeping it clean is by using a stiff paint brush followed by the vacuum cleaner. (Don't get any ballast down there!!)
If I may highjack your thread a minute, I will follow up the remark made by Petermac about cutting the sleepers on the Underground module I built. A few photos will show how I did it:-
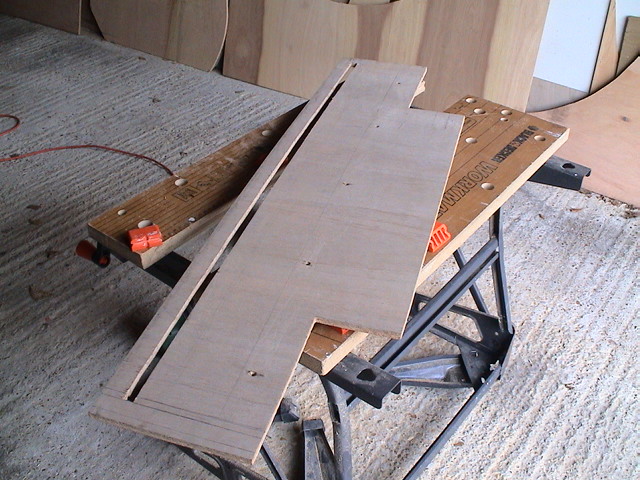
I first cut a long slot in the baseboard (9mm ply)
I then glued the track in place - still with the sleepers intact. (By the way, I marked up the slot with the aid of the piece of aluminium channel seen resting on the board in this photo.
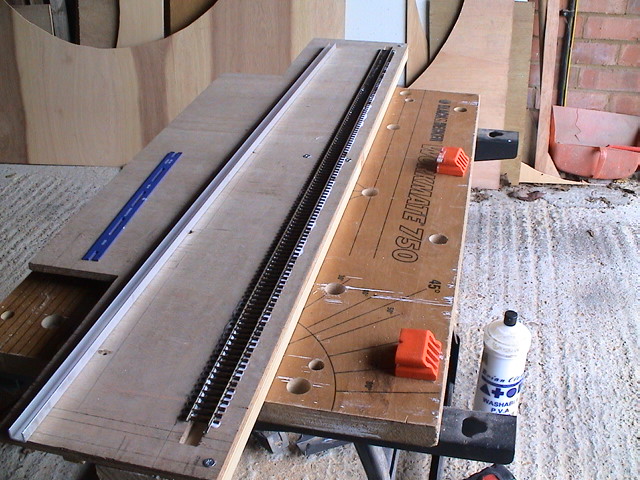
Finally I trimmed all of the sleepers out (a total length of 38 ins !!!)
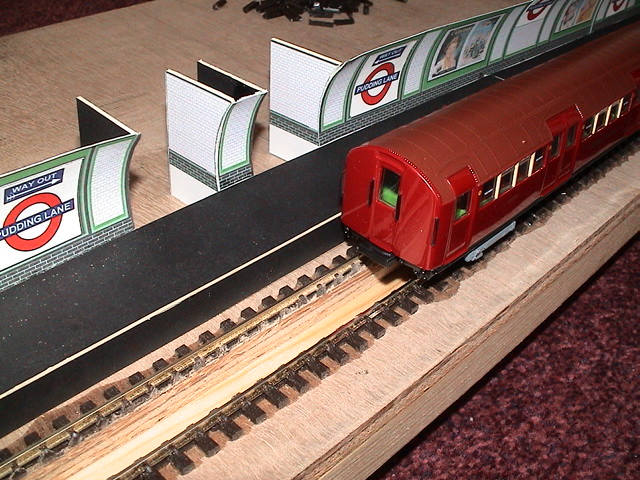
As you can see in the photo, I lost some of the moulded chairs while doing it. However, I had seen from photos (and the real thing), that on the London Underground the chairs are fixed to blocks (maybe timber), which themselves are set in concrete. So I poured modelling plaster over the whole thing:-
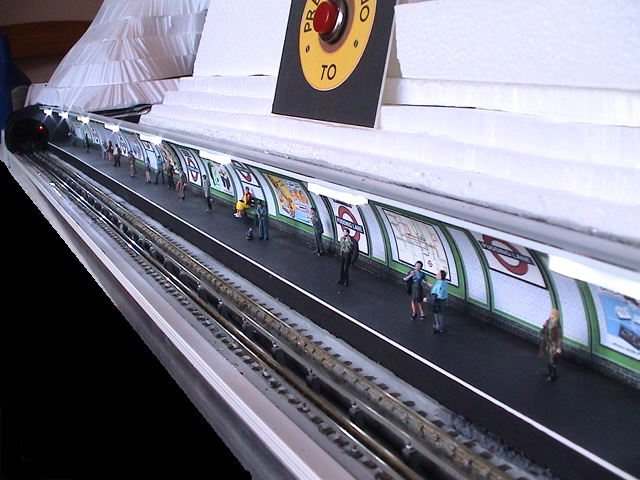
Not too bad in the end, especially with the third and fourth rails added.
You can have your thread back now. Thanks!
Oh and Happy New Year.

Posted

Full Member
'Petermac
Posted

Full Member
All good work, John.
I expect there's a reason why the TT lined up as shown above is not feeding the 'last' outlet to avoid the abyss.
As it stands there is room at the other side for an additional exit (but not in the 'covered' picture).
You will know best.
Also, I expect it is just a shadow but, where the TT is lined up with the exit there is an apparent misalignment (on the RH to view) which, if true, will cause problems.
Not criticisms - just observations which you will disregard as necessary of course.
Good stuff!
Hi DD
The "covered" version is the latest………the outlet on the left will serve the sandhouse. The extensions to the 2 RH shed roads havent breen added because of the abyss……ie the second baseboard…………once that is in I will complete the wiring and add one or two more outlets I want to include a wheel drop and I am trying to work out how to treat the LMS
You had me worried about the misalignment but it is indeed a shadow
Kind Regards
Posted
Full Member
Hi GeoffI am watching your installation of the Heljan with great interest. As you know, I have one installed (the non-DCC version), but mechanically exactly the same. Incidentally, I have no problem having mine powered up without the bridge in place - must be the difference of the DCC control circuit board, I guess.
As you say, although tedious to set up, the indexing repeats precisely every time once set. It is also easy to change/trim if things move a little whilst the track is "settling in". I found that once I had ballasted, it was best to take the plunge and IPA the rail ends to the table outer rim. That keeps everything in place, yet it is not impossible to move the rails if really necessary with the aid of a little water - yes, I have tried it!!
One word of warning, it is absolutely essential to keep the "gear" track in the well spotlessly clean. Any tiny speck of dust causes my bridge to stall and then the indexing system gets lost until I remove the bridge, clean up and reset the zero point. I have found that the only really successful way of keeping it clean is by using a stiff paint brush followed by the vacuum cleaner. (Don't get any ballast down there!!)
A happy new year to you ……………….its great to hear from you again………..I thought perhaps you had taken up a new hobby like golf perhaps:lol:
Thanks for the words of warning…….I am absolutelty paranoid about getting debris in the TT……only the second day and a tiny bit of debris got caught in the gear wheels and everything came to a literally grinding halt. With all the ballasting I have to do despite a double cover I am bound to get some stuff down there………..it will be back to my army days with a tooth brush I guess.
Getting it to work with RR&Co was interesting I will do a post shortly
Kind Regards
Posted
Full Member
I know they used to whitewash the heaps of coal at station to stop anyone stealing it but I didn't realise they used the army and their toothbrushes to clean the ballast ……………:shock::lol::lol::lol:………………………….it will be back to my army days with a tooth brush I guess.
'Petermac
Posted
Full Member

Posted
Full Member
Posted
Full Member
I have been ballasting and weathering the approach roads to the North of the TT……….not the most photographic subject and very tedious…..to break the monotony I made a start on the raised siding that carries the Loco Coal Wagons to the coaling station
This shot hopefully captures the type of intensive operation I want to run with RR&Co

In the foreground the LMS Fairburn 2-6-2T doesnt need turning so is heading out of the yard on the relief loop having cleared out some ash and been coaled and watered………immediately behind a Mogul 2-6-0 is standing over the Ash Pit……………and behind that is the ramp
In real life the ramp would be 1:80 or better……… the slope below is clearly somewhat steeper than that


I am too embarrassed to reveal the actual numbers and there will be no prizes for the best estimate.
I will confess to thinking for a moment about one of those Swiss type ratchet systems or a hawser……it is however now wired up and a Pannier (naturally) had no problem crawling up it
As I said in a previous post when you get to the edge of the board and the rest of the track is laid you are between a rock and a hard place.

Locos will come into the Yard from both North and South so the coaling section has to be long enough to allow tenders to line up under the chute in either direction.
You can see in the shot above that "Northcote Manor" is only just clearing the Xover point
LMS Patriot "Morecambe and Heysham" has completed coaling and is now in the head shunt …..once the Xover point is thrown it will enter the bypass loop and head to the TT

Not so much a hard place as a big 4' drop…….There will be a firmly secured set of buffers there….the shot shows the extent to which I reduced the headshunt to the minimum…….RR&Co is pretty good but I think I will need to bring the larger locos right to the buffers to clear the xover point from the other direction

Pictures are indeed worth a thousand words…….. Coaling Station+Xover Point+Headshunt leave very little room for ramp at other side………one of life's many compromises
Moving right along………Dews standard embankment system:

Card formers cut to both support the track bed and the embankment itself. The vertical face is for a support wall
I created an alcove on the far side for a cotton waste/oil store along with a fire iron rack . The staircase up to the coaling platform will be in a similar alcove on the other side.

Damp tissue paper is laid on the formers and coated with my Ballasting PVA…….allowed to dry and the process repeated a couple of times……not durable enough for a moveable layout……but fine for here

Wills walling saved from Granby II cut to size and fixed in place

Painted with a mix of Acrylic Green Brown and Black Paint…….allowed to dry and then painted over with neat PVA
Scattered with woodland scenics grass mix…………I generally use their burnt grass first over everything and then a more general mix as highlights
Finally I moisten it with the scent spray (water not scent) and drop 50:50 PVA mix over it to secure everything

Next Job…….the Ash Shelter which will go over the Pit above and conceal to a degree both the slope and the landscaping I have just done!
Posted
Full Member
You make it sound so easy John :roll:
Apologies if you've said earlier, but is the coaler built from a kit ? It really looks the part - particularly that slight "buckling" of the chute.
I've often thought I build my baseboards strong enough to carry the real thing, resulting in lots of weight, expense and "hefty" battening exactly where I want to run an underpass. I note for the ramp, you've supported the track bed on card formers only. Do you ever pin the track or is it always just glued ? Pins, I've discovered, need strong boards if one is going to carefully insert them using a 7lb sledge hammer ………….;-)
As I've said before, I do like the "John Dew" embankment system. :thumbs
'Petermac
Posted

Full Member
I might be using a couple of your methods when I come to building the coaling stage at Market Havering.
Regards,
Trevor
Trevor
Posted

Full Member
Phil
Phil
Posted
Full Member
By coincidence, I have also been working on something similar these past few days with an embankment for my junction station.
Posted

Full Member
I know what you mean about the slope, but for what you are doing there it's not that bad. Maybe you could disguise it some with a few trees or high shrubs, if it bothers you?
Wayne
Posted
Full Member
I have started on the Ash Shelter…….and the incline problem is solved……the Shelter almost totally hides it!
Geoff……….out of interest when you had a ramp on Mangarth did you actually use it…….ie regularly shunt coal wagons up there? I ask because I have discovered a slight electrical problem with the connecting point :oops::shock::oops::shock:
[user=6]Petermac[/user] wrote:
I havent talked too much about the coaler……….its the only semi active relic from Granby II and is about to undergo intensive restoration work…………it was scratch built from a couple of Ratio Water Towers and some Wills sheets……..loosely based on some photos I took at Didcot in 1997.Apologies if you've said earlier, but is the coaler built from a kit ? It really looks the part - particularly that slight "buckling" of the chute.
I've often thought I build my baseboards strong enough to carry the real thing, resulting in lots of weight, expense and "hefty" battening exactly where I want to run an underpass. I note for the ramp, you've supported the track bed on card formers only. Do you ever pin the track or is it always just glued ? Pins, I've discovered, need strong boards if one is going to carefully insert them using a 7lb sledge hammer ………….;-)
As I've said before, I do like the "John Dew" embankment system. :thumbs
The track bed actually has a few ply supports as well (you can see one by the coaler). After my foray into scalescenes building I have become very impressed with the strength of card bonded together.
I avoid pinning whenever I can……I prefer to glue a little at a time using Peco Tracklay guides (one of my best buys)……particularly to ensure a few inches of straight after exiting a point.
I find pins very fiddly………they seem to fly off at random (only to reappear months later in "shorting" mode) if I really make sure they are well fixed…..it turns out to be too well fixed and the tie gets warped:twisted:
Posted

Banned
Can you please tell me which brand of buffers you have used at the end of the coaling road ?
Cheers, Gary.
Posted
Full Member
Regards
Posted
Full Member
Phil
Posted
Guest user

Gary if its these one's then there the PECO Buffers.
A little tricki to get the base of the legs fitted over the track, but once on a drop or two of super glue to hold them to the track as well and away you go.
(Click to enlarge)
Posted
Full Member
Not regularly, but I did on occasion, especially if visitors were present. I only used a 4 wheel pug to push a couple of wagons, so I used to get a problem at the place where the ramp started due to the amount of vertical curvature there. A quick run at it worked though. Coming down was much easier!Geoff……….out of interest when you had a ramp on Mangarth did you actually use it…….ie regularly shunt coal wagons up there? I ask because I have discovered a slight electrical problem with the connecting point :oops::shock::oops::shock:
Sorry to hear that you have a problem with the point. :sad: Can't see it in any of your recent photos. What is wrong with it? With all of your RR&Co schedules, I am sure you will want to include the arrival of a coal supply train if you can??
Posted
Full Member
Geoff, what you need is some electrical conductable sand for your sand boxes ;-)[user=434]John Dew[/user] wrote:Not regularly, but I did on occasion, especially if visitors were present. I only used a 4 wheel pug to push a couple of wagons, so I used to get a problem at the place where the ramp started due to the amount of vertical curvature there. A quick run at it worked though. Coming down was much easier!Geoff……….out of interest when you had a ramp on Mangarth did you actually use it…….ie regularly shunt coal wagons up there? I ask because I have discovered a slight electrical problem with the connecting point :oops::shock::oops::shock:
Phil
1 guest and 0 members have just viewed this.