Granby Junction 1948 N. Wales
Posted

Legacy Member
GWR/LMS OO Gauge DCC RR&Co
Looking forward to the results of that Kevan.
Posted

Full Member
Not sure if I fancy attempting much embossing although for smaller areas I think it is a great idea. As it happens I may have to do some because on one section the card is ever so fractionally higher than the railhead :twisted: so I will have to apply some pressure!
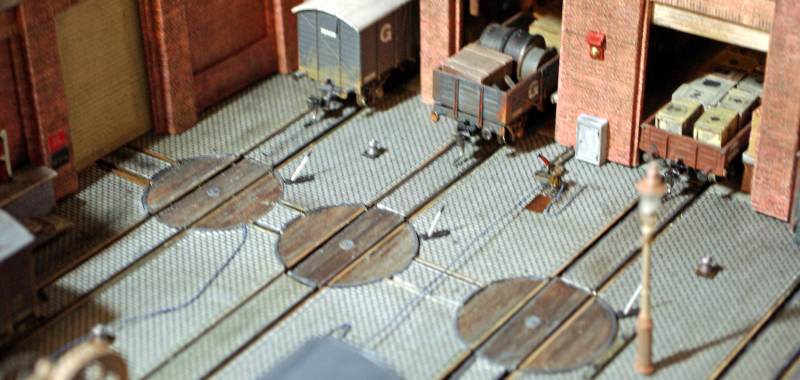
Been pretty wet here (after all it is the rain forest) so quite a bit of progress in the last week

I relaid the 4th siding to create a proper road entrance and …..finally…..completed all the infills. I have stuck with the setts all more or less lined up although of course every photo I look at now has them as per Peter……..although in reality once in situ it will be quite difficult to spot
The kadee magnets are a bit of an eyesore but the layout will be in the far corner and hopefully worked fairly intensively. I really dont have sufficient confidence in my track laying to rely on a single upstream uncoupler
Like most of my modelling its been a good news, bad news story. The short term bad news….taking a photo with a derailed van…..pas de probleme. The more permanent bad news …..I managed to grab an earlier print sheet of cobbles and fitted it (naturally) in the most difficult area. The fit is near perfect….the colour match much less so
 …..I am going to live with it……
In fairness the photo is worse than real life and hopefully some weathering, which I still have to do, will level everything off a bit.
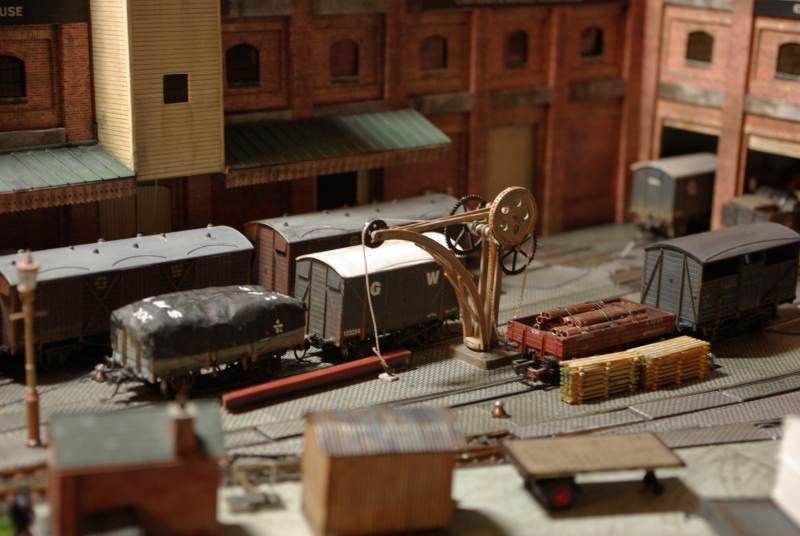
You can see in the foreground I have added some scalescene concrete…….the legend being that this was added in the thirties when the Big Four started going after container traffic. The gantry is avery basic manual Langley kit rescued from the Timber Yard in Granby II…..the plan is to add an operators platform and engine housing using some bits I have left over from the Ratio Signal Gantry Kit.
I am hoping that the concept of a (relatively) recent addition will allow me to also install the more conventional crane. This is another Ratio kit (which needs to be rigged) that I built originally for the canal warehouse but it got bumped by a gibbet crane! Its a nice model and in keeping with the Victorian set up. Comments appreciated

I am struggling a little with the less is more approach……once I am operating most of the sidings will be occupied anyway but I do want to include some road traffic and those clusters of little buildings that all railways the world over seem to generate…….on the other hand I dont want more to become less!!
One of the other areas of concern, which I may have already mentioned, is integrating the module into the existing very flat rather pale back scene

So to the next project…..I have laid some ashpalt and temporarily some pavement…..hard against the wall will be a couple of town scene cutouts …….in front will be a yard wall and then an office and weigh bridge hopefully this will create some depth and a sense of life beyond
Posted

Full Member
 Last edit: by Phil.c
Phil
Posted

Full Member
Doug
'You may share the labours of the great, but you will not share the spoil…' Aesop's Fables
"Beer is proof that God loves us and wants us to be happy" - Benjamin Franklin
In the land of the slap-dash and implausible, mediocrity is king
"Beer is proof that God loves us and wants us to be happy" - Benjamin Franklin
In the land of the slap-dash and implausible, mediocrity is king
Posted
Full Member
Posted

Site staff
I think the scene is looking really great, John. Just a thought for the Kadee magnets, have you considered gluing the Scalescenes cobbles to them? I t shouldn't make any difference to operation, and it might blend them in a little.
Kadee instruction have it that the magnets are to be 1/64th of an inch above rail height - presumably so the delayed action works better so unless the cobblestones normally are above rail height, the change in level maybe noticeable.
Using the rare earth magnets like Perry started with & what I use, that problem goes away so cobbling over the lot would perfect visually.
Ron
NCE DCC ; 00 scale UK outline.
NCE DCC ; 00 scale UK outline.
Posted

Inactive Member
I've seen Sol's magnets in the flesh. They work really well, being rare earth magnets and unless he points them out, you can't spot them.
They could just be the ticket under the cobbles.
Max
Port Elderley
Port Elderley
Posted
Full Member
I was a bit worried about the additional height…….some of my earlier converted stock have low hanging couplers but it seems to works so I will give it a go:thumbs
I was intrigued with the idea of rare earth magnets but as you can see I already had a fair sized inventory of Kadee (notice the absence of a Y Ron:lol:) so I am sort of comitted
Posted

Full Member
John
John
Posted
Full Member
It was very good of Peter to nominate it……..he has always been a great fan (despite a recent difference of opinion about cobblestone alignment:lol:)…….but right now he should be focussing on UXBs
Posted

Full Member
A worthy selection John. Congratulations. :cheers:cheers:cheers
p.s. I thought I'd leave out anything in colour …………………………………….:roll::roll::roll::lol:
'Petermac
Posted
Full Member
Doug
'You may share the labours of the great, but you will not share the spoil…' Aesop's Fables
"Beer is proof that God loves us and wants us to be happy" - Benjamin Franklin
In the land of the slap-dash and implausible, mediocrity is king
"Beer is proof that God loves us and wants us to be happy" - Benjamin Franklin
In the land of the slap-dash and implausible, mediocrity is king
Posted
Full Member
To celebrate both the Header Photo and finishing all the detailing on the Goods Yard here is another, more recent, Black and White shot
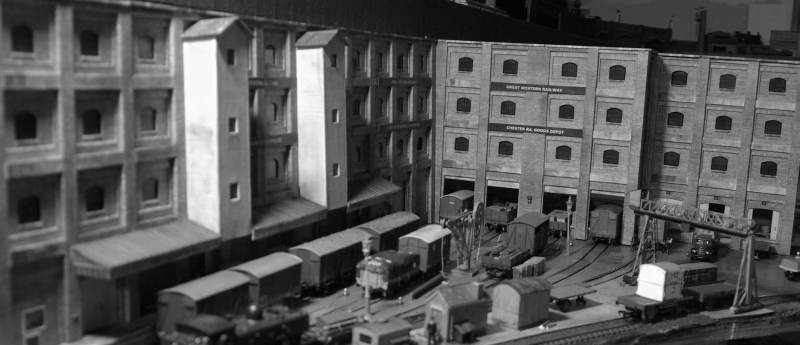
Bearing in mind the viewing distance I have probably spent too much time on the detailing…….but it is the bit I really get a kick out of……………so its all done …..people, bollards, point levers,lamp standards, clutter, cranes and buildings.
As I write this I am waiting for my son in law and grand daughter to help me lift the module into positon…..then all that remains is to hook up the power and run some trains
Here is its permanent home

and its ;present temporary location
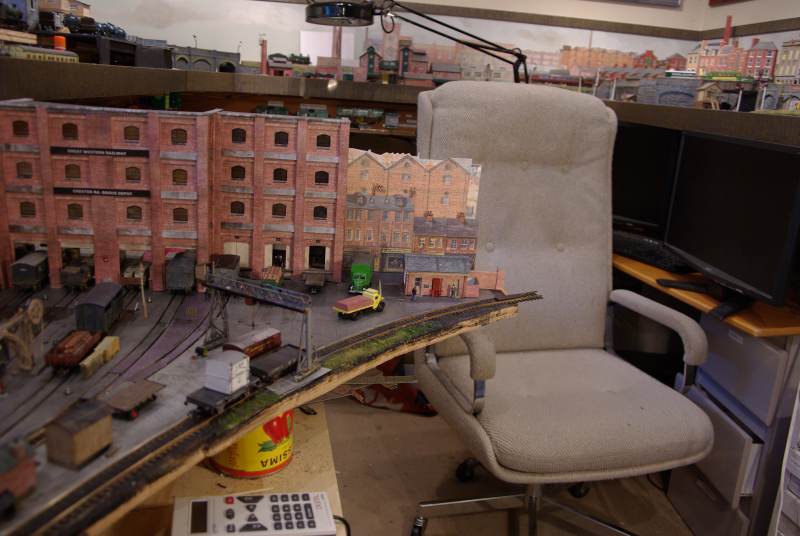
………..that protruding rail stub can be really painfull………..not been a lot of room the last three months
This shows the yard entrance which will link to the back wall
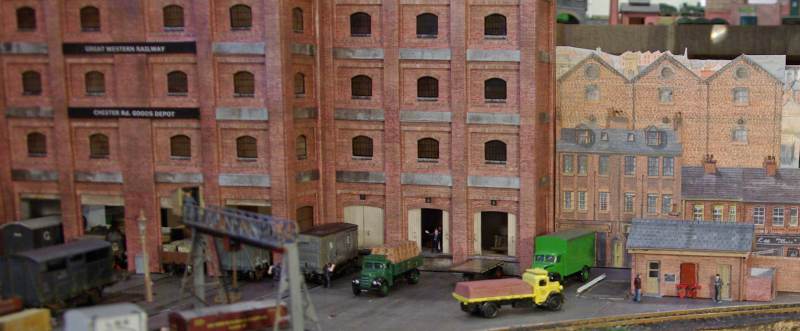
Its a bit theatrical above but not quite so bad in real life……the buildings and backscene have still to be bedded in
The weigh bridge (complete with guard rail) is from Granby I …….but the building itself was too small so this yard office is a heavily modified Scalescene small station.
The Ratio yard crane is now rigged
The gantry previously looked like this :

Rather too basic………………….so I added some more girders and a walkway surplus from a Ratio signal gantry
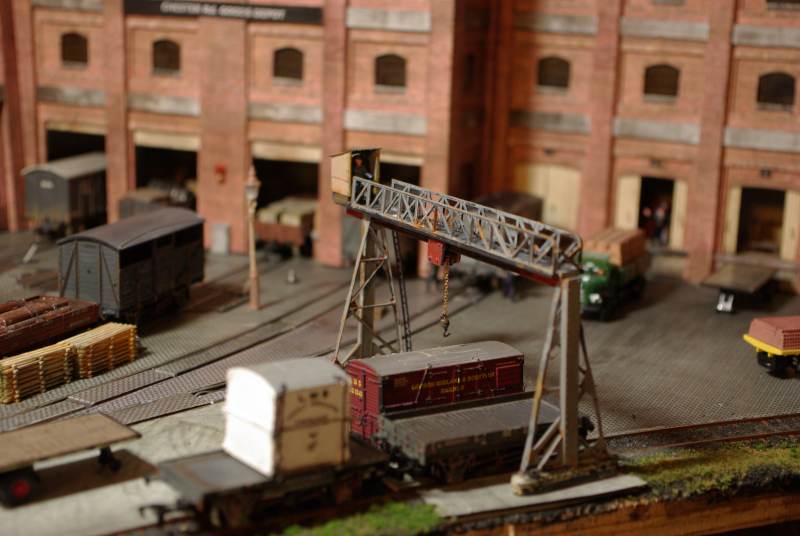
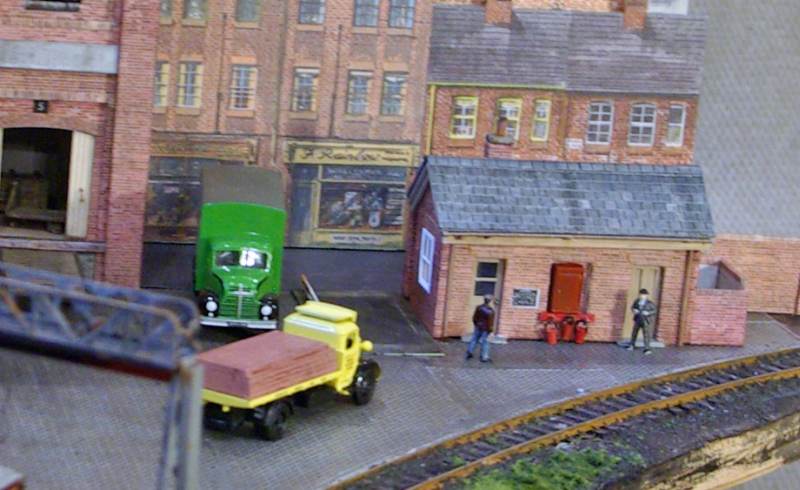
This doesnt bear too much close examination but hopefully will look the part from a distance

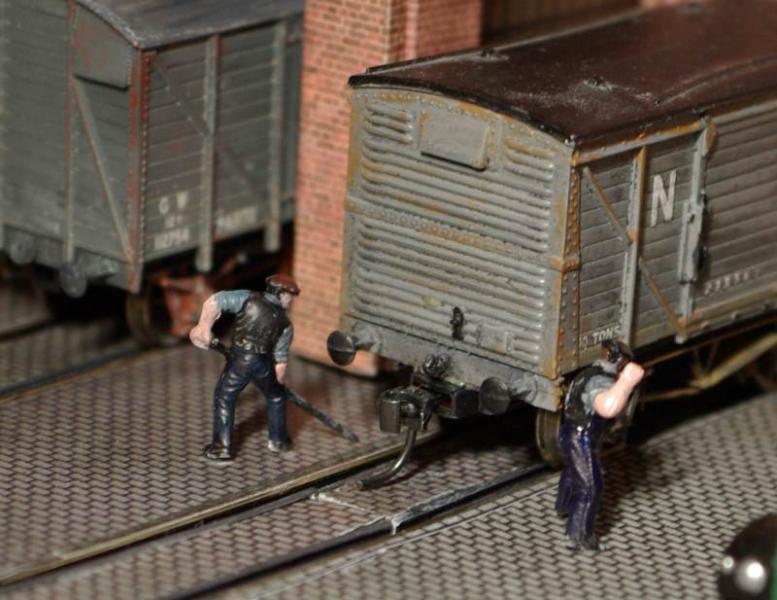
Here's one of those unique features of the GWR ( they were usually a little bit different) ………the yard pilot was invariably coupled to a shunters wagon , or runner.
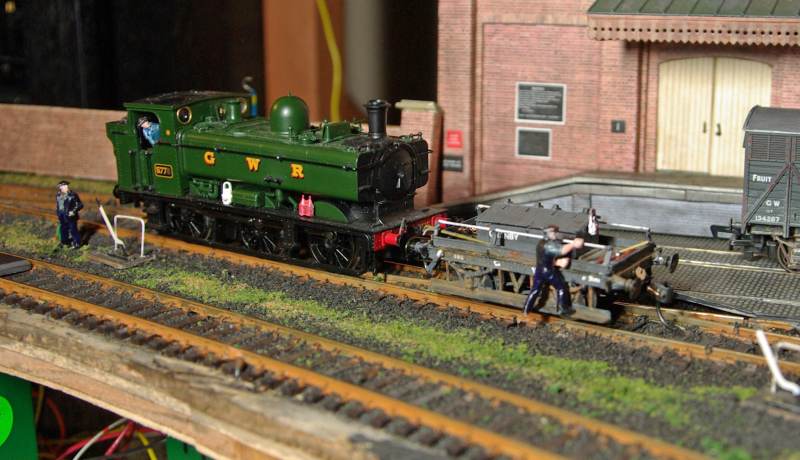
Health and safety…….risk assessment?
No headlamp code on the front of the loco because runner and loco were treated as one unit……with a single red light (unlike the red and white lights on Station Pilots)

The wagon itself is a Cambrian Kit…….probably one of the first I ever built……..and I am afraid it shows! Its a bit fragile and not very well built. Having done a few test runs I am a bit dubious about using it for prolonged automatic shunting………….but I did enjoy researching and detailing it.
Continuing with the theme of moving wagons about the yard………..I took Doug's advice and used Air Gun pellets as bollards!
Quite the performance buying them from a locked cabinet in the Hunting Section of Canadian Tire!
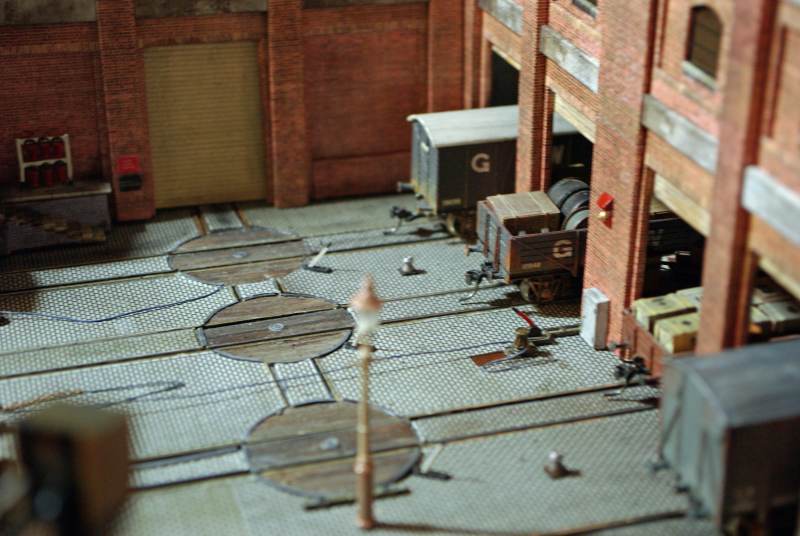
I only needed 8 so if any one could provide a good home for 292 hollow point .177 pellets please send me a PM
The wagons were moved, via the bollards and, in this case, a single capstan using steel ropes and a short length of chain that hooked on to the sole bar of the wagon

Of course when all else failed……in those days…….two guys with pinch bars
Posted

Full Member
Posted

Full Member
A really good idea those air pellets.
"The only stupid question is the one you don't ask"
Regards.
Tony.
Regards.
Tony.
Posted

Full Member
Posted
Full Member
Looking forward to meeting up with Les tomorrow, for a serious discussion on 4mm telegraph pole insulators, or several cold beers, whichever seems most appropriate…..[It's about 80F here in Alicante at the moment…]
Doug
'You may share the labours of the great, but you will not share the spoil…' Aesop's Fables
"Beer is proof that God loves us and wants us to be happy" - Benjamin Franklin
In the land of the slap-dash and implausible, mediocrity is king
"Beer is proof that God loves us and wants us to be happy" - Benjamin Franklin
In the land of the slap-dash and implausible, mediocrity is king
Posted
Full Member
It's a real hive of activity - as it should be. I don't think you can ever "over-detail" a scene like that . It calls for plenty of bits and bobs when you think of all the comings and goings when labour was so cheap.
Wagons arriving to be off loaded and trans-shipped. Lorries taking goods out to the customers and briging packages in for onward shipment. A tally-man making sure everything ends up in the right place and all the shouting and clanking of metal on metal. You've created such an atmospheric scene. :thumbs
It's such a pity it's in a back corner. Certainly good enough to make a stand-alone scenic feature. :pathead
'Petermac
Posted
Legacy Member
Posted
Full Member
I probably spent rather too much time on this project…….but false modesty aside, I must admit I am pretty happy with the end result…….When I started I had an image in my minds eye of what I wished to achieve……and, in general, I think I have been able to include all the elements I wanted and to create that elusive atmosphere.
As you may have seen in Shunters Return this will be my last post for a while as we head off in the boat on Monday.
I thought I shouldnt leave you in suspense until September!
Yes the module fitted into the baseboard like a glove………..

There is no reason why it shouldnt have because it was built on the cut off from the main line baseboard…..but I will confess to a frisson of anxiety as my Son in law and I dropped it into place with grand daughter below guiding the wiring loom.
So here it is with the main lines from Birkenhead sweeping into the Junction at Granby with the branch from Cynwyd

There were only a couple of issues……at some stage I must have decided to re arrange the points in a more logical numeric pattern……but omitted to renumber them
 …….so there I was entering Point #73…..hearing the zzzzz of the Tortoise but not seeing the blade of the point move…..for far too long I thought the blade had jammed……finally I watched below the baseboard and saw that #73 was totally static and #76 was moving sweetly…….grrr….a swift reprimand to self for gross carelessness, a couple of amendments and we moved on with everything now functioning correctly
Sadly paper on the uncoupling magnets didnt survive contact with the enemy……as Ron foresaw the hook on some of the coupling was just sufficiently low to scrape the paper off
Final snag was revealed when I put the warehouses back in place

Actually its not too bad in this shot but in real life the roof of the warehouse and the frame of the backscene are definitely not parallel
 ……..the module is absolutely level and I now vaguely remember that the frame was slightly (?) out of true when I glued (!!!) it in place some years ago……………never thinking at the time there would be such a long continuous datum line so close beneath it!
The next job is to add some more backscene to connect everything up…….guess whats in the modelling box on the boat!
1 guest and 0 members have just viewed this.