Granby Junction 1948 N. Wales
Posted

Full Member
GWR/LMS OO Gauge DCC RR&Co
[user=753]Phil.c[/user] wrote::shock::shock::shock: They sound big and brutal Phil …………….:hmm Are you sure they're acceptable as capstans ………:roll:If you can't get air pellets, I can get you some .700 bullets, maybe a little over sized though :lol:
'Petermac

Posted

Full Member
Phil
Posted

Full Member
Posted

Full Member
Over three weeks since I posted……..Gardening and Sailing have intervened plus I got diverted by the arrival of the Loco TT
Thanks for all the comments guys!
Airgun pellets sound great……I can get 100? from Canadian Tire for $4.99…….I only need 10 max!
Its still very much a work in progress……but here is an interim report………this is not so much a "how to" more of a "how I did it"
I have previously attempted inlays with Wills Plastic Sheets and Metcalfe Card.
This exercise is based on Scalescene Paper applied to two layers of 1 mm card
The Scalescene paper, seen below, is quite realistic but does lack the three dimensional effect one gets with the other two products. However its big advantage is the facilty with which it can be cut to shape.

I got a fair way down the project before I realised I had not been recording it……so here better late than never…….the third turntable.
The first layer of 1mm card is very much a foundation……doesnt have to be a super neat fit (although I do try)

The pencil marks are guides for the centre line of the the TT and the changeover from the concrete paper used in the warehouse to the setts.
The straight infills are easy……just a measurement and maybe a little chamfering.Check they fit then using a gluestick apply the paper, laying one straight edge with the vertical retaining course……..on the other side one trims a single retaining course and applies it on top of the sheet…….this is a huge plus and obscures any cut errors within 2mm
The rail infills are equally easy……..7/16" wide before the check rails
Here is the third TT siding with the sett and concrete paper applied and the aperture cut for the last segment of the TT

The curved sections are trickier and caused me endless problems using Wills and Metcalfe. Fortunately the sidings were laid with Peco track gauges. So I was able to use the gauges as a cutting guide……..although I still cut too thin at the right.

One of the key things I have tried with this project is to always line the setts up and I think this has made a significant difference to the overall appearance. Previously, particularly for rail infills, I tended to follow the track curve. Now I gluestick the base layer and apply the new paper so that it exactly lines up with the paper above ….rather than following the curve……then I trim to size using the rail as a cutting guide. More waste but overall far more effective.
The rail infills then have check rails applied.Generally I use spare painted code 75 rail which just fits into 1mm card
This shot shows a top and bottom

The third piece at the bottom is a curved section……..here I had problems with rail and used plastic I profile as the check rail…….it is a little wider but much easier to fix
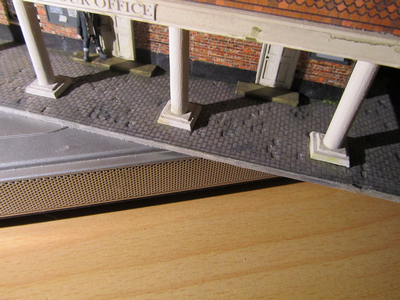
So here is the semi finished product……..less than perfect……but much better than my previous efforts……and, crucially, the tracks are operational (a big failing in the past where the infill was higher than rail height)

I say semi finished because there is still lots to do…..weathering with pastels to conceal the paper joins, detailing….TT locks, capstans, point levers, 4th Siding……people etc
The track gauge indicates a change of plan. Some of you have, quite rightly, asked about road access. To be frank. I ran out of space!! I hoped to "suggest" an off scene entrance. On reflection I have decided it is better to sacrifice some running line to achieve a more credible overall look. The siding will be shortened to lead to the first loading bay and become an end loading dock……this will free up space at the side of the warehouse for a gatehouse and weigh bridge

Posted
Full Member
The in-fills look really good.
 Last edit: by ddolfelin
Posted
Full Member
I too have experimented with the Scalescenes cobbles but, because of the lack of 3D effect, I have to say, I'm not a big fan.
I do think cobbles need to look like cobbles and, whilst from a distance (and from above) , they probably look similar, once you see them closer or from an angle, they lose their effect somewhat.
I also notice that in your curved section, you've kept the paper straight and cut in the curve. I'm sorry but IMHO, this doesn't look right …………
 The cobbles were always (I'm pretty sure) laid at right angles to the tracks. If the track curved, the cobbles followed it still at right angles. That's not possible, at least not easily, with any sheet material.
Laborious as it sounds, I'm going to try plaster and scribe ……………………..:hmm
'Petermac
Posted

Site staff
What happens then Peter when both tracks curve as those by John does?I also notice that in your curved section, you've kept the paper straight and cut in the curve. I'm sorry but IMHO, this doesn't look right …………
Ron
NCE DCC ; 00 scale UK outline.
NCE DCC ; 00 scale UK outline.
Posted
Full Member
Phil
Phil
Posted
Full Member
Absolute consternation in Chateau Dew this morning…….this from Granby's most loyal fan!I also notice that in your curved section, you've kept the paper straight and cut in the curve. I'm sorry but IMHO, this doesn't look right …………

I have studied photos of yards and wagon tables for months but I have to confess I had not checked on the alignment of the cobbles:shock:………………quelle horreur……………ripping up and starting again was unthinkable…………maybe I could plead long standing GWR practice ( after all Peter does rather focus on the North East…….anything West of the Pennines could, perhaps, have slipped below his radar?)
I have to say that in my previous attempts I had done more or less as Peter suggests…….having the cobbles at right angles to the track…..the problem is that with the multiple cuts involved in a curve…….it looks pretty gruesome…….the eye was automatically drawn to the joins rather than the alignment of the setts…….this time I consciously tried to line all the setts up. From a modelling perspective I think this works……..after all the floor surface is merely background and should not force itself on the viewer.
However I now had the nagging doubt that prototypically it was wrong. So lunch time was spent delving through Bob Esserys books……..quite a few cobbles but very few curves………however the photographs I did find showed the infill cobbles were lined up with yard rather than the curve of the rail
:doublethumb
However they were generally parallel to the track rather than at right angles (as I have done):twisted: and the infill had retaining courses (which I havent bothered with:twisted:)
In fairness they were Midland Sheds (Leicester and Nottingham) so maybe as we move further west Granby will look even more accurate:lol::lol:
Regarding the Scalescene sheets…………….Peter you are absolutely correct………at first sight they dont cut the mustard……in my case I printed out a couple of sheets and immediately rejected them……..it took me almost a year to realise that if one dimensional brick and stone ashlar sheets would work then maybe the setts would as well…………..before you start with plaster and scribing it might be worth a small test run!:cheers:cheers
Posted
Full Member
If it bothers you and you have a graphics programme, John, it should be possible to outline the track shape and then modify the sets to follow the track.
(I know what I mean!)
Posted
Full Member
The shot that threw me was this one:
The lower curved rail just doesn't sit well with my eye so I did some research knowing that, contrary to popular opinion, I had been wrong one one occasion (I think) but that was many, many years ago …………
On the overall views of the yard, there's little to suggest everything is not as it should be and the effect is superb. With hindsight, I'm pretty sure, had you not posted the above shot, then I would have been delighted. It was just this 1 shot that made me look very closely..
I found several shots of, admittedly, tram tracks and cobbles on curves but the principle remains the same. Here's an example (hope it re-prints - it's just a stock photo) You can see lower right how the cobbles follow the curve on the crossover(?) - perhaps not the best example but it was readily to hand and available to copy. I'll try a post before I go any further then come back to edit - just in case it doesn't come up) ………….

good, it seems to work :thumbs …….unfortunately, I can't get your post back John so I'll have to re-edit ……….:oops::???: Don't go away …..
As far a quelle horreur" is concerned John, you're absolutely right !! I had no intention of being "over-critical" and had not meant my comments to provoke this reaction. Don't even think of ripping it up or trying to lay them "row by row" - I was trying to say that "I" didn't like them when I'd tried them and my reasons for not liking them.
As I've said, the overall effect is superb and, once away from that ever cruel close-up, I'm sure you just won't see. As you say, the yard is a "background" to what's happening on top, not the "event" itself.
Please forgive me - having re-read my post, it does seem a little harsh - maybe a mirror of my mood at the time of writing (I'd just had 2 days which are best forgotten :twisted::twisted::twisted:). What makes it even more strange, is that it came from someone who has so much skill and experience - you'll recall it's taken me just 3 years to not-complete a 6ft long board ……………….:hmm
'Petermac
Posted
Site staff
Ron
NCE DCC ; 00 scale UK outline.
NCE DCC ; 00 scale UK outline.
Posted
Full Member
If it needs to be prototypical and on printed paper then bending the cobbles in Photoshop is the answer.
Phil
Last edit: by Phil.c
Phil
Posted
Full Member
I was not in the least irritated by the comments……..frankly I would far rather have factual constructive criticism than a stream of "looks good!"
There is a certain logic about the cobbles being at right angles and following the curve and in Peter's photograph they do look more pleasing to the eye……..I had honestly not looked at my own photographs from that angle until Peter's post…….I had just made a conscious decicision to do it 'my way' because I thought it would be easier to achieve in the model……….I am relieved that I have now found some photos (cant post because of copyright) to actually support this……….I wonder if it was a tram/railway thing? Probably not…….more likely local practice or even the requirements of the site itself.
Whatever…….its too late to change now……I only have two more tracks to do and I really want to start running some trains.
Do keep the comments coming
Kind Regards from Vancouver
Posted

Inactive Member
My worry now is that I shall have to do something like this on my quayside - which I hadn't even thought of before! - and they'll probably turn out to be a load of old cobblers!!! :lol::lol::lol:
Ken.
'It don't mean a thing if it ain't got that Swing'
Posted
Full Member
Phil, thanks for the reminder about adding PVA. I have read that it improves the "flexibility" and therefore, strength. The fact that thin plaster in particular, is so brittle, has often worried me for my tram tracks but I've seen it done to superb effect. I'll give it a go and see how I get on. I'm also told it is a PITA to do in any quantity ……..
Unfortunately, I can't think of any easy way to do cobbles "the Yorkshire way" (:roll:) with sheet material……….:cheers
Ken, I'm really looking forward to seeing your quayside. Devon is just as good a target as Lancashire ……….;-)
'Petermac
Posted

Full Member
Have you tried being a 'plonker'?
I made up several 'plonkers' by filing the ends of 3" nails to the same size as a cobblestone, a half-brick and a whole brick and then soldering a penny washer at the head end to make it a little less painful to use when pressing the sharp end into the card/paper that I wanted to 'plonk'.
The lower picture gives some idea of the effect obtained on S'scenes cobbles, once the human eye has seen a few uneven/dented ares it assumes that there is a lot more texture there than there really is!
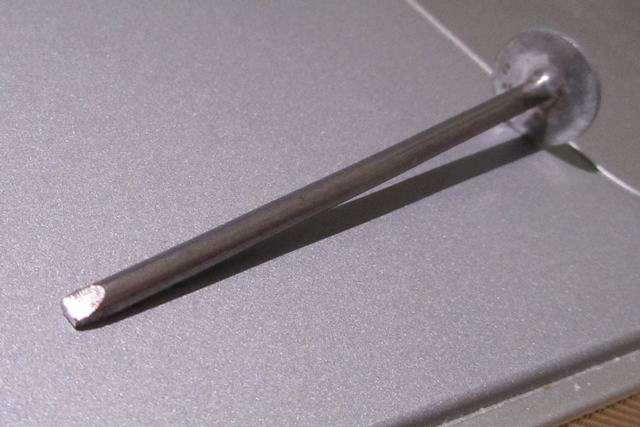
…….anyway, it worked for me!
Doug
'You may share the labours of the great, but you will not share the spoil…' Aesop's Fables
"Beer is proof that God loves us and wants us to be happy" - Benjamin Franklin
In the land of the slap-dash and implausible, mediocrity is king
"Beer is proof that God loves us and wants us to be happy" - Benjamin Franklin
In the land of the slap-dash and implausible, mediocrity is king
Posted
Full Member
Having said that, I suppose, because the cobbles are so small, even ply would (or should that be ply-wood would :lol:) "give" sufficiently to see the effect …….:hmm
'Petermac
Posted
Full Member
Phil
Phil
Posted
Full Member
Regards
Kevan
1 guest and 0 members have just viewed this.