Granby Junction 1948 N. Wales
Posted

Full Member
GWR/LMS OO Gauge DCC RR&Co
[user=434]John Dew[/user] wrote:I'm not sure I'd always agree with you John.………but I should run the trains more often because when all is said and done thats the purpose of the exercise:lol:
Regards
When I used to build model boats, I'd really enjoy building them and, once finished, I'd sail them a few times just to make sure everything worked OK and that performance was adequate then get bored and start another ……….
I suspect that's the case with many modellers. The fun is in the chase …………:roll::roll:
'Petermac

Posted
Guest user
. The fun is in the chase …………:roll::roll:
or
The journey, not the arrival.
Posted
Full Member
'Petermac
Posted

Full Member
Posted

Full Member
There was a layout called Bash St at our local MR show and both BrianPR1 and i said it could be a John Dew, it was rammed with features. This is a compliment by the way.
When you look at different layouts they have a signature and style and if the builder moves to another one it will move with him IMO.
 Last edit: by wogga
Regards
Pete.
ECOS2 with RR&Co Traincontroller and a load of other electronics so i can sit back and watch the trains go by.
Pete.
ECOS2 with RR&Co Traincontroller and a load of other electronics so i can sit back and watch the trains go by.
Posted
Guest user
I tend to do a module at a time and I do test it rigourously before I ballast. I like to break the different jobs up so that nothing becomes too montonous……after all it is a hobby.
Couldn't agree more John. :thumbs
Posted
Full Member
looking good as ever John, i must admit the low relief terraces look good, have you done much to them or is that how the kit finishes them?
Thanks Pete
I havent done a lot to the Metcalfe Kits
I apply water colour to all the cut edges….I think that makes a huge difference and I also hand paint many of the window lintels…….the unrealistic white ones.
I add Wills guttering and drain pipes and each module (2 kits) has a lampost and some detail…..housewife milk man etc and thats about it……I should weather them a bit they still look too pristine although they are toning down a bit from the little sun they are occasionaly exposed to in the basement
That is indeed a very nice compliment from you and Brian. I do strive for a coherent look but no one has ever been kind enough to use words like signature and style before……thank youThere was a layout called Bash St at our local MR show and both BrianPR1 and i said it could be a John Dew, it was rammed with features. This is a compliment by the way.
When you look at different layouts they have a signature and style and if the builder moves to another one it will move with him IMO.
Posted
Full Member
Regards
Pete.
ECOS2 with RR&Co Traincontroller and a load of other electronics so i can sit back and watch the trains go by.
Pete.
ECOS2 with RR&Co Traincontroller and a load of other electronics so i can sit back and watch the trains go by.
Posted
Full Member
They are great shots. It looks an interesting layout. He sure crammed in a lot of detail………I liked the way he dealt with the perspective issues that arose from a relatively narrow baseboard. One of the regrets about living in Canada is my inability to go to model railway shows……its a totally different culture here
Kind Regards
Posted
Full Member
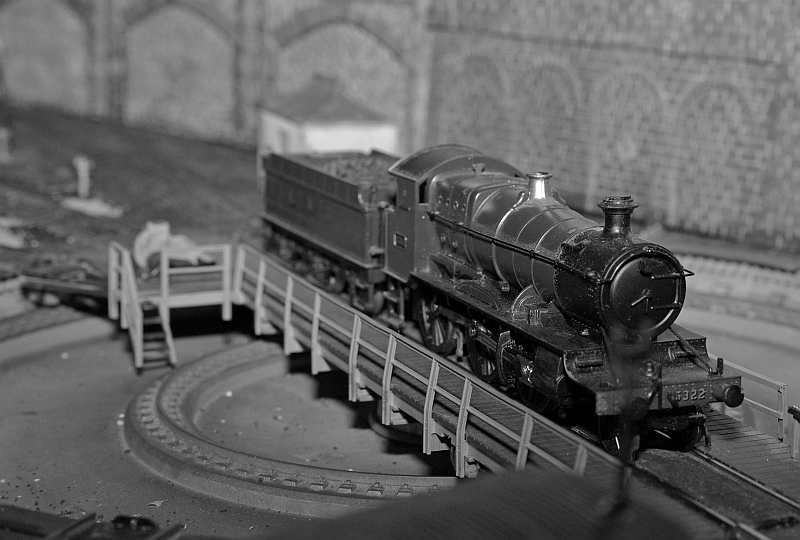
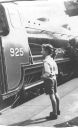
To set the scene 2-6-0 Mogul 5322 on the turntable
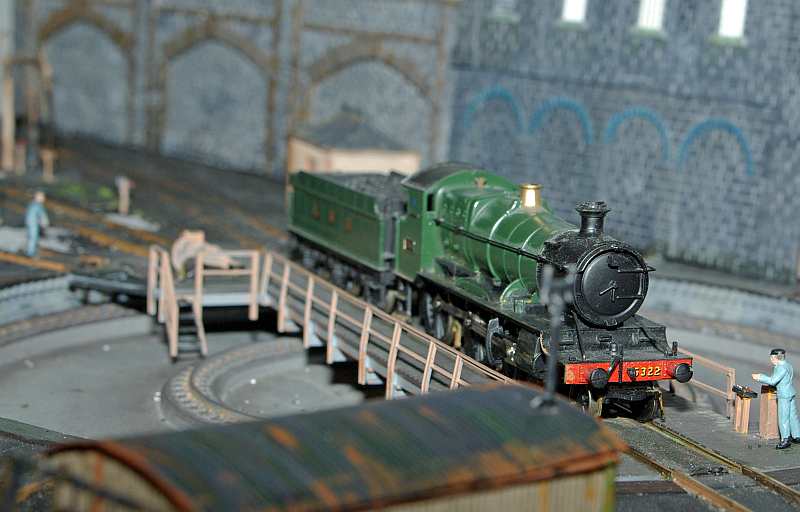
The Turn Table was the first of my frustrations…..I believe I mentioned I bought it for a song many years ago
I moved and rewired one of the solenoids……which promptly declined to work…… while I was sorting this out I discovered why the TT was such a steal………it was slightly out of alignment so when it circulated one end of the bridge rails would occasionaly catch on the stub rails…………solution file down the recalcitrant bridge rail……….doh……in so doing force down the spring that makes the electrical contact……not a good idea…….took 2+ hours to gently (very gently) fix
Finally all was well and I completed the Ratio Engine Shed which will conceal the relocated solenoid.
This is quite a useful shot. In front of the shed is the service siding and in front of that the main line……in the foreground the retaining wall for the the lower level branch Goods Yard

From the other side

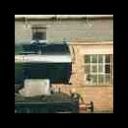
The lean to was originally meant to conceal the other solenoid but I changed my mind to allow more space in front of the shed. The lean to is scratchbuilt from a Wills corrugated sheet and some drain pipes
The rust is far more orange in the photo than real life……its even worse in the next shots
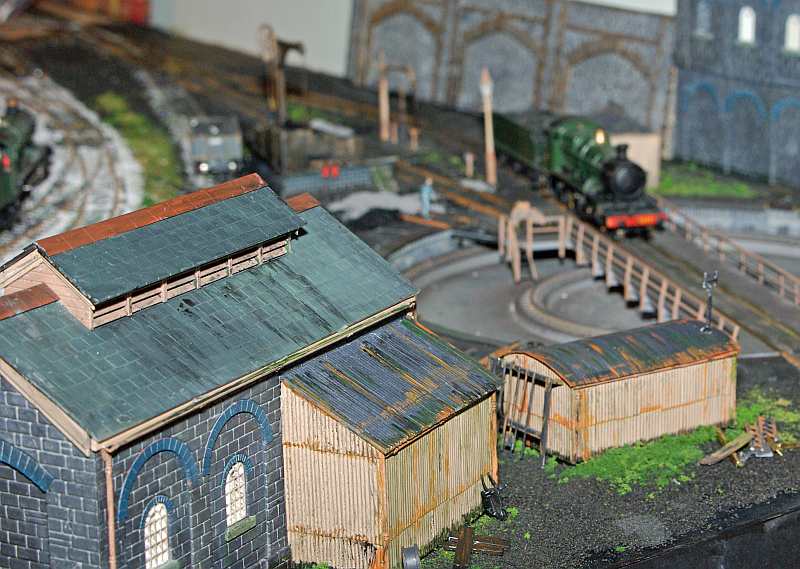

The shots above show the second scratch built shed….a mess hut? which I finally used to hide the second solenoid

The road in front of the shed is not hooked up so it will serve as a cripple road……..which definitely describes the 14xx that currently resides there!
You may well be wondering what happened to the "coliseum" that I was going to use as a backscene to the TT………well here it is……..just needs barge boards, drain pipes and weathering

I am quite pleased with the model itself although it looks more like the stables at Versailles than a Wagon Repair Shop……Doreen thought it looked more like a prison…Strangeways?……..whatever…. I think it is too overpowering so I will probably settle for a continuous retaining wall with a simple printed back scene above
I have added the basic elements of a loco servicing facilty in front of the TT. Hopefully I have captured some of the elements one would see in the steam age at a Turn Table facility attached to a terminus

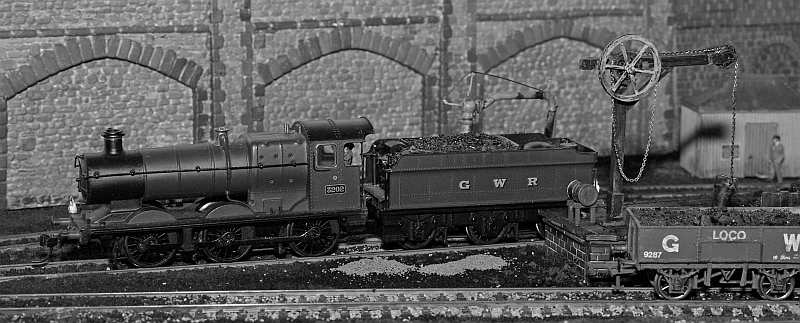
The water crane is from Mikes Models and is amazingly well detailed……even has GWR embossed on the base plate.
The coal stage is less sophisticated……how does the saying go……something old….something new…..something borrowed and something blue
Old….a cut down platform from Granby I New……the Ratio Crane which I originally bought for the canal warehouse
Borrowed……assorted bits and pieces that were being held in reserve for Granby's shed Blue? ………..look at the base of the coal bucket……the camera has exposed the unpainted part of the cut down ball point
It aint perfect…..sadly my modelling never is……and the camera has unerringly focussed on many imperfections tonight but overall I think I am reasonably close to capturing that grey, dirty, smoky, cluttered look that one associates with steam age sheds
The next challenge is to wire up 2 reeds and magnets so I can operate the TT automatically from the computor…………5 days……perhaps
Posted

Full Member
It aint perfect…..sadly my modelling never is……and the camera has unerringly focussed on many imperfections tonight but overall I think I am reasonably close to capturing that grey, dirty, smoky, cluttered look that one associates with steam age shedsÂ
Maybe John, or maybe not…..but regardless you have created oodles of atmosphere. :thumbs
Posted

Full Member
I shouldn't beat myself up over 'The Prison', if you masked the windows and sprayed it over with a light colour to more closely match the stone work to it's left, it would recede, I'm sure?
As the proctologist said, 'Upward and Onwards…'
Doug
'You may share the labours of the great, but you will not share the spoil…' Aesop's Fables
"Beer is proof that God loves us and wants us to be happy" - Benjamin Franklin
In the land of the slap-dash and implausible, mediocrity is king
"Beer is proof that God loves us and wants us to be happy" - Benjamin Franklin
In the land of the slap-dash and implausible, mediocrity is king
Posted
Legacy Member
I rather like the Wagon Works/Stable building as a backdrop to the TT . Not sure about the proximity of the doorway to the turntable pit but then H & S would not have been a great concern in those days.
By coincidence I was looking at a web site that an aquaintenance runs dedicated to the history of the Newport area earlier in the week which featured some views of the real 5322 when it was kept at what remained of Caerphilly Works about 40 years ago. Its not an engine in the limelight very much so I dont know where it is these days but its nice to see it in model form.
Richard. A sorely missed member who lost a brave battle in 2012.
Posted
Guest user
A perfect model isn't always believable but what you have created is.
:doublethumb
Posted
Guest user
:doublethumb:lol::lol::cool:
Posted
Full Member
John do you use flash? have a go without, it will take the colours down, just using natural light is the best of course.The rust is far more orange in the photo than real life……its even worse in the next shots
Other than that another shed load of header candidates…excellent.
Pete
Last edit: by wogga
Regards
Pete.
ECOS2 with RR&Co Traincontroller and a load of other electronics so i can sit back and watch the trains go by.
Pete.
ECOS2 with RR&Co Traincontroller and a load of other electronics so i can sit back and watch the trains go by.
Posted
Legacy Member
Posted

Full Member
Just joined the forum and being interested in computer control and RR&Co in particular followed the links to RR&Co - but soon found myself on your layout page reading through all the posts starting at page 1.
Now having seen what you have done I feel inspired and I haven't even started on your RR&Co pages yet !!
Dave
Posted
Full Member
I have to recognise that I am often my harshest critic and I must try and avoid beating myself up in public…….my apologies
Pete……you are right I had used flash…….and forgotten that I had the white balance set for a cloudy day:oops::oops::oops:
John…….that was a timely reminder regarding the GWR. It is sometimes difficult to draw the line between too pristine and too grubby. I try and keep the public areas fairly crisp but I do try to bear in mind that even in those areas it is unlikely they had received much maintenance in the previous 8 years (1939-1947)
Doug and Richard………..the wagon works has grown on me I think I will take your advice and leave it in situ by the turntable……….weathered and detailed. I think I need to tell the world its purpose (usually the sign of a bad model!)…….how do you think the sign should read?
Great Western Railway
Northgate Wagon Repair Works …..or Shop? (definitely not Shoppe …..although very popular over here)
The beauty of this usage is I can quite properly employ that timeworn cliche…..discarded wagon wheels
Now for a change of pace ……testing (playing) I spent a very pleasant day on Sunday getting the whole thing to work
The plan was for a loco to enter Track 2 (the centre track) via the 3 way point…… draw to a halt by the water crane , pause for a few minutes and then draw slowly forward on to the turntable bridge. The turntable then rotates anti clockwise through 165o coming to a halt opposite Track 3 (right hand track)…….the turned loco leaves the turntable and exits the yard thru the 3 way point……..the turntable then rotates anti clockwise thru 15o coming to a halt at track 2 ready for the next train………………all this to be done automatically with just one mouse click :cool wink
This is not intended to be a tutorial on RR&Co…..I will write this up elsewhere…….but I thought you may be interested in some of the magic
Getting a loco to run automatically from A to B via a correctly set point and stop at a given position on B is one of the building blocks of RR&Co although as you will shortly read (unless you are totally bored by this) getting an 11" Grange to stop on a 12" bridge was not without incident:lol::roll:
Once the loco stops in B you can get the programme to initate other pre set actions………….Max and Pete use this facility to iniate sound effects…..Whistles, Lights Doors slamming etc………..in this case I set up a short delay, turned Track 3 virtual switch on (ie the computor knows I want the TT to stop at track 3) and then started the turntable (the start wires are hooked to a point motor so it was just like throwing a point)…………..no brainer…….worked like a charm apart from a couple of occasions when it went clockwise:roll:.
The initial tests were "interesting" to say the least.
Test 1….click the button..the 3 way point sets correctly, the loco moves off smoothly and stops near the water crane, pauses as required and moves equally smoothly on to the TT bridge where it stops after 9"
Short (too short) delay and Turntable starts as planned but with 2" of protruding Grange tender majestically sweeping all before it………the TT is at the other end of the room from the computor…….by the time this geriatric operator worked out what had happened it was too late to save a number of figures artfully placed on the periphery of TT!!
Adjust stop marker……increase delay sufficient to allow me, on the next run, from preventing 3" of Grange Boiler from majestically sweeping etc etc…………..Doug I believe this was called bracketing in the Royal Navy?
So now at the third attempt I have the loco in the middle of the bridge …..the TT starts in the required direction whenever I so command……..but how to stop it in the desired location ?
I place a magnet on each end of the bridge and reed switches on the stub ends of the two tracks……………….when the bridge approaches Track 3 the magnet causes the reed switch to close….making the circuit…..the computor now knows that the bridge is at Track3 and if the virtual switch for track 3 is on then the Turntable stops.
As you can see from the next photo placing and fixing the magnets and reeds in position involved extreme precision.
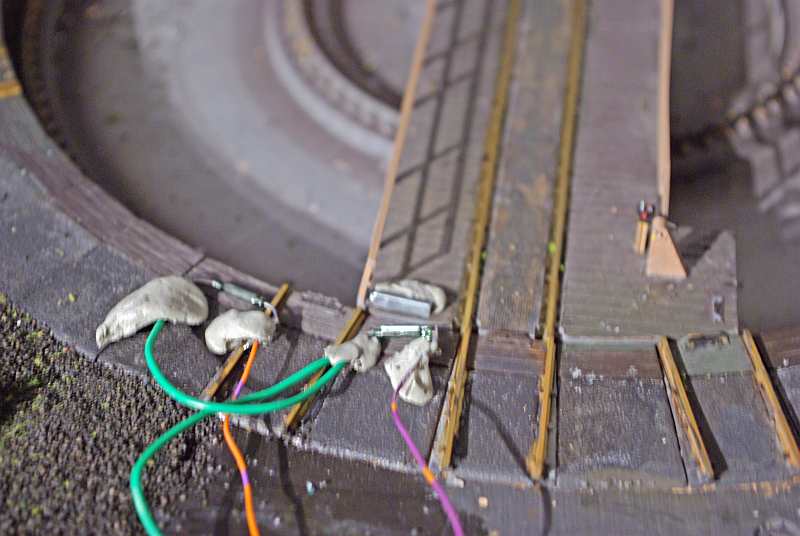
Plasticene has its uses…..Astonishing! Worked perfectly every time.
I ran the complete routine 5 or 6 times and also used a different loco and it does seem pretty stable…..
So all in all, despite the amount of time that I have spent, this has been quite a worthwhile exercise………I have satisfactorily filled a key scenic corner at the entrance to the room and added significantly improved the operation of the storage yards
Finishing the half relief scenes in front of the yard will probably have to wait until the summer. Apart from the garden and the boat my next objective has to be the double slip module on the main line
Posted

Full Member
1 guest and 0 members have just viewed this.