Granby Junction 1948 N. Wales
Posted

Full Member
GWR/LMS OO Gauge DCC RR&Co
Wishing you all a Happy New Year
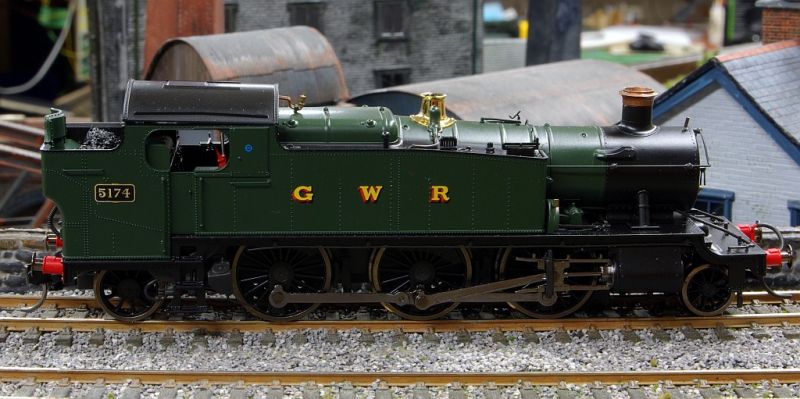
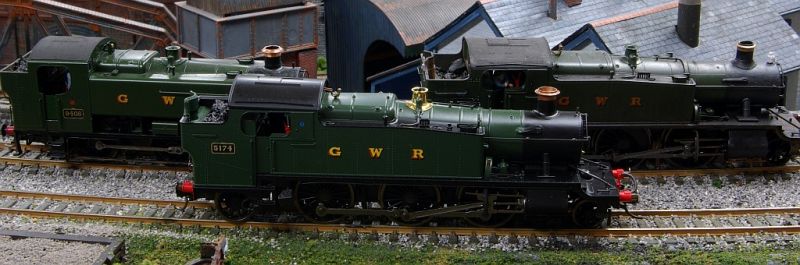
Arrived just in time for Christmas……..the Dapol Large Prairie.
Its shown here in virtually out of the box condition. The loco number has been changed to 5174 (Chester Shed 1947) with engraved plates. The buffer beam numbers will be changed when I weather her.
Visually its very attractive with an abundance of neat accurate detail. The brass safety valve cap is a delightful moulding but the highly polished finished would, perhaps, be more suited for a Horse Guard's helmet than a hard working loco. A touch of dullcote should solve that.
In the opening shot you can see that the slide bars have been splayed for clearance purposes. Its not proto-typical and it does jar somewhat. However its not that obvious when running so I can live with it.
As with the Dapol Mogul, decoder fitting is innovative. Ease out the push fit smoke box door with the provided tool, pull out the PCB, plug in the Next 18 decoder and replace…..job done.
There were reports of poor running with frequent stalling over point work. Happily that does not seem to be the case with my model. Neither is haulage an an issue. At 300gm its 50% heavier than the Hornby Prairie which needed packing with lead before it would look at 4 coaches. However RR&Co is very demanding. There is a suggestion of hes itation below speed step 4. I may need to file the rear pony truck axle slots down a little
I mentioned detail and innovation……the cab roof slides off:
The rear cab windows are individually glazed and just look at the protective bars
The back head detail is astonishing:
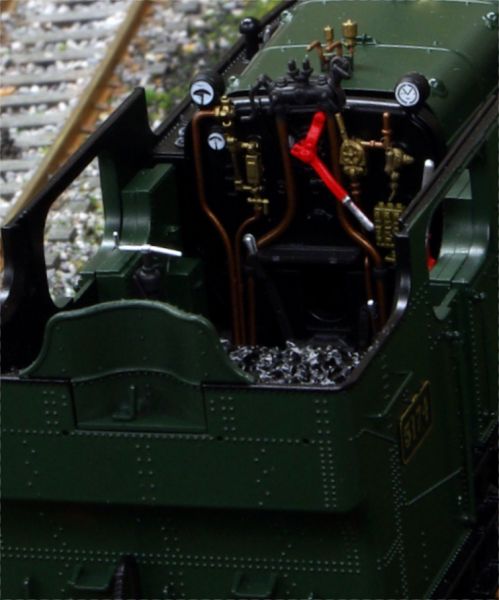
Not sure how much will be seen, but its nice to know its there. It will definitely make it much easier to add crew.
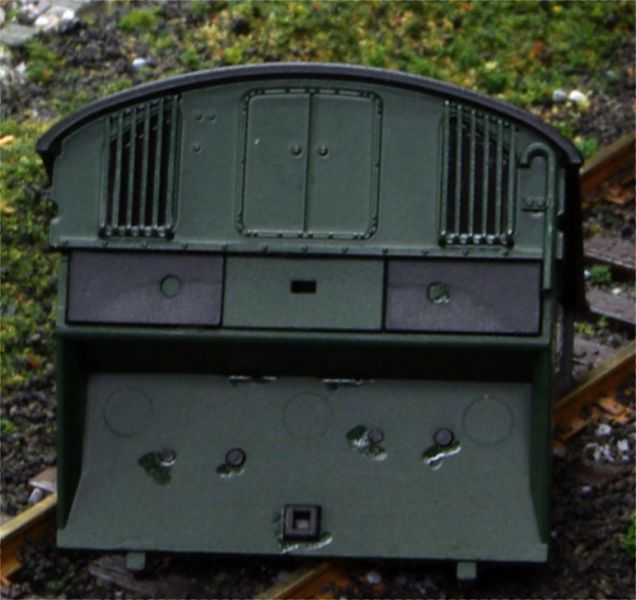
The coal load is quite realistic but it is removeable and the bunker is fully modelled
Here is a comparison shot with the Hornby Prairie. Its bit unfair with a pristine 5124 and a more realistic workstained 4129

I have been running the Hornby Prairies for a year now. Initially they were very disappointing. After all the remedial work particularly hard wiring Stay Alive Capacitors, they are now solid reliable performers. Although my heart is still beating a bit too fast when they approach some of my point work. The Dapol prairie is much more sure footed.
To finish…… a three company colour comparison………..which is the authentic GWR green?
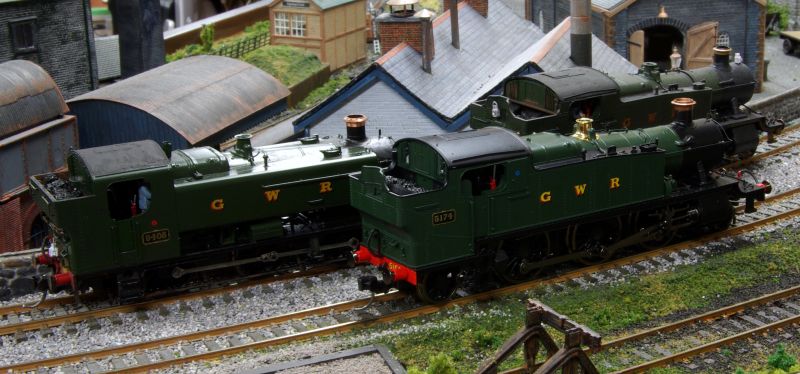
To my mind the Dapol Prairie is pretty close to the Bacjmann 94xx. Even allowing for the heavier weathering, the Hornby green looks a bit washed out.
All a bit subjective……we have had a load more snow here and that may have reflected into the light in the Train Room.
Best wishes from a very cold (23o F) Vancouver
 Last edit: by John Dew

Posted

Full Member
Phil
Posted

Full Member
Very best,
Bill
At 6'4'', Bill is a tall chap, then again, when horizontal he is rather long and people often used to trip over him! . . . and so a nickname was born :)
Posted

Full Member
Your Prairies look super. Regarding their colour, my memory of green locos in the better region up north is that, once wiped over a few times with an oily rag, they took on a very deep green/black colour with a distinctive sheen so, in spite of your comments, the Hornby one would be my choice for tone although it lacks that oily sheen. But then I suppose the starting point for GWR green, which I understand was designated "middle chrome green" is different to that of the LNER which seemed to vary depending on whether the locos were built in Doncaster or Darlington.
On the subject of decoders, do you think there would be enough room in the smoke box for a sound decoder and does the loco come with a pre-installed speaker ? This latter seems to be quite a popular addition because finding a home for a decent speaker is often problematic. :roll: Also, where do you install the stay-alive caps and are they tantalums or super caps ?
'Petermac
Posted
Full Member
Sadly, I cant comment on Apple Green. The lack of sheen that you referred to is a valid criticism of my weathering technique. I learned a great deal from Tony, who you may remember. He used to create that effect by lightly spraying “Pledge†or similar. Maybe its time I plucked up courage to try it.
I used the basic Zimo Next 18 decoder. Noticeable difference between DC and DCC running.
The Dapol prairiie boiler is virtually the same as the Dapol Mogul. The youchoos fitting guide shows how a Zimo sound decoder can be installed. I believe there is room for a sugar cube in the boiler but they put a larger one in the bunker.
I removed the pcb from the hornby prairies and was able to hardwire standard zimos and a supercap…huge differenve.
Sadly there are no mounting pads on Zimo Next 18s nor the Dapol pcb. Youchoos show how you can install tantalums in the boiler of the mogul by removing the pcb and drawer and hard wiring. They managed to fit a supercap but it involved carving away part of the body! I am so used to the absolute certainty of operating with SAs I suspect I will eventually hard wire tantalum into the Dapol prairie.
Sign of things to come….the Accurascale Manor that Bill and I are getting excited about comes with built in capacitors!
Posted

Site staff
Regards
Alan
Born beside the mighty GWR.
Alan
Born beside the mighty GWR.
Posted
Full Member
I get so much enjoyment from YMR, it would also be remiss of me not to thank you for your ongoing generosity in hosting this forum.:cheers
Best wishes
John
Posted

Full Member
I've been away for a while, but it is good to be back on line! I just had to comment about your picture of the month image… if it were anywhere else, I would swear it was real. The new Prairie looks great, I suspect once you have worked your magic it will be a "go to" model for photographs. Interesting about the "caps" fitted as standard, while Hornby are going for smoke effects…. I know which I would prefer. I hope you are all well.
Regards
Michael
Posted
Full Member
Thanks Michael.Hi John.
I've been away for a while, but it is good to be back on line! I just had to comment about your picture of the month image… if it were anywhere else, I would swear it was real. The new Prairie looks great, I suspect once you have worked your magic it will be a "go to" model for photographs. Interesting about the "caps" fitted as standard, while Hornby are going for smoke effects…. I know which I would prefer. I hope you are all well.
Regards
Michael
Glad you liked the photo. As I said in the thread, it is one of the very few occasions on Granby where I was able to implement the advice of my late friend John Flann : " Less is more" :).
Weathering on the Prairie has stalled somewhat. Like other owners I have discovered that the lack of vertical movement available to the rear pony wheels impacts performance. If the track is a little uneven the lack of upward movement in the rear pony wheels results in the rear driver being lifted sufficiently clear of the track to cause a stall.
Very tiresome, I am now filing the pony truck to created deeper slots. I suspect I will end up removing the PCB and hardwiring a Decoder + SA. The installed PCB (for a N18 decoder) doesnt have a solder pad for the -ve ground connection needed for an SA- hence hard wiring! Equally tiresome but "nec aspera terrent" as we used to say in the 8th of foot :)
Regards
Posted
Full Member
I did find time to populate the extension in front of the hotel and finish the Wills Stone Wall that surrounded it.
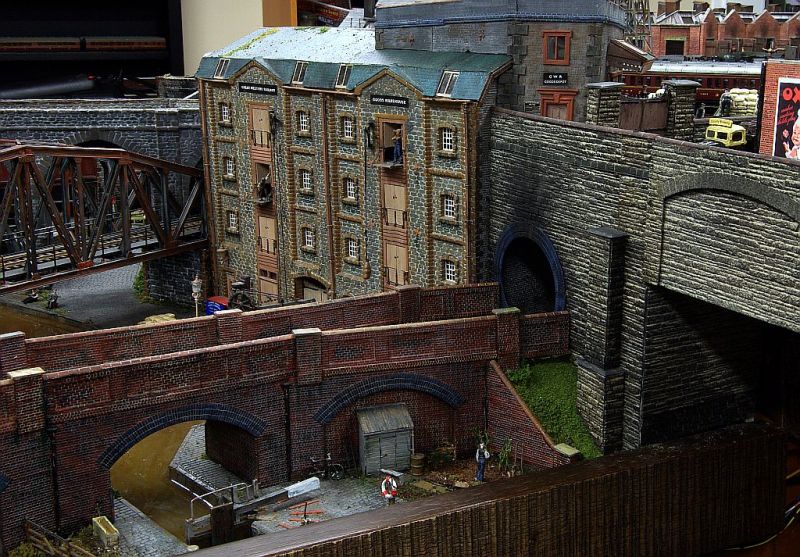
By way of a reminder, here is a shot from December showing a section of the wall and tunnel which connect the extension with the the canal/warehouse scene.
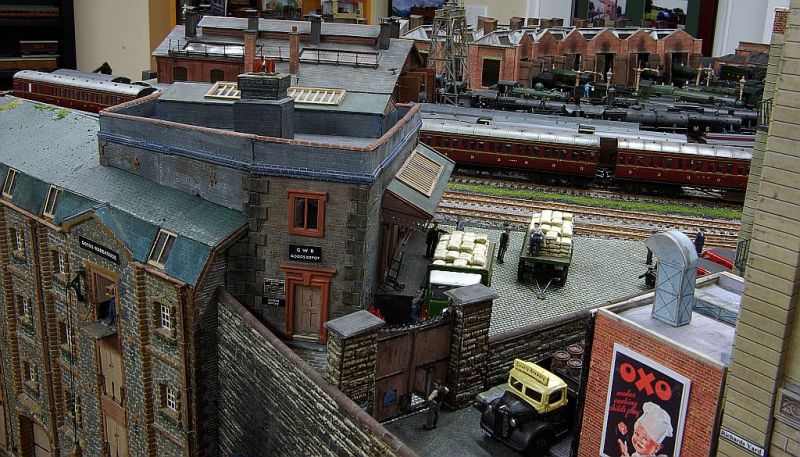
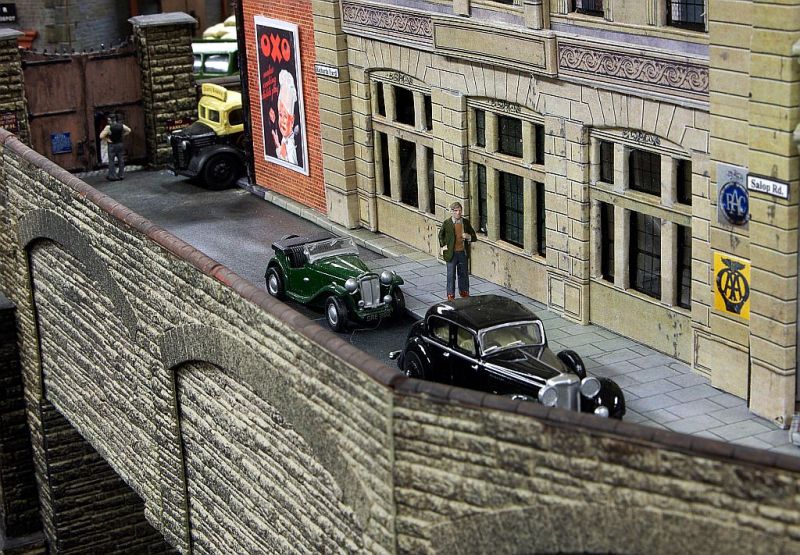
For the first 4-5 years, most of the buildings on Granby were built from plastic- Ratio/Langley kits or scratch built from Slaters/Wills sheets. Then I was introduced to Scalescene and most of the subsequent buildings were created from paper and card.
I have tried to avoid having large structures in plastic and card in close proximity but sometimes its unavoidable:
This is a bit like Check Point Charley, where East meets West or in this case Old meets New! The warehouse was built for Granby II circa 1998- the Hotel in 2021
I originally separated the yard from the hotel with a Scalescene wall but it seemed to make the contrast more obvious. I think the new wall provides a more pleasing link with the tunnel/edge wall. Its a little lower than ideal but I didnt want to impede the view of the hotel kitchens from the other side.
It also allowed me to install the Langley Gate set which make a nice focal point at the end of a rather narrow Richards Yard
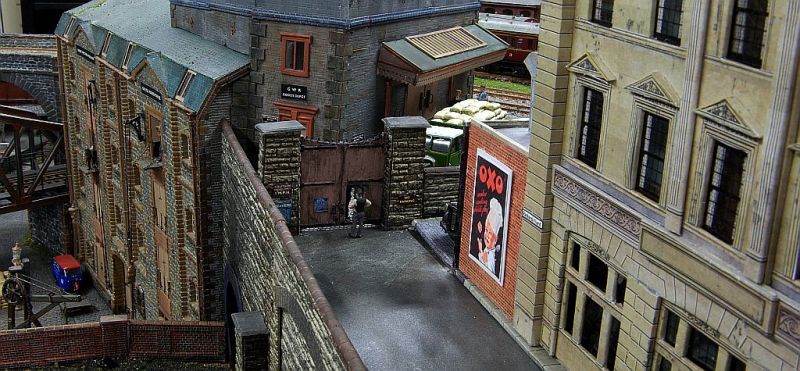
Cruel close up to show/expose the detail:
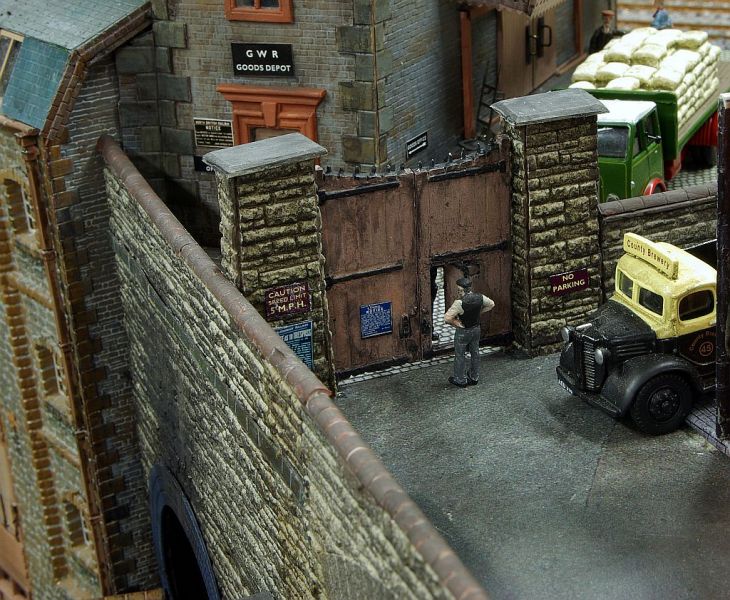
The Gate pillars are scratch built from off cuts. Tons of fun trying to file the edges to 45o to get mitre joins.
I had even more fun trying to photograph the guy on the other side of the gate. Bit like painting engine crew that will never be seen. I spent ages giving that fellow a green tie.
Close examination of the signs shows I am nearing the end of this project. I have long since used up all the GWR Tiny Signs. I guess the Blue signs are pre grouping from the Granby Jctn Rly and British Rail were awfully quick off the mark with the others.
The next shot exposes how little space I had to work with in accommodating the hotel and the duck under:
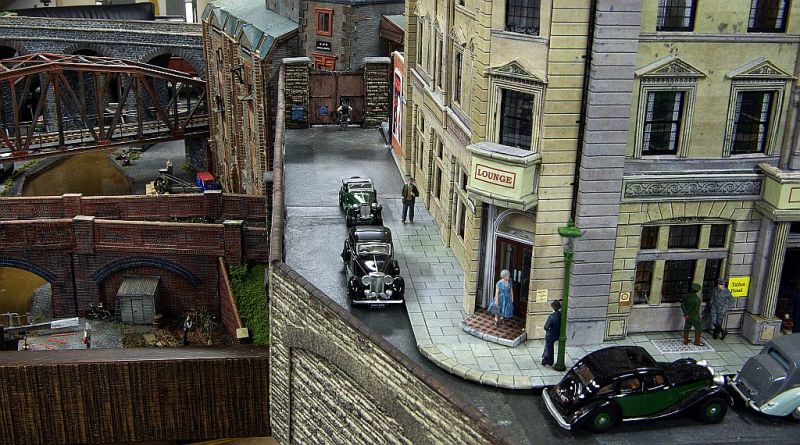
Its only a narrow lane so I deliberately put just a few people here. The young man who has just parked the MG may be of interest to some:
Willliam Longman has just popped over from Liverpool for the day. Any resemblance between Mr Longman and a fellow GWR enthusiast of this parish is, of course, entirely coincidental.
Now for the last scene:
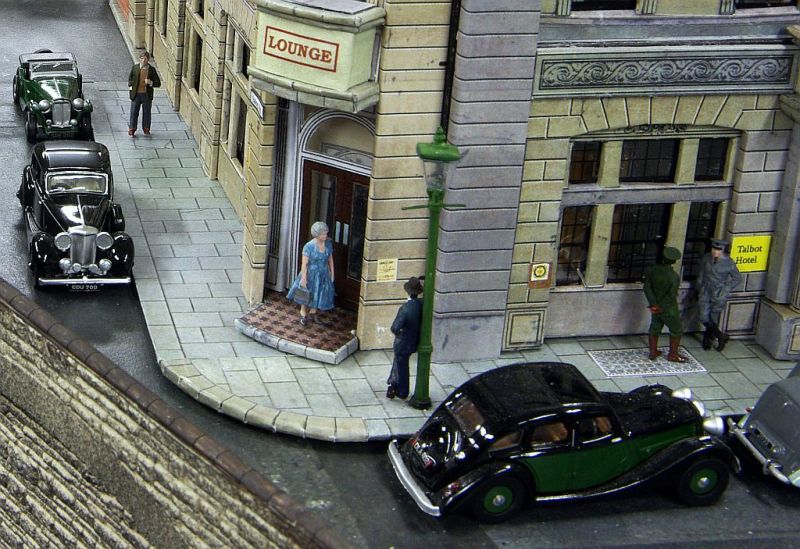
I had originally intended to call this "Ladies who lunch" but then I found guy in a trilby to lean against the lamp post- the second lady was swiftly moved elsewhere and we now have:
"Dancing in the Rain" -very appropriate for Vancouver!
Next post I hope to show the continuation of the wall and rather more people.
Last edit: by John Dew
Posted
Inactive Member
I'll settle for both
Cheers
Evan
Last edit: by Ssamm
Posted

Full Member
Posted

Full Member
Posted
Full Member
Thanks Evan :thumbs thats very kind of you. The photos turned out a bit darker than I expected so I am more than happy with “brilliant†:lol:I can't decide if it is fantastic or brilliant.
I'll settle for both
Cheers
Evan
Best wishes
Posted
Full Member
Hi DaveGreat pictures John and inspirational as always. Looking forward to more pictures soon. I hope "nearing the end of this project" is just round the hotel area and there is more to come. I guess at some point it may mean revisiting earlier areas, I know, even with my little progress with comparison to yours, there are items I already have ideas for a mk 2 (or 3).
Thank you, glad you liked the post. “ Nearing the end†applies to that entire hotel/station frontage which seems to have been going on forever.
There are only two major building projects left. I fancy building a castle to clad the window pillar and replace the very tired buildings on the sill with that and a market hall. I have a stalled Brewery to finish ( that was supposed to replace the original mk1 brewery circa 2010 )
The first priority is to try and extend the storage yard - too many trains for the available space - and this will involve demolition rather than building…..I have my eye on some terraced houses in the corner
Best wishes
Posted
Full Member
Thank you :thumbs Though I think you will have to lobby the boss (Alan) for a jigsaw :)I feel another jigsaw coming along… Please!
Best wishes
Posted
Full Member
Looks absolutely fantastic I especially like the door in the gate.
Posted
Full Member
I remember those gate doors well, but only because Johns Granby reminded me. Superb.Just ignore the non-train related tasks and keep on with that amazing modelling!
Looks absolutely fantastic I especially like the door in the gate.
Cheers Pete.
Posted
Full Member
Michael
Posted
Full Member
TeaselBay wrote:I remember those gate doors well, but only because Johns Granby reminded me. Superb.Just ignore the non-train related tasks and keep on with that amazing modelling!
Looks absolutely fantastic I especially like the door in the gate.
Thanks Chris and Pete
Glad you like the gates. I cant claim any credit for the inner gate- was it called a postern gate? - its all part of the Langley moulding, I just had to paint it and glue it in an open position.
They were a pretty common feature when I was a lad.
Its a lovely kit which I have had for a while I was just waiting for the right opportunity to come up!
Best wishes
Last edit: by John Dew
1 guest and 0 members have just viewed this.