Granby Junction 1948 N. Wales
Posted
Guest user
GWR/LMS OO Gauge DCC RR&Co
Yes, very nice indeed.. just love the fine detail.
Posted
Guest user
Posted
Full Member

Posted

Full Member
Pe[user=6]termac[/user] wrote:
When I see the last couple of shots with the buildings / viaduct removed, I realise what a good eye you must have. To visualise what you have ended up with looking at the open spaces must have taken some doing. :roll:
Thanks Peter
Amazing amount of trial and error…….I held my breath when the 56xx approached the exit and I realised I had tested it some months ago with a much smaller tank:roll:
I have had umpteen versions of the building positions and probably waste too much time on minor detail
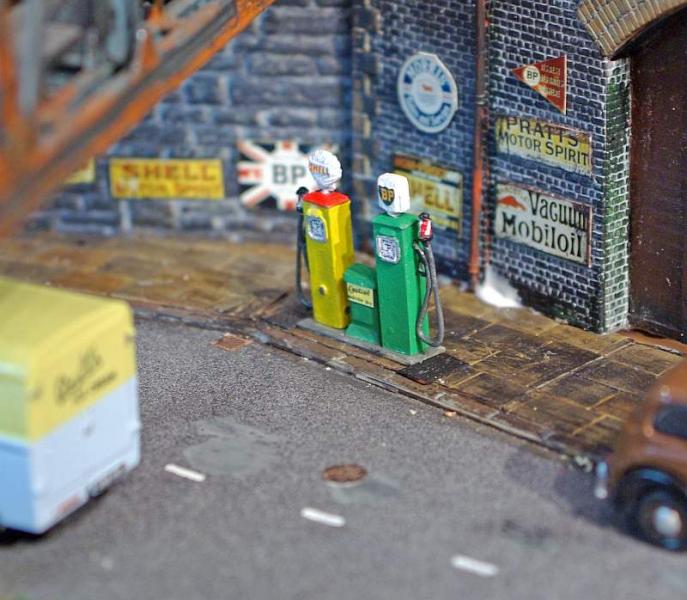
The garage cameo is great - there must have been hundreds of those places tucked under the arches in the 40's and 50's. I'm with you on the pumps too - the colours are as I remember them but for me, it was indeed from the 50's.
The swinging arm holding the hose was also an interesting feature. If memory serves me right, there was a little sight glass at the outer end of the arm with a "twisty barber's pole" type of float inside that turned whilst the fuel was being fed into your tank and large clock type hands on the face that showed the volume.
As soon as I got into the garage photos I realised these were just a bit too modern although I think I will have to live with them for a while…….the photos brought back memories of pumps such as you have described outside the George Hotel in Great Crosby just after the war……we tend to forget that petrol was sold by all manner of people……dedicated service stations were relatively uncommon
Langley provided a little printed face that emulated the clock hands….its a bit obscure in the photo……but you can just see my attempt at painting the "barbers pole"
[user=422]Geoff R[/user] wrote:
Thanks Geoff……..I guess its now apparent that its the detailing that I really enjoy……..and I am afraid, as a result, I tend to get side tracked……………..all the points,tortoises and decoders to do the terminus approach and throat arrived in November and they remain unopened while I fiddle with the canal detail :roll::roll:Wonderful detailing there, John. As has been said, you have great imagination being able to see what you could develop over a fairly complex area of ends of baseboards. This will look terrific when you have everything in place.
Express trains over the top of the viaduct, perhaps?
Eventually……..maybe before the summer…………I have a Grange and Black 5 chipped and raring to go along with GWR and LMS moguls and an 8F (I have Manors and Halls and Patriots as well but they are split chassis and, as yet, unchipped)
Hopefully I will have a shot of an express on the viaduct pretty soon….even if like the 56xx it aint going anywhere in the immediate future
Regards
Posted
Full Member
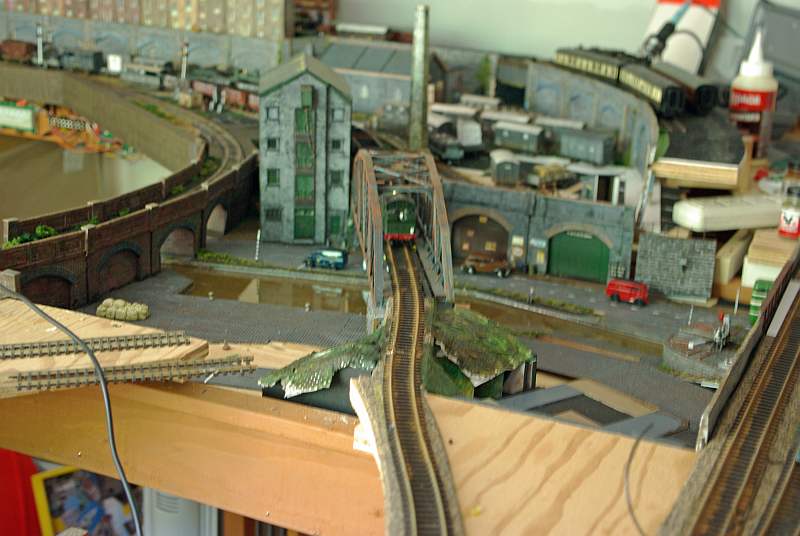
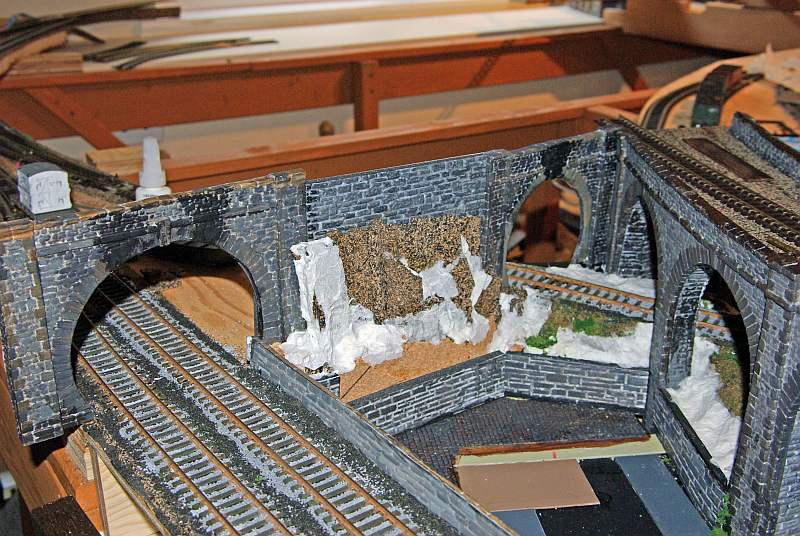
Formers to delineate the embankment are cut from Foamboard…….from the Warehouse Side:
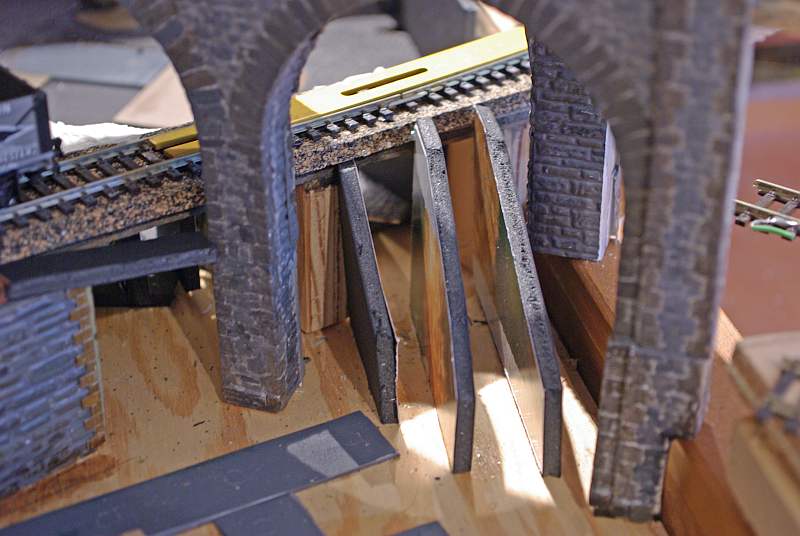
and the Pub Side
The black foamboard rectangles will be clad with Plasticard to create scale 8' retaining walls
The formers are covered with paper tissue/towels soaked in 60:40 PVA
The viaduct is temporarily removed and a couple of coats of Green and Brown acrylic slapped on

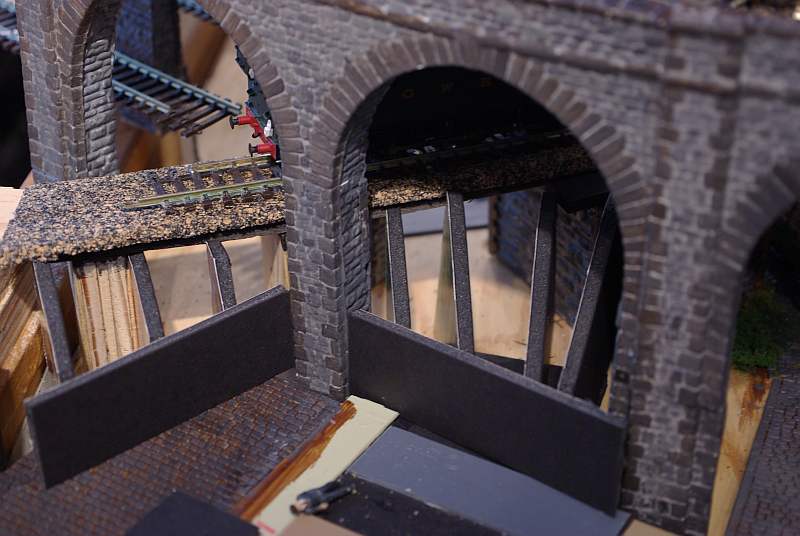
Its pretty crude because most of it will be obscured by the Pub and Warehouse bulidings. Nevertheless I will also be applying Woodland turf/shrubs and I am toying with inserting some rock out crops to tie in with the rock face that will be on the extreme left of the shot above.
Once this is done all I have to do is paint the track and sleepers and ballast the track that exits the girder bridge……..and CLEAN the track because once the viaduct is in place it will be quite tricky (impossible actually)! As I said in the last post the clearances were quite tight…..here is the 56xx edging its way through the viaduct exit

Having breathed a hearty sigh of relief I then started laying the track for the coal branch to climb its way up to the main line station (3")
I have a horror ( based on bitter experience) of two level tracks…..Petermacs comment in another thread (Sol's I think) about the amount of vertical space he requires certainly resonates with me…………hence the little reverse curve as I direct the line towards the edge of the base board before resuming the 36" radius curve on to the main left hand base board. The space to the left is destined for an, as yet unplanned, engine shed and I dont want any significant track underneath it.
Here is the reverse shot of the new track
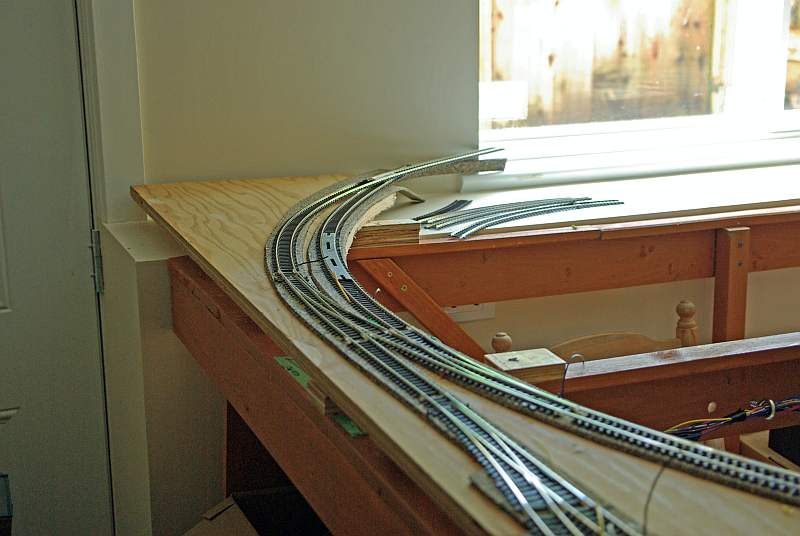
The coal line is on the right hand side (with the tracksetta) heading out towards the window sill and vegetable garden……the curved crossover heads out towards a head shunt……(perhaps!!) and back to the two tracks that will go over bridge #4
The track starts to climb here…… 1/2" in 48"……which is fairly gradual…….leaving 2 1/2" to do in about 96"
As an aside this is the first time I have used the new(?) design Peco points….previously they were resurrected from Granby II Great improvement…..no cutting and the frog wire already set up…..as Max would say Tick VG and Moose Stamp!
Anothe shot as I head towards the garden
The next shot should confirm (a) my somewhat cavalier approach to detailed planning and (b) a very cavalier approach to the lease negotiated by SWMBO
For me, the coal line was always a key element in the design. Long coal trains (25+ wagons 8'+-) running to and from the lower level via the girder bridge up to the main line and the back down via a hidden single line to the lower level.
Operationally one train (loaded) would be stored on the hidden line)and the other (empty) on a long through line in the storage yard…….when running they would pass one another and reverse their storage locatons
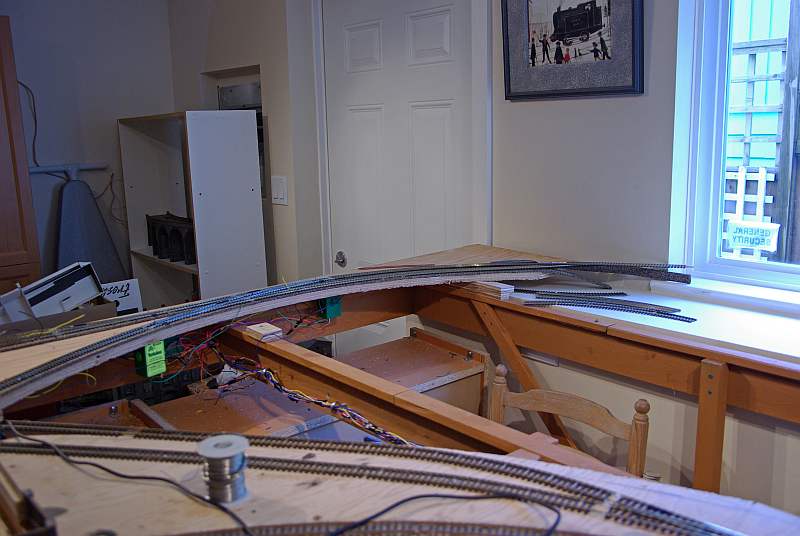
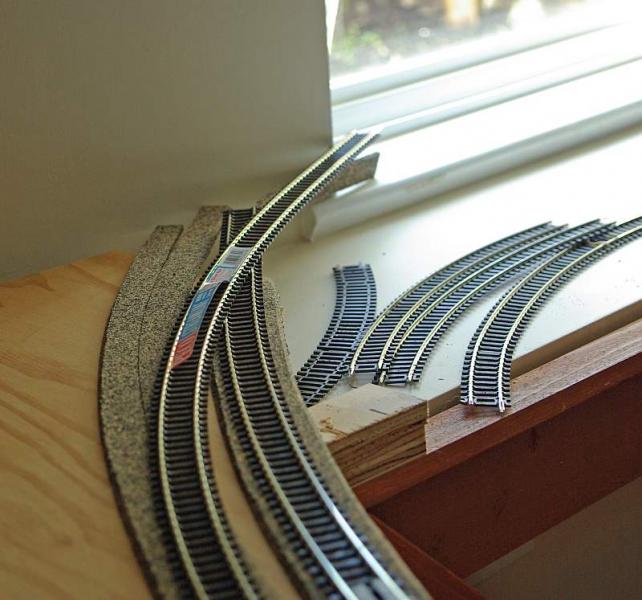
The track I have just laid is the start of the hidden line……..the right hand track with an unauthorised excursion on to the window sill can climb up to the mainline with a 36" radius curve (well maybe 30") with minimal intrusion into the main line clearance
The left hand track was designed(?) as a head shunt for two storage sidings……..however I am now thinking if I compromise and go down to 24" (18" perhaps) radius the line could be doubled (further unauthorised use of the window sill) saving a line in the storage yard and providing more operational flexibility.
However I dont want to compromise the space available for the main terminus so no firm decision will be taken until I get the terminus throat resolved and perhaps more important cook a great meal on Valentines night
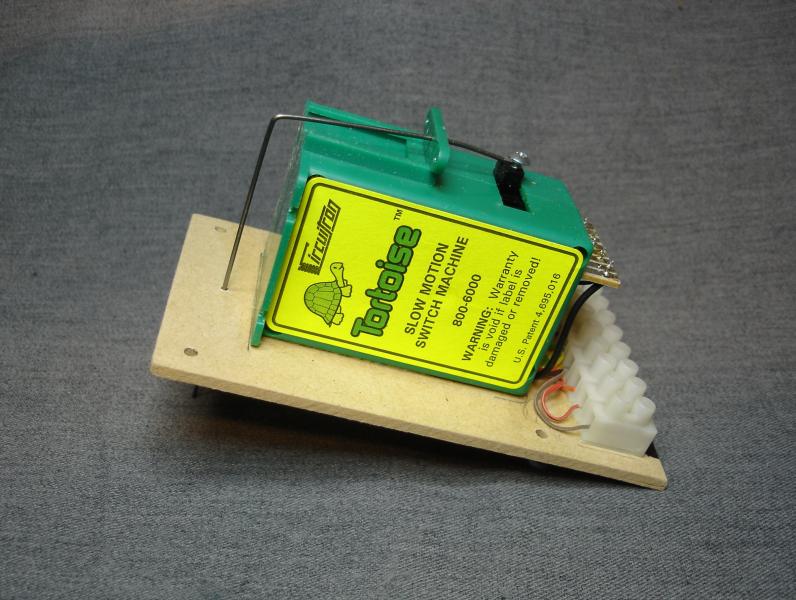
Meantime in keeping with the warts and all concept and to prove its not all scenery here are some shots of the electrics…….
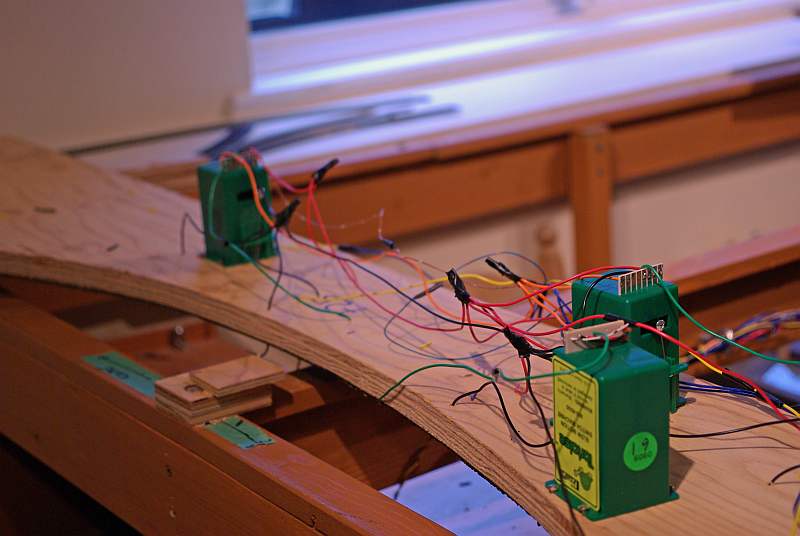
A trio of tortoi………..
I managed to source a thicker spring wire and life is now much simpler…..with the wire tortoise supply I couldnt get the blade moved over without removing the spring…..which is tricky with the new design…..now I get a zzzzzzz and a click……very re assuring
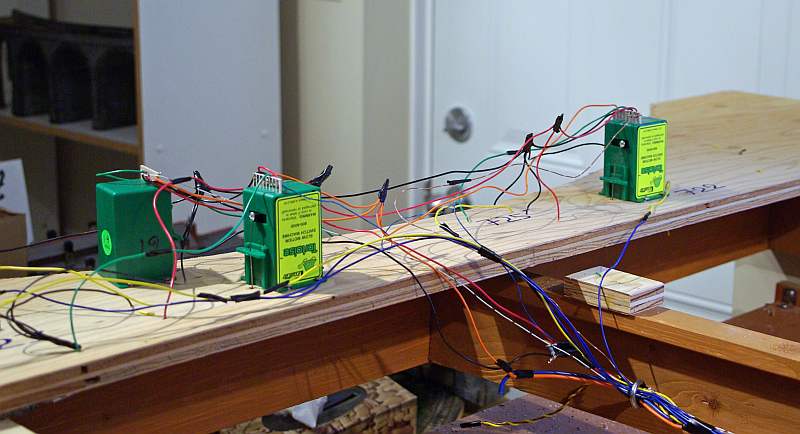
The wiring may appear excessive as well as untidy. But the polarity on the points is switched thru the tortoise and I use a separate point power bus.
You have to have occupancy detection to operate RR&Co so each isolated block has to have its power fed through a contact indicator……….initially I screwed these devices on the underside of the baseboard close to the block……but they are a total pain to debug…..particularly at my age so now I mount them in clusters at the edge of the baseboard
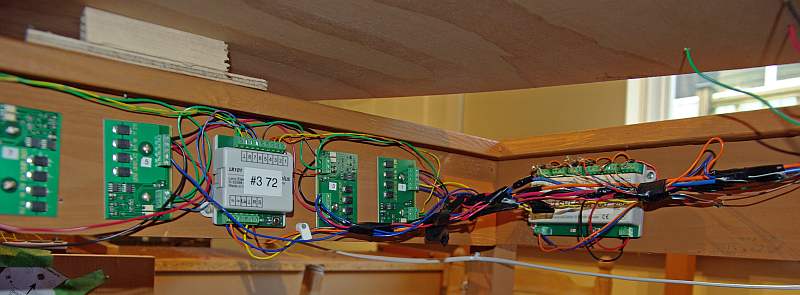
On the right partially obscured by wiring is a Lenz LS 150 decoder which controls 6 points…..the mess at the top are the diodes you have to add for tortoise/cobalt.
In the centre labelled #3 72 is the Lenz LR 101 decoder which controls 8 occupancy detectors; on either side are two LB 101 detectors each of which will detect two blocks
Hopefully next post the viaduct will be firmly in place :thumbs
Posted

Full Member
Are you going to have to move that window ? It seems to be in the way of the layout - either that, or you're going to have a very interesting little "scene" there …………:roll:
Looking at shot 8 (or it might be 7 :???:), one realises just how bulky those tortoise motors are. :shock:
Once again, some wonderful little cameos developing although I do just wonder if you need a slightly larger house ………..
p.s. the special meal on Valentine's night is an excellent idea. :thumbs I'm really an old romantic at heart and I've always found that pushing the boat out a little for Valentine's paid dividends. I remember one year with my ex, when I was feeling a little "flush", I lashed out on haddock rather than cod at the chippie (and added extra scraps to boot) so her Valentine's would be extra special. It worked a dream - she left !!!:lol::lol:
'Petermac
Posted
Full Member

The line on the sill will actually be hidden by the higher level main line…….which is a good news bad news story……dont have to worry about the scenery…..and there wont be a back scene because I dont want to lose the light…..the downside is the question of access…….even with the ape like length of my arms stalling engines or horror of horrors a derailment will involve major acrobatics on my part
You are right about the bulk of Tortoises……. its a definite disadvantage……I believe Cobalts are somewhat smaller……but as long as I remember to allow for the depth the other advantages particularly totally reliable switching outweigh that problem.
Love the fish and chip story……I had something more romantic with a different end result in mind
Kind Regards
Posted
Full Member
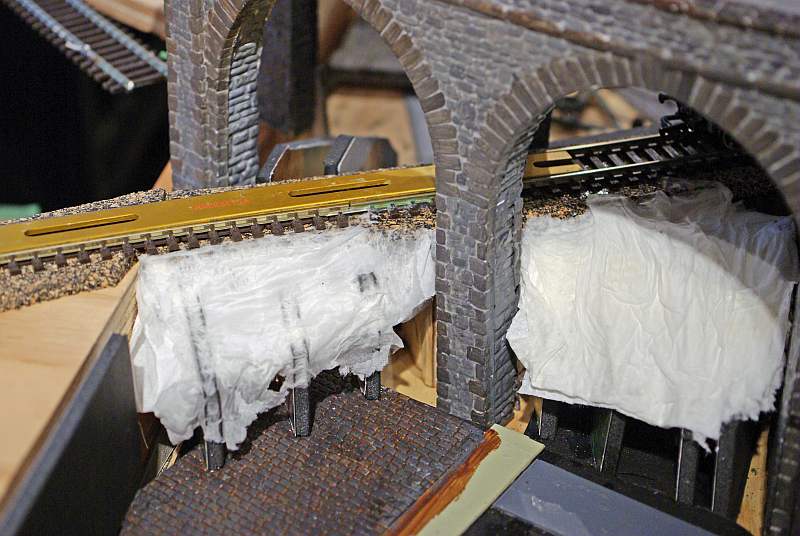
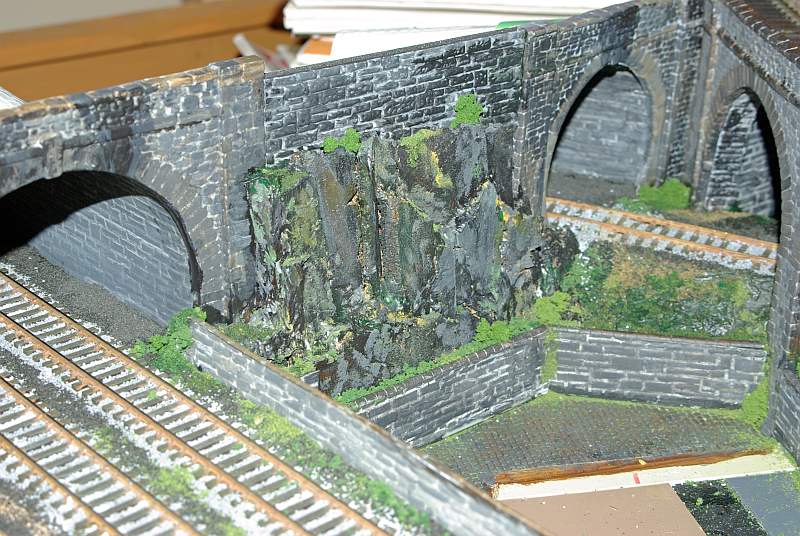
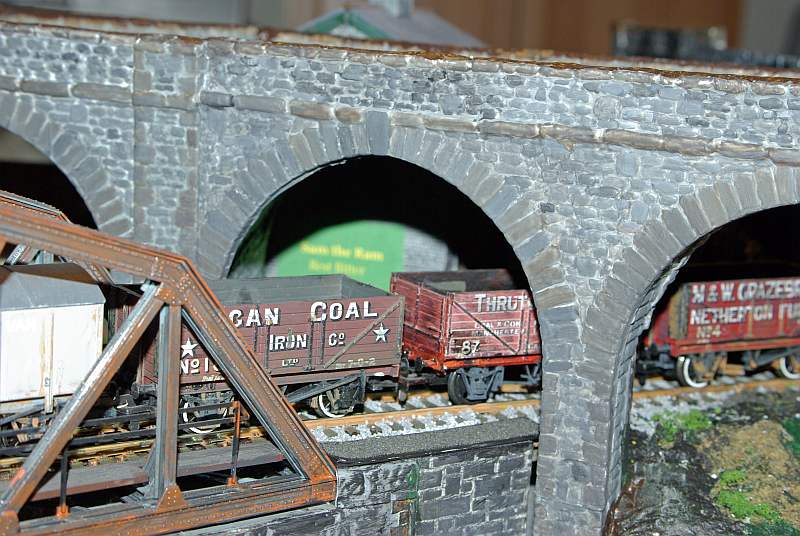
Once the viaduct was bedded in I was able to add the retaining walls to the coal line embankments
The white stuff isnt snow…..although we have had some here….its the usual mix of tissue paper and PVA but now taken into the viaduct walls
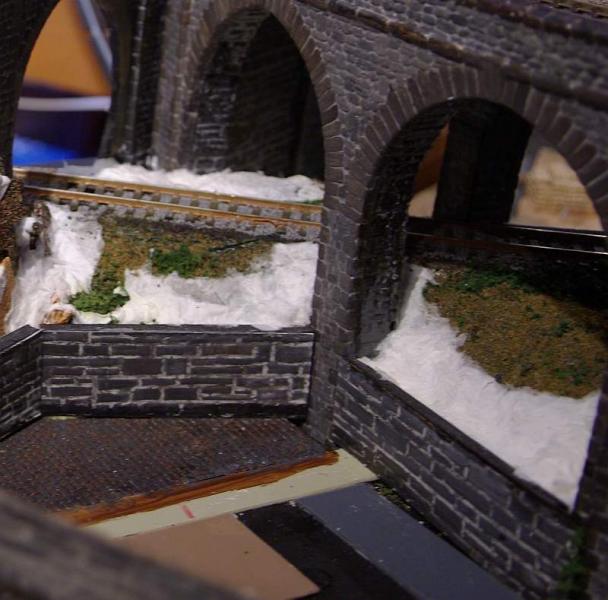
The next step was to set up tunnel portals for the coal line and the double track that goes over bridge#4
I painted the tunnel portals (Langley) at least 15 years ago but never actually installed them on Granby I or II. The cruelty of the camera on this occasion was very useful because it exposed the heavy handed "smoke" on the tunnels and the differing colouring on the new (2011) linking wall
The rock face is my attempt to link the three vertical levels…canal base/ branch and coal line / main line and engine shed (2013?)

I cut bits of scrap cork and glue them on the bias to try and replicate a man made rock surface……I try and think of the cutting into Liverpool Lime Street…..last seen 30 years ago……almost to the day
The cork strips are then linked with Tissue Paper. To finish lots of dirty black undercoat then highlights and dribbles with grey and brown acrylic and a little scattering of mixed turf
This shot also shows the method I use for the retaining walls…..foamboard with some embossed (Langley or Slaters) plasticard glued on……..then when all the painting and grass is done a Wills coping stones are added
So heres the finished result …….hopefully I have managed to link the tunnels together without too many seams
It was difficult to work out how much time to spend on this because once the pub (foundations bottom right) is in place one cant see too much of this
And even less of this……behind the scenes at the tunnel mouths……with an antique Railway Modeller pressed into service as a light touch clamp………….all this will eventually be covered with the board for the upper level engins shed

On the other side of the canal, once the viaduct was bedded in I could add the wall that connects to Bridge #4 along with a load of of probably un nescessary detailing

I am beginning to feel that Bridge #4, which you can just see bottom right above, is actually a "Bridge too far" .
Originally it was supposed to be for a kickback from the coal line and lead to a Coal Mine…….I should explain that this corner of the layout is right by the doorway and the first thing everyone sees when entering the railway room…….so I felt that scenically I needed something reasonably significant .
For a variety of reasons I have decided the mine will not work…..backing a 7' long train up an incline, round a curve and hidden from the operators view, being three of them
Discarding the bridge would give better views of the Pub and Lock but by the time I made this decision it was too late. So now I have an 8' run of double track going nowhere .
I have one or two ideas but nothing definite………….for now lets at least establish which company owns the "Ghost Line"

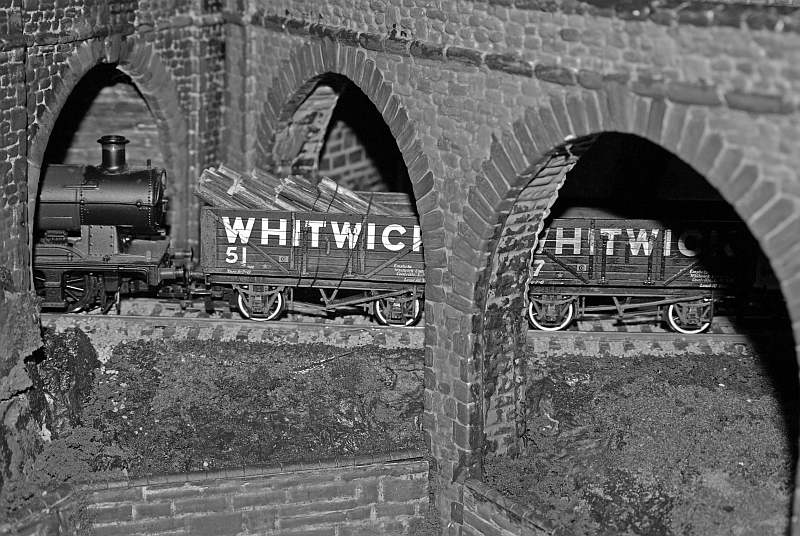
This is a bit of a cheat as I still have to chip the Jinty and convert it to Kaydees…….but you get the general idea……in the background by way of contrast a GWR 56xx actually crawls along with a load of empties, the lead wagon loaded with pit props
I see from Gwiwers thread that it is now fasionable to show Black and White shots on RM Web. I have always liked doing this…..it hides loads of errors (sadly not all)…..so here to finish a close up of the coal empties
Posted

Full Member
I know what you mean about hidden detail.
I've spent hours on a Market for Much Wittering, most of which will be seen only on Google Earth.
Like the B&W pic. too.
Posted

Legacy Member
Bozzy(never known to pass a pub)
Posted
Inactive Member
Thanks for shareing.
Derek
Posted
Full Member
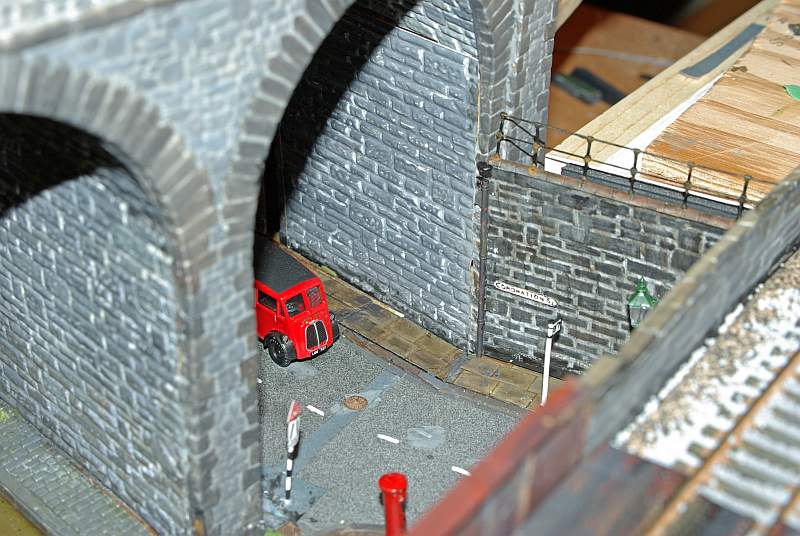
In this latest batch of photos things popped up to add to the "this is more than a train set" feeling and there are a couple of them on this shot:

The rear footpath (near the Post Office van) looks extremely good - just like the York stone flags of yesteryear before that dreadful concrete came along - what are they ? There's the lovely touch with the drain cover and run-off across the pavement from the fall pipe. The patchwork of repairs to the road surface and rusty railings along the wall top. All really great stuff and things that are so easily missed out but make a massive difference to the scene.
I also notice the lovely little name board telling us it's "Coronation St" (:roll::roll::roll:) Was that printed off the computer ?
Extremely impressive work John. :pathead
'Petermac
Posted

Inactive Member
For what it's worth for future builds?
Max
Port Elderley
Port Elderley
Posted
Full Member
They look like Wills Sheets.
Great pics. John.
I, too, particularly like the downspout and run-off.
Posted

Full Member
Bob(K)
Posted
Full Member
I am sure that the engine shed layer will look just as great - we will be watching closely in 2013!!
Posted
Full Member

So once again, thank you so much for your kind words.
To answer the questions :
The York Paving stones are indeed from the Wills range……I tend to use their products a lot….. I find I can create plausible structures quickly and they are more forgiving than paper……….the run off is actually an attempt at concealing a bad join and the down spout performs a similar function
The setts in the Pub Yard are also Wills but they come with narrow kerb stones on 2 (?) sides which I cut off because I think it looks more realistic that way………..I use the cut offs as edgings on the pavement and tow path. I apply a lot of different coloured washes to change and soften the original Wills colour
The stone walling in the Viaduct is from Langley (who made the vacuum forming for the viaduct) they come in quite large sheets (38 x 29cms) and the embossing is much more obvious than Slaters. The stonework is perhaps too large for buildings but perfect for retaining walls and arches. There are two options (rough stone and dressed stone). I think the rough is best……the dressed is a bit too smooth.
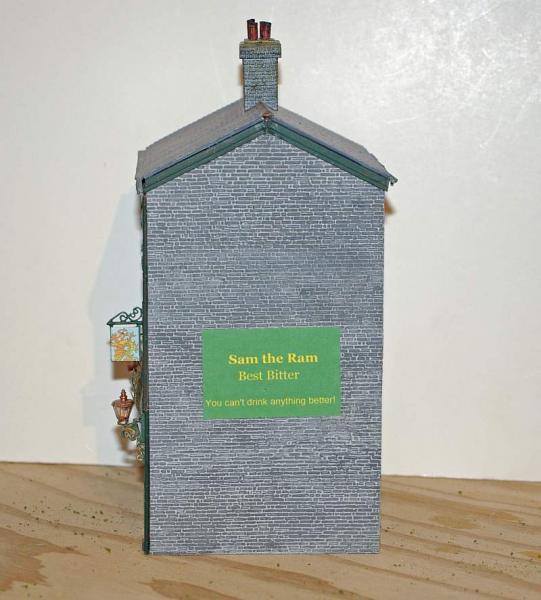
The street sign "Coronation Street" is an embossed brass etching and came from the fret that Langley supplied for the Warehouse whose re appearance will signify the completion of the Canal saga (7 months and counting!)
Hopefully thats covered everything……now down to the railway room to finish off the pub
Kind Regards
Posted

Full Member
Top Job!
Cheers,John.B.:thumbs
Posted
Full Member
Once the pub foundations were in I was able to work on the model itself which as you may recall was a bit delapidated and had the Dew signature item…..an unfinished wall
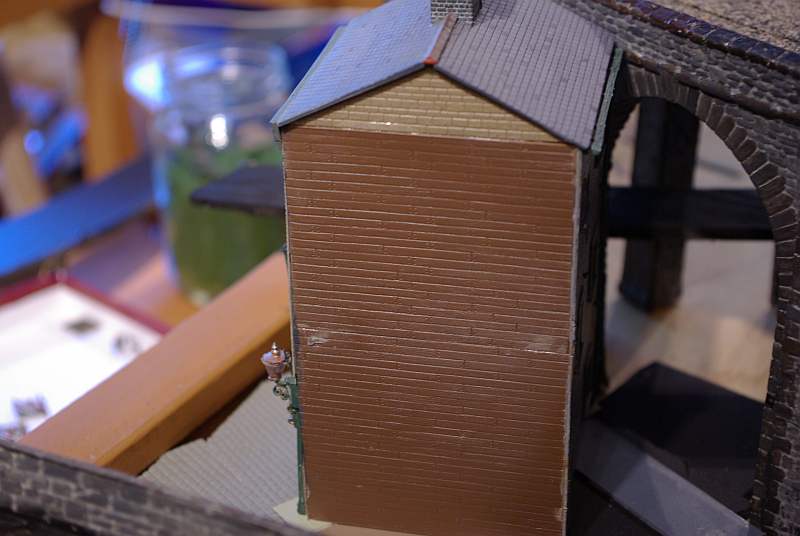
I fixed that with some Slaters Plasticard . The wall faces right on to the viaduct so I didnt need to insert any windows…..just an advert for that well known brew
Once the pub was in location I realised I probably didnt need the advert….you can hardly see it
Not the first and certainly not the last time I have done something like that I am afraid.
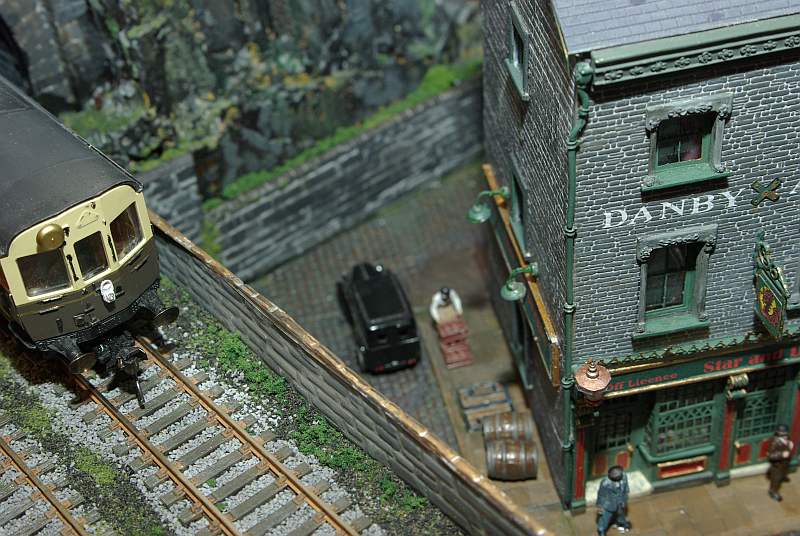
Here is the finished pub in situ with a few customers.
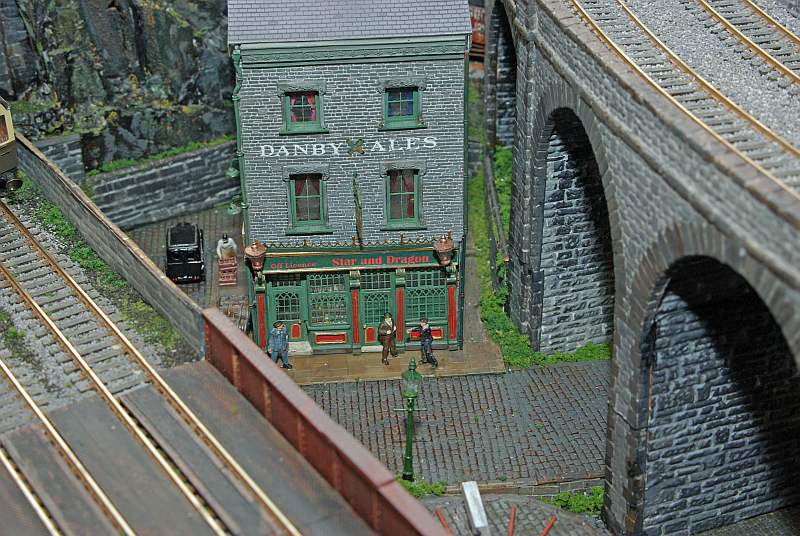
The next shot shows that at least the lock keeper is working.
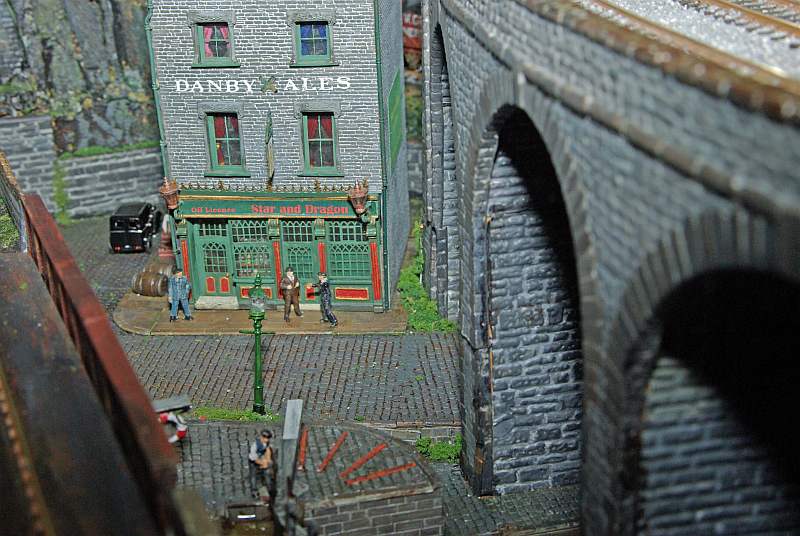
…..I am guessing its 3pm…….thats when the pubs used to close after lunch I recall

There hasnt been a freak hail storm…….the large rocks are debris (despite my best efforts) from ballasting the viaduct
I still havent made my mind up what to run on the #4 Bridge line……last week it was LMS now I am leaning towards another GWR shuttle……(until I can get an LMS push pull)
I really feel the end is in sight…….I just have to finish the Warehouse and the back of the Mill
To finsh this post here is another Black and White shot complete with ballasted main line
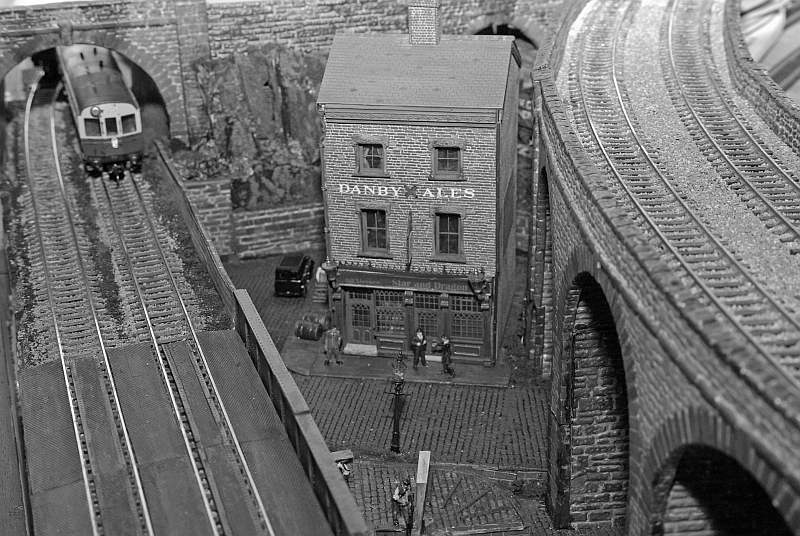
Regards from Vancouver
Posted
Guest user
:doublethumb:lol::lol::cool:
1 guest and 0 members have just viewed this.