Granby Junction 1948 N. Wales
Posted
Full Member
GWR/LMS OO Gauge DCC RR&Co
Yes, but we were talking about Zimo decoders.
Cheers Pete.

Posted

Full Member
Nigel
©Nigel C. Phillips
Posted

Full Member
Rather than finish any of them I decided to spend some time tinkering with the Branch automated pick up goods routine which gave me an excuse to photograph (again) two iconic GWR locos.
First the Dean Goods ……having uncoupled the Brake Van, it reverses its train through the goods yard so the three rearmost wagons are just inside the goods shed.
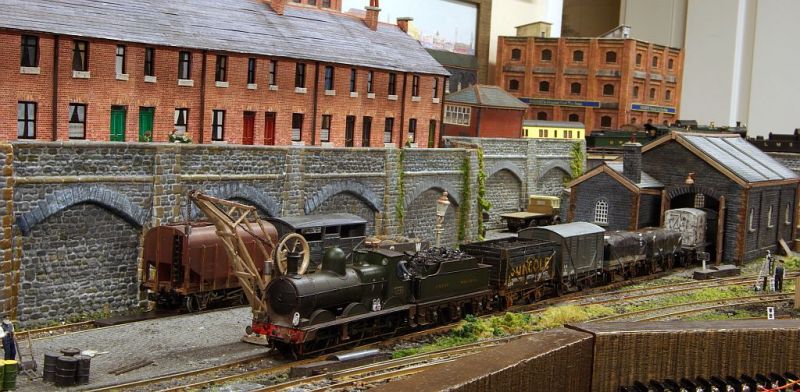
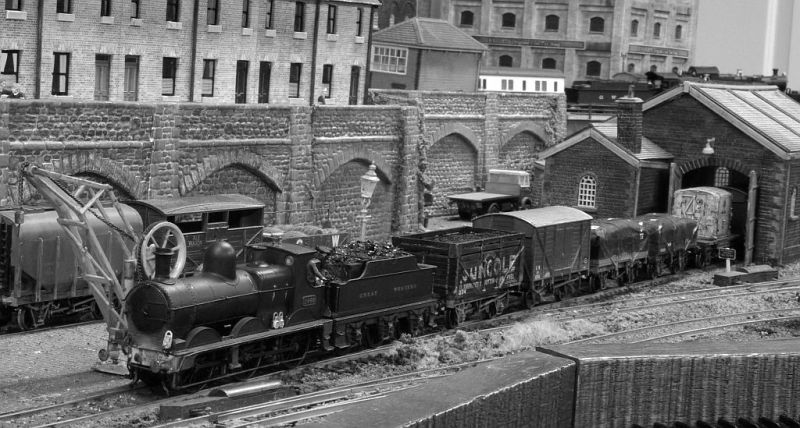
This is a classic "prodigal" loco…….slated with a degree of justifcation by the experts it also turned out to be very very poor performer. Now with a Zimo decoder + SA and a substantial quantity of lead it runs like a dream. One of my favourite locos

As the Dean uncouples its delivery in the yard, a through train for the ICI works at Runcorn crawls over the Branch junction
Collett Goods…….designed to replace the ageing Dean……..an interesting contrast in style:

This also now has a Zimo + SA, tender pick ups added plus a much needed load of lead.
Up an incline, on a curve and badly laid track with 18 up……..childs play in real life but previously too much of a struggle for this loco
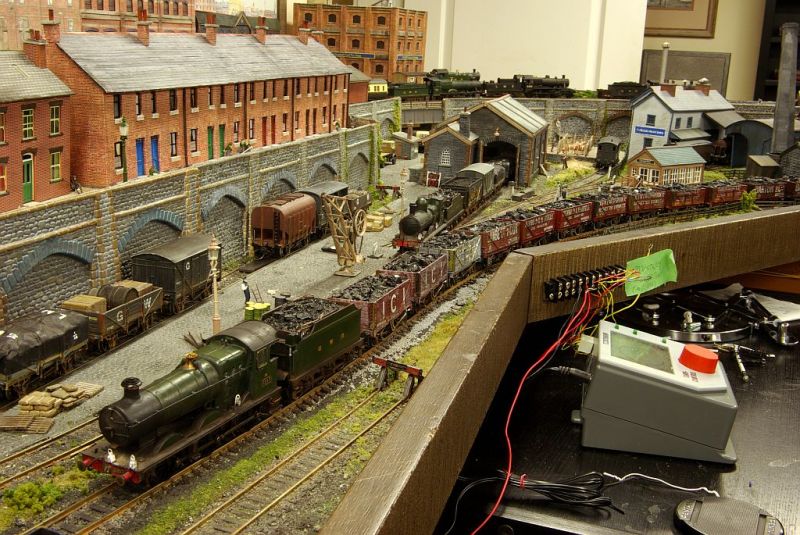
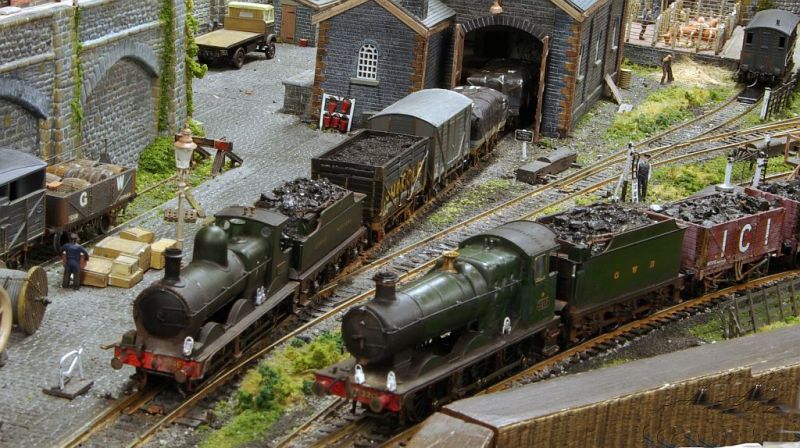
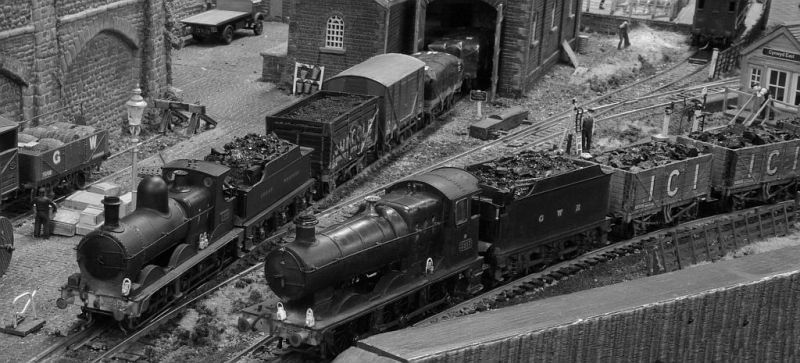
As the Collett rolls by, the Dean continues shunting. It has to go to the Pick up siding and collect 3 wagons for Mold… top left above. Once completed it has to reverse back to the Cattle siding to pick up the parked Brake Van…by the Dairy
Sorry about the industrial look but the branch is so narrow it was the only way I could capture most of the scene.

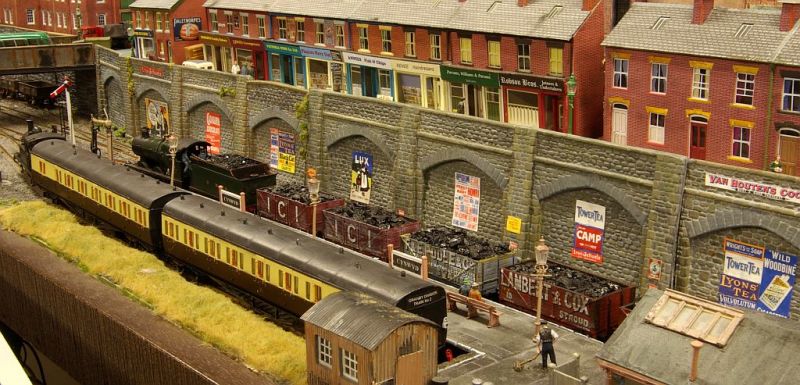
Meantime the coal train passes through the station clearing the line for Branch B Set 's eventual departure to Granby:
The pick up goods notionally runs every week daily at mid afternoon. The wagons left in the shed will be "unloaded/loaded" . (In theory I can do this in RR&Co thus changing the weight of the train)
Tomorrow morning, after the rush hour, when the branch BSet arrives the loco (14xx), instead of just running around will park the carriages in the bay. The light engine then goes to the yard and moves the wagons from the shed to the pick up siding…….ready for the cycle to start agin
On the should do list …..change the head code on the coal train and develop a routine to change the empties in the coal yard……..but long before that I have to move up to the main line…..weather the prairies and have them running regularly
Best wishes from Vancouver
Posted
Full Member
It took a few years for me to summon enough courage to start washing dirt over a brand new locomotive. Eventually I recognised that it was somewhat unrealistic to have an industrial layout like Granby populated with pristine locomotives.
The methods and materials I use have developed over time. The end result is rarely if ever perfect, and certainly hasnt enhanced the re-sale value, but to my mind passes the three foot rule and complements the overall look and feel of Granby.
In an attempt to avoid a "sprayed on" appearance I apply a series of different layers over a number of days
First job a few coats of matt black paint over black plastic surfaces……Bunker interior, Tank tops and Cab roof:
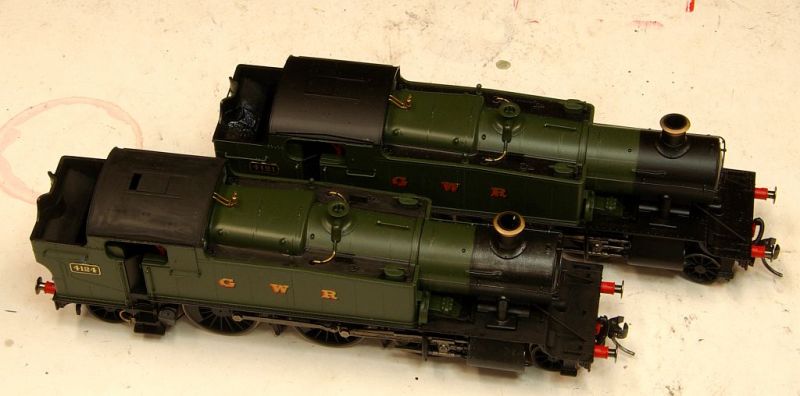
I add steel to the black (50:50) and paint the smoke box and cylinders to replicate the sheed created by intense heat

Top and sides receive multiple washes of diluted black and brown. I use cotton buds to wipe up any excess and to push it into the cracks and crevices where dirt and ash would naturally accumulate.

I try and relate the degree of weathering to the age and type of loco. These locos were ten years old in 1948. I am guessing they had their last repaint along with GWR livery in 1944/45. Even with the constraints of the immediate post war world I believe passenger locos were generally kept cleaner than freight locos. These locos were used for intensive suburban passenger service……….so cleaner than a Dean Goods but dirtier than a Castle!
Mixed washes of Mud and Rust on the chassis and brake gear
Normally I have to spend a lot of time painting greasy steel on to the connecting rods etc ……but Hornby have already done that for me
With the exception of the bunker I have applied very little rust to the upper body……just a suggestion to the smokebox door, a few areas of very high usage such as steps and lamp irons and undercoat on the buffers.
The bunker however had to withstand a daily battering from hard welsh coal.
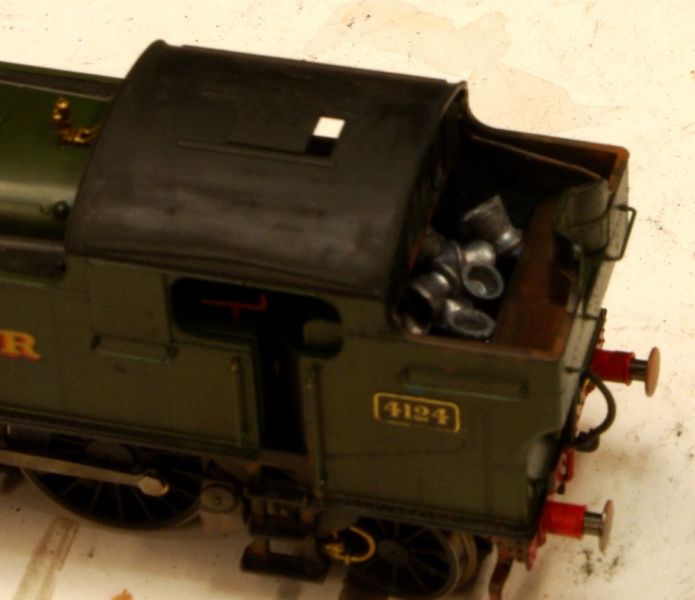

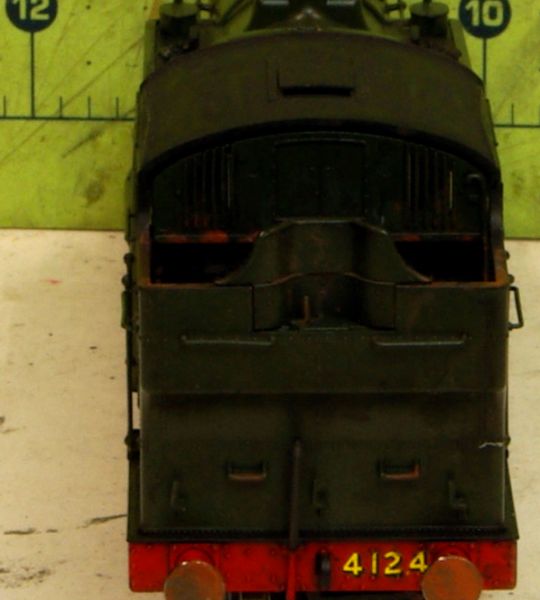
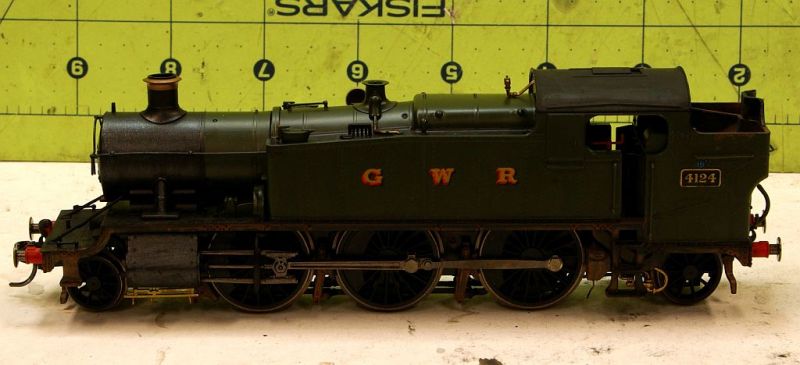
Not great close ups I am afraid but hopefully you get the idea. Ignore the air gun slugs which add a little more weight…..to be painted black and covered with real coal
A couple of questions for the experts
(1) In the three shots of the bunker you can see a pipe on the right hand side. It starts at the bottom, rises vertically and then turns 90o to run horizontally near the top of the bunker and turns thru 90o again and rises vertically to terminate in a loop on the edge of the right hand grille.
Not seen this detail before and have no idea of its function……any suggestions?
(2) Can I assume that Fire Irons and Spare Lamps were stored inside the cab?
There are no retaining devices for fire irons and no side lamp irons. I dont recall seeing any on photos although perhaps I should do a more detailed search. Any help will be much appreciated
Hopefully I can finish both prairies this week……the main job is a very light dusting of grey/black weathering powder plus some mud powder to finish the underside. Then coal, lamps and crew…..the , I fear, will be an interesting challenge
Posted
Full Member
Cheers Pete.
Posted
Full Member
Can't help with the pipe but the loco's are coming along nicely. You're a braver man than me with weathering loco's. I still can't pluck up the courage to 'have a go.'
Thanks Pete. It seems the pipe is a breather pipe for the rear water tank. Quite impressed with Hornby for modelling it.
I started by experimenting with non runners….then when I gained confidence I moved on to tank engines on coal trains….didnt matter if I over did it!
Cheers
John
Posted
Full Member
Cheers Pete.
Posted
Full Member
Posted

Full Member
It’s amazing how you discover the small interesting details when getting close and personal with a model, a lovely surprise. I’ve only so far found the opening roof shutter, but am looking forward to running mine in and weathering in due course.
So good to hear that your eye op went well, as evidenced by the first prairie. Good luck with the other one!
Best,
Bill
 Last edit: by Longchap
At 6'4'', Bill is a tall chap, then again, when horizontal he is rather long and people often used to trip over him! . . . and so a nickname was born :)
Posted

Full Member
Michael
Glad the operation went well, I look forward to seeing your new eye for detail!
Posted
Full Member
I could have sworn I answered this post! Anyway I ended up on Mighty Ape Australia and ordered some paints at more reasonable price than the few other places that sell them; cheap postage too.Is Vallejo available in Oz…thats what I use
Good news about the laser surgery and it's marvellous what can be done nowadays.
Cheers Pete.
Posted
Full Member
Thanks for the nice comments about the weathering……….its not actually finished though! Apart from the finishing touches….crew, lights and coal I still have to apply weathering powders. I think it makes a huge difference. Applied carefully they add another layer of realism by softening the paint colours. It is ,however, very easy to over apply…..and bingo…. the subtle light weathering job looks like a loco that spends all its working life in the Severn Tunnel………definitely a case of “less is moreâ€. It will be very interesting to hear your reactions.
Thank you, also for the good wishes about my eye surgery……..it was a routine procedure that probably took less than 5 minutes! I had cataract surgery on both eyes in 2017 . Apparently it is not uncommon for minute particles resulting from inserting the lens to collect in the eye sac….which can affect vision….the procedure uses a laser to get rid of them. I am glad to say its made a noticeable difference.
Best wishes
John
Posted
Full Member

Cheers Pete.
Posted
Full Member
Posted
Full Member
Cheers Pete.
Posted
Full Member
Hi Bill, Michael and Pete
Thanks for the nice comments about the weathering……….its not actually finished though! Apart from the finishing touches….crew, lights and coal I still have to apply weathering powders. I think it makes a huge difference. Applied carefully they add another layer of realism by softening the paint colours. It is ,however, very easy to over apply…..and bingo…. the subtle light weathering job looks like a loco that spends all its working life in the Severn Tunnel………definitely a case of “less is moreâ€. It will be very interesting to hear your reactions.
John
Sorry if I jumped the gun John, as I know only too well from past examples that your light, expert touch with powders will do the brushwork full justice and that the Prairies will look just right in service.
You are spot on about the danger of overdoing powder application and first time users will be amazed at how it will stick to everything everywhere, including just where it's not wanted!
A great tip I learned from Mick Bonwick at Pendon, is to give the pot a good shake and let it settle a few seconds before gently removing the top and setting it down. Then taking a brush to pick up the small deposits from inside the top makes it easy to control application, graduly building up the desired effect. Definitely a case of applying small quantities at a time to stay in control.
Dry and cool here today, just right for replacing our sewage pump!
Have fun, best regards,
Bill
Last edit: by Longchap
At 6'4'', Bill is a tall chap, then again, when horizontal he is rather long and people often used to trip over him! . . . and so a nickname was born :)
Posted
Full Member
Nice weathering. From my various attempts at using washes and powders can I offer the following?
Diluting acrylics beyond 30% with water dramatically reduces adhesion. Especially Vallejo airbrush acrylics. Basically applying pigment not paint. An alternative is to use water color paints for a wash.
Dilute acrylic paints with acrylic thinner (gloss or matt or a mixture to give semigloss) to give lighter paint shades.
Shaking weathering powders in plastic containers generates electrostatic charges. Powders (being finely ground rocks, often from various ironstones) are very abrasive. Cheap ones (or home ground efforts) will leave noticeable scratches.
Do not use talc. It's dangerous.
Acrylic artist paints are the consistency of toothpaste and are readily diluted with water or medium to generate washes. Useful for generating small rust spots if used neat and applied with a 00 brush or wire.
India ink comes in various colors and is useful for generating weathered seams. Flood, wipe off excess.
I have often read that powders can simply be removed by washing. Unfortunately not true! Brushing on leaves the pigment embedded in whatever surface was there. Water colors and India ink do wash off with minimal if any damage.
BR were trying to present a modern image. Carriage sides were generally clean, locomotives not so much. Many steam engines had faded paint from the war years, which in b/w looks dirty. I remember riding in a Manor or Mogul on the Saturday local goods in the late 1950's and it was kept clean
Nigel
©Nigel C. Phillips
Posted
Full Member
Thanks for the complimentary remarks and for the various tips. That was a very comprehensive summary Nigel……..do they still maintain the help index that Bob set up? Your post should be copied into the weathering section
The comments about powders were particularly helpful and I hope to make use of them over the weekend!
Best wishes
John
Posted
Full Member
Thanks Nigel.
Cheers Pete.
Posted

Full Member
Always try to look on the bright side of life!
Barney
Barney
1 guest and 0 members have just viewed this.