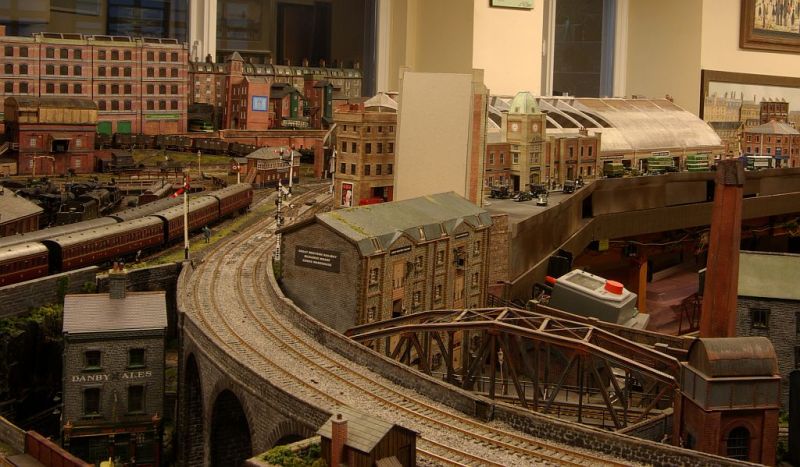
Granby Junction 1948 N. Wales
Posted

Full Member
GWR/LMS OO Gauge DCC RR&Co
Thanks Nigel, that was very helpful.Best Wishes
John

Posted
Full Member
The plan is to modify the Scalescenes Low Relief Kit to create a complete building
Here is a clip of the low relief building from the Scalescene website.

Its pretty tall…..10" high but only 1 1/2" deep.
The plan is to build the frontage direct from the kit and then scratch build sides, back and a roof.
I was a bit worried that the building will be too tall and dominant in relation to the station and GPO. To help make up my mind I set up the front base layer as a mock up in the hotels intended location
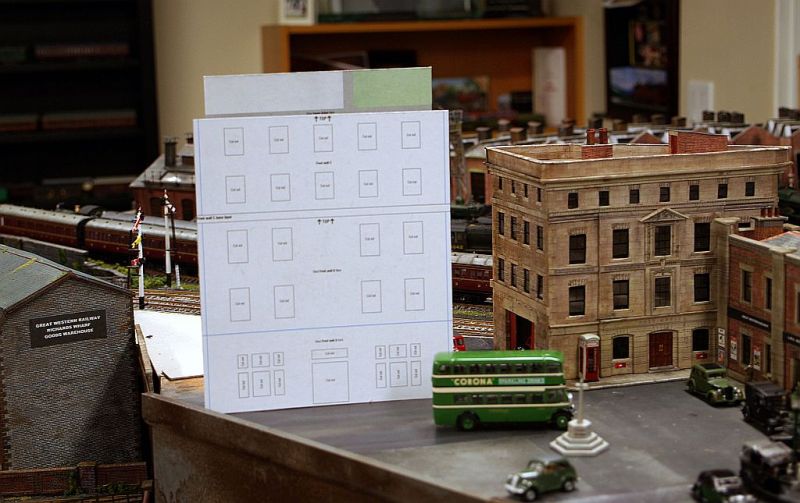
I left it there for about a week before cutting anything. Finally decided it would work but the jury is still out on the roof line.
I originally intended to build the hotel in the same simplified manner as the GPO…..ie no interior detail relying solely on internal beams and buttresses to support a single structural floor.
Having read the instructions more than once…..always a good idea……I changed my mind and decided it would be prudent to build the frontage exactly as specified ie low relief and use that structure as the foundation to which I would subsequently add sides and rear.
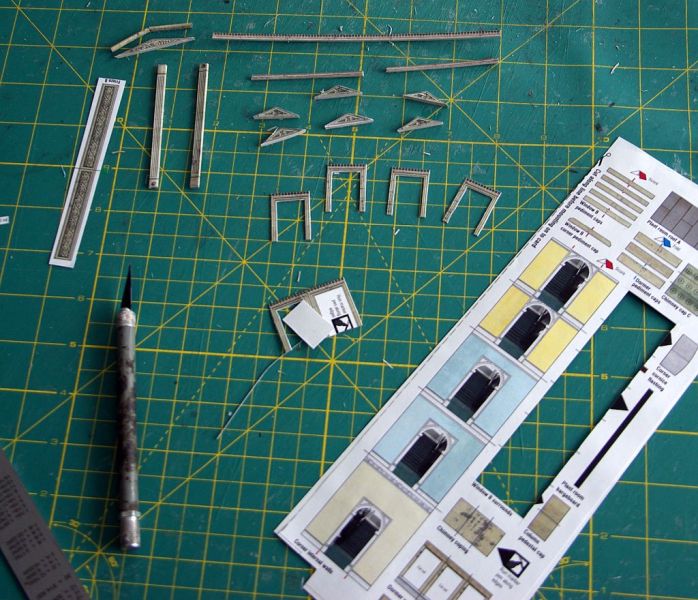
So lots of cutting…..5 floors,10 internal walls and 2 (4 ply) external walls just for starters
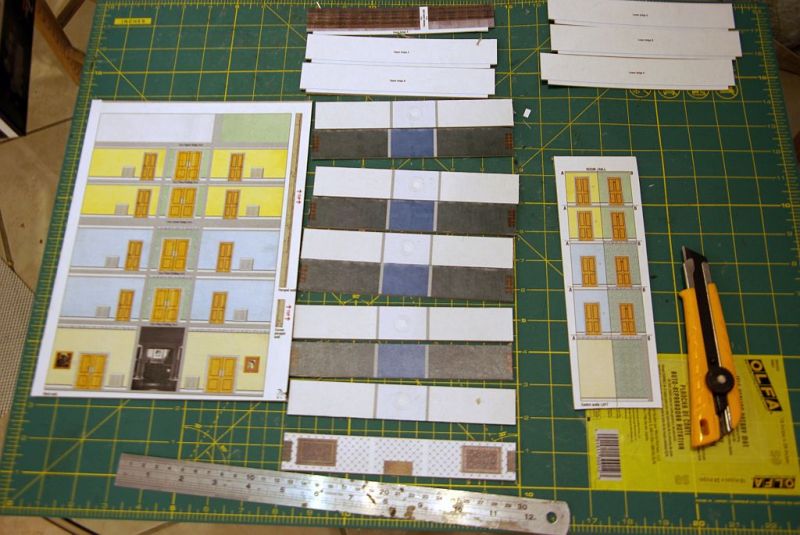
Classic John Wiffen design………this will not be a flimsy structure!
One of the issues with a multi floor construction such as this is "measurement creep".
If one side walls is 1mm over size its not a problem……but if the overcut (or overprint) is consistent over all 5 floors then you have a 5mm discrepancy which is significant.
I used the skirting board and architrave on each floor as a guide and had to trim almost every side wall
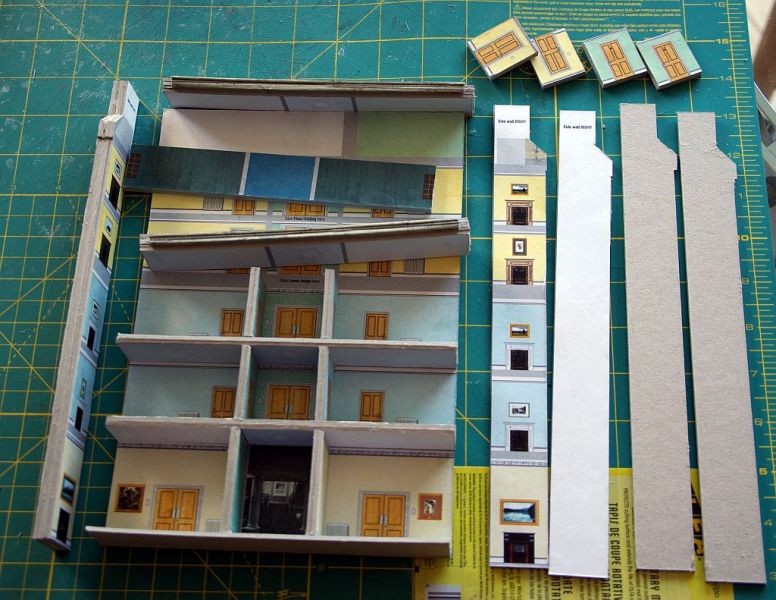
Next job was to cut out and trim the window apertures for the face layers
At the base a window sill is being prepped.
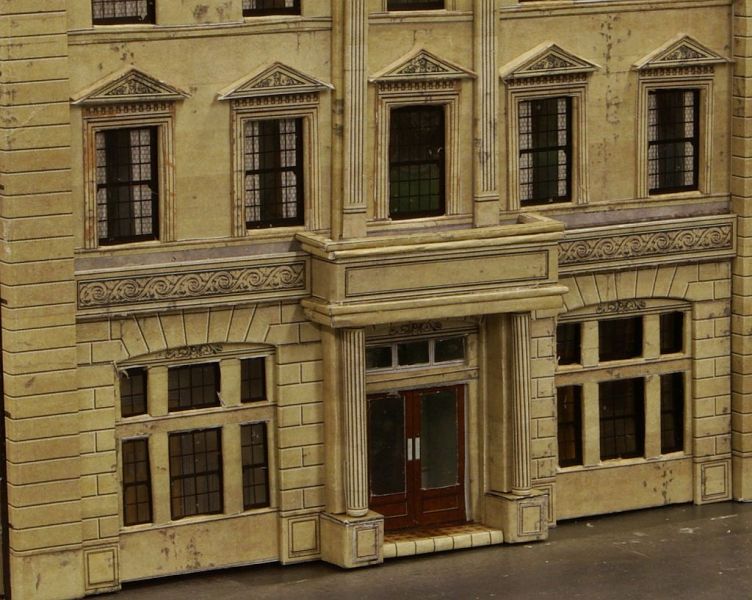
Once the face layers are done they are presented to the base structure

As you can see, despite my best efforts, measurement creep created a 1-2mm overhang on both sheets which had to be trimmed off.
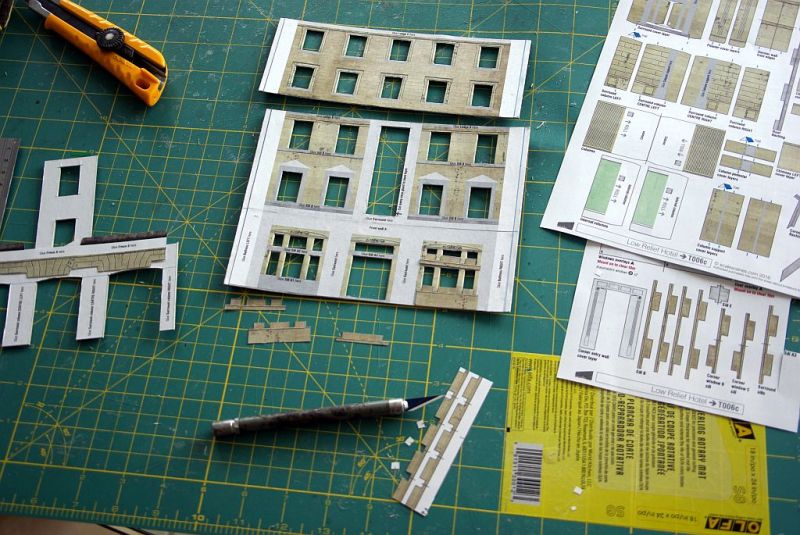
This has been a challenging kit……not recommended for the beginner
There was an astonishing amount of intricate finishing detail to cut and fit
Here is a close up of the finished frontage…….sadly exposing assorted cutting errors which I hope some discreet weathering will conceal.
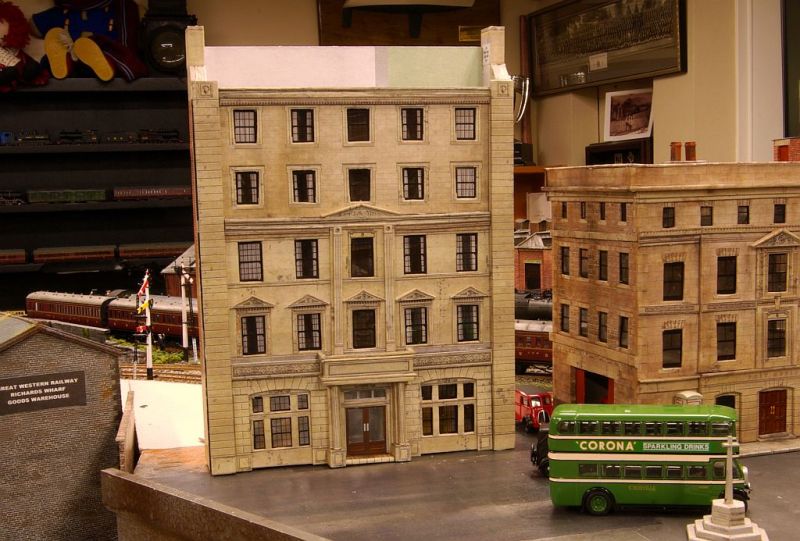
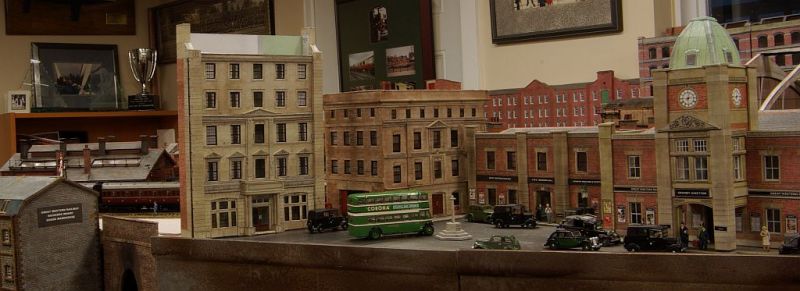
Full size shot alongside the Post Officei
The roof is unfinished…..the design calls for gables and a plant room. I am going to wait until the other three sides are in place before deciding the best layout
With only the front semi complete the back doesnt look too exciting
Obviously still a lot to do but showing potential….. I think the varied roof lines will look rather well.
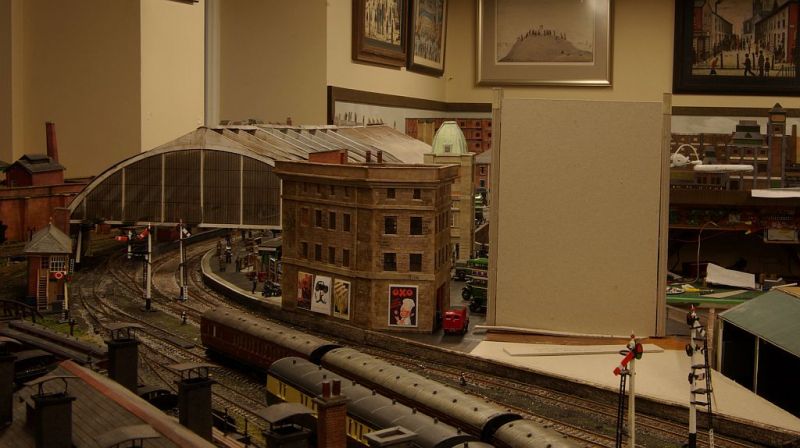
The hotel back wall will have a semi industrial look…..kitchens and ventilation which will link in with the third and final building …..a warehouse extension of the canal warehouse.
Finally a shot which, hopefully, conveys the some idea of the scene I am trying to create
I am going to take a break from cutting card for a few days and run some trains……..there may well be pictures of a loco or two next week
The weather in the UK sounds horrendous (it certainly looked wild at Murrayfield) I hope you are all safe and well
Best wishes
John
Posted

Site staff
Ron
NCE DCC ; 00 scale UK outline.
NCE DCC ; 00 scale UK outline.
Posted

Full Member
Posted
Full Member
Looking good John, something that is NOT done in a day.
Thanks Ron……..you are right….I wouldnt want to fill out a time sheet for this one!
Best wishes
John
Posted
Full Member
Thanks DaveAnother impressive structure coming together on your layout. It looks a complicated kit to put together and get a finished item which looks the part. I gather from your comments it is unusually difficult for a scalescenes kit (I have a few in my stock box but not ready for them yet)?
Most Scalescene kits rely on a multi layered approach to achieve both visual depth and structural integrity. The layering on this model is more complex than most and there is a lot of very precise cutting. I am glad I had made a number of other models prior to starting this one.
Best wishes
John
Posted

Full Member
John,Most Scalescene kits rely on a multi layered approach to achieve both visual depth and structural integrity. The layering on this model is more complex than most and there is a lot of very precise cutting. I am glad I had made a number of other models prior to starting this one.
Best wishes
John
superb work. Just out of interest, how many card sheets comprise this kit and what about window panes?
Colin
Posted
Full Member
Hi Colin[user=434]John Dew[/user] wrote:John,Most Scalescene kits rely on a multi layered approach to achieve both visual depth and structural integrity. The layering on this model is more complex than most and there is a lot of very precise cutting. I am glad I had made a number of other models prior to starting this one.
Best wishes
John
superb work. Just out of interest, how many card sheets comprise this kit and what about window panes?
Colin
Thank you! There is still a lot to do.
Not sure how many "card sheets". I buy 32" x 40 " sheets of medium and heavy millboard…..grey board…….its cheaper and means I am not confined to the A4 (?) 8 1/2" x 11" format.
However there are 16 sheets of components and 15 pages of instructions!
Windows…..There are two options …….cut out the window frames from a paper print out and mount on film…….I did this for the door…….or you can print direct to film which I did for everything else. Using the latter method the frames are black and look a bit heavy but its far easier than cutting out the individual frames.
Are you thinking of making one of these and converting it to a stately home for your layout…….it would look good!
Best wishes
John
Posted
Full Member
Hi John,Hi Colin
Thank you! There is still a lot to do.
…………..
Are you thinking of making one of these and converting it to a stately home for your layout…….it would look good!
Best wishes
John
No I'm not, just interested.
The only "Stately home" or anything like it I know of in the Quantocks is much nearer to a Grand Manor House, no more than 2 floors. Your lovely building would stick out like a sore thumb in my space.
Colin.
Posted
Full Member
In truth I also needed time to pluck up courage before spoiling the pristine finish.
I have long since given up having any qualms about attacking brand new shiny locomotives but, for some reason, I always get rather nervous about applying a few coats of grimy black to immaculate white coach roofs.
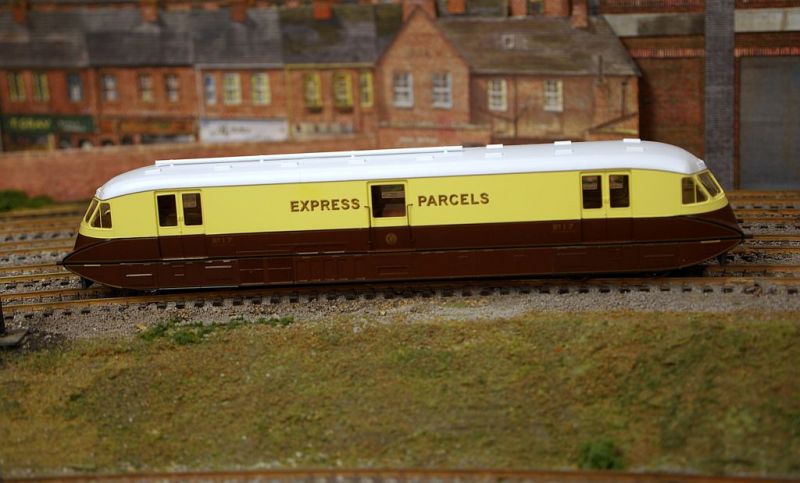
Anyway the deed is done:
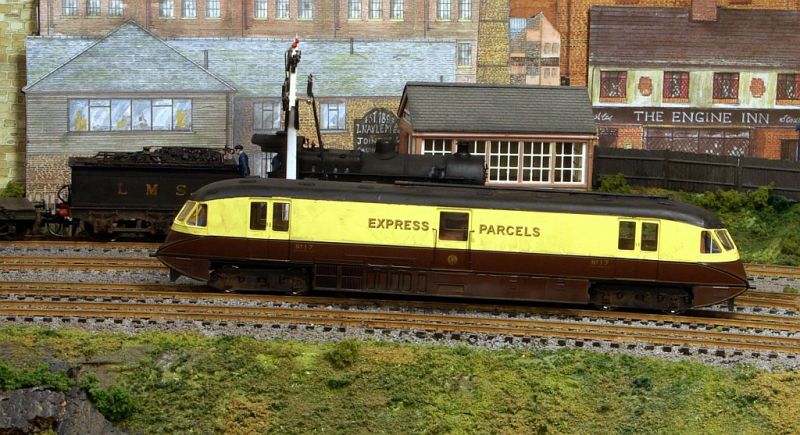
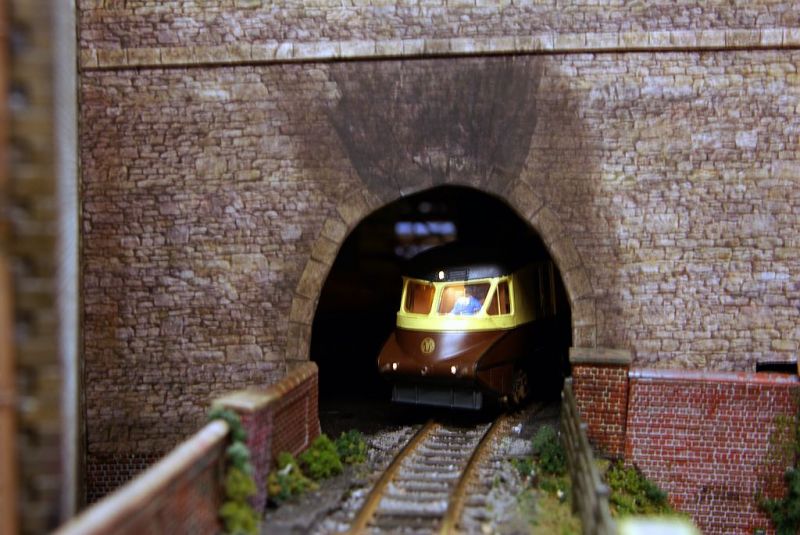
Not the best paint job I have ever done but in the interests of realism……essential. The Railcar was built in 1937…..Granby is based in early 1948……not too many white roofs about then
In addition to the roof the body had a few washes of diluted dirty brown……rather more coats on the lower body along a light dusting of weathering powders. The valances or skirts were almost all removed from 1939 so they have gone and the bogies painted with gunge, grease and a touch of rust.
The Zimo Budget 21 pin decoder was a straightforward plug in. You will be able to judge the performance from the video. There is perhaps the slightest suggestion of "hunting" but generally its silky smooth.
With pick ups on both bogies, I didnt bother with stay alives but I did find that it could be sensitive to track imperfections! The unpowered bogie didnt like being pushed through a couple of my facing points although had no objection when pulled, so a little care had to be exercised with speed limits and orientation.
I do like the lights:
Never had a loco with lights before so I am like a kid with a new toy!
Testing concluded, the railcar has been incorporated into Granby's RR&Co schedules. There is now a regular routine where the car leaves Chester (storage) for King Street Parcels Depot at Granby then heads back to the lower level branch. Stopping briefly at Cynwyd it continues over the canal to Corwen (Storage under main station!).
The video shows the second part of this routine……from King St to Corwen
Here are a few stills by way of a trailer……

The railcar leaves King Street

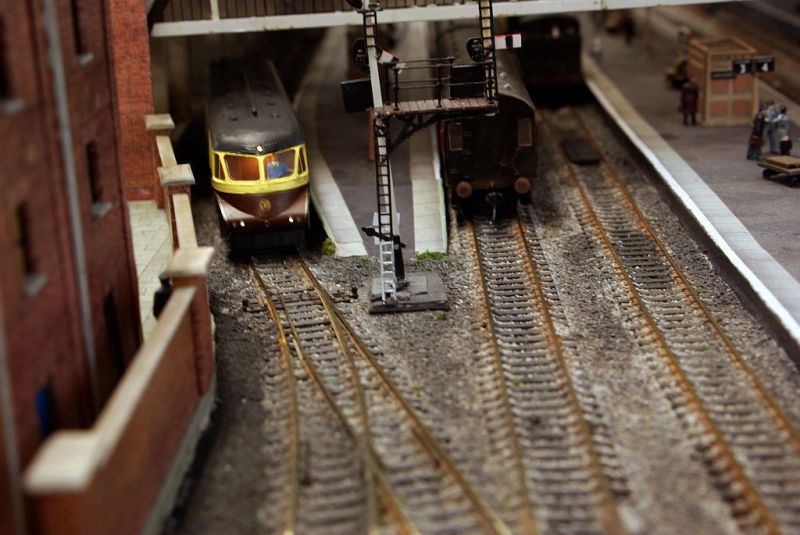
And enters Bay Platform 1
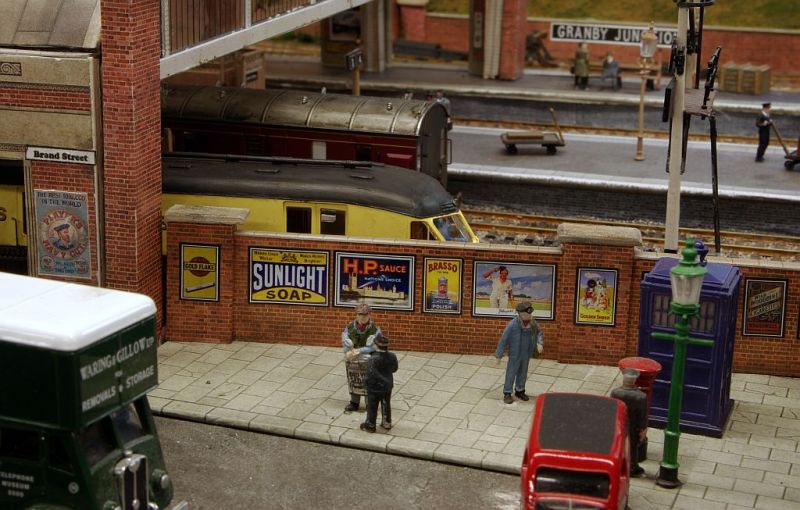
Note the rear light (but try and ignore the driver and absence of a Rear Loco Lamp :oops:
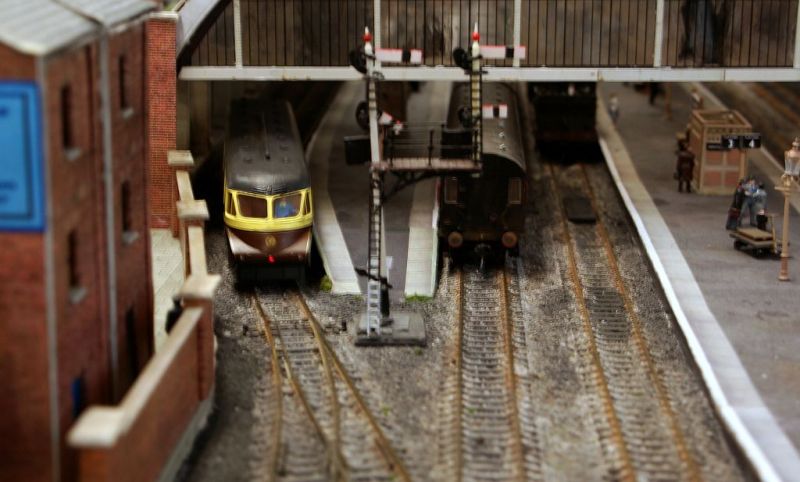
The car prepares to depart and the lights automatically change……the child in me thinks….cool!
The car arrives at Cynwyd
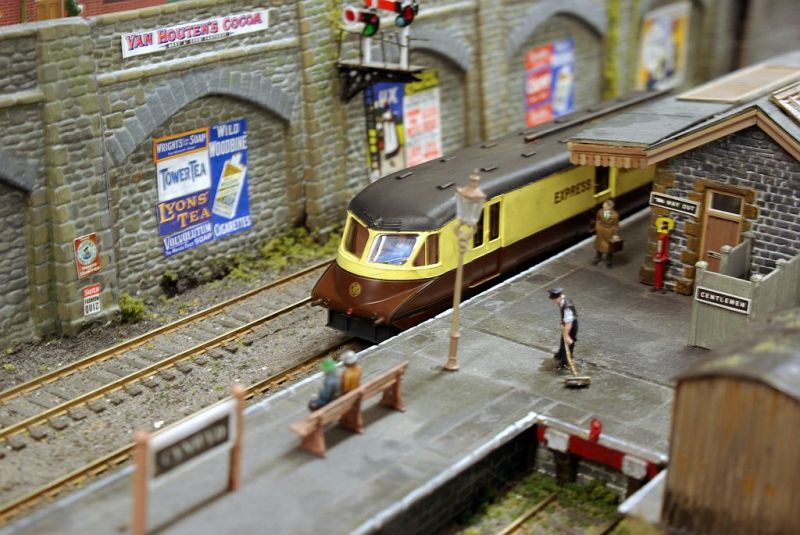
and crosses the Canal for Corwen
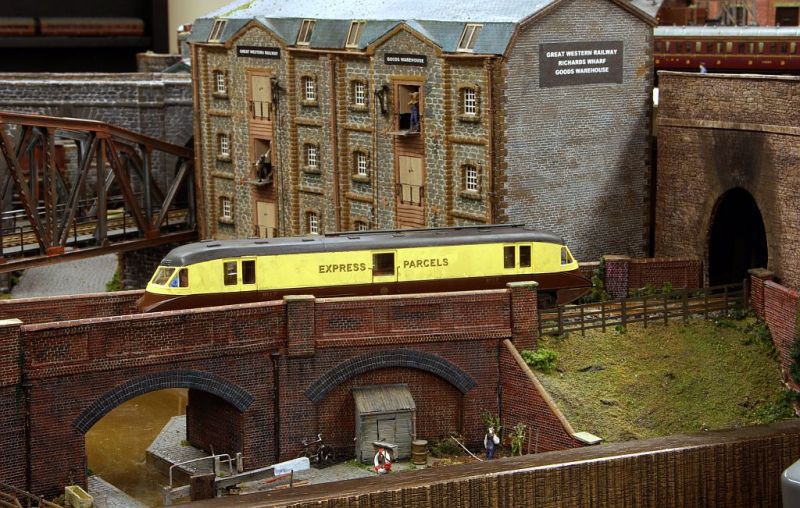
Hope you enjoy the video……its kind of rough and ready. I just started the routine and pointed the ipad. The only editing was cutting out the ceiling shots when I changed position
[yt]BS851AlsOgg[/yt]
Posted
Full Member
Cheers Pete.
Posted

Site staff
Ed
Posted
Full Member
Posted
Full Member
Very nice John. I like the blackened roof, it looks much better than the white. I find the only decoders I've been able to get super smooth starts and stops with is Zimo. I've got one ESU in my DP1 and it won't play ball. Just wait till you put sound in it. ;-)
Thanks Pete. I am very impressed with Zimo and the budget versions are such good value….same price as a Lenz standard….definitely my decoder of choice now.
Petermac has been trying to persuade me for ages to install sound……I fear my resolve is beginning to weaken! :roll:
Cheers
John
Posted
Full Member
Looks good John :thumbs
Ed
Thanks Ed :thumbs
Cheers
John
Posted
Full Member
Thanks Dave…..glad you like it.Like the video John and as already said, the black roof looks a lot better to me. You may have already covered this but are your signals all linked in with traincontroller?
I am afraid that the signals are all cosmetic and this does get rather exposed when I shoot a video. :oops: :oops:
The Dapol signals were not available when I started and it would be too disruptive to start drilling all those holes now…..apart from being prohibitively expensive.
I keep thinking about trying one on the branch though…..it would look great hooked up to TC
Will your signals all be operative and linked?
Cheers
John
Posted

Full Member
Good to see No.17 in appropriate workmanlike condition and trundling round earning its keep. Yes, those lights do make one smile!
Sorry for not responding to your post sooner, but I'm tied up with an unforeseen maintenance issue, having some interesting challenges!
I'm still deciding on my weathering approach to the railcars and am looking forward to some fun on the workbench.
Best,
Bill
At 6'4'', Bill is a tall chap, then again, when horizontal he is rather long and people often used to trip over him! . . . and so a nickname was born :)
Posted
Full Member
The chant goes: In stall sound in stall sound install sound. No pressure. ;-)[user=1120]peterm[/user] wrote:Very nice John. I like the blackened roof, it looks much better than the white. I find the only decoders I've been able to get super smooth starts and stops with is Zimo. I've got one ESU in my DP1 and it won't play ball. Just wait till you put sound in it. ;-)
Thanks Pete. I am very impressed with Zimo and the budget versions are such good value….same price as a Lenz standard….definitely my decoder of choice now.
Petermac has been trying to persuade me for ages to install sound……I fear my resolve is beginning to weaken! :roll:
Cheers
John
Cheers Pete.
Posted
Full Member
Hi BillHello John,
Good to see No.17 in appropriate workmanlike condition and trundling round earning its keep. Yes, those lights do make one smile!
Sorry for not responding to your post sooner, but I'm tied up with an unforeseen maintenance issue, having some interesting challenges!
I'm still deciding on my weathering approach to the railcars and am looking forward to some fun on the workbench.
Best,
Bill
Good to hear from you.
I hope the maintenance issue is not too challenging and you will soon be able to start weathering your railcars…..I will look forward to seeing the results
Cheers
John
Posted

Full Member
I do love the railcar, and you have weathered it very sensitively. A great investment - it really suits Granby and is in eye catching model.
Regards
Michael
1 guest and 0 members have just viewed this.