Granby Junction 1948 N. Wales
Posted

Full Member
GWR/LMS OO Gauge DCC RR&Co
Lovely stuff John ;-)
Phil

Posted

Full Member
What a wonderful transformation. The use of the etches is a most effective route to a convincing representation of this essential war transportation and they are well worthwhile the effort. I particularly like the treatment of the warflat's timber decking, which is something I need to research in order to represent timber effectively.
Like yourself, I've been embracing the use of weathering powders of late and today had great fun getting down and dirty after a few days away in the UK.
Do you have a chemical blackening solution on the brass etches, as I've found it much more reliable than paint rather than paint, which seems notorious for falling off in similar situations.
Best,
Bill
 Last edit: by Longchap
At 6'4'', Bill is a tall chap, then again, when horizontal he is rather long and people often used to trip over him! . . . and so a nickname was born :)
Posted

Full Member
Regards
Michael
Posted

Full Member
Comments like that are particularly nice from a such a brilliant modeller…….thank you Phil :thumbs…..Lovely stuff John ;-)
Best wishes
John
Posted
Full Member
Thanks BillHi John,
What a wonderful transformation. The use of the etches is a most effective route to a convincing representation of this essential war transportation and they are well worthwhile the effort. I particularly like the treatment of the warflat's timber decking, which is something I need to research in order to represent timber effectively.
Like yourself, I've been embracing the use of weathering powders of late and today had great fun getting down and dirty after a few days away in the UK.
Do you have a chemical blackening solution on the brass etches, as I've found it much more reliable than paint rather than paint, which seems notorious for falling off in similar situations.
Best,
Bill
I am so glad you liked it.
I am afraid I may have mislead you about the etches. I only used the hooks from the Roxey etch……I binned the eyes because the shanks were too shallow and never attempted to use the etched turnbuckles……I used the screw link couplings supplied as as an add on accessory with new locos from virtually all manufacturers now. They are a bit over scale in places but the shackles are hinged and quite exquisite.
I use powders a lot (hence my recent question to you) but have yet to apply them to the wagon.
I thought the planking out of the box was really plasticky…….

I had blobs of Brown,Beige,Grey and Black acrylic paint in a saucer…… and just mixed different proportions and painted multiple coats along the lines of the planking….I didnt attempt individual planks but did try and grade it so the ends were lighter because they would be more exposed than the centre.
I did a mixture of dilute washes and dry brushing…….I worked fairly quickly so if I got a mix wrong (typically too dark or strong) I could just wash it away or smudge it

Once I was happy with the overall base look I made a lighter mix to paint an uneven strip on the edges to reflect how the tank tracks chewed up the surface……this feature was very obvious on the photos. Then I dribbled Vallejo Oil/Grease down the centre .
Multiple brown/black washes to get between the planks and then a bit of fresh oil to reflect recent deposits
My struggles to set up the chain created some natural weathering at the edges……and all the handling added to the worn look
I still have to paint and dirty the chains and when I brush powder on the wago sides I will add a little rust powder to the chains.
I keep meaning to ask Phil C about blueing/blacking liquids for Brass etches and polished connecting rods…..right now I just paint them…….and it does chip easily from brass.
Hope all this helps
Best wishes
John
Posted
Full Member
Thank you Michael…..that is very kind of you.Great job John. I am always amazed that you and others know how these things would have been done in real life - if I were using a RTR model, I would trust that they had done that bit for me. And then the execution is quite exquisite. As always.
Regardsk
Michael
I guess not everyone buying a Warflat wants to have a tank permanently attached…….in fairness to Bachmann in the accessory pack with the Warflat there are four plastic turnbuckles with matching recesses in the buffer beam……..but they are really just cosmetic.
I must confess that I do enjoy the research part of the hobby. In this particular case, my army service was in the Infantry…..I knew very little about Tanks. Google, as always, was helpful. There are a surprising number of photos of tanks being moved around during the war. I used a photo from David Jenkinson's book "The Last Years of the Big Four"
I also got a lot of advice from an internet friend on another forum who served for many years with the Household Cavalry…….I had an uneasy feeling that he was looking over my shoulder all the time I was doing this…….hopefully it will meet with his approval! :shock:
Best wishes
John
Posted
Full Member
Next job was to secure the Comet to the Warwell……..not before time…..its been on the to do list since September 2017!
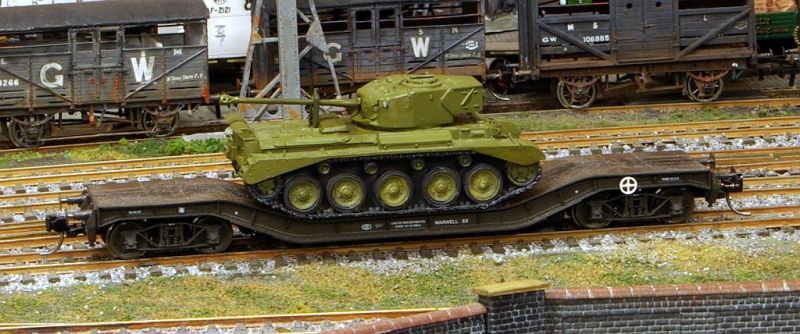
Unlike the Cromwells which came with the Bachmann Warflats, I had to buy a suitable load for Hattons Warwell. I finally settled for a Comet kit from Millicast. The kit wasnt super easy to assemble but the resultant model has much better detail than the Cromwell. It is also more appropriate for my era.Comets first saw service just after D Day and were in action during the Korean War eight years later.
I used the same securing system described in the previous post except the chains were attached to pieces of rod inserted in the buffer beam rather than the side
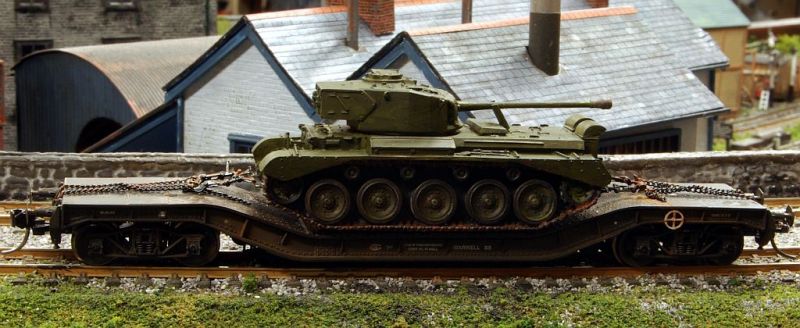
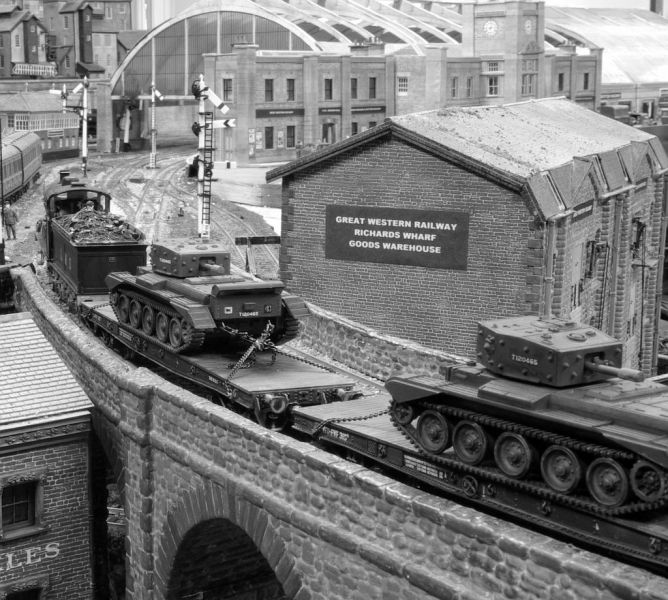
The shot above shows the front of the tank with the turret reversed for transport and only the casing remaining on the Machine gun. .
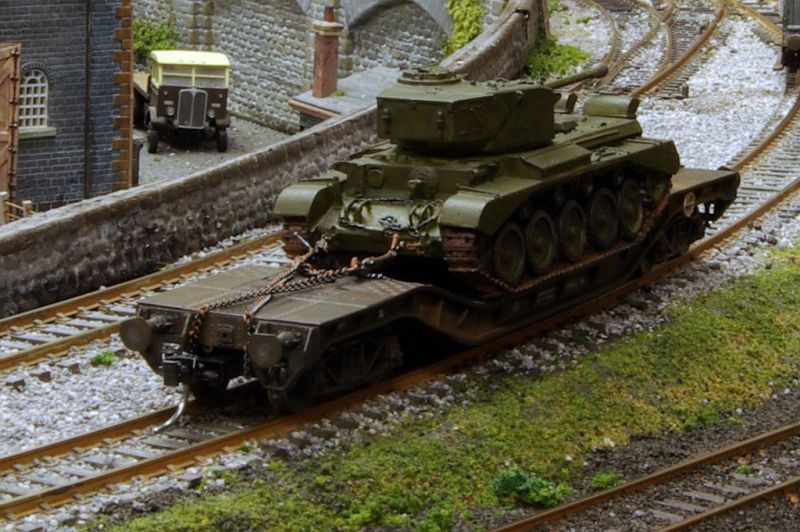
Now the reverse view ……the kit had a cosmetic barrel/support lock molded on the deck. I built one in the transport position from plastic girder.
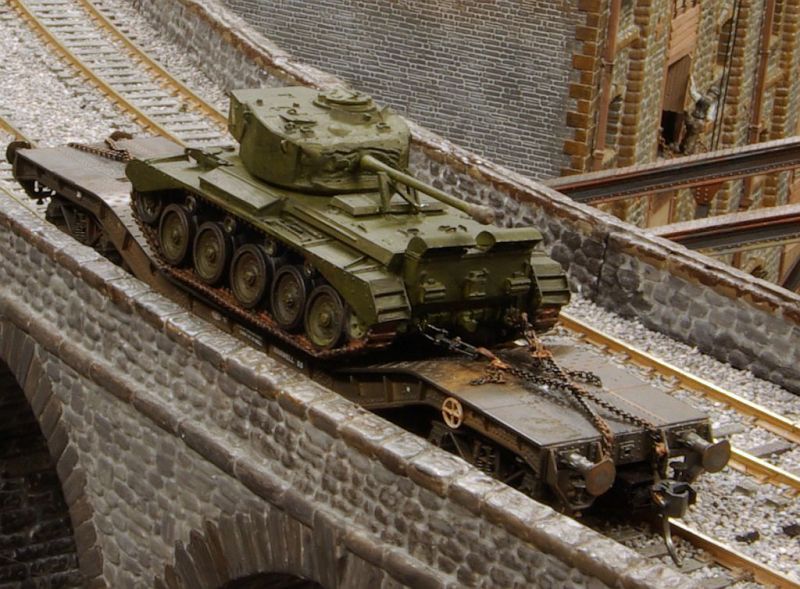
To stop all the ash and cinder etc entering the gun barrel, not only was the turret reversed but the muzzle was covered in a canvas cap. I tried overlaying some tissue paper but it looked too clumsy. The barrel already had a bulb shaped blast deflector so I built up layers of PVA and painted it dirty sand. There is still a bit of a dent but otherwise it works ok
One bit of molded detail I could have done without were the the tools entrenching (pick and shovel to non squaddies) seen on the left hand side. I should have filed them down but it was too much faff and nobody would have noticed anyway.
Two Warflats and one Warwell coupled up ready to go
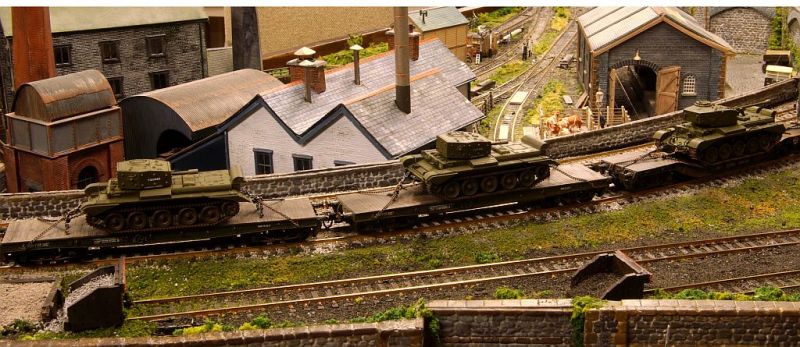
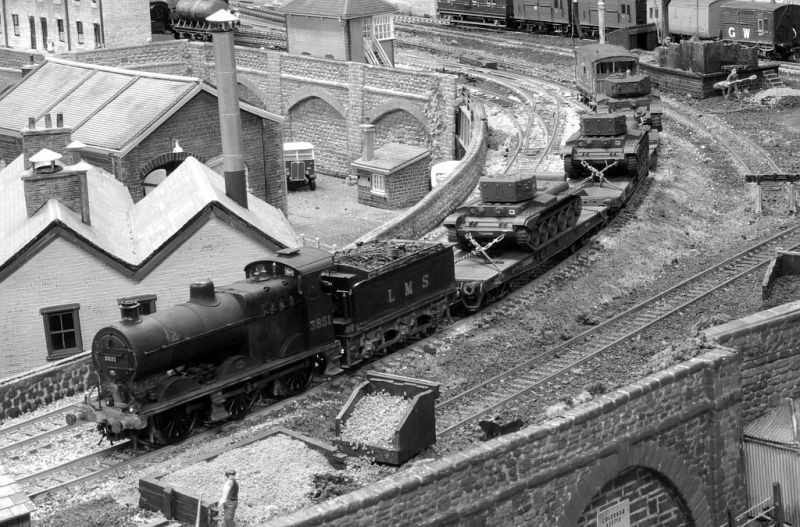
I delayed buying the Warwell and when I finally made up my mind the GWR version had sold out so I had to settle for the LMS version hence the Fowler 4F 0-6-0
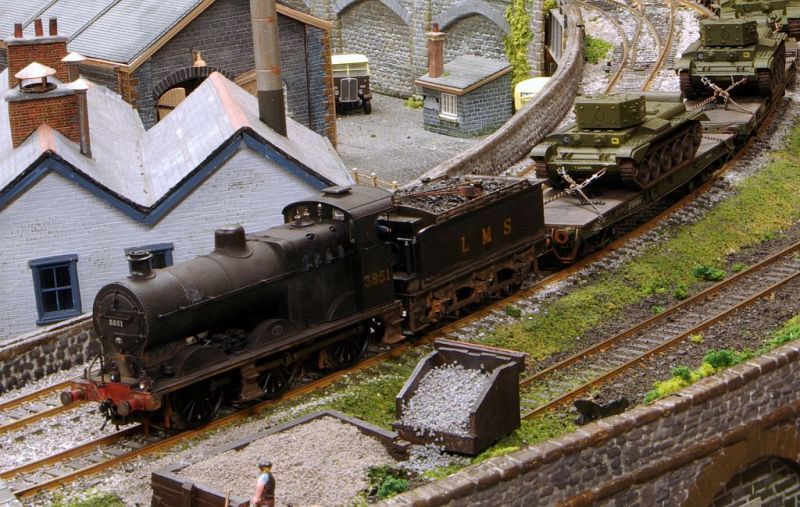
I may well have used the 4F anyway. It is one of my most reliable and powerful locos and the three wagons with loads are surprisingly heavy. I have to admit that ascending the slope to Granby Viaduct is quite a challenge for my Collet and Dean Goods

I ditched Photoshop Elements about a year ago and switched to Affinity. I am pretty happy with the results. I am still just scratching at the surface. Generally I just crop and fiddle with the auto buttons but this session I experimented with the focus stacking option on some of the shots

Not perfect but has some potential for the future I think.
Regards from Vancouver
John
Posted
Full Member
Michael
Posted
Full Member
Cheers Pete.
Posted
Full Member
Ooh! Lovely photos John. While I am sure your commentary is accurate and that there will be modellers with opinions…… as someone who just likes seeing a convincing model,I have to say it really looks lovely. You have a remarkable knack for capturing an atmosphere - for me, that is the aim of my modelling. I know there are many different outcomes that modellers want, but you hit my buttons every time. Such an inspiration.
Michael
Many thanks Michael.
It was very gratifying to read your comments about atmosphere. I am a big fan of Iain Rice and I always try to strive after his definition of what makes an authentic model railway……it went something like this…..one should be able to look at a layout and without seeing the locomotives or rolling stock be able to immediately determine both the operating company and the decade in which the layout is based.
Not sure that I always succeed but I do try and establish what I call date stamps……vehicles,figures, advertisements etc…….I had to produce new shop signs to replace the sixties fonts that Metcalfe used. Sometimes I realise I am far too picky………I suspect not too many people share my concern that the Cromwell Tanks with short barrel howitzers are not right for Granby in 1948…….they are securely chained now so I will have to live with it
Thanks again for your interest and encouragement
Best wishes
John
Posted
Full Member
[user=1120]peterm[/user] wrote:
Thanks Pete…..you are very kind.Yeah well, passable I suppose. ;-) My train set doesn't and never will measure up to that.
I think my last sentence about “ not perfect but has potential†was not very well worded, it was intended to refer to the focus stacking experiment.
I fear that I can sometimes appear either too self critical or worse, guilty of false modesty. I do get irritated with myself when I post photogaphs with errors in……I will just have to try and be a bit more relaxed. :shock:
Cheers
John
Posted
Full Member
Cheers Pete.
Posted
Full Member
Phil
Posted

Site staff
They look great :thumbs
Ed
Posted
Full Member
Cheers
John……relaxing in Vancouver:lol:
Posted
Full Member

Phil
Posted
Full Member
I also like to be fussy with correct period details, but I can persuade myself occasionally to fall back on Rule 1, so worry not about the size of your chosen weapon! I've included a couple of photos in my gallery concerning Churchill barrels, rather than post them here on the thread, just in case copyright might be infringed.
I also realised when adding further touches to my Field Marshall tractor today, that it is in fact a 1950 model (the Series 1 came out in '45), though looks much older, rats! I shouldn't use it, being at least 11 years outside my latest modelling date, but we'll see! Fortunately, a vintage car buddy recently gave me a white metal kit for a 1920s tractor which will be spot on.
As Ed said, they look great :thumbs
Bill
Last edit: by Longchap
At 6'4'', Bill is a tall chap, then again, when horizontal he is rather long and people often used to trip over him! . . . and so a nickname was born :)
Posted
Full Member
Thanks again Pete:thumbsI do think your modelling would take a lot of beating and what others say about atmosphere is so true. You're not too picky, just too hard on yourself. Don't get too relaxed with the photo's. I don't have a clue about focus stacking but take it to be something like multiple shots with different focus settings, then put together somehow.
You pretty well hit the nail with focus stacking……except its multiple shots different focus points. Foreground, different parts of loco, background etc……..then the editing suite merges them all together….fascinating to watch.
Some modern cameras can do this automatically….just take burst of shots with different points. With my oldish camera you have to individually select and take each shot albeit with a remote button…….and no matter how rigid the tripod there seems to me to be a risk of imperceptibly nudging the camera when you select the focus point…..which tends to defeat the purpose of the exercise :shock:
I will keep plugging away
Regards
John
Posted
Full Member
Not to worry John, I can Photoshop those tools out and fix the dent in the barrel cover
Very drolll Phil:lol: All the tools are there in the Affinity suite……I just dont seem to have the patience/ability to use them properly.
Maybe a 2020 New Year resolution?
Best wishes
John
Posted
Full Member
Hi John from a dark and chilly 5 deg evening in the Loire Valley. The Churchills look very purposful on their way to get seriously weathered in France and that's one less task you had to do in preparing this wonderfully modelled train and Peter Mc will be especially pleased with your choice of rolling stock!
I also like to be fussy with correct period details, but I can persuade myself occasionally to fall back on Rule 1, so worry not about the size of your chosen weapon! I've included a couple of photos in my gallery concerning Churchill barrels, rather than post them here on the thread, just in case copyright might be infringed.
I also realised when adding further touches to my Field Marshall tractor today, that it is in fact a 1950 model (the Series 1 came out in '45), though looks much older, rats! I shouldn't use it, being at least 11 years outside my latest modelling date, but we'll see! Fortunately, a vintage car buddy recently gave me a white metal kit for a 1920s tractor which will be spot on.
As Ed said, they look great :thumbs
Bill
Hi Bill
Thank you for the nice compliments and in particular for taking the trouble to post those photos. I hadnt seen the long barrel version before…..interesting how much manpower was involved. The other shot I had seen, its in David Jenkinsons book….â€Final years of the Big Fourâ€. Its a super photo isnt it? Packed with all sorts of detail.It made up my mind where to fit the securing chains!
The personal application of Rule 1 is a fascinating topic. I guess, like you, I like to know that I am using something out of period and that I can justify its use (at least to myself). Sometimes nostalgia…..a Walls Ice Cream Austin 3 way van in 1948!!!! Other times its the absence of alternative “correct†stock…..eg GWR PBVs…..hence my use of the fictional Hawksworth vans.
Its all part of the fun though
Best wishes
John
1 guest and 0 members have just viewed this.