Granby Junction 1948 N. Wales
Posted

Full Member
GWR/LMS OO Gauge DCC RR&Co
[user=1338]Ed[/user] wrote:Thanks Ed……..I should have googled myself.[user=434]John Dew[/user] wrote:Did a Google search John and allegedly it stand for cruiser, (maybe).Anyone know why almost all British Army tanks have names beginning with C?
https://www.theguardian.com/notesandqueries/query/0,5753,-1161,00.html
https://www.arrse.co.uk/community/threads/why-the-c-in-our-main-battle-tanks.133337/
Ed
I think the C for Cruiser story makes sense…….the Cromwells/Centaurs etc were classed as cruiser and then I guess the tradition stuck so that the much heavier battle tanks that followed continued to be named with a C…..Centurion …Conqueror.
John

Posted
Full Member
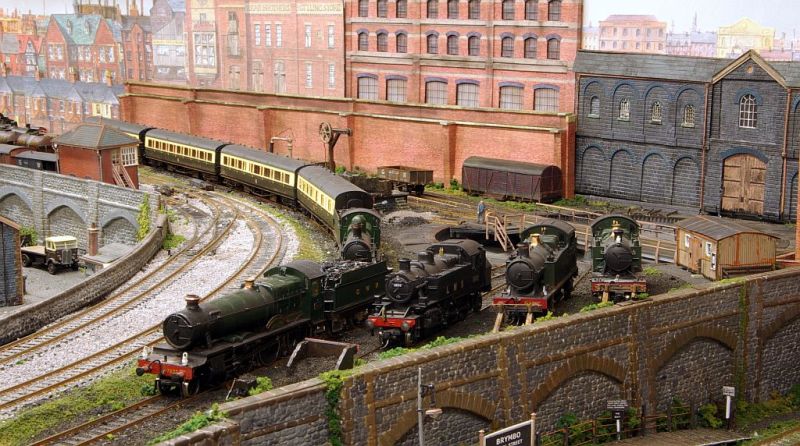
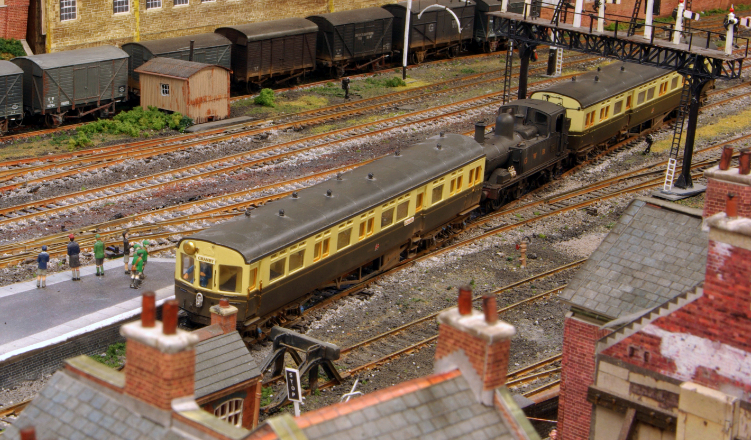
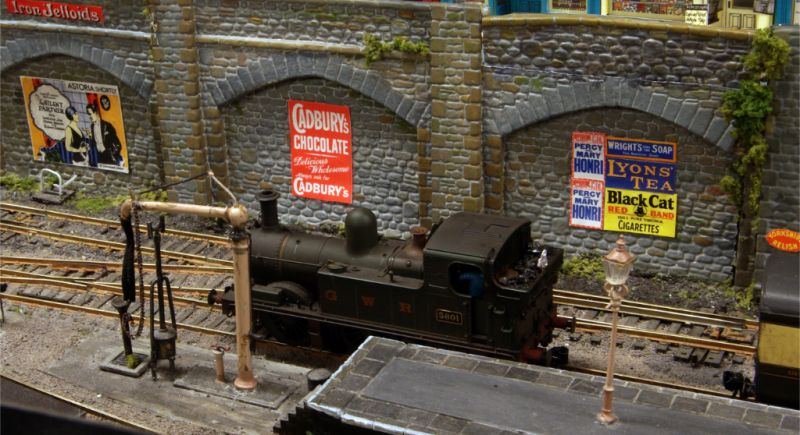
I spent a lot of time earlier in the year creating local passenger services to and from the "south" or right hand side of the storage yard. The only way I could squeeze 4 extra trains into an already crowded yard was to run them all into Down storage siding #5…….run a swift loco exchange and store them elsewhere…in fact wherever I could find a spare siding.
This rather fuzzy shot shows one of the trains….. the Ruabon B set crossing over from the Up line to enter the Down Storage yard
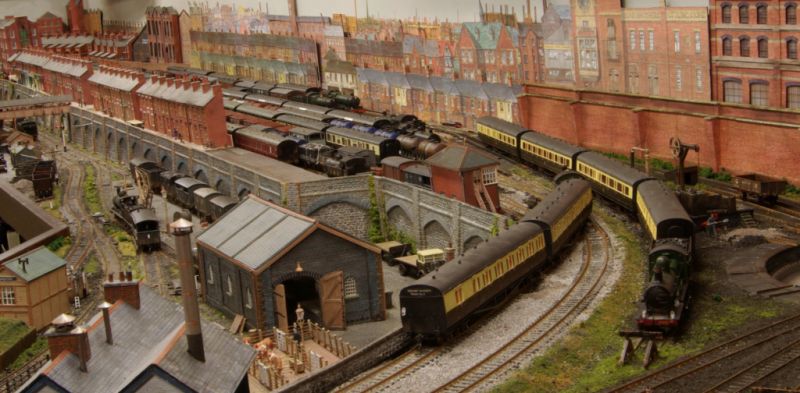
Siding #5 is the one empty space you can see in the middle distance.
A second train (from Barmouth) is stored in the siding to the right. A third train is stored at Granby carriage sidings and the fourth I managed to fit in front of the Up Express at the other end of the storage yard.
The routine for all four trains is broadly the same. Enter D5….uncouple and pull clear….relief loco couples and the train is ready for the return journey
The relieved locos were then turned/stored in one of the turntable exits.
Its a Fleischmann TT that I bought second hand over 20 years ago.
To get it to work with DCC and RR&Co involved a Heath Robinson mix of Point Motors, Reeds and Magnets …….some of which where concealed under the Engine Shed:

It actually worked fine but this system could, realistically,only handle two exits.
Its quite cumbersome trying to manouver 4 relief locos in two exits particularly as one road has to be cleared whenever a Milk/Fruit or Parcels loco needs turning
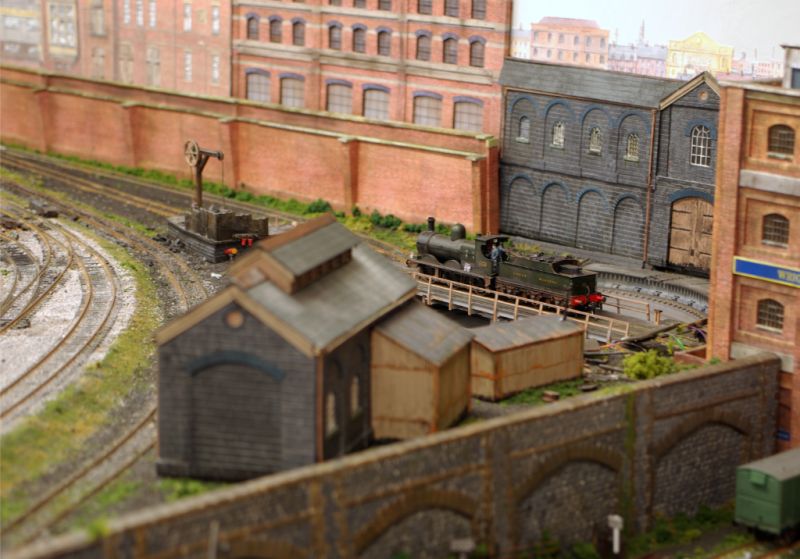
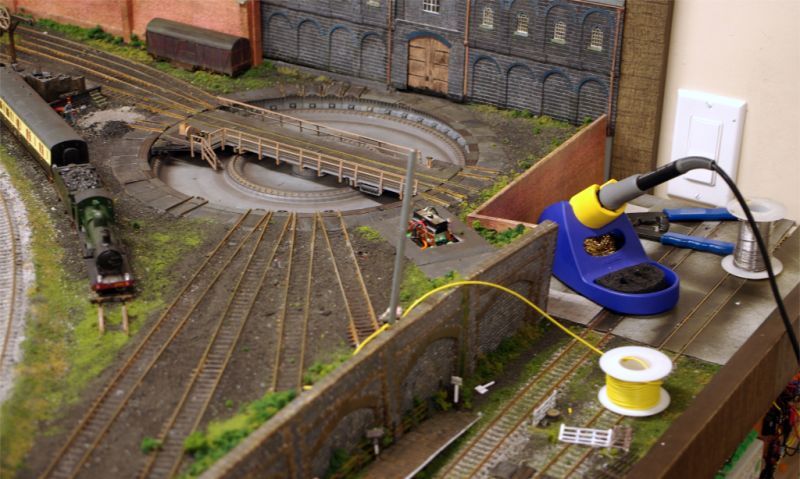
Its a far cry from the main turntable
Where this device handles 16 exits without turning a hair

(Ignore the DCC Concepts unit alongside….just sharing the shelf)
The Fleischman Turncontrol unit is an amazing piece of kit…….its a pleasure to handle and integrates seamlessly with the computor.
It slowly dawned on me that it could also operate the antique storage TT ……..not the cheapest option but after a limited amount of soul searching:
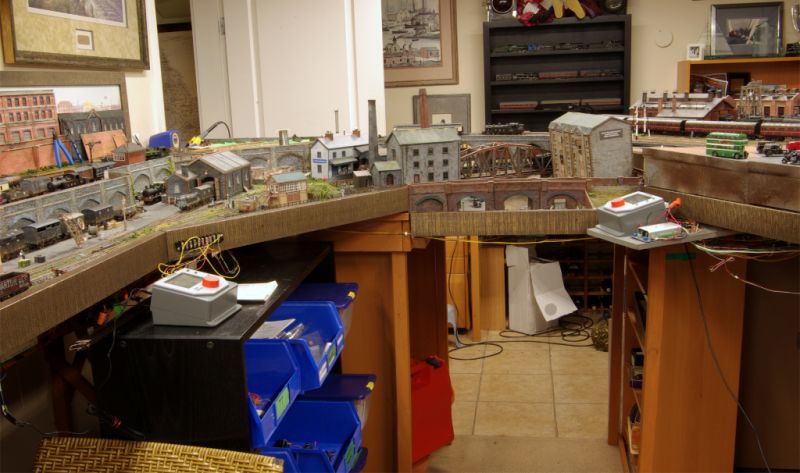
That was the easy part……now to hook it up………under the duck under to the other side
Remove the library….
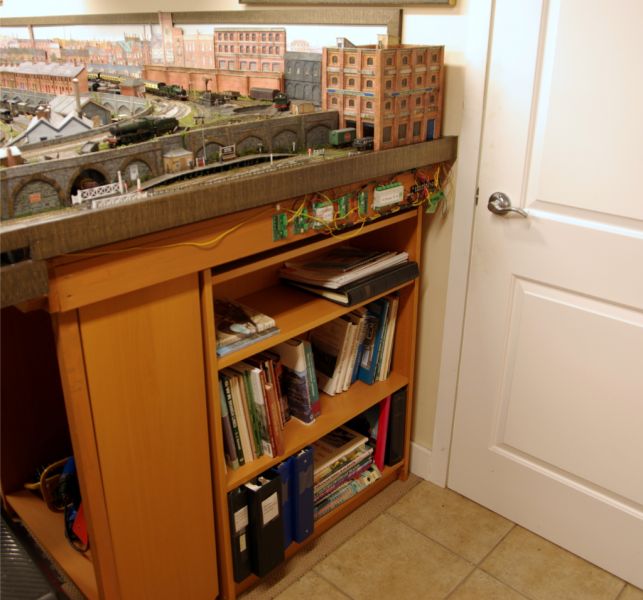
No problem:

And then the problems really started! I had completely forgotten that the lower branch line baseboard was not a 12" shelf…….it was 4' deep……..in the dim and distant past this was going to be a coal mine served by the branch!
When this plan was superseded by the storage TT I had just inserted a second baseboard 5" above the old one creating an almost inaccessible void.
Lots of fun trying to insert droppers through that lot
In the end I had to surface mount the droppers and conceal them with ash ballast and a somewhat unlikely shrubbery.
The final connection was made by drilling one very large hole through both baseboards (Naturally I managed to find part of a supporting beam as well)
I always maintained this would be a warts and all thread…….
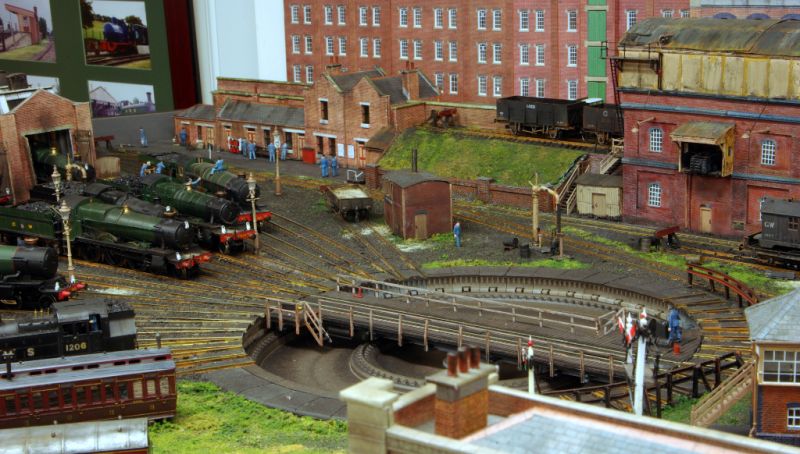
Finally, after a not entirely stress free fortnight, we have moved from two exits to seven:

Including a dedicated road for each of the four local passenger relief locos
From the left
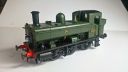
Barmouth 7802 Bradley Manor
Crewe LMS Ivatt 2-6-2T
Oswestry 6698 56xx 0-6-2T ……..on temporary loan from the coal run until the Hornby large prairies
Ruabon 4550 Small Prairie
I always like to finish with a black and white if projects……….eventually……….turn out ok

So the next few days will be spent alternating between concern that England may have emptied the tank and quiet confidence that all will be well. Who could not be impressed by that defiant yet respectful response to the Haka.
Posted

Site staff
The final connection was made by drilling one very large hole through both baseboards (Naturally I managed to find part of a supporting beam as well)
That is almost a 99% certainty in this hobby

Ron
NCE DCC ; 00 scale UK outline.
NCE DCC ; 00 scale UK outline.
Posted

Legacy Member
Brian
OO gauge DCC ECOS Itrain 4 computer control system
Posted

Full Member
Michael
Posted

Full Member
Douglas
'You may share the labours of the great, but you will not share the spoil…' Aesop's Fables
"Beer is proof that God loves us and wants us to be happy" - Benjamin Franklin
In the land of the slap-dash and implausible, mediocrity is king
"Beer is proof that God loves us and wants us to be happy" - Benjamin Franklin
In the land of the slap-dash and implausible, mediocrity is king
Posted
Full Member
 , intervened.
I am particularly glad that you enjoyed the post……..I found it quite difficult to distill two weeks work into a meaningful post…..I took forever to take photos which conveyed what was going on.
Best wishes
John
Posted
Full Member
In a poor performing Bachmann 64xx Pannier I replaced a Lenz decoder with a Zimo decoder and attached a TCS KAT2 keep alive. The results were amazing …..the video showed it continuing to move for about 18" after the power was cut off.
I then turned my attention to a DJM/Hattons 14xx 0-4-2T. Notoriously indifferent runners and mine was no exception. Space constraints prevented the use of a full fat capacitor so I added 3 Tantalums (lower volume but significantly lower capacity). You may recall that I found the results a bit ho-hum. There was an overall improvement in running but still some hesitation at low speed and the occasional hand from God to start.
I put them both back on the layout with their autocoaches and got on with other things.However, regardless of the project of the day, on most evenings I run both autocoach schedules…….with a glass of wine….quite therapeutic.
It slowly dawned on me that I had been a bit hasty with my initial assessment………. the 14xx was actually running impeccably…….shuttling back and forth (on an admittedly undemanding schedule) …….untouched by human hand.
Time to give the same treatment to my other DJM 14xx…..58xx 5801

Not all the 0-4-2s were autofitted. The 58xx sub class were used on branch good and standard branch passenger diagrams. I had hoped to use 5801 on the Cynwyd B Set. Although a better runner than 1407 she still proved unreliable and had been relegated to "pottering"……on the layout but no schedules…..one step away from the display case
The set up was identical….decoder in smokebox and redundant speaker wires used to connect to lifelink and tantalum assembly……all stored in bunker

And here in a 45 second video is the result…….
[yt]y-czqx29Szo[/yt]
Believe me quite the transformation!
I havent done a price comparison with other stay alives but 20GBP for 3 tantalums and a lifelink board doesnt seem unreasonable to convert a "potterer" back to a scheduled loco.
I dont think its solely the stay alive element…..I am very impressed with the Zimo decoders. Same price as the Lenz Standard (my default decoder) and about a third of the size. I have always found that Lenz decoders provide very smooth transitions between the speed steps but the Zimo is ultra ultra smooth.In the years before I retired I generally drove a Volvo…..for a brief period I had a Lexus…..same difference!
Despite a zillion Zimo CVs and a manual longer than a Trollope novel, I stuck to my normal practice…..I dont adjust CVs very much….. set the max speed between 30 and 40 mph (anything more looks daft on Granby) and the mid speed value to give a slightly concave slope. However on the advice of the ever helpful John Gwymer of Youchoos I set CV 56 to 22 (Back EMF) and CV 57 to 125. (14xx has a coreless motor) this eliminated the juddering that used to frequently occur with this model.
A happy camper in Vancouver (not literally ….it is sunny but quite cold)
John
Posted
Full Member
I'm rather interested in the new DCC Concepts Black decoders, which they claim will not require a stay alive, while also giving shuttle operation (not relevant to you, I know) with additional purchases. I've pretty much found that their products do exactly what they say they will do, but it can come at a premium price.
Helpful comments about the Zimo decoder though, I will have a look at those too.
Regards
Michael
Posted
Full Member
You can adjust CV153 to give a shorter run time from the Kat2 if you want to. It could save a collision. I think I put on here recently that you count the time in tenths of a second for this CV.
Anyway, whatever you do, the layout and stock look great.
Cheers Pete.
Posted
Full Member
Very nice John, and great to have another working loco for a very reasonable outlay.
I'm rather interested in the new DCC Concepts Black decoders, which they claim will not require a stay alive, while also giving shuttle operation (not relevant to you, I know) with additional purchases. I've pretty much found that their products do exactly what they say they will do, but it can come at a premium price.
Helpful comments about the Zimo decoder though, I will have a look at those too.
Regards
Michael
Thanks Michael….glad you found it helpful…..I have sent you a PM
I know Lenz decoders have a shuttle facilty and a load of other options like the kadee shuffle. I am sure Zimo have the same…….I suspect that lurking in the manual is an option to top up my wine glass…hoping/joking:lol:
Best wishes
John
Posted
Full Member
Thanks PeteGood to see such good running John. I've sworn by Zimo decoders for years now. I used to use Lenz but couldn't get such smooth starts and stops.
You can adjust CV153 to give a shorter run time from the Kat2 if you want to. It could save a collision. I think I put on here recently that you count the time in tenths of a second for this CV.
Anyway, whatever you do, the layout and stock look great.
I hadnt heard about Zimo until about a year ago now I am totally committed. I am not going to replace all my Lenz decoders…….and hopefully I can reuse the ones I have taken out…..but I am tempted to progressively change them to a Zimo/tantalum combination in my 0-6-0 tank engines
Best wishes
John
Posted
Legacy Member
This is something that i intend to pursue myself as i have a number of smaller locos which could greatly benefit from this.
Historically i have insulfrog points as when i bought masses of them insulfrog were considered the DCC friendly point.
of course i know if i were buying afresh electrofrog would be the way to go.
Brian
OO gauge DCC ECOS Itrain 4 computer control system
Posted

Full Member
 Last edit: by Phil.c
Phil
Posted
Full Member
The thing that has really impressed me is not only do I have total reliability but the actual performance is so much smoother…..no jerks or juddering. I can see myself building up a surplus stock of Lenz decoders now:roll:A good result John especially as you are noticing a great difference in performance.
This is something that i intend to pursue myself as i have a number of smaller locos which could greatly benefit from this.
Historically i have insulfrog points as when i bought masses of them insulfrog were considered the DCC friendly point.
of course i know if i were buying afresh electrofrog would be the way to go.
Brian
Cheers
John
Posted

Full Member
A few weeks ago I posted about some experiments with stay alives
Now there's a fine idea, another very good reason to have my therapeutic glass of an evening! :hmmon most evenings I run both autocoach schedules…….with a glass of wine….quite therapeutic…
Posted
Full Member
At the time I bought one, the 6 pin Bachmann DCC Chip was a rebadged ZIMO, in case that's of help. I put it in my 64xx and found it ran like a charm.
Posted
Full Member
Bob
Posted
Full Member
Good to hear from you. Hope you are keeping well and the house move went ok.
Best wishes
John
Posted
Full Member
During the last two weeks I have had to draw on all my reserves of perseverance and patience, not very high at the best of times.
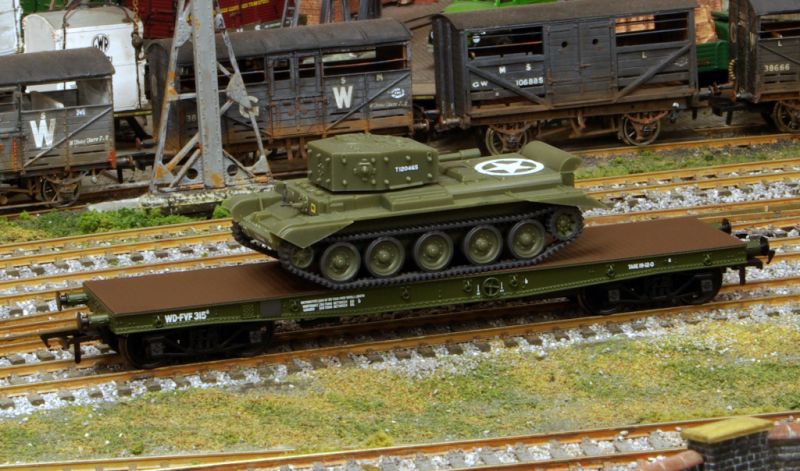
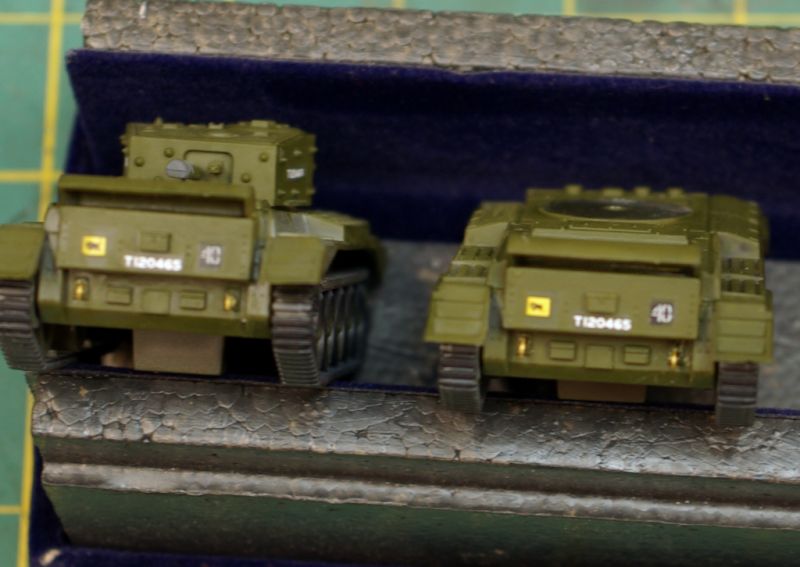
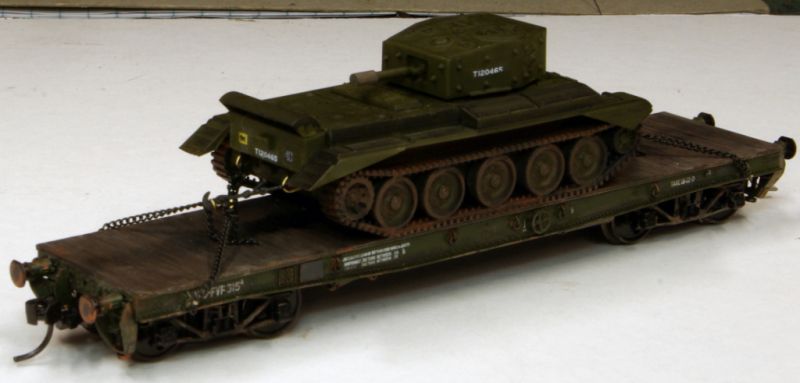
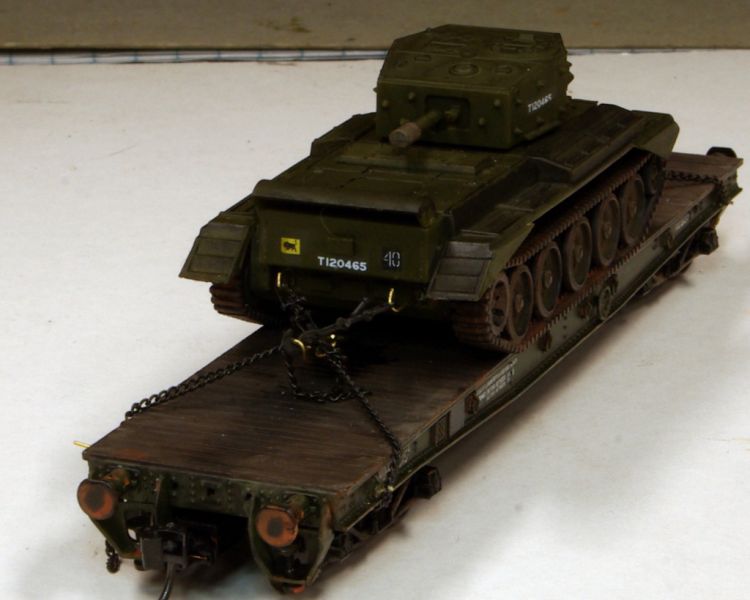
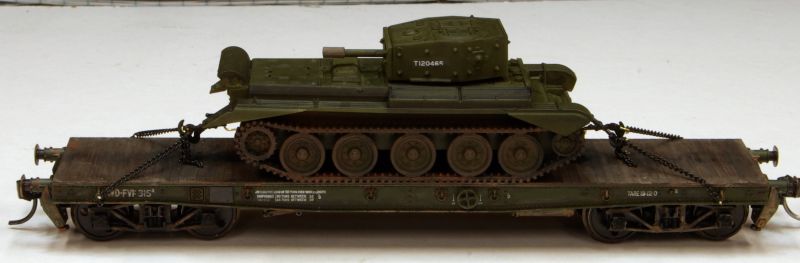
I started working on the Bachmann Warflat wagon with its rather toy like Cromwell tank…….here it is straight out of the box
Task list
[1] The Warflat is unrealistically pristine……lots of weathering
[2] The Cromwell needs to be set up for transport and painted. (the air recognition star has to go)
[3] Secure the Cromwell to the Warflat.
This post describes the challenges of completing item [3]
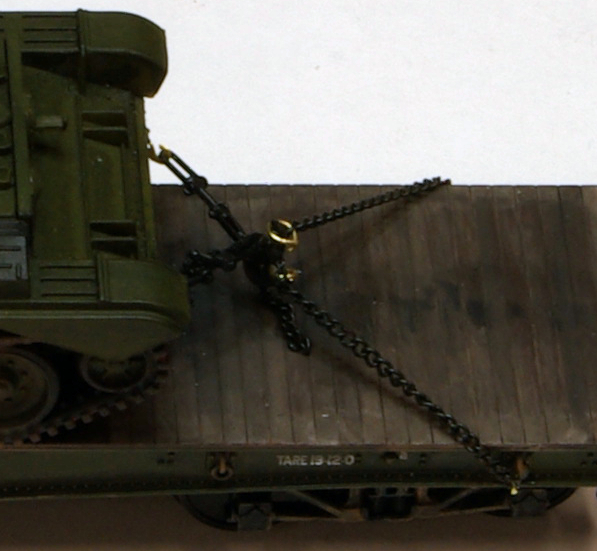
There are nicely molded securing rings on both the Warflat and Cromwell but they are purely cosmetic. Working securing points had to be added
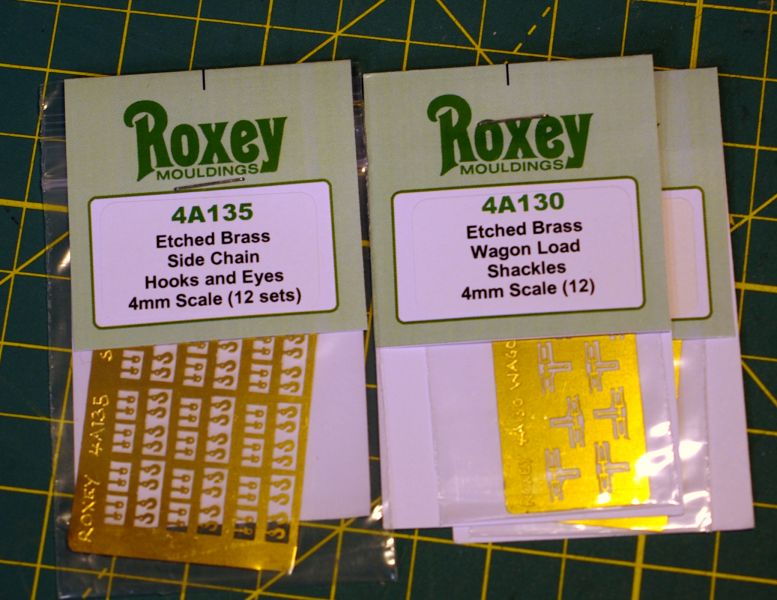
I drilled into the cosmetic rings on the tanks and inserted hooks with a dab of super glue
Using the same technique, Roxey eyes were inserted into the Warflat

On the prototype, chains were permanently secured to the Warflat, attached to a turnbuckle which was shackled to the tank and then tightened.
The tank was secured to the Warwell by cross braced chains…fore and aft (not sure if they used nautical terms but old habits die hard)
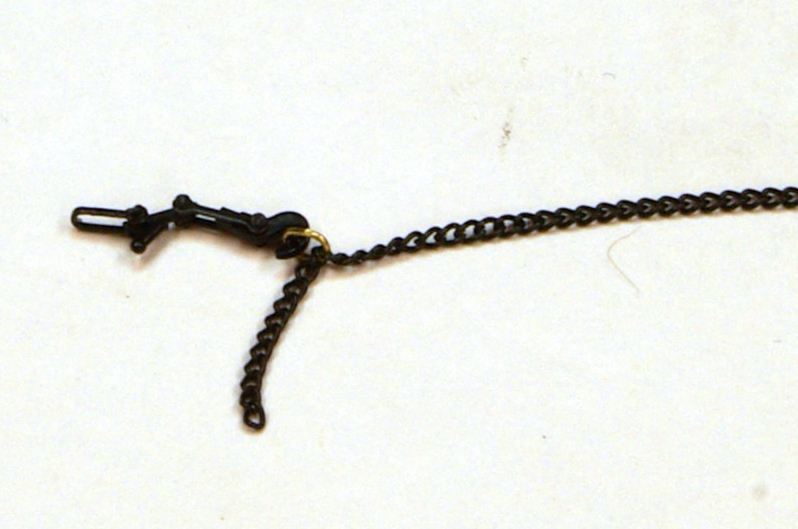
From the outset I discarded the Roxey turnbuckles and opted to use the screw link couplings that are supplied with locos……I never use them if I have Kadees at the front, so I have built up quite a stock. The hook is a bit overscale but it helps with fat fingers attaching the chain to it.
4 chains per tank…..3 tanks……so I needed to make 12 of them
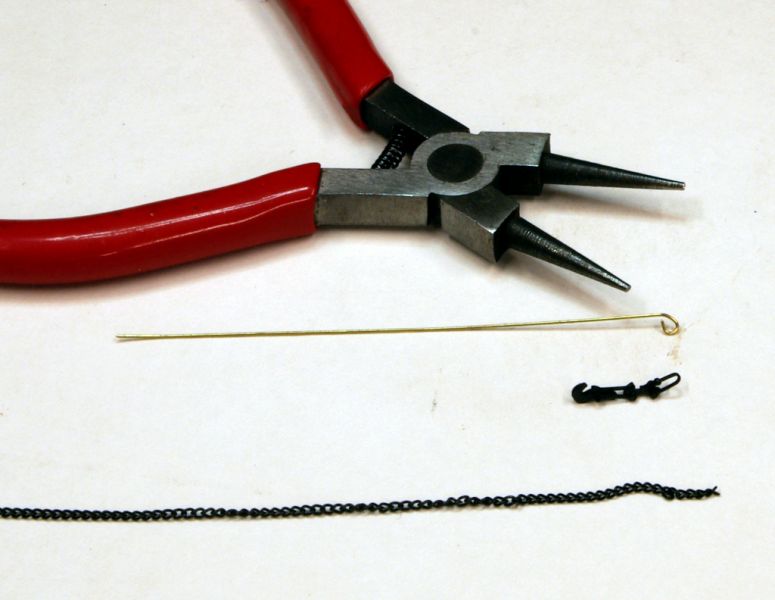
1 (?) mm brass rod curved to shape (sort of) using Mrs D's jewelry pliers. The chain is slipped on the long end of the rod leaving 3/4" from the end to represent the tensioned tail. The surplus rod is then snipped off………guess how long it took for me to work that out as opposed to making the rings then trying to attach the chain!
The shackle is slipped over the tank hook and the chain tensioned and secured to the wagon eye with a piece of 1 mm brass rod
Sounds great in theory…..reality was somewhat different. Applying equal tension to four separate chains so the tank stays central and square was very challenging. The shackle would slip off the tank hook or the ring would lip off the screw link hook. The most frustrating thing was the wagon eyes……it took forever to thread and glue a piece of rod through the chain and then through the eye. I used to do one chain per tank and let the superglue dry overnight. The next day I would try and fit the opposing chain on the other end……the tension applied to the new chain would then rip out the eye on the opposing chain……..grrr
After a few days of frustration it was clear the shank on the eye was too short…..out they all came. I drilled the existing hole deeper …about 1/4" . Inserted a piece of rod, tip dipped in super glue. When dry I cut the rod leaving about 3/8" exposed. This left a fixing point that was accessible and rigid.
It was then relatively easy to pull the chain taut and slip the appropriate link over the rod…..dab of glue…….and next day snip the rod almost flush cut any surplus chain (Intially the chain must be over length. You need the leverage and its impossible to predict the exact position
These photos should give a better indication of the process……..
The Roxey hooks had a deeper shank and withstood the tensioning pressure……with one exception. With the tank already secured on three points (naturally it was the last one to come out) I found it impossible to re insert the hook so I bent one up from rod……its bigger and you can see it now but I doubt if it will be visible when its painted and weathered.
A couple of close ups

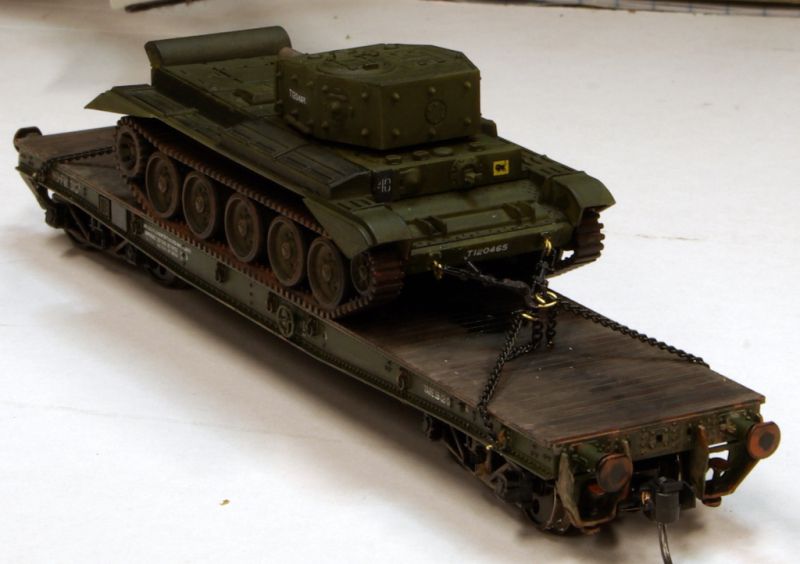
Chains have to be painted and weathered and I have to do a similar job on the Warwell and then the train is ready to go on the circuit.
A tiresome and frustrating job but ultimately worth the effort. These are the most expensive good wagons I have ever bought and I did want them to look the part
Regards from Vancouver
John
1 guest and 0 members have just viewed this.