Granby Junction 1948 N. Wales
Posted

Full Member
GWR/LMS OO Gauge DCC RR&Co
[user=269]MaxSouthOz[/user] wrote:Looking good, John. :thumbs Two bits of advice from one who has used Magic Water. 1 Make sure there are no holes in the baseboard, and 2 Make sure the layout is level. It's the very devil to get out of the carpet.
Thanks Max. I have tried to seal everything and the brochure suggests painting a thin coat of diluted Magic Water as a final seal (I guess like the the first coat of varnish)
The carpet is pretty bad what with an accident with a soldering iron and a pot of black paint…..regardless in an abundance of caution there will be newspapers down AND SWMBO is actually going to do the pouring…..so I may emerge squeaky clean…..fingers crossed

Posted
Full Member
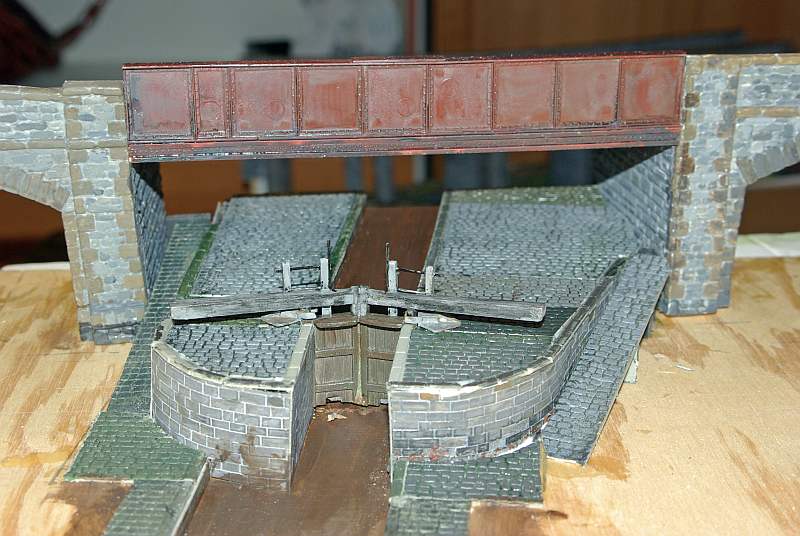
As you gathered after looking at the photos I was getting a bit down……now its all onward and upward.
Thanks for the input Richard……weathered white beams it is.
Posted

Full Member
Bob(K)
Posted
Full Member
Good to hear from you. I have always admired your layout and I am flattered that my canal may inspire you:thumbs:thumbs
Posted

Full Member
Those lock gates look good to me. Not sure if the ends would have been white back then, but I presume that the canal is supposed to be run down / derelict so maybe just a little white dry brushed would do the trick.
Looking good John.:cheers
Posted

Full Member
I have to say that, from where I'm sitting, this is definitely up there with the very best of them. :thumbs
The paint job and weathering is absolutely first class - not over done and conveying just the right amount of wear and tear in the right places. The lock looks wonderful - and the gates are incredibly detailed. Some of that is down to Langley but, as anyone will confirm, it's the painting that makes or breaks a model. It's certainly made yours.
Really looking forward to seeing how it progresses but in the meantime, I'm going back for another session of inspiration. :cheers
'Petermac
Posted
Full Member
Those lock gates look good to me. Not sure if the ends would have been white back then, but I presume that the canal is supposed to be run down / derelict so maybe just a little white dry brushed would do the trick.
[user=6]Petermac[/user] wrote:
Thanks Guys as I wrote earlier it is very good of you to make such nice comments…..particularly when I was getting a bit depressed about my progressI haven't commented on this latest batch of photos John - I've been far too busy studying them !!
I have to say that, from where I'm sitting, this is definitely up there with the very best of them. :thumbs
The paint job and weathering is absolutely first class - not over done and conveying just the right amount of wear and tear in the right places. The lock looks wonderful - and the gates are incredibly detailed. Some of that is down to Langley but, as anyone will confirm, it's the painting that makes or breaks a model. It's certainly made yours.
Its 1947 Nick so the canal is sort of running down rather than run down……there will be some warehouse activity on the wharf between the girder bridge and the foreground bridge……I am contemplating a canal exchange siding leading into the warehouse at the upper level…………my canal guru Richard says white was right for the period but it will be weathered
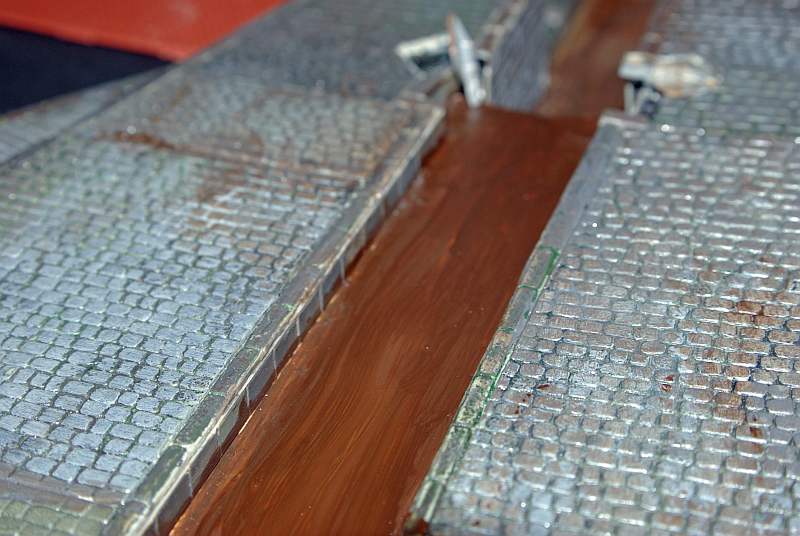
A couple of setbacks…..Richard wrote me a charming complimentary PM but pointed out the hinges for the gates should be set into the sets…………….ugh ugh and ugh again………this makes perfect sense…….why didnt I think of it??? but it will take forever to make a half decent job of cutting them in and worse still it will upset the way the gates are set into the canal……..hopefully he will come up with some sort of precedent/work around
The hinges arnet glued down in this shot but you can see the problem
Secondly SWMBO the resident colour guru has determined that the base colour is too dark and not green enough……having seen a canal in Inspector Lewis last night she may well be right (she usually is)
This is one of those things I have to get absolutely right……once I start pouring the Magic Water there is no going back so I need to do some more work on the test bed and do a trial pour and then repaint the actual canal bed
I will let you know how I get on
Posted
Legacy Member
Have PM 'd a couple of possible solutions to the hinge problem .As regards water colour dont compare the canal you saw on Lewis or the same one in episodes of Morse as it is usually the Oxford canal which in modern times is completely different from a canal ( and especially the Shroppie) in working days when the colour was far more influenced by industrial polution and the deep drafted loaded working boats dragging the bottom and releasing the silt into suspension. A deep muddy brown or even brackish black in towns would be more to the time period.
Richard. A sorely missed member who lost a brave battle in 2012.
Posted
Guest user
Real Life & TV do not always agree.
Posted
Legacy Member
Compared to a few years ago todays canals are very clean and hold hugh stocks of fish and other forms of plant life and wildlife thrive with many forms of rare UK species making their homes on canal banks.
It wasnt like that not many years ago when I was stood on the bank of a canal in the Midlands watching a boat which seemed to be emitting a large amount of smoke and steam from the area around its propellor that it was pointed out to me that it wasnt steam but phosphorous residue that had been dumped into the canal by a chemical works being disturbed by the prop and absolutely nothing could live in that water. Things have come a long way and if you fall in there today not only would you survive you might , just might get away without being hospitalised and having to have your stomach pumped.:lol:
 Last edit: by Wheeltapper
Richard. A sorely missed member who lost a brave battle in 2012.
Posted

Full Member
Very difficult to model.
I went on the horse drawn tourist canal boat at Llangollen recently (don't ask) and that water was very clear when in shadow.
(Some may remember that, at the end of the outward trip, the horse is attached to the opposite end of the boat and towed back.
On this occasion, the attendant forgot to re-attach the horse and wandered about 300metres back up the towpath without the boat).
Posted
Full Member
John
Have PM 'd a couple of possible solutions to the hinge problem .As regards water colour dont compare the canal you saw on Lewis or the same one in episodes of Morse as it is usually the Oxford canal which in modern times is completely different from a canal ( and especially the Shroppie) in working days when the colour was far more influenced by industrial polution and the deep drafted loaded working boats dragging the bottom and releasing the silt into suspension. A deep muddy brown or even brackish black in towns would be more to the time period.
Thanks for the workarounds Richard but in the end I decided I shouldnt compromise…….grabbed a new exacto blade took a deep breath and started carving
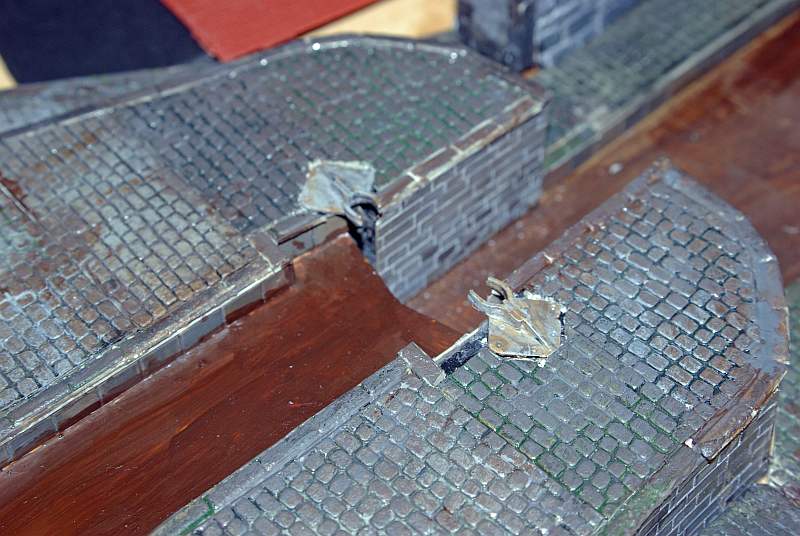
I am delaying inserting the last bit of coping stone until the gates go back

Its fortunate I never aspired to be a brain surgeon:lol::lol: But white glue, paint and a bit of moss and grease(?) will hide a multitude of sins…………I had to file a bit off the bottom of the gates and a bit off the bottom gate hinge but they fit fine now……just waiting for the white paint to dry
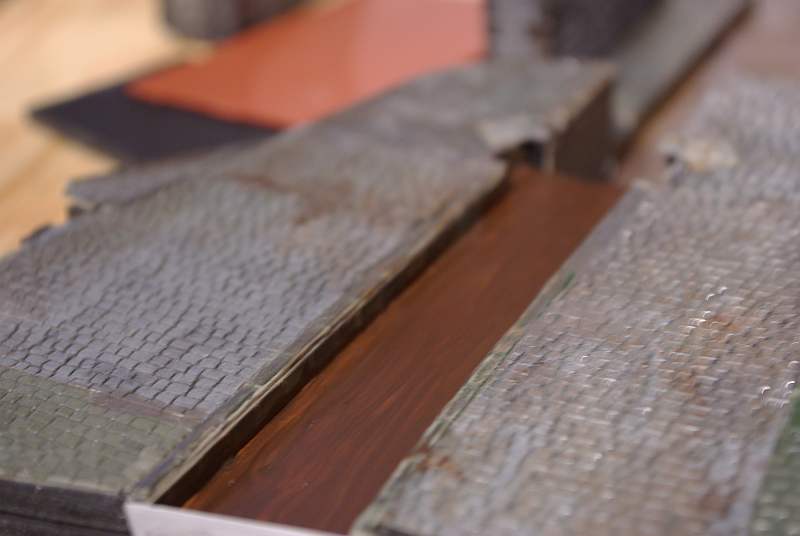
This shot shows I have started to dry brush the setts to get them a little more uniform…..as I said the whole area is made up from off cuts from goods yards and shed areas from two previous layouts and it was a real patchwork quilt
I appreciate the warning about canal water in North Wales 1947 as opposed to Oxford 2008!
This is the base colour I am thinking of going with…………………..comments would be welcome
The brush marks arent as obvious in real life……….and the coping stones need some touch up
Posted
Full Member
Bob(K)
Posted
Full Member
I use Photoshop Elements and usually do an Autosmartfix and that makes the shots more presentable but perhaps less close to actuality
This one is straight from the camera untouched using standard electric light with the Tungsten Light White balance setting
The brush strokes are there but less obvious and the colour is a closer match
Posted

Full Member
By trial and error, [certainly not 'coz I'm a photographer of any ability] I found that by backing off, to the point where an ordinary shot 'focuses', taking the picture and then cropping the result to get a close up give me much better results than using the macro setting which only seems to be good for very small things like moffs….
Doug
'You may share the labours of the great, but you will not share the spoil…' Aesop's Fables
"Beer is proof that God loves us and wants us to be happy" - Benjamin Franklin
In the land of the slap-dash and implausible, mediocrity is king
"Beer is proof that God loves us and wants us to be happy" - Benjamin Franklin
In the land of the slap-dash and implausible, mediocrity is king
Posted
Legacy Member
The mix and match on the sets is very prototypical as all lock surfaces have had many repairs needed through wear and use , subsidence or damage over the years and wouldnt look right if perfect.
The hinges look much better now they are set into the surface and I dont think you are far out with the base water colour but until you actually get the magic water in place it is difficult to tell . Its a product I have never used so am looking forward to seeing the results.
Richard. A sorely missed member who lost a brave battle in 2012.
Posted
Full Member
John, may I ask a question, are you using the 'macro' function on your camera? I ask because your last picture above shows an area in focus, and very nearby an area out of focus….
By trial and error, [certainly not 'coz I'm a photographer of any ability] I found that by backing off, to the point where an ordinary shot 'focuses', taking the picture and then cropping the result to get a close up give me much better results than using the macro setting which only seems to be good for very small things like moffs….
Doug
The camera doesnt have a macro function…….it has a sort of multi focus gizmo and I am afraid I was in a rush to get the shot sent off so I was rather careless:oops::oops::oops: Thanks for the reminder about the cropping technique I use it occasionally but not nearly enough. Thank you so much for sharing the "moff" with me its an amazing shot
[user=373]Wheeltapper[/user] wrote:
I am relieved to hear that:lol:The mix and match on the sets is very prototypical as all lock surfaces have had many repairs needed through wear and use , subsidence or damage over the years and wouldnt look right if perfect.
The hinges look much better now they are set into the surface and I dont think you are far out with the base water colour but until you actually get the magic water in place it is difficult to tell . Its a product I have never used so am looking forward to seeing the results.
The moment of truth is very near……warch this space!!!
Posted
Full Member
Langley include a couple of accessories with the lock gates
Sluice Gates

I was thinking of putting this on the downstream lock. From a practical point of view it makes sense in that it would provide additional supply when filling the lock……..Richard raised this way back.
I assume I would set it in to the setts (I now realise it is facing the wrong way :oops::oops:) and I have a spare paddle set so I could attach this to the lock wall which would add some interest as well…….I am not certain whether this would be correct or whether it would have been recessed into the wall
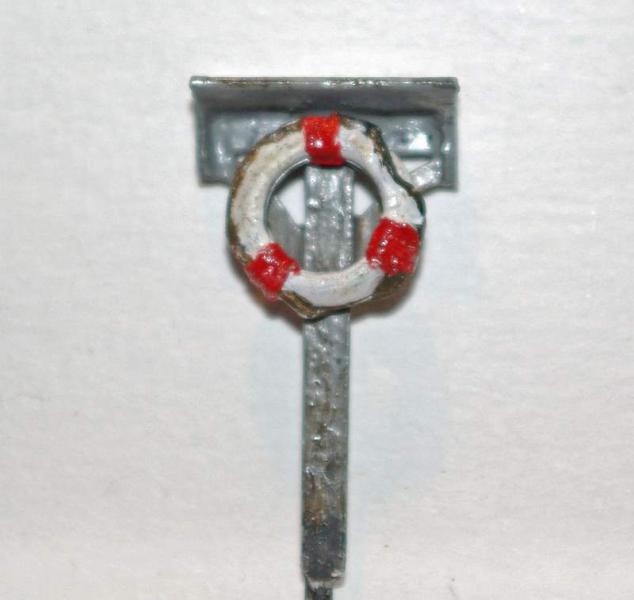
Life Belts
I cant recall seeing Life Belts on any of the Photos Richard sent me……I am sure they will be in place now but I am less certain about 1947
I am assuming they would be in the lock areas where the depths will be up to 14' as opposed to the canal depth of 4'. Anyway unless it is absolutely wrong I propose putting them on the lock area…..it will give that splash of light DD was suggesting
Langley supply three different types…..a loose one and two on different types of stand. This one is straight forward (sorry about the photo quality)
 .
.But this one intrigues me
,

The life belt is attached to a wooden board about a scale 3' x 3' with a lip at the top and a metal hinge at the bottom. I am confident it is the right way up…..Langley photo it this way.
I am deducing that it is mounted at the waters edge with the life belt side away from the water…..if someone falls, in the lifebelt is thrown to them and the board kicked over (through 180o) into the water where the lip now forms a step.
I would appreciate either confirmation or an alternative set up.
Bollards and Mooring Rings
Langley provide 4 of each…..I ve painted and weathered them and the plan is to use the bollards on the locks and "Richards Wharf" and the rings suitably rusted on the tow path before the upstream lock
Now for some other questions
Lighting
The towpath runs alongside a road so I will have municipal street lighting but I am not sure whether the locks and wharf would be lit…….if they were….. I have some Mikes Models Lamp Standards that I could paint Battleship Grey……would that be appropriate?
Clutter and other detail
Any ideas on the sort of stuff I should put in the lock areas……fire buckets for example?
Fire away guys…..I need your help
Posted
Full Member
I like the detail on that sluice gate ratchet.
Any space for a lock-keepers cottage (or hut)?
Posted

Full Member
Unfortunately I can't give you any pointers as to detailing, locks, let alone canals, do not exist here in Western Australia.
1 guest and 0 members have just viewed this.