Granby Junction 1948 N. Wales
Posted

Full Member
GWR/LMS OO Gauge DCC RR&Co
Superb! :)
Mike
Pig Hill Yard - a small Inglenook shunting layout for my boys, in 00.
Pig Hill Yard - a small Inglenook shunting layout for my boys, in 00.

Posted

Full Member
Phil
Posted

Full Member
Thanks Mike thats very kind of you……..sorry I am so late acknowledgingSuperb! :)
Best wishes
John
Posted
Full Member
I'm sure John that anyone visiting your layout would need to book a two day stay to take it all in ;-)
 Problem is the Train Room occupies the best potential guest room!
Cheers
John
Posted
Full Member
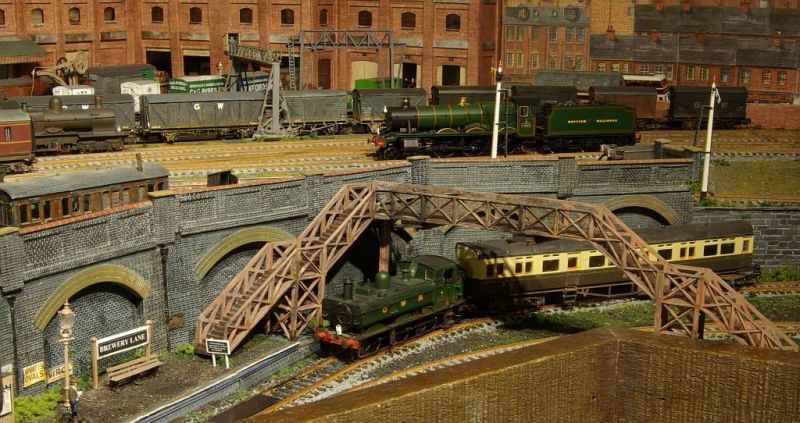
The halt outside the brewery for the Brymbo-Mold Autotrain which leads to the lower level storage sidings
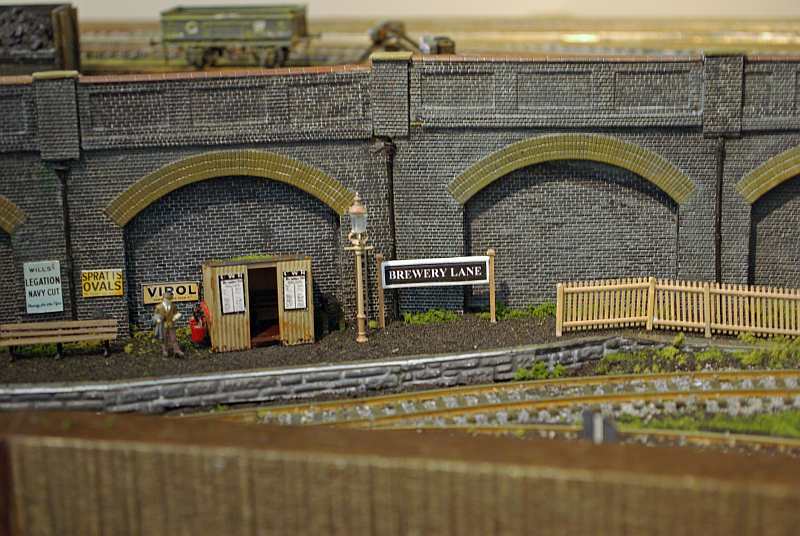
The picket fence lead down to the level crossing which gave road access to the brewery
The halt suffered some collateral damage when the storage sidings were relaid a couple of months back

With the storage sidings completed and the covers back on it was time to rebuild the halt and realign the entrance to the brewery.
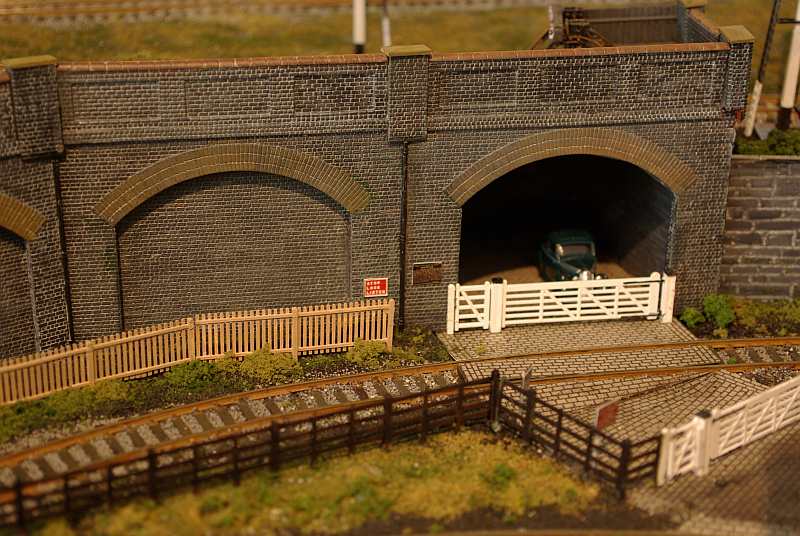
The tunnel and level crossing made quite a nice cameo but the crossing had to include the brewery siding and in consequence was never entirely convincing.
The halt was obviously in place to serve the brewery so there had to be some way for passengers to cross the line safely. The halt is very much in the wings in relation to the brewery so I didnt want to invest a lot of money in a footbridge…..always assuming it could be adapted to suit the geometry of both track and siding. I decided to attempt to kit bash an inexpensive Dapol (ex Airfix) bridge
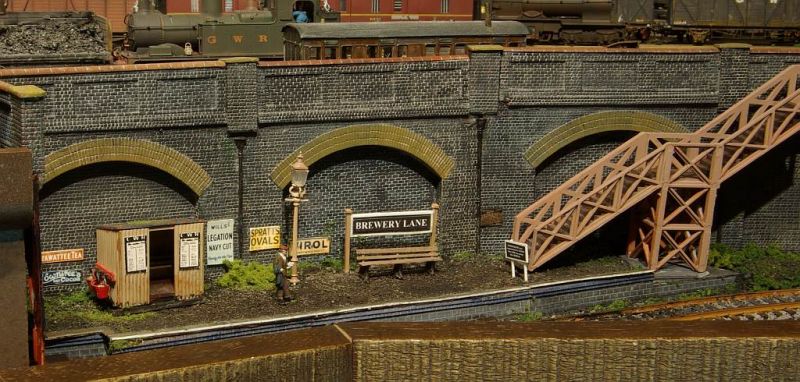
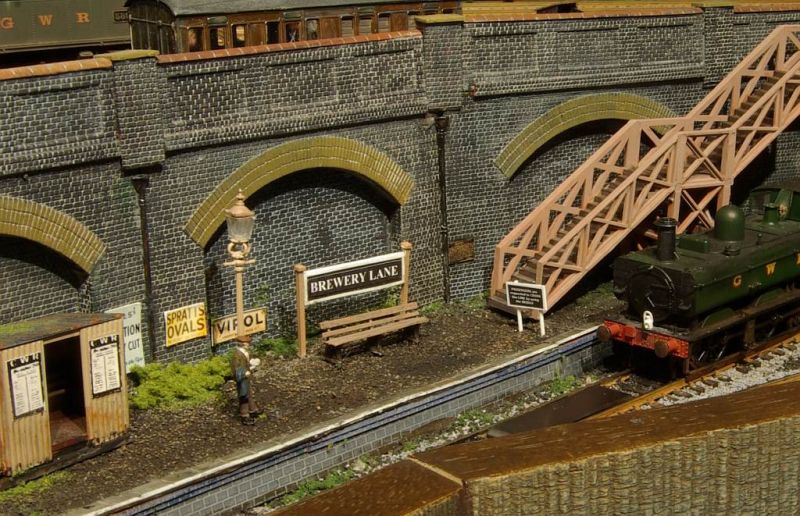
The bridge looks a bit clunky right now……..but , as the next shot shows, its still very much a work in progress.
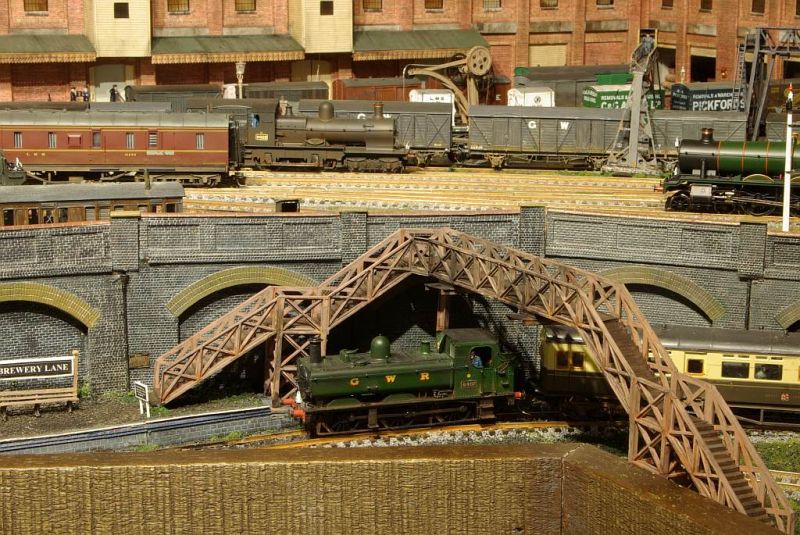
Panning back a little to reveal more of the corner:
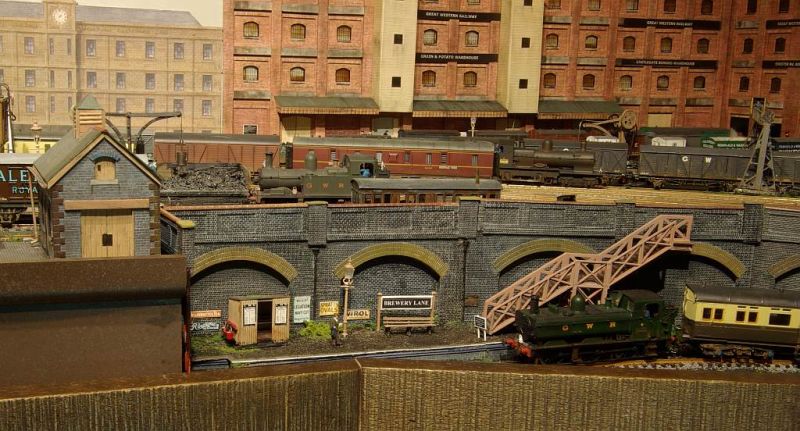
Not so much a bridge too far……more a bridge too short.
The other half (well three quarters actually…..I had to buy a second kit) is resting on its back on the brewery site while the glue dries

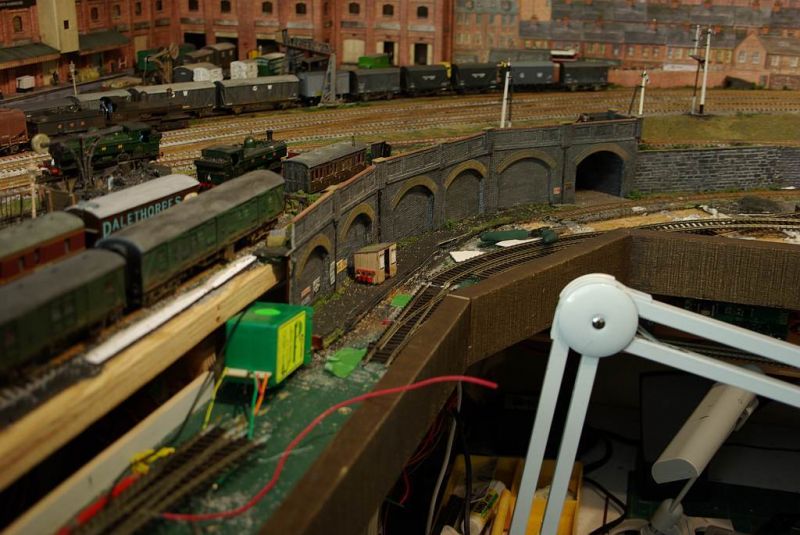
Which is a convenient segue to show the completed trackwork for the new brewery

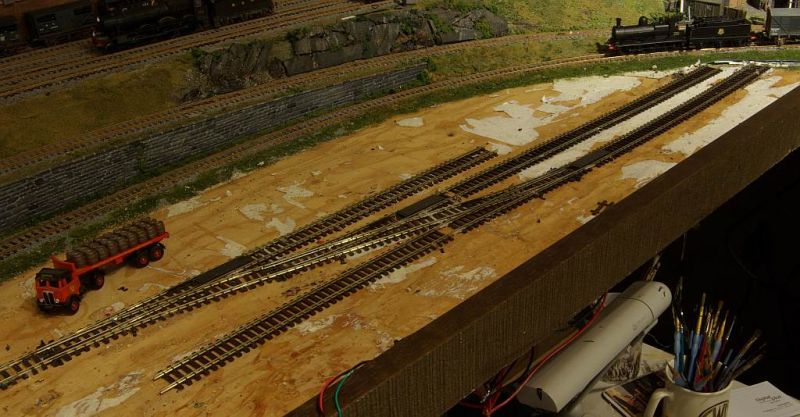
The brewery entrance siding (which will also serve as a headshunt) curves round from the halt and splits into three sidings. There is a fourth kick back siding into which I can just squeeze an Engine Shed for the Hattons Barclay Shunter
To end here is something quite different……..check the top right of the shot above……….a new loco with a very unusual insignia for Granby
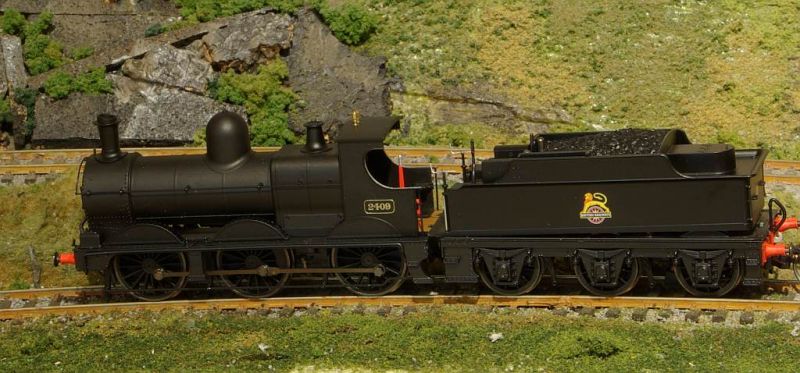
Oxford Dean Goods…….decided I couldnt wait for the Green GWR version to arrive so I ordered one of these guys. ……..I have just put a decoder in hence the loose tender body…..I have to get busy with the Canadian equivalent of T cut.
First impressions are excellent. It is probably one of the smoothest runners I have experienced. Both its appearance and performance sure put the pre release pages and pages of froth into perspective. More pictures when she is reliveried, weathered, coaled and crewed
Posted
Legacy Member
reg
Posted

Full Member
First impressions are excellent. It is probably one of the smoothest runners I have experienced . . .
Congratulations on Granby's latest loco John. She does look a fine piece of machinery and so good to hear your first impressions. The war time livery should be a doddle!
I'm very much looking forward to the unlined green livery in time for Christmas.
Oh, I really liked the dairy, but a brewery, now you're talking! I hope you'll have some heavy horses.
Best,
Bill
At 6'4'', Bill is a tall chap, then again, when horizontal he is rather long and people often used to trip over him! . . . and so a nickname was born :)
Posted
Full Member
Thanks Reg I am glad that you got that impression.The footbridge may look clunky up close ,but it looks ok from the shot taken further out. Nice work John.
Being ex Airfix it is a very old kit……and close up it shows. I am hoping weathering will tone it down and it will be overshadowed, in every sense, by the mass of the adjacent Brewery buildings
Cheers
John
Posted
Full Member
Thanks Bill
Oh, I really liked the dairy, but a brewery, now you're talking! I hope you'll have some heavy horses.
Best,
Bill
I hadn't thought of that but now you mention it I think either Langley or Dart have a rather nice Brewers dray:hmm
Cheers
John
Posted
Full Member
Two smoke deflectors/baffles cobbled together from bits of plasticard were added, along with mutiple dirty washes and some weathering powder
The auto coach enters the halt on a 24" radius. Accommodating the difference in platform height, the complex angles and ensuring the autocoach had adequate clearance was "interesting". Note the chamfered edge of the LH support foundation in the next shot!
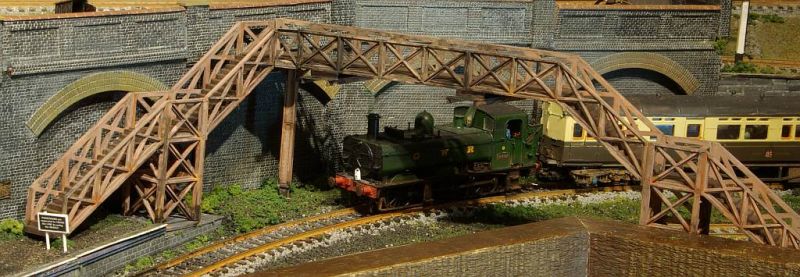
The slightly askew support pillar is not part of the Dapol kit. It is made up of two pillars butted together from the Ratio Canopy kit……..last used in Granby I circa 1998………waste not want not.
Talking of which the equally askew keystone girder immediately above the pillar came from the Peko bridge that I butchered a few months ago
Here is an overall shot that, hopefully, puts the footbridge into the context of the overall brewery project
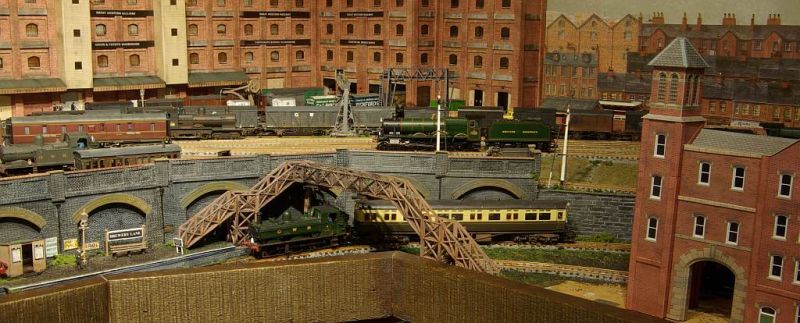
The first and, at present, only building of the new Brewery……. a Metcalfe unit with an additional storey added many years ago for a long abandoned project.
Some may query the presence of such an imposing footbridge on a minor branch line. The more informed will recall that the branch line had to pass through land owned by Danby Breweries. Colonel Sir Morgan Danby Bt MP DSO, great grandfather of the present chairman, was a formidable negotiator.
Posted

Site staff
Now that sounds about right for the area surrounding Granby Junction….
Nicely done there John. :thumbs
Ron
NCE DCC ; 00 scale UK outline.
NCE DCC ; 00 scale UK outline.
Posted

Inactive Member

Max
Port Elderley
Port Elderley
Posted

Full Member
Re the 72xx. That 8-coupled motion was curve-shy, even with the side-play on the trailing driven wheels, and they suffered chronically from derailments. That, along with the almost continuous rail squeal and complaints from local residents for several miles around, meant they were banned from many sidings with tight curves in the yards.
Standard parts from a 28xx cobbled together by Churchward as a 42xx/52xx to address motive power shortages in South Wales, and subsequently enlarged by Collett. Most seem to have kept the bunker cast iron number plate in BR days in the 1950's. And were usually absolutely filthy.
Probably best to set "rail squeal" to continuous unless on the main line.
Nigel
©Nigel C. Phillips
Posted
Full Member
Some may query the presence of such an imposing footbridge on a minor branch line. The more informed will recall that the branch line had to pass through land owned by Danby Breweries. Colonel Sir Morgan Danby Bt MP DSO, great grandfather of the present chairman, was a formidable negotiator.
Now that sounds about right for the area surrounding Granby Junction….
Nicely done there John. :thumbs
Thanks Ron…..glad you like it…..I thought it was time I introduced a bit o legend! :lol:
Best wishes
John
Posted
Full Member
Thanks Max……its a while since I earned one of them :lol:That all looks excellent, John.
Best Wishes
John
 Last edit: by John Dew
Posted
Full Member
Fortunately, being quite deaf, I dont do sound. :lol: But I am practising my heavy weathering!Hi John,
Re the 72xx.
Probably best to set "rail squeal" to continuous unless on the main line.
Nigel
Regards
John
Posted
Full Member
So am I, which is why I usually have sound cranked up high.
You can at least keep the GWR plate. And keep the 72xx on the straight and narrow.
Nigel
©Nigel C. Phillips
Posted
Full Member
Hi John,I have been contemplating buying one of Hornby's big tanks for a while…….finally took the plunge….and guess what the Lenz decoder was also in the delayed package.
So at long last with the decoder fitted, tried and tested here is my new 72xx 2-8-2 Tank
The original release was part of the "Design Clever" series with a number of design defects …moulded smoke box darts and hand rails, no brass bearings etc……..most of these defects were corrected with later releases like this model………note to Ebay bargain hunters….check the Hornby model# before bidding.
One un-corrected defect was the cab back wall treatment. The window grilles look rather clumsy and the bunker door has gone AWOL

I do think the missing door is rather unfortunate and detracts from the model even applying the 3' rule.
It would be great if other 72xx owners could tell me how they have addressed the problem? I know Brassmasters provide a detailing kit (with door)…..is it worth it?
I was surprised how much I had to adjust my default CV settings for a Lenz Standard.
Above 10mph the loco is silky smooth….the motion is a joy to watch. Below 10 mph it was very erratic with frequent stops. I thought I had cleaned the wheels but when I re checked there were still traces of paint and grease…..performance improved but it was still unsatisfactory crawling (stumbling rather). The test track was the often photographed main line….clean, level and much used. I finally noticed it was stalling on track joins which I guess means a barely perceptible variation in level………so I eased the keeper plate retaining screws and now she strolls along at notch 2 (say 2mph) and I have reduced CV2 to 5
So whats the score………the only design defect for me is the bunker door……from a performance aspect its not unusual to have to tinker with pick ups etc,this was a bit more than normal, but it now looks promising……..like Len used to in Strictly…….I would give it a…….SEVEN (no dance off though)
Next post….Weathering and how big a load can she haul?
Regards from Vancouver
At long last, I've been running in some stock and today, it was the turn of the 42xx. Like your 72xx, mine is the later version, but still with the missing rear cab door, which I agree, definitely needs remedial action. However, I like the fact that it lets in more light to see the backhead detail and crew, so I'm thinking of two pieces of thin plasticard glued to the inside to represent the doors in the almost fully open position (assuming there were two sliding doors, but I will research this beforehand). I must take a look at the Brassmaster's detail kit though to see what else it offers.
I also think some darker coal dust weathering of the cab back will disguise the plastic feeling of the those window rails, as I reckon the windows would have been all but impossible to see out of in real life.
On my DC test circle, the loco performed very well from the beginning, with an impressive slow crawl showing off the rods most mesmerisingly and to my delight, full power was rewarded with something like prototypical scale speed, rather than rocket propulsion.
Thank you for the note on CV settings, which I will be tinkering with, but not sometime soon, as my layout needs to expand somewhat before I can reasonably justify running the big tank.
Continued good progress with your brewery project and may your in-depth research leave you with a clear head!
Best,
Bill
Last edit: by Longchap
At 6'4'', Bill is a tall chap, then again, when horizontal he is rather long and people often used to trip over him! . . . and so a nickname was born :)
Posted
Full Member
Bill
At 6'4'', Bill is a tall chap, then again, when horizontal he is rather long and people often used to trip over him! . . . and so a nickname was born :)
Posted
Full Member
Thanks for the good wishes about the brewery.
While that has been my main focus I have been progressing with the 72xx and the Brassmasters Kit. The back is now installed and awaiting a coat of paint……..The etch is very good and I must confess I am rather pleased with it. It covers a whole raft of improvements but I only bothered with the Back Wall and Bunker Fender. I am afraid though that it does tend to conceal the splendid back head detail. When finished I will post some more photos.
If you go to the Brassmasters site the instructions for the detailing kit will show you the full extent of the etch
Best wishes
John
1 guest and 0 members have just viewed this.