Granby Junction 1948 N. Wales
Posted

Site staff
GWR/LMS OO Gauge DCC RR&Co
[user=434]John Dew[/user] wrote:Hindsight really is a wonderful thing :lol:Big improvement all round. Totally reliable entry and exit to the TT. Two locos can stand in the entry and exit roads and the third siding ( carriage siding/headshunt ) can now accommodate six carriages so I can run trains to and from London.
Dont know why I didnt do this in the first place. It means I can now go ahead and confidently build the bridge to conceal the yard exit…….which was supposed to be the main winter project.
Merry Christmas John :thumbs
Ed

Posted

Full Member
I also have a couple of places that really need ripping up and re-laying with extra turnouts, I know it needs doing and progress has stopped in those two areas due to it.
You may have actually prodded me into doing something about it over Xmas by these posting this.
Cheers
Andy
Andy
Posted

Full Member
Just an observation, that point on the left, last picture, a bit of a kink in it or is that temporary.
Phil
Phil
Posted

Full Member
Thanks Ed………..my hindsight is far too good……..years of practice……if only my foresight was half as good! :lol:Hindsight really is a wonderful thing :lol:
Merry Christmas John :thumbs
Ed
Campaman wrote:
Thanks Andy. Glad to be a catalyst! :roll: It must have taken almost 12 months of prevarication and constantly glueing that dratted switch blade before I finally did something about itA good job done there.
I also have a couple of places that really need ripping up and re-laying with extra turnouts, I know it needs doing and progress has stopped in those two areas due to it.
You may have actually prodded me into doing something about it over Xmas by these posting this.
Phil.c wrote:
Looking good John, innit good ripping track up :)
Just an observation, that point on the left, last picture, a bit of a kink in it or is that temporary.
Phil
Thanks Phil
I guess you mean the point bottom left by the wall? :oops: :oops:……………..well spotted!

I am afraid thats not temporary………its been there for about 6 years :roll: The photograph somehow exaggerates the poor transition but it aint pretty. Its on the inside curve coming off the viaduct and I dont think I can rectify it without some wholesale track ripping. Fortunately the only siding affected is the one coming off the next turnout. My solution is to enter it (and very rarely) at a very very slow speed. Primarily I use it to exit in a trailing direction and that works ok.
Regards to all
Posted
Full Member
I covered the build details in a separate thread :
http://yourmodelrailway.net/view_topic.php?id=14799&forum_id=62

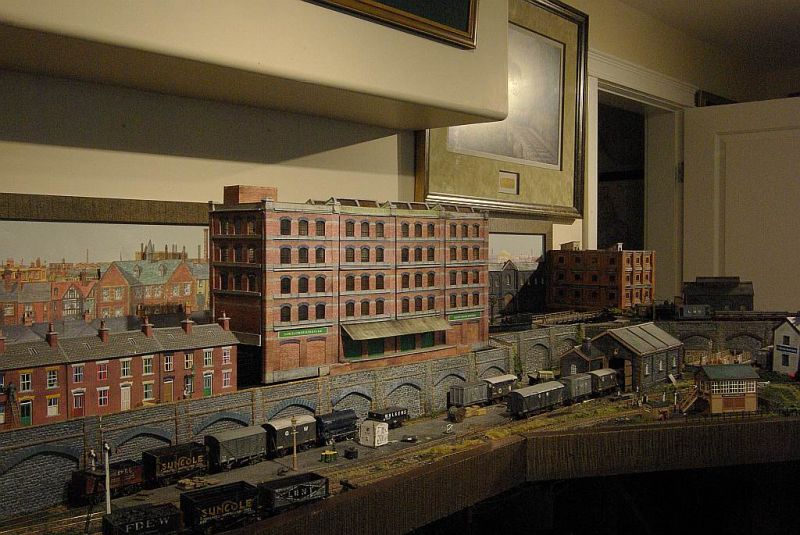
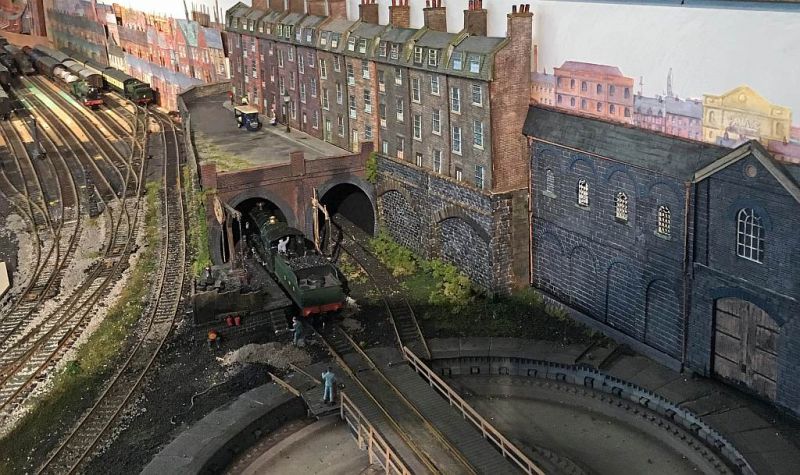
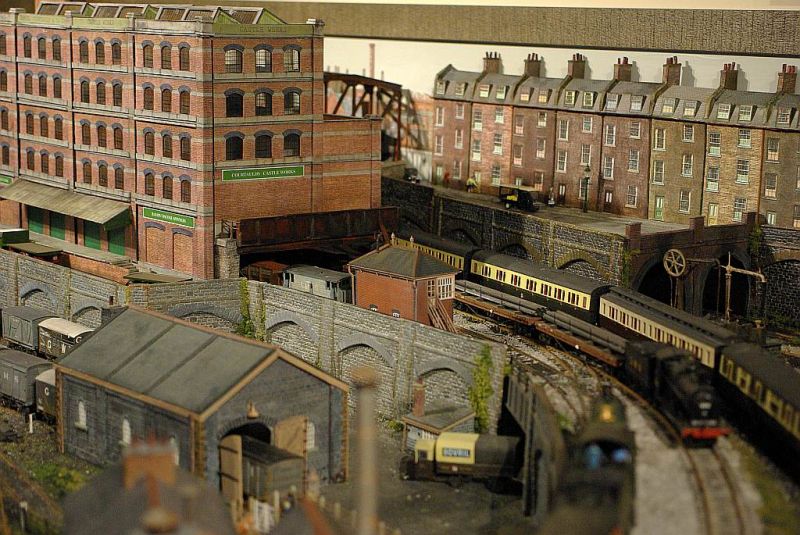
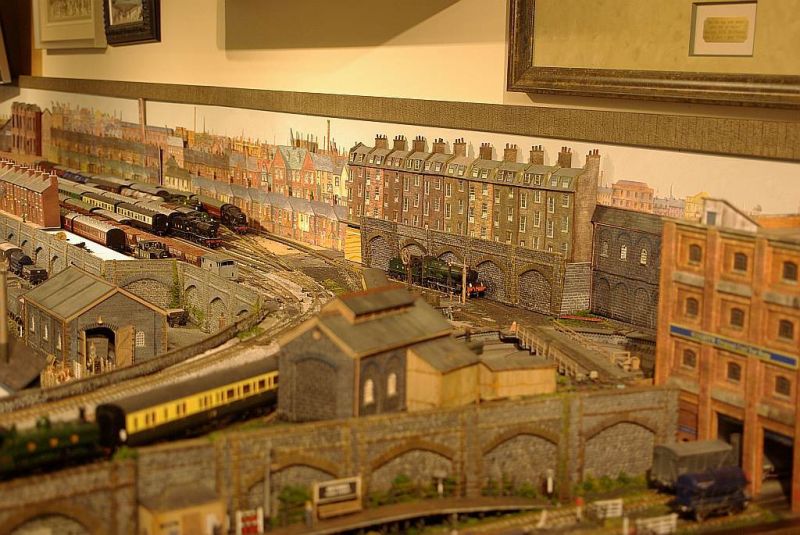
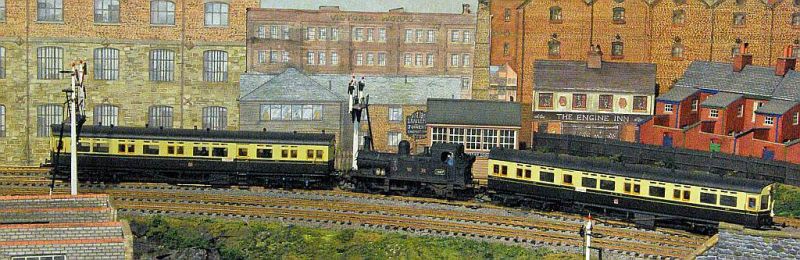
The building was designed to be part of a scenic block to screen the storage yard from within the room and from the entrance door which is at 90o to the axis of the layout
The second part of the project involved a new backscene.
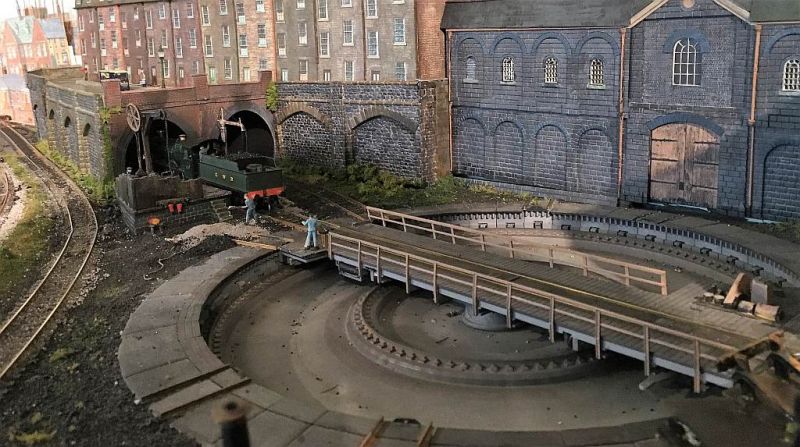
In December I removed the dreaded three way point and re alignmed the track leading to the storage yard turntable
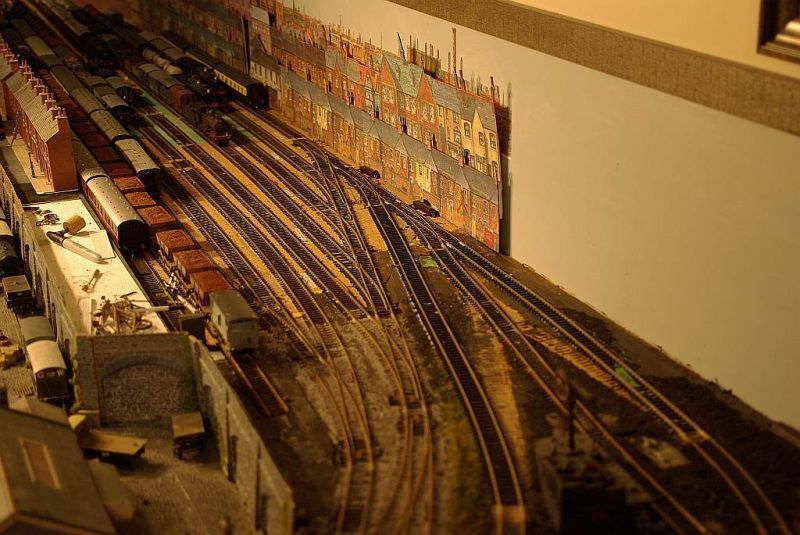
The exit track was moved closer to the wall and displaced the low relief back scene …..an elderly Bilteezi tenement block.
I did think about extending the Townscene card cutouts that constitute most of the backscene but I am very attached to the Bilteezi kit. I bought it on a UK holiday from Norman Wisenden's shop in Saddleworth nearly thirty years ago. Its featured (perhaps a rather flattering description) on Granby I, II and III .
To accommodate this piece of nostalgia I had to build a platform over both the the entry and exit turntable tracks
The track layout forces the wedge shape. The warehouse block means it can only be viewed from the entrance way…..about 4 feet away. Too much detail would be pointless but there is a risk of the structure looking contrived and unrealistic. Hopefully I will be able to avoid that.
Here are some work in progress shots
 ..
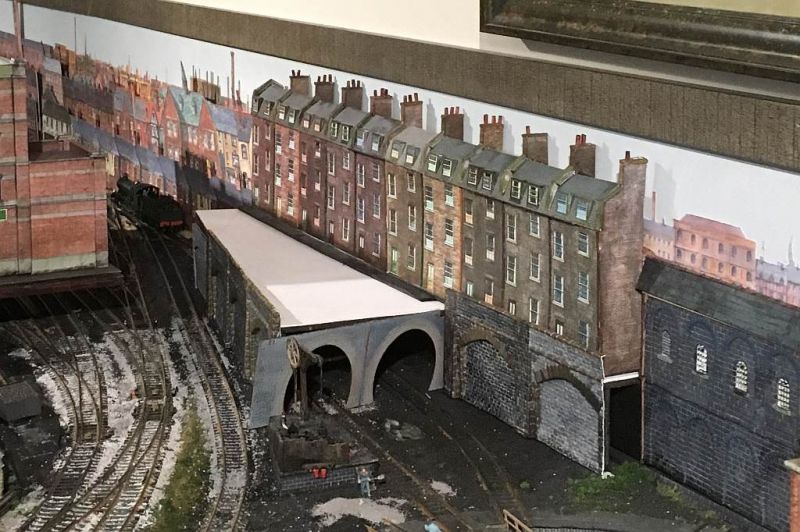
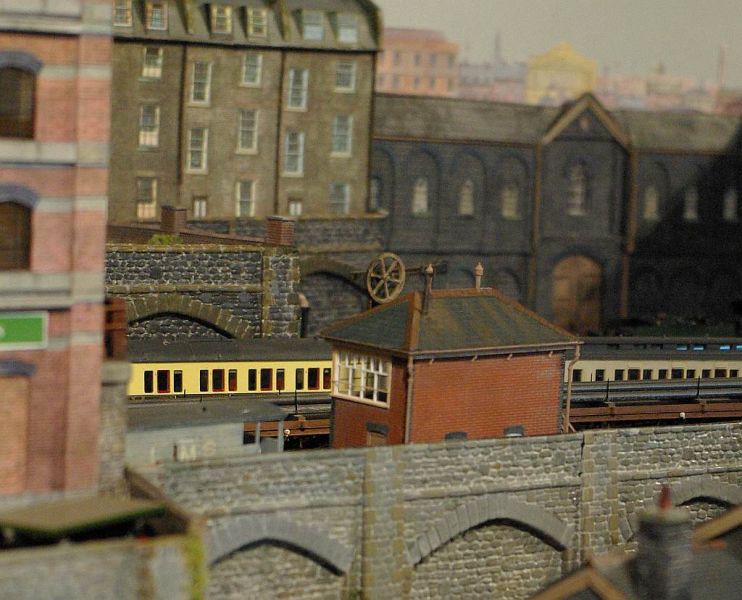
..Scruffy back street wth a milk man delivering………I have to paint some Langley child figures who will be playing on the waste land and that should do it……..oh and straighten the wall……the kink is clear and obvious at 4 feet
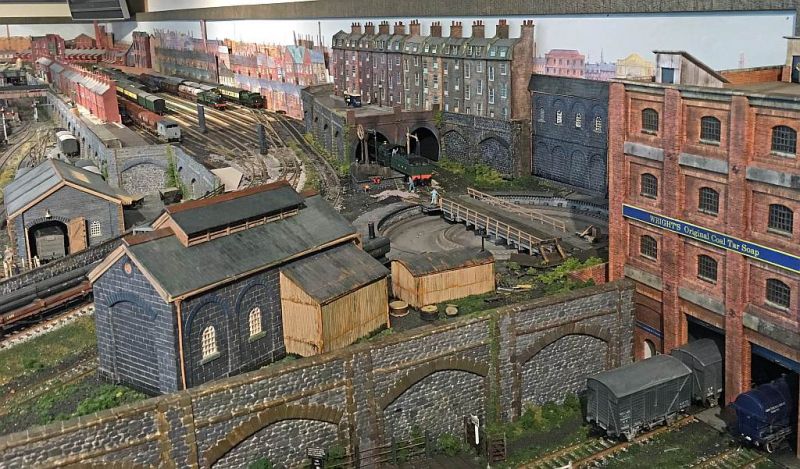
I hadnt anticipated that the tunnel wall in combination with the Soap Factory would "frame" the turntable /coal stage scene so effectively. I find ones eye is drawn to all the activity around the TT and the tenement street fades into the background.
To finish…. here are two of my favourite locos
Bradlley Manor, now turned, backs off the turntable as Hardwick Grange hauls the Down Milk towards Granby and Birkenhead

Next week I hope I can show you the third and final component in the scenic block
Posted

Inactive Member
I really like the area around the turntable.
Max
Port Elderley
Port Elderley
Posted
Full Member
Thanks Max……….the turntable must have been in for at least four years (your Soap Factory went in three years ago!) I use the TT quite a lot operationally but I guess it rarely got photographed because of the storage sidings. As I said in my post the most recent work has somehow brought the whole area into much sharper focus……I got lucky for once! :lol:That's turned out very well, John
I really like the area around the turntable.
Posted

Full Member
Posted
Full Member
You must be looking for space to add more modelling now :lol:
Phil
Posted

Full Member
Very effective John.
The road and wasteland in front of the houses works too and really gives it that inner urban feel.
cheers
Marty
Posted
Full Member
Thanks Aaron……..we have a pineapple express here so lots of modeling time…..its virtually finished……watch this spaceGood work on the turntable area, really brings it together, look forward to seeing it all combined with the new warehouse and fiddle yard 'block'.
Phil.c wrote:
Thanks Phil…..glad and flattered that you like it. I had my eye on expanding thru the doorway you can just see glimpses of under the tv. Sadly Mrs D made a pre-emptive strike and annexed it to her empire…..its a sewing room now :sad:Good stuff John ;-)
You must be looking for space to add more modelling now :lol:
Mind you I still have the Post Office and Hotel to build next to the station and then there is the embankment by the shed coaling station…….lots to do….. but first I have to crack on with weathering locos and running some trains at long last.
Marty wrote:
Thanks Marty……as I said it was sheer happen chance but I am very pleased at the way it turned out. Still got to add some details to the wasteland…….thought of borrowing Phil's brilliant idea of a rusted old car but I am not convinced I could achieve a similar result. I think it will be kids playing cowboys and indiansthe second photo with the shadows and sunlight from the surrounding buildings is a beauty and does draw the eye away from the terrace houses and into the turntable yard.
Very effective John.
The road and wasteland in front of the houses works too and really gives it that inner urban feel.
cheers
Marty
Regards to all
John
Posted
Full Member
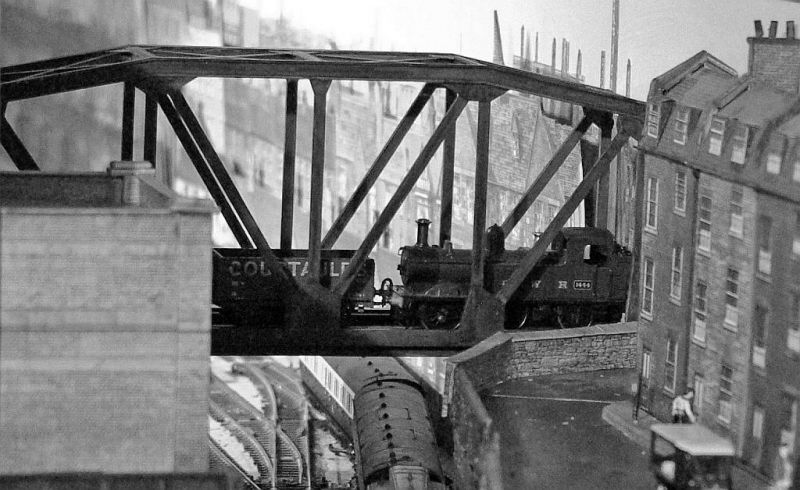
Last night we watched the final episode of the Scandi noir thriller "The Bridge" .
So it seems rather appropriate that I should start the final post of this project with a shot of crude butchery on a bridge

An inexpensive clip and glue Atlas HO girder bridge being cut to size then painted and weathered.
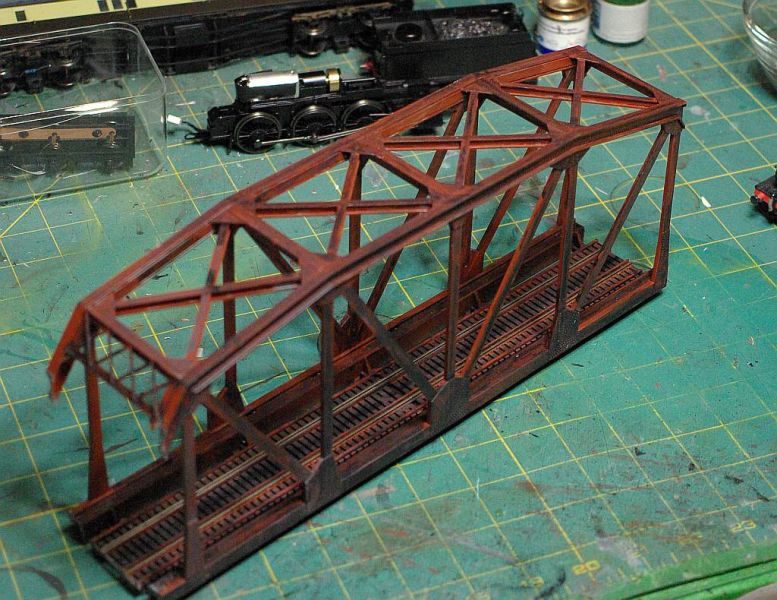
In place behind the mill going from nowhere to nowhere……..but providing a further visual block.
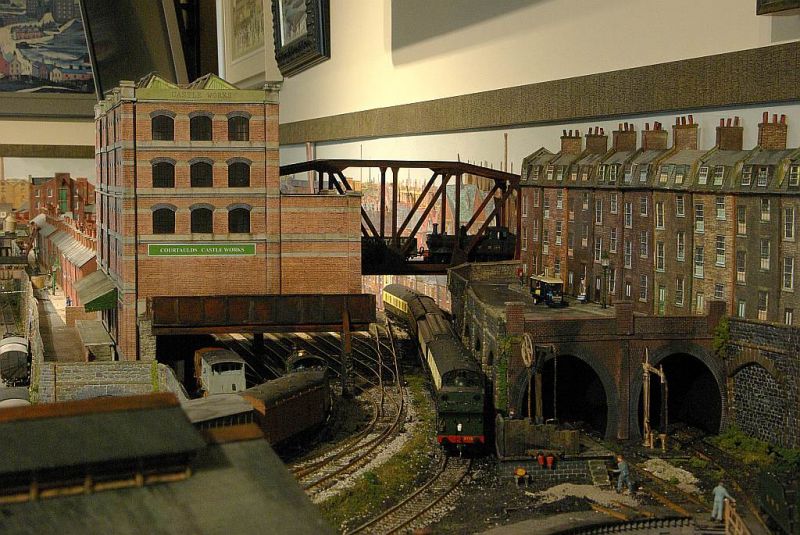
A 14xx pushes a wagon towards Courtaulds Castle Worksl. On the main lines below the Ruabon pilot shunts a 4 coach set into the carriage siding
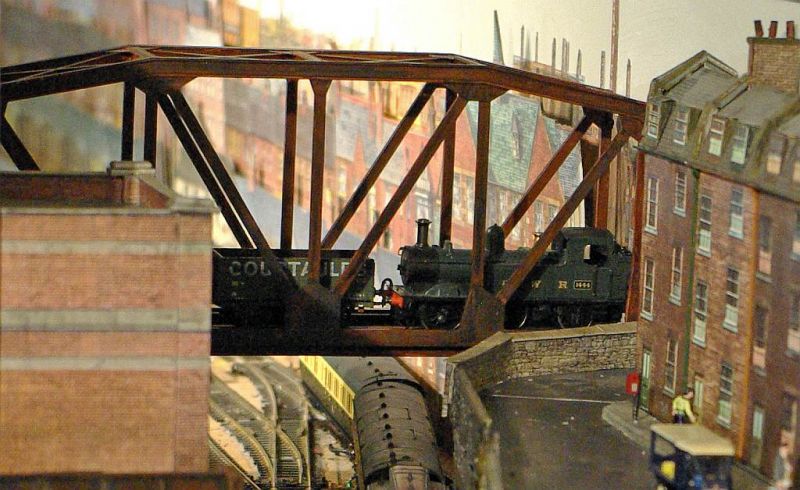
Surprise surprise……..its a Courtaulds wagon.
The last piece of the jigsaw involved filling in an awkard spot just in front the Mill. Its at the junction of two baseboards complete with a nasty change of level.
A signal box seemed to be a likely solution

For those who dont recognise it……a Ratio GWR hipped roof signal box…….its a brilliant model. Super easy to assemble……..The building itself was all done in a couple of days.
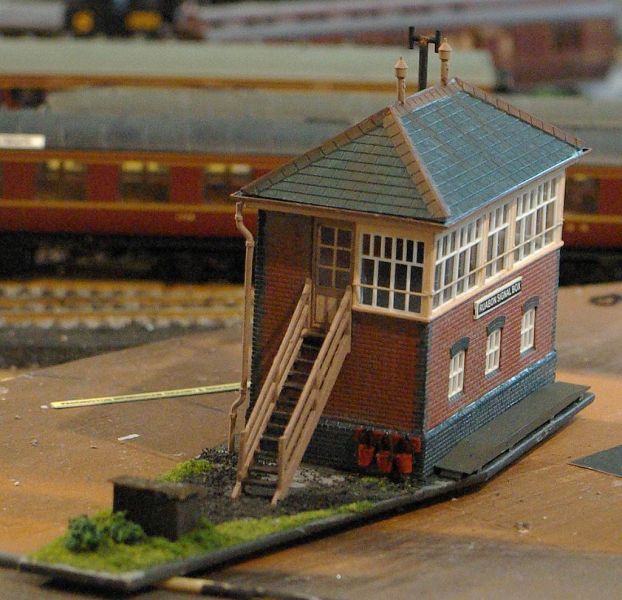
Mind you the stairs and pesky fire buckets took about the same amount of time! I must have built at least four of those Ratio staircase and they always turn out to be a severe test of my character.
The base with the coal store doesnt come with the kit ……it was built from card to fit the awkward shape and to accommodate the change in level

Not sure why I modelled the front in such detail……you can just catch a glimpse of the nameboard if you stand in the doorway and crane your neck.
I guess having to name it did force me to apply a little more precision to Granby's location.Granby is loosely (very loosely) based on Wrexham but I am afraid I have been guilty of moving it 20 or so miles north and south! :shock:. Now at least we know Ruabon is south of Granby.
So its all done and dusted……..here is the before, posted in January
And the after……three months later

and finally………
Best wishes from Vancouver
Posted
Inactive Member
Is the little loco a shelf queen? :lol:
Max
Port Elderley
Port Elderley
Posted
Full Member
Thanks Max…..glad you like itThat idea with the girder bridge is inspired, John.
Is the little loco a shelf queen? :lol:
"Shelf queen"……………..not heard that before…..very apt. The 14xx used to work for a living hauling a couple of auto coaches. She is retired now with the chip moved to another loco
Best wishes
Posted
Full Member
The downside of near perfect distance vision is that my uncorrected near sight is not great. I have to wait until June before I can go to the Optometrists and get glasses sorted meantime I have to make do with $30 drug store reading glasses. My apologies for some (or all :oops:) of the photos……..I finally had to edit them from a distance of 24" without glasses
Regular readers may recall that back in January I realised my Halls were in the wrong livery for 1948 and were far too pristine. I thought it prudent to practise on some Panniers first:
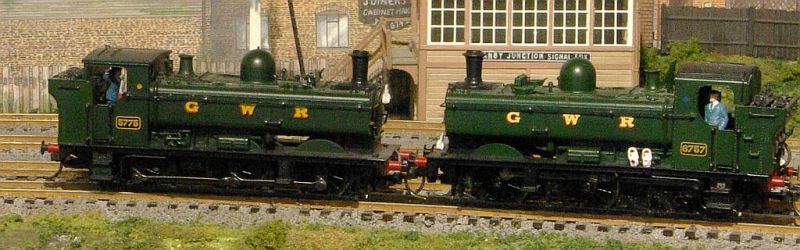
Extremely pristine……..the only dust came naturally and there isnt much of that because these guys, like the prototype, are powerful,super reliable and consequently worked hard.
I have been meaning to correct the power/route indicators for a while. During WWII an instruction was issued to move them to just above the number plate…….I assume to minimise torches flashing about during the blackout.
Furthermore Panniers were only re-classified from blue to yellow by British Railways in 1950. Trivial, I know, but it must be the military in me….incorrect rank badges jar :lol:

Both locos have discs changed, hand rails painted green and etched plates added. Previously I have only added etched plates when forced to re number but they look so much better that I bit the bullet and invested almost two months modelling money in etched plates for a lot of locos!
The right hand loco represents my attempt at "light weathering" . A little Vallejo weathering paint but mostly Humbrol weathering powder……a mix of Earth/Sand/Rust below the footplate and Smoke/Black above.
The Pannier weathering and Loco re plating operation came to a rather abrupt halt last week with this new arrival:

One of two eagerly awaited 14xx variants from Hattons. This is 5801 in green …..lightly weathered. :shock:
Not a great photo but I am afraid this is not my conception of light weathering. It seems to have been subjected to an overall spray of gunk and lacks subtlety.
A disappointing start…..however on the plus side the model itself is exquisite with masses of superb detail.
There has been much adverse comment about these models….missing Ash Pan,recessed number plate, oversize (1mm+-) driving wheels etc did not overly concern me, however reported indifferent erratic running performance, particularly on DCC, was a major concern for me.
Both ran well on the very short DC track and then spent a couple of hours on the DC rolling road. Fitting decoders ( Lenz mini gold from a German box shifter) into the boiler space was straightforward…….removable smoke box door, held in place by magnets……very ingenious.
I had heard they ran well with the default CV settings. Not with me……it was pretty disastrous and I was very close to putting them in their boxes and back to Liverpool. Lots of stop/ start and evidence of what I call hunting (cogging?) .
They are very sensitive to the slightest speck of dirt or any badly laid track. I have some iffy track on the branch which the Panniers and Prairies handle ok…….these locos did not.
Things got better when I thoroughly cleaned all the wheels……not something I normally do with a brand new loco…..these were filthy….perhaps a residue of the weathering spray?
Things got even better when I adjusted the CV 5 (max speed) to 100 giving a scale speed of 25 mph (which is all I need) and CV 6 (mid point) at 70 which gives a nice smooth concave speed curve. Basically 20 of the 28 speed steps are used getting from rest to 12 mph. Result……very impressive slow, smooth, acceleration and no hunting…….with the caveat …..on clean well laid track.
So I put the boxes away and decided to add some detail and make the weathering more realistic

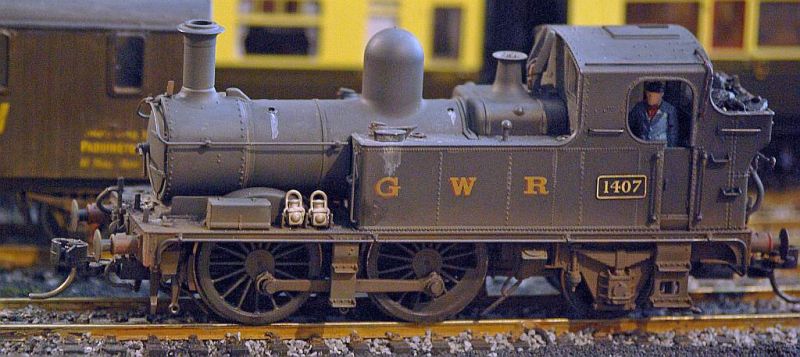
The second loco is in GWR war time black (a must have for Granby)…..again "lightly weathered" to which I have brushed on additional Humbrol powders…….I tried to buff up the firebox a bit……..suggestions/ comments much appreciated…..is the run off from the wash out plugs and tank filler ok or a bit over done?
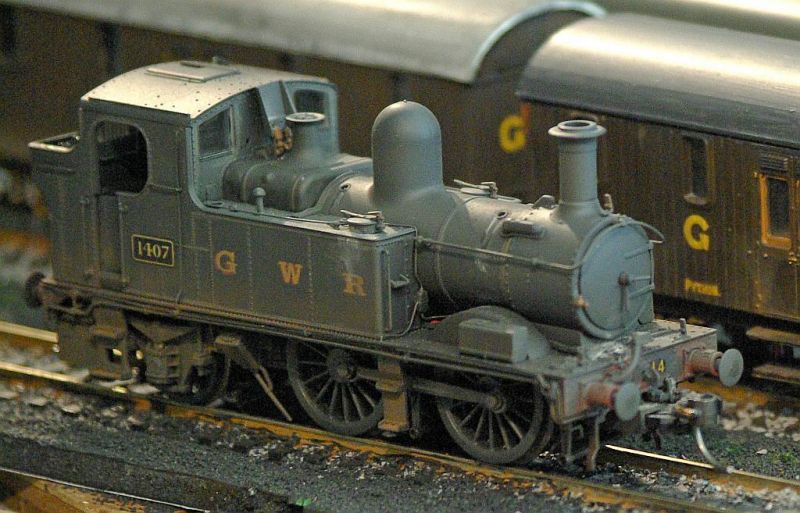
The loco is sold as 4807 but, as GWR fans will know, the 48xx numbering sequence was reallocated in 1946 to the Hall oil fired experiment. Thus the auto fitted 0-4-2 Ts became 14xx.
The new etched plate (which does need weathering) fitted straight over the original recessed one. To me it looks much better so I have ordered new plates for 5801
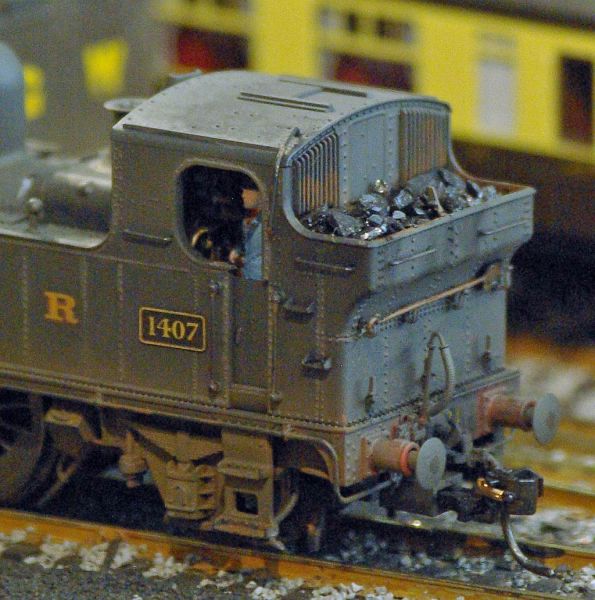
Real coal (Canadian not Welsh I am afraid
 ) . Token fire Iron…more to come. The Kadee hides the added ATC detail. Its a standard #18 but I have ordered some 17#s which will be better
 The cab doors actually open. I couldnt get the roof off as per the instructions but the fireman was inserted the old fashioned way with tweezers round his neck
The new 14 on the buffer beam needs to be toned down a bit more.
No driver because 1407 will be permanently sandwiched between the two autotrains that shuttle between Granby and Ellesmere
It now runs this computor operated shuttle over both the storage and Granby point throat without any trouble.
The Bachmann 64xx which used to do this has now been promoted to the second autotrain which shuttles on the lower level branch. There are a couple of bits of dodgy track there which I hope to replace so that eventually 1407 can run there also.
In summary………if its destined for the display case (a shelf queen in Oz) its undoubtedly a superb model although I probably wouldnt go for the weathered options.
If its going to earn its keep on the track………the said track has to be spotless and if you are operating DCC you will need a degree of patience but once sorted its a delight to operate.
Now I need to get 5801 sorted for duty
Sorry for the lengthy post……but hope you enjoyed it
Posted

Full Member
Your layout has great atmosphere.
Good to see you got a decent 14xx from Hattons.
Some modellers have had problems with that model.
Incidentally I love gunk. You can never have enough :doublethumb
Tony.
"The only stupid question is the one you don't ask"
Regards.
Tony.
Regards.
Tony.
Posted
Full Member
Probably more courage than having the eye op :lol: ……still glad thats over.
I admit to being worried about the running of the 14xxs its a long way from Vancouver to Liverpool. I was never overly concerned about the various detail gates……..although I now admit that proper etched plates do look better.
It did need a lot of patience to get them running acceptably and even now they are allocated to "easy " routes although I have ambitions to use them on the more complex routines……there will be another DVD when I achieve that milestone.
Interestingly the more I run them the more reliable they get……….who knows in time you may even change your mind
Best wishes
John
Posted

Full Member
I've heard rumour that the coreless motor responds well to CV tweaking and you seem to have found settings which work well, so a very big thank you and I'm looing forward to getting to grips with my 48xx just as soon as I'm able. Your comments regarding the 'light weathering' confirms my suspicions from earlier photos, so I'll not be ordering the shirt button 4871, lightly weathered, but will need to go down the re-numbering / re-decaling route, as I'm a great shirt button fan and they sit comfortably at the end of my modelling era.
I like your auto worked services and have just bought a tired, but very cheap Airfix trailer to ad to my other pair and a little chopping will be in order, following further research in the two Lewis volumes.
I really like your work hardened panniers . . . one just can't have too many, but I must also congratulate you with your fettling on 1407. I like the fact that one cannot be completely sure if it's green or black and it really looks the dogs dangly parts. Lovely.
Enjoy working with 5801 and a continued good recovery to you.
Best,
Bill
PS. I also use a German box shifter for my Lenz decoders nowadays as prices are excellent and post inexpensive :)
At 6'4'', Bill is a tall chap, then again, when horizontal he is rather long and people often used to trip over him! . . . and so a nickname was born :)
Posted
Site staff
I may have gone Diesel and Electric on Latton Fields but I'm still a big steam fan, and what a loverly little loco (even if it isn't LNER)

Hopefully you now have the running problems sorted :thumbs
Ed
Posted
Full Member
Yes, absolutely John, I've certainly enjoyed reading it and savouring the images. Sorry though that you have also been under the knife, but you seem to have bounced back quite well and your new close vision glasses will also be worth the wait.
I've heard rumour that the coreless motor responds well to CV tweaking and you seem to have found settings which work well, so a very big thank you and I'm looing forward to getting to grips with my 48xx just as soon as I'm able. Your comments regarding the 'light weathering' confirms my suspicions from earlier photos, so I'll not be ordering the shirt button 4871, lightly weathered, but will need to go down the re-numbering / re-decaling route, as I'm a great shirt button fan and they sit comfortably at the end of my modelling era.
Bill:
Because I was concerned about the running I initially changed CV 2 from the default to 5………once I cleaned wheels and track :oops: I reset it to 1 without problems
RR&Co looks after momentum and acceleration so I always set CV 3 and 4 to 1 but I am quite happy with those settings using the Lenz Throttle.
You may want to edge CV 5 up a tad but 100 will be a good start point
Interested to hear how you get on
I like your auto worked services and have just bought a tired, but very cheap Airfix trailer to ad to my other pair and a little chopping will be in order, following further research in the two Lewis volumes.
Have you tried the Dart Castings detailing kit? Nick did a great job with his ……I must admit I am tempted
I really like your work hardened panniers . . . one just can't have too many, but I must also congratulate you with your fettling on 1407. I like the fact that one cannot be completely sure if it's green or black and it really looks the dogs dangly parts. Lovely.
Thank you…….I do appreciate that. :thumbs :thumbs….as you may have gathered I was a little uncertain!
Best wishes
John
Enjoy working with 5801 and a continued good recovery to you.
Best,
Bill
PS. I also use a German box shifter for my Lenz decoders nowadays as prices are excellent and post inexpensive :)
1 guest and 0 members have just viewed this.