Granby Junction 1948 N. Wales
Posted

Full Member
GWR/LMS OO Gauge DCC RR&Co
[user=434]John Dew[/user] wrote:Hi John,[user=1632]BCDR[/user] wrote:Thanks for the kind comments Nigel……..Funnily enough I was thinking of playing with the Macfisheries theme. Scalescenes do quite a nice chippie so one may appear eventuallyHi John,
And here I was hoping to see a Macflounder fishmonger. Or at least a chippie.
I have got a rake of 4 Ratio 4 wheelers painted Brown:roll:…….just not quite finished and not quite good enough:sad: Its one of those 15 year projects I should really address:oops:If Granby Operating Division managed to keep their hands on a Siphon C can we expect to see some 4-wheeled passenger stock in Lake Red or WW1 brown trundling around? (and which prototypically lurked around in the wilder reaches of Wales until the late 1940's. Nationalization finally did them in).
Cheers
John
Those little Ratio 4-wheelers are actually a very good model, let down by the underframe. Ratio did them working with Jim Russell from official diagrams, only problem is getting them painted white/cream and brown. There are techniques for this, long and tedious unfortunately. That's why weathered Lake Red or WW1 brown works well up to the late 1940's.
Those Comet sides look good. I've used them in the past for various projects (Centenary stock mainly), they work well (as long as they remember to send 2 sides) and the curve is already done.
Nigel
©Nigel C. Phillips

Posted

Full Member
It has already been remarked upon but the way you squeeze such a massive maount of detail into tiny corners is mind blowing. Just like the real thing, if there was a bit of "industrial" ground larger than a postage stamp, the Victorians would build something on it, make it functional and embellish it with some kind of fancy brickwork or ornate metal work. Granby is just such a place. :thumbs:thumbs
I have it on good authority that Mr McPeters doesn't really mind if his supplies come on a siphon A, B, C or even a D and as for churn size, he employs some strong northern lads who cut their teeth on 17 gallon churns before the war so the 10 gallon ones will sit comfortably one under each arm ………….;-)
I am however, slightly worried that you might take a closer look "on the dark side" having seen your much travelled brake van.
"Almost a perfect fit with very little fettling" you say then, on the accompanying photo, show a huge electric whirly cutter machine thingy…………..:shock::shock:
The end result is superb and I envy all those "Mr Mallards" with the skills to turn these models out. I, on the other hand, find it difficult opening some of the Hornby packaging …………….:oops:
I assume it has more weight than the RTR version which should make running qualities superb. :roll:
Such amazing detail John - everywhere. It's uncanny the way you've managed to perfectly capture the atmosphere of the railways in your chosen era. I know it's North Wales but, because I don't know that area well, it could so easily be one of the industrial Lancashire towns, and those I do know.
Keep them coming - please !!!!
'Petermac
Posted

Full Member
Thanks Bill…….it is a good summer project…..I can sit in the shade with something cool and refreshing and take it all very slowly and carefully:lol:Hi John,
What a great place railway for a can be, populated by some generous modellers . . . and what a lovely project, which will be a great addition to your coaching stock. Good luck with final fitting up, painting and detailing. Just take your time, then sit back and enjoy the milk run!
Bill
BCDR wrote:
Thanks NigelThose little Ratio 4-wheelers are actually a very good model, let down by the underframe. Ratio did them working with Jim Russell from official diagrams, only problem is getting them painted white/cream and brown. There are techniques for this, long and tedious unfortunately. That's why weathered Lake Red or WW1 brown works well up to the late 1940's.
Those Comet sides look good. I've used them in the past for various projects (Centenary stock mainly), they work well (as long as they remember to send 2 sides) and the curve is already done.
Nigel
I painted my 4 wheelers brown for that very reason! I guess I should get cracking and run them as a workmens train.
Its the first time I have attempted anything like the brake van so there is an element of both excitement and trepidation…..hopefully all will be well
Petermac wrote:
Thank you Peter:thumbs I cant tell you how wonderful it is to see you posting again. I do hope your recovery programme is going to planSo much here to see and so many comments to make John. ;-)
It has already been remarked upon but the way you squeeze such a massive maount of detail into tiny corners is mind blowing. Just like the real thing, if there was a bit of "industrial" ground larger than a postage stamp, the Victorians would build something on it, make it functional and embellish it with some kind of fancy brickwork or ornate metal work. Granby is just such a place. :thumbs:thumbs
I must confess it did turn out rather better than I expected…..I was concerned that it may be so cramped that the whole thing looked contrived……you will note that I diplomatically have placed the road tanker as far away from the loading bay as possible:shock:
I hope you liked the RN allusion!:roll:
I have it on good authority that Mr McPeters doesn't really mind if his supplies come on a siphon A, B, C or even a D and as for churn size, he employs some strong northern lads who cut their teeth on 17 gallon churns before the war so the 10 gallon ones will sit comfortably one under each arm ………….;-)
I am however, slightly worried that you might take a closer look "on the dark side" having seen your much travelled brake van.
"Almost a perfect fit with very little fettling" you say then, on the accompanying photo, show a huge electric whirly cutter machine thingy…………..:shock::shock:
I think he used the whirly thing to smmoth away any moulding detail on the donor coach……he also did some pretty drastic surgery on the interior
The end result is superb and I envy all those "Mr Mallards" with the skills to turn these models out. I, on the other hand, find it difficult opening some of the Hornby packaging …………….:oops:
I assume it has more weight than the RTR version which should make running qualities superb. :roll:
I hope so………as a BSet it wasnt great hence its surplus category. I got a set of reamers from DCC concepts which are great for improving the bearing recesses in RTR stock…..and yes it is noticeably heavier.
Such amazing detail John - everywhere. It's uncanny the way you've managed to perfectly capture the atmosphere of the railways in your chosen era. I know it's North Wales but, because I don't know that area well, it could so easily be one of the industrial Lancashire towns, and those I do know.
As I may have said previously, my ideal scenario would have been for the GWR to run through Oldham ……Doreen comes from there and I spent almost 5 years in East Lancashire and it shows! Over the years it just crept in almost without me noticing….now of course I am totally committed although I persist in applying North Wales geography:roll::oops:
Keep them coming - please !!!!
:cheers:cheers
Posted
Full Member
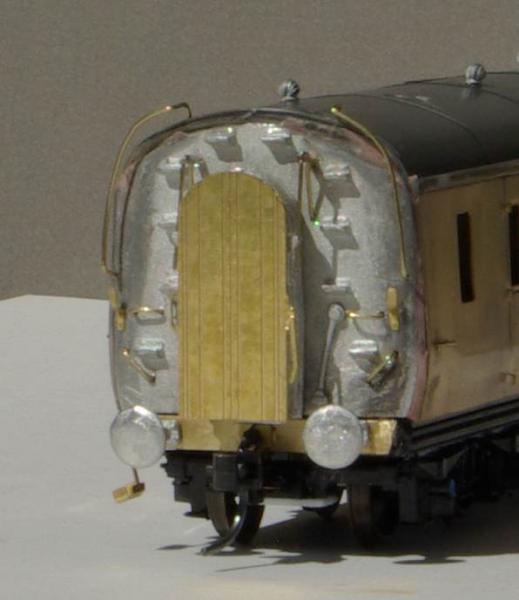
All the original ventilators had already been removed by Phil……..too many and in the wrong places.
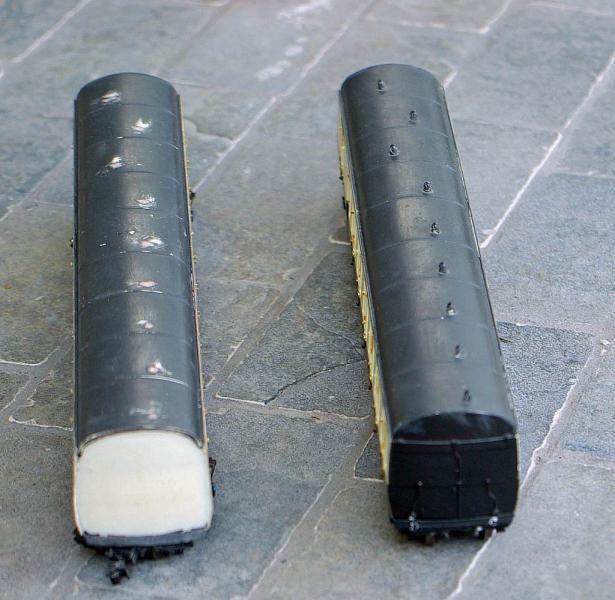
Comet provide excellent instructions and their roof diagram showed eight roof ribs but spaced differently from the donor coach. For a brief moment I contemplated sanding them down and putting microstrip in the correct location:shock:. I then quickly decided that ineptly applied microstrip could easily look worse than incorrect spacing!
The K40 Brake Van was not fitted with ATC gear so the moulding representing that had to be removed. The moulding of the jumper cables were also removed because the bag of little bits contained more realistic white metal castings along with proper Brake Van buffers.
Finally, unlike the B Set donor this is corridor stock so I have to fit the supplied corridor connectors. The diagram for the hanging detail looks fiendishly difficult……..cant wait:roll:

Comet ventilators in place as per the diagram along with side grab rails. I placed them exactly as per the template but to me they look a little low in relation to the sides…..particularly when I compare them with the Collet Bow Ended Stock
The sharp eyed will note a number of filled pin holes at both ends of the coach. One end of the coach has steps to allow roof access the holes were for the safety rail running alongside the steps………why both ends then I hear you ask?
I drilled one set at the wrong end:oops:
Why are both sets filled then? To my embarrassment I realised that I had failed to order a stepped end unit :oops:
Andrew at Comet got the pack to Canada remarkably quickly but for whatever reason I had assumed it would be brass which I could overlay on the existing end. In fact it was a rather chunky white metal casting and far too thick to overlay:twisted:.
All this called for a period of quiet contemplation and a small malt to calm my shattered nerves. The following day, never drink and cut, I took a deep breath and carved out the existing end :shock:……..sadly no photographs……and then after a fair amount of fettling inserted the white metal end

Its a bit more bow ended than when it started and the roof is flush rather than overhanging but I am hoping the corridor connector will obscure that.
Work has now come to a standstill while I await the arrival of drill bits and .45mm wire from Eileen's Emporium……..just got a bit concerned that my drill holes are over large……..I am hand drilling so maybe I should drill smaller pilots first
Finally I refuse to tempt fate by referring to next Saturdays Australia v England match, other than to observe that I am looking forward to it a great deal:lol:
Posted
Full Member
I shall follow further progress with interest and look forward to seeing it on your milk train in due course.
All the best
Jon
Posted
Full Member
The sides are marked out for door protectors…..all 42 of them:roll:……I am thinking I might forget about them, it will be very fiddly and they will be barely noticeable.
Cheers
John
Posted
Full Member
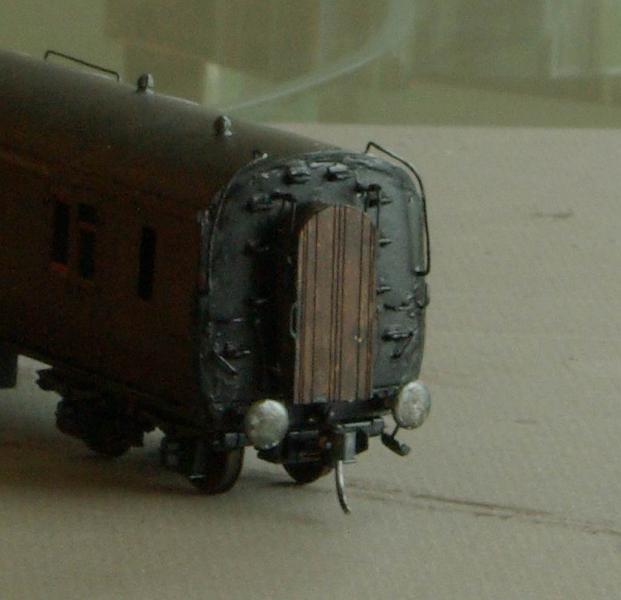
The drill bits and wire took a bit longer to arrive from the UK but once they got here I was able to fit all the end fittings surprisingly quickly.

There are recesses in the doors for door handles and grab handles. These have been backed with styrene and predrilled. Both types of handles are finished brass so will be fitted after painting…….that looks like being a real picky job:roll:
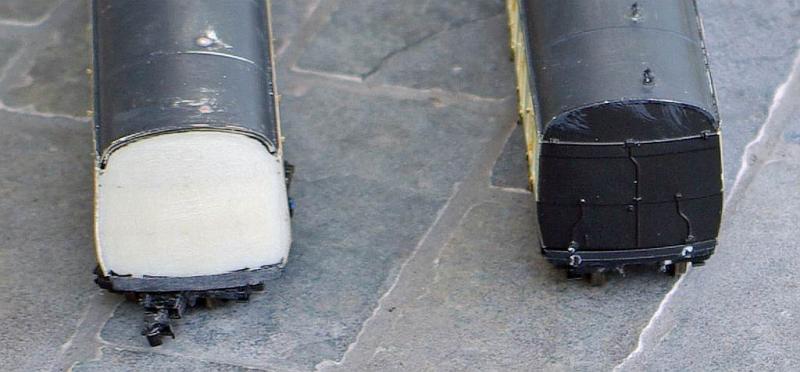
Here is the non step end
White metal jumper cables and corridor connector. Grab handles from brass wire and lamp holders (not supplied in the kit?) from a long abandoned Perseverance (sadly I didnt;-)) kit.

Close up of the corridor connector hangar assembly. This was the fitting I was not looking forward to at all but it went together surprisingly smoothly…….not perhaps exactly the same geometry as the diagram but sill far more detailed than most of my RTR stock
The kit only came with only one corridor end door but this van will be marshalled in the middle of a milk train so I modified a second door using a spare from my new Collet Bow end coaches
Here is the step end with curved hand rail and the supplied end door
The bogie step board is on only one side, I am still unsure whether to fit them…….because I am using the unmodified donor chassis they are a total pain to fit and I suspect will not last long in operation.
So the next step is priming and painting…….but before that everything has to be cleaned and degreased……..Comet recommend a thorough scrub with household cleaning product called Cif (used to be Jif) followed by a wash down with a solution of vinegar and water
I have no idea what Cif or Jif is (Mrs D has a vague recollection of the latter) We are thinking of using a local product called Simply Green ……non abrasive we use it on stoves, BBQs and the boat……….any suggestions or advice will be much appreciated
Posted

Inactive Member
Lovely stuff. :thumbs
Max
Port Elderley
Port Elderley
Posted

Full Member
In French it's 'lessive poudre', I know the French is spoken in some necks of the Candian woods….
I admire your patience, it's paying off.
Doug
'You may share the labours of the great, but you will not share the spoil…' Aesop's Fables
"Beer is proof that God loves us and wants us to be happy" - Benjamin Franklin
In the land of the slap-dash and implausible, mediocrity is king
"Beer is proof that God loves us and wants us to be happy" - Benjamin Franklin
In the land of the slap-dash and implausible, mediocrity is king
Posted
Full Member
Can you buy 'sugar soap' in Canada? Cleans and degreases, and rinsed off with distilled water leaves no residue. Used maily by decorators etc, it contains no silicons or other 'shine' agents.
In French it's 'lessive poudre', I know the French is spoken in some necks of the Candian woods….
I admire your patience, it's paying off.
Doug
Thanks Doug
Apparently "Simply Green" is almost identical to the recommended Cif so the coach had a thorough scrub last night!
Canada is officially a bi lingual country. Cornflake packets etc must be printed in French and English. In realty French is rarely spoken other than in Qubec and New Brunswick. In Vancouver you're far more likely to hear Mandarin or ,in NorthVancouver, Farsee
Cheers
 Last edit: by John Dew
Posted
Full Member
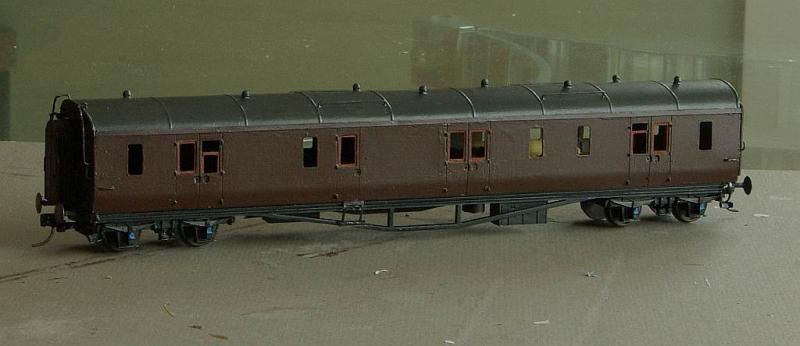
Having scrubbed the van with a diluted vinegar it was washed with the Canadian equivalent of Jif/Cif and then rinsed. As I was using Vallejo Acrylic for the top coat I brush painted a single coat of their surface primer. Given hindsight, that invaluable gift, I may have been better to spray on a standard primer from a rattle can. At the very least I should have applied a second coat of primer and spent more time rubbing down.
The Vallejo acrylic top coats went on really well and appeared to cover a multitude of errors and dried with a nice dense matt finish. However, prior to applying transfers, I brushed on a protective coat of Vallejo matt varnish. Not good is an understatement……..every brush stroke and defect were cruelly exposed……fortunately I only did one side. After more than a few choice words I bit the bullet and started to try and sand down the blemishes using 2000 wet and dry. In part this worked but in one section the primer started peeling away like a rubber mask. Eventually I had to strip the entire section back to the bare brass which then took forever to re prime
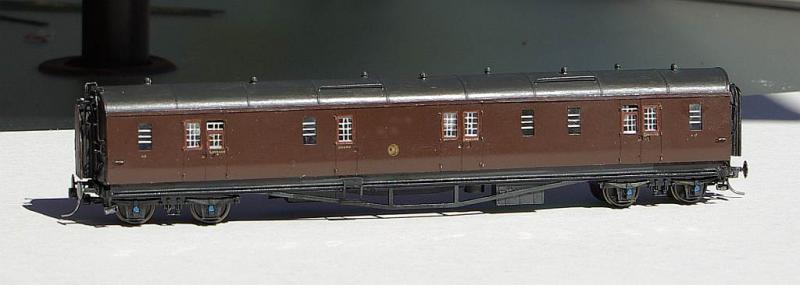
I finally finished the painting a few days ago.

A rather flattering shot…….you aint going to get any closer!
Rather than try again with the varnish I sprayed on some of the artist's fixative that I use to protect my Scalescene printed sheets
I am quite pleased with the satin-like finish. The surface is by no means perfect but the van certainly passes the 3' rule……it almost scrapes past the 2' rule
Next job decals and then glazing
Posted

Legacy Member

:thumbs;-):cool:
Owen
web-cam http://82.2.74.174:8081
if the lights are off no cam
if the lights are off no cam
Posted
Full Member
Yes it will pass at 5000 miles……..thanks Owen……..this project is certainly character building…….at my age I am not at all certain that is what the Doctor ordered!Cheers
Posted
Full Member
Too hot to do any gardening so I have pressed on with the decals and glazing under the welcome shade of a very large sun awning
First a word about livery. The K40 Brake Vans were built between 1931 and 1933 ie prior to the introduction of the shirt button livery. However at some stage in the mid-late thirties a number of these vans were painted in overall dark brown. I opted to use this livery primarily for convenience but also I think it will look more appropriate on the daily milk train.
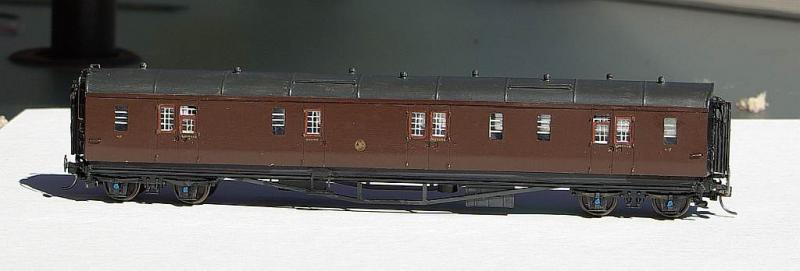
There is a lengthy thread on RMWeb about The N gauge society's model of a slightly different van of the same era with a lot of very useful detail about livery……including the offset shirt button.
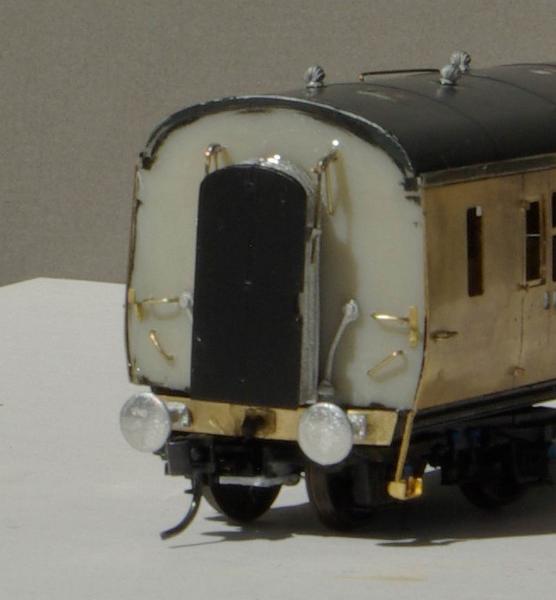
I was so glad the GWR limited the numbering to two digits……..not sure if its old age or what but the number transfers seem much smaller than when I last used them. Drove me scatty trying to line up 43 at each end.
I now realise that on one side I stupidly put the "Luggage" lettering on the wrong double door……should be on the door with a handle. I think I have spares but unsure whether to bother changing them.
Here is a very cruel close up
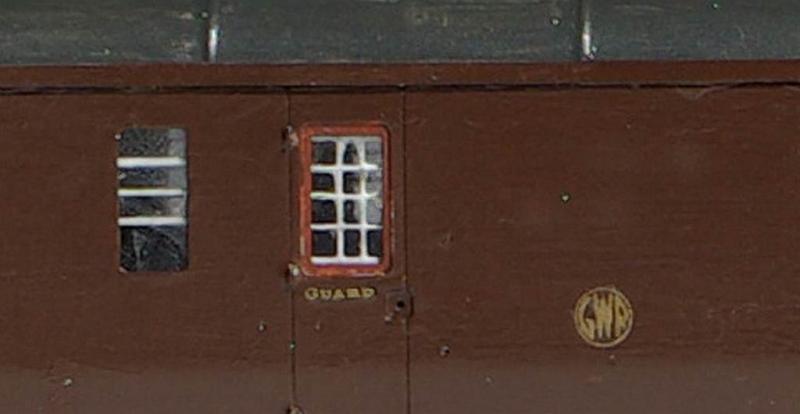
The grille on the drop light does look a tad clumsy in this shot. Phil suggested hand drawing but knowing my drafting skills that would have been even clumsier.
The Roxy etchings are designed for Southern Vans but work well on closed drop lights however on half open windows the thicker base is exposed…….lesson learned for next time…..dont drop drop lights!
Last and final job: door and grab handles…..now thats something I am really looking forward to!
Posted
Full Member
I confess the delay was, in part, caused by me worrying about my inability to add the finishing touches, door handles and grab handles, in a competent manner :oops:.
To my surprise the door handles, a minute brass etching were relatively easy…..and fortunately there were lots of spares to replace all the ones I screwed up or dropped and lost forever on the floor.
I had more difficulty with the grab handles which had to be formed from 0.45 mm wire. Rather than getting two crisp 90o bends I tended to get an un-prototypical curved shape. I guess I should have tried to make some sort of jig.
Anyway here she is up and and running.
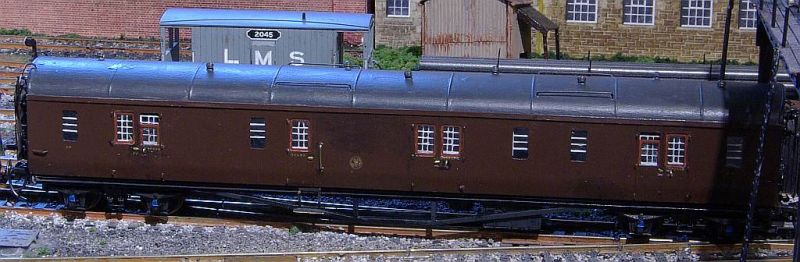
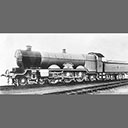
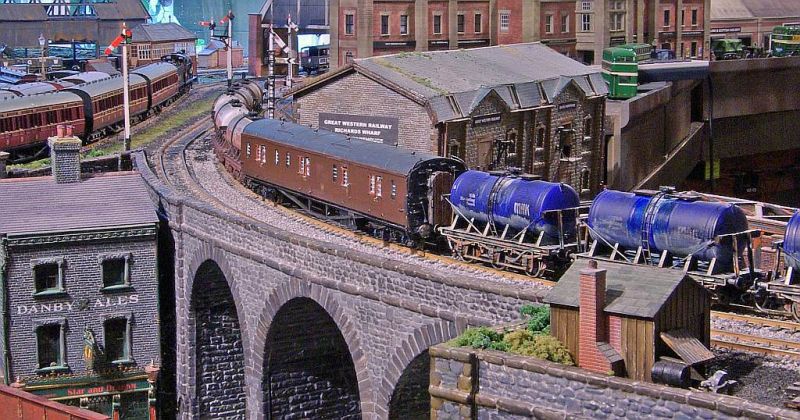
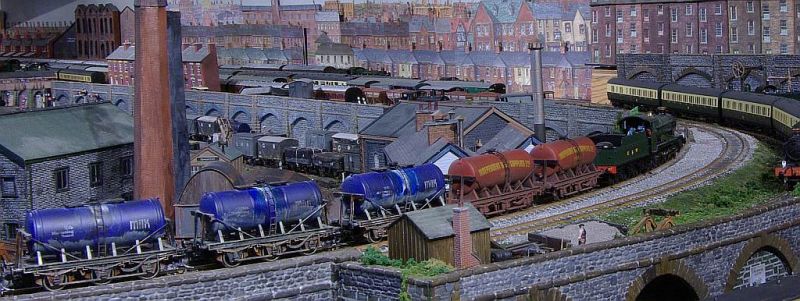
The Up Milk (empties) from Birkenhead (I am guessing Hooton?) hauled by 6818 Hardwick Grange entering Granby


The two rear tankers are dropped off in the main head shunt. They will be returned to the dairy at Cynwyd as tail traffic on the branch B set
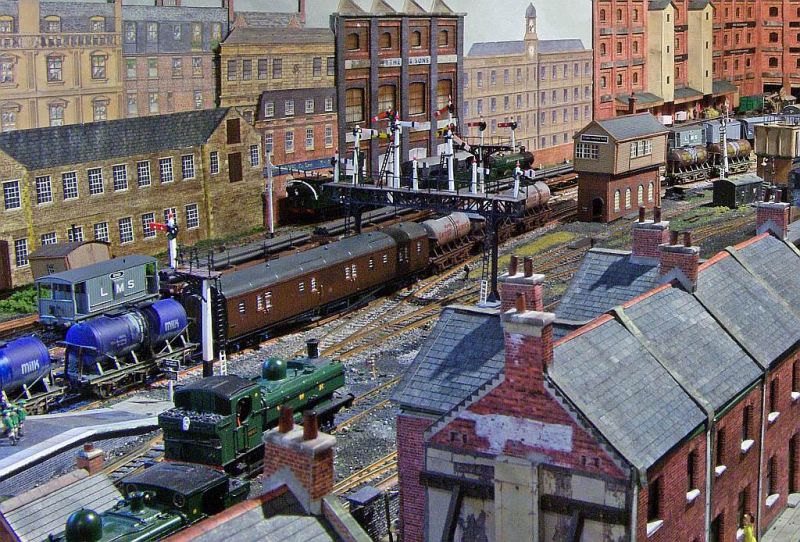
Here is the Grange continuing its journey to Shrewsbury over Granby viaduct
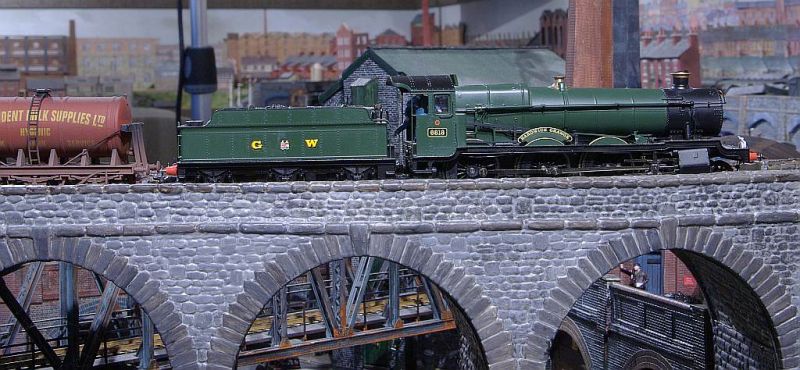
I think this is one of Hornby's best ever locos…..super reliable runner and impressive hauling power. Puts the Bachmann Halls to shame. Once I get the Milk sequence going the two Granges I have will have to handle the Down runs because the Halls struggle with 8 tankers and the PBV on the combination of curve and relatively gentle incline out of Shrewsbury (storage yard)
Its hard to believe that its over six months that I posted this shot worrying about using a 4 wheel brake van

Fortunately I was prodded, encouraged, and massively helped by internet friends to make my first attempt at adding Comet sides to an RTR coach
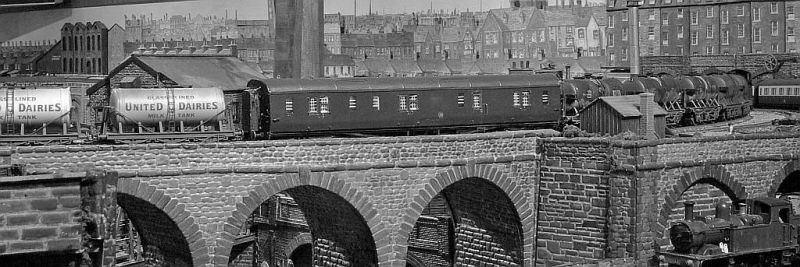
It is by no means perfect but to my mind it does look the part.
Its undoubtedly been time consuming and occasionally more than a little frustrating but on the other hand it has also been quite enjoyable…..even relaxing occasionally…….and I now have quite a strong sense of achievement.
I may well be tempted to try another conversion …..I do have lots of donors available.
Regards from Vancouver on our Thanksgiving Day
John
Posted
Inactive Member
Max
Port Elderley
Port Elderley
Posted
Full Member
Best Wishes
John
Posted

Full Member
Phil
Phil
Posted
Full Member
I am about to start a bit of loco weathering…….with frequent references to your thread!
Cheers
John
Posted
Full Member
Just catching up. Comet do a roll of tape for roof panels. C20, £3.00. I use it all the time to get the spacing correct. Much easier than styrene strip.
Nigel
Edit. Or with a sharp scalpel and a burr-free edge cut the strips from suitably sized adhesive postage labels. Peel and apply to first coat of primer (or to plastic), seal with second coat. Same principle as window mullions/transoms.
©Nigel C. Phillips
1 guest and 0 members have just viewed this.