Granby Junction 1948 N. Wales
Posted

Full Member
GWR/LMS OO Gauge DCC RR&Co
[user=1560]emmess[/user] wrote:Thanks Mike……..glad you like it…..including the back:lol: In the past I had a bad habit of not finishing the unseen side of my buildings and all too often it came back to haunt me when I did a relay:roll:I love that dairy. Even though the back won't be seen (contortionists aside!), I think it is brilliant that it's a complete building in its own right. Fabulous! :)
Cheers

Posted
Full Member
Thanks Keith:thumbsHi John
Your pic of the week is top drawer! Congratulations.
Must admit I don't really understand all this stacking business, but the results make me think I should try to catch up with some of this new technology stuff… when I have a spare few days! Nice to see you've got the milk train running - very impressed with the dairy.. I'll have to make do with the dairy off layout as I mentioned before… but I must at least get those milk wagons out on the layout.
Keith
I have been getting a lot of help from Phil C and Max with my photography……….I try and take my loco shots with the camera on remote and mounted on a tripod. That way I can set the aperture at the smallest setting (F22 in my case) and the camera can take as long as it likes for the exposure.. that way you maximise the depth of field in focus.
Photostacking takes that a stage further by taking six identical shots…Camera doesnt move and the settings are unchanged except that you vary the focus point…..when you upload the shots to the computor the software does its magic and merges all sx shots into one……….result a far better focussed loco.
Jon (The Great Bear) gives a far better explanation, with examples, on his thread.
I have still some work to do before my milk train routine is properly up and running but I must admit I do like the time stamp it gives to the layout…..Milk Trains were so much a part of our daily life in the forties and fifties
I have just realised this will be post #3000:Happy How fitting that I should be writing……yet again …….about Granby:lol:
Best Wishes
Posted

Full Member
"It takes a fair bit of time…. but I prefer to cut each strip of tiling and blacken the cut edge with a felt tip"
The counsel of perfection, however I have decided that as I am a lazy so-and-so I now prefer to scrape a little black artists' pastel onto the surface and brush it upwards against the exposed edges.
Just back from our Venice/Slovenia/Croatia/Hungary/Switzerland trip so a bit of catching up to do.
Doug
'You may share the labours of the great, but you will not share the spoil…' Aesop's Fables
"Beer is proof that God loves us and wants us to be happy" - Benjamin Franklin
In the land of the slap-dash and implausible, mediocrity is king
"Beer is proof that God loves us and wants us to be happy" - Benjamin Franklin
In the land of the slap-dash and implausible, mediocrity is king
Posted
Full Member
Many thanks for the expalnation…. my first step would seem to be getting a tripod…. I'll add it to the list….
I understand the first bit about setting the aperture - not sure if I can do that with my digital camera, I'll have to read the manual - at present I just use it in point and click mode. The stacking also seems straightforward, but for now at least too much computery stuff for me. I'll try to get the aperture sorted first.
3000… there's me getting quite pleased with myself getting in to three figures!
Keith
Do I have a plan? Na, if I did I'd spend most of my time trying to remember where I put it.
Posted
Legacy Member
Posted

Site staff
Ron
NCE DCC ; 00 scale UK outline.
NCE DCC ; 00 scale UK outline.
Posted
Full Member
Hi DougKeeping the Card Modelling Banner flying high, eh, John?
"It takes a fair bit of time…. but I prefer to cut each strip of tiling and blacken the cut edge with a felt tip"
The counsel of perfection, however I have decided that as I am a lazy so-and-so I now prefer to scrape a little black artists' pastel onto the surface and brush it upwards against the exposed edges.
Just back from our Venice/Slovenia/Croatia/Hungary/Switzerland trip so a bit of catching up to do.
Doug
This project is kind of mixed media plasticard sheets mounted on card with a scalescene roof :oops: I had to do it this way to match the surroundings that were built before, thanks to you, I had my epiphany and took up the card banner in earnest:lol:
Why didnt I think of that trick for the tiling…..I always use pastels for weathering

Hope you had a great trip…….do we get to see pictures?
Best Wishes
Posted
Full Member
There are generally setting options so that in addition to point and shoot you can select aperture priority or shutter priority (for action shots)Hi John
Many thanks for the expalnation…. my first step would seem to be getting a tripod…. I'll add it to the list….
I understand the first bit about setting the aperture - not sure if I can do that with my digital camera, I'll have to read the manual - at present I just use it in point and click mode.
Keith
Cheers
Posted
Full Member
Hi JohnJohn, just caught this. Excellent!
Great to hear from you on this site…….thank you…..praise from you is always greatly appreciated……..did you get the email I sent you or are you still in Montana?
Posted
Full Member
JD, well done for 3K of informative posts.
Thanks Ron……..you must have done a name change to have less posts than I?
Puzzled in Vancouver:lol:
Posted
Site staff
No John, I did have lots before I left YMR & then when I came back 2011, the post count started again.[user=606]Sol[/user] wrote:JD, well done for 3K of informative posts.
Thanks Ron……..you must have done a name change to have less posts than I?
Puzzled in Vancouver:lol:
Ron
NCE DCC ; 00 scale UK outline.
NCE DCC ; 00 scale UK outline.
Posted

Full Member
Re. The back of the building can't be seen sindrom, I have the same situation with the backs of my terraced houses, but what a shot when the camera is dropped down there…well worth that extra effort and we have the unseen area captured ;-)
Phil
Phil
Posted
Full Member
Hi John[user=1798]Woodside[/user] wrote:There are generally setting options so that in addition to point and shoot you can select aperture priority or shutter priority (for action shots)Hi John
Many thanks for the expalnation…. my first step would seem to be getting a tripod…. I'll add it to the list….
I understand the first bit about setting the aperture - not sure if I can do that with my digital camera, I'll have to read the manual - at present I just use it in point and click mode.
Keith
Cheers
Thanks for that - I'll check the manual, as soon as I remember where I put it….
Keith
Do I have a plan? Na, if I did I'd spend most of my time trying to remember where I put it.
Posted
Full Member
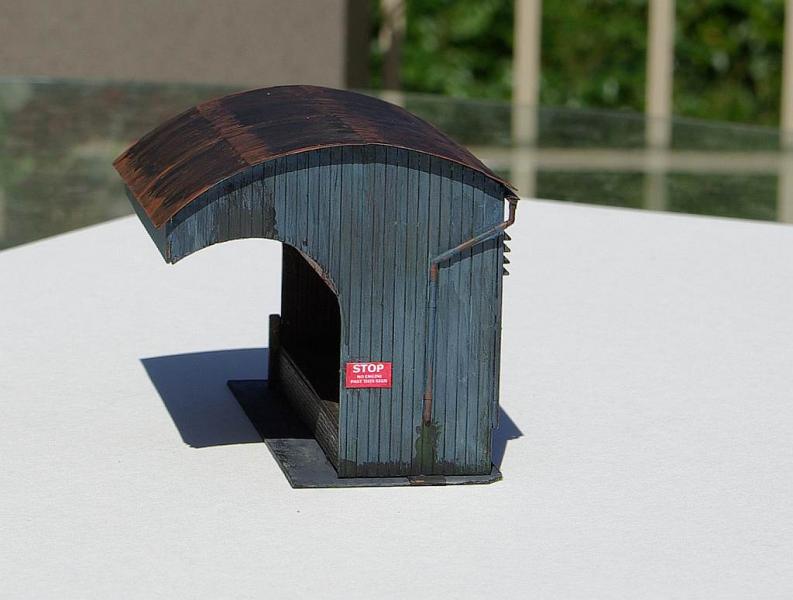
The plan was to convert the Ratio Timber Merchants into a steam clean shed for the returning empty milk tankers
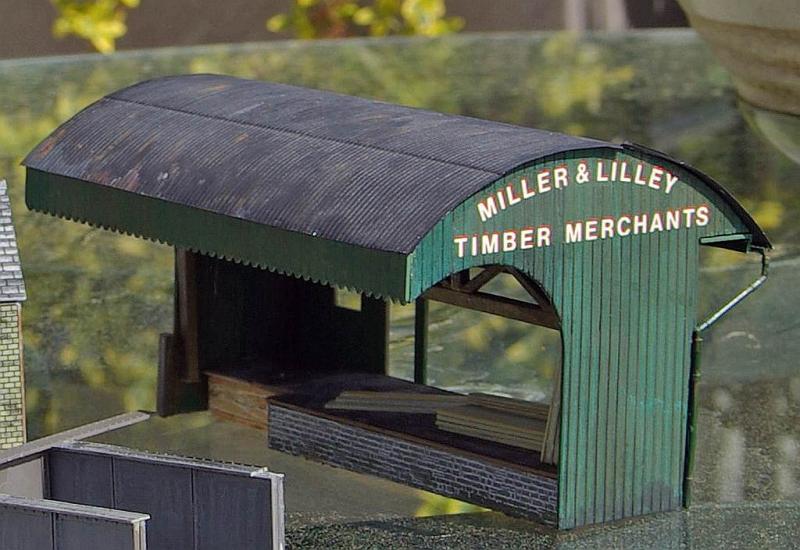
This is quite a handy kit……I used it on both Granby II and III before I decided to have a dairy rather than a timber yard……operational traffic is far more interesting with a dairy/creamery
Its a useful building but I dont need the road side platform and it is both too wide and too long
I was pleasantly surprised how easy it was to strip it down
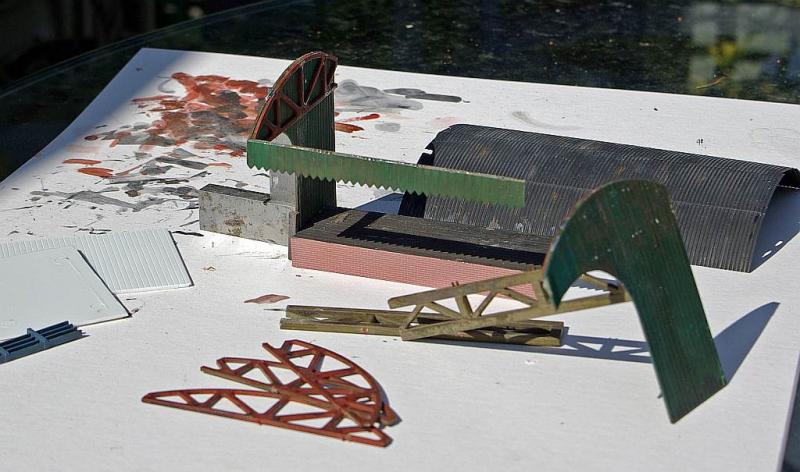
Saw the girders down a bit and close the road side bay with some Will's cladding and Bob's your uncle

I am very uncertain about how the interior of a steam wash shed should actually look………fortunately my ignorance will not be too obvious because this lineside view will almost always have a tanker in front of the platform.
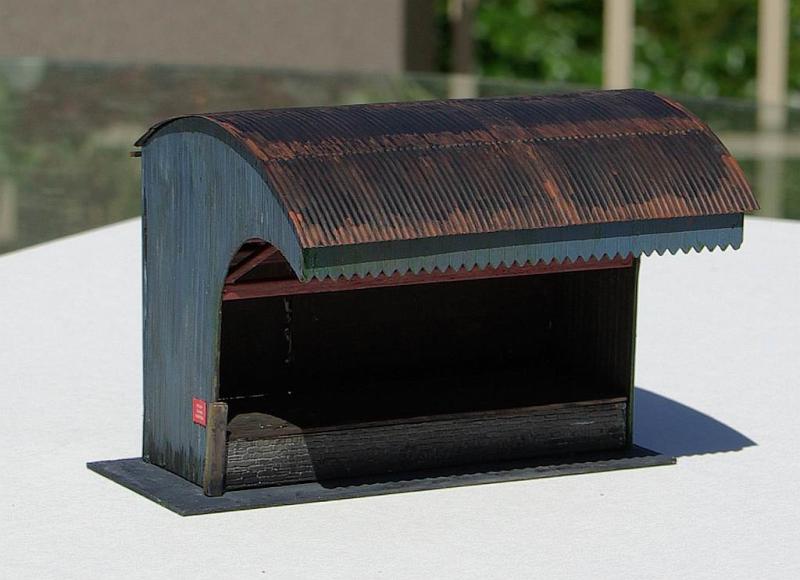
……….and its pretty dark anyway:lol:
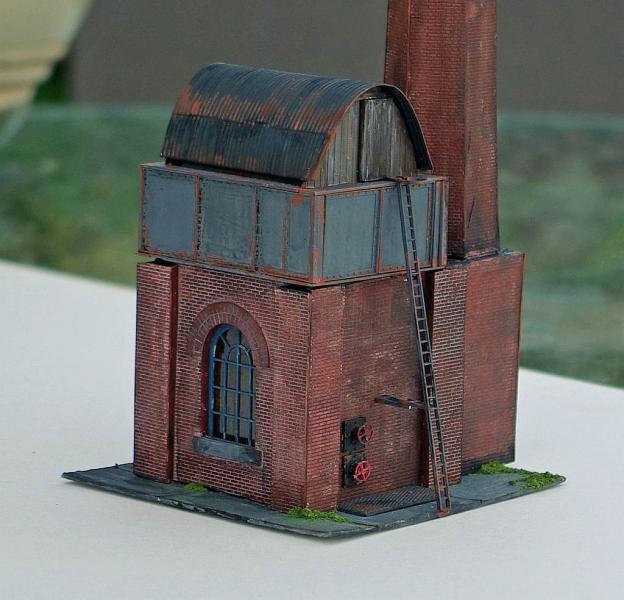
The side you can see will be adjacent to the Boilerhouse……I may connect the two buildings with a pipe.
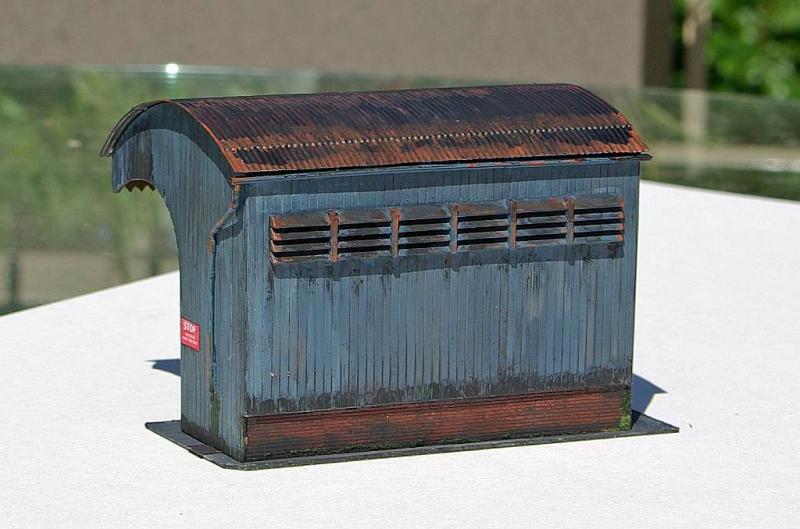
Here is a view of the other side
I deliberately chose to weather theses ancillary buildings more heavily than the main dairy building. It seemed quite plausible that in late 1947 the main building could have been repainted and whitewashed and the other buildings left until more materials became available and cash flow improved. (Not sure if they had cashflow in 1947 but the principle would still hold true)
So I used the same paint shade (French Blue……how appropriate:lol:) but mixed in some pale grey to give a sunbleached look and then added some light dirt washes.
Not sure if Dai Thomas the regular shunting driver always observes the sign reading "STOP No Engine beyond this point ":roll:
This is the rear of the building
This will be the most obvious view as it will back directly on to the branch line. Continuing to use up leftovers…….. the ventilator is a spare from an old Ratio Engine shed kit
Next week the boiler house and water tank……… which will not be quite so simple
Posted
Site staff
Ron
NCE DCC ; 00 scale UK outline.
NCE DCC ; 00 scale UK outline.
Posted

Legacy Member
:thumbs;-):cool:
Owen
web-cam http://82.2.74.174:8081
if the lights are off no cam
if the lights are off no cam
Posted
Legacy Member
 Last edit: by
Posted
Full Member
Thanks Ron…….I must confess the cut and shut was far easier than I expected it to be:thumbsThe steam clean shed has certainly seen better days - a neat job of making a structure look old !!
Silver Fox wrote:
Thanks Owen…….I am trying to get the boiler house done as fast as I can…..the weather is so nice here, Mrs D encourages me to spend more time in the gardennice build John,you seem to have it just right,keep em coming
Owen

John Flann wrote:
Thank you John…….I must admit that some structures do look much better in plastic (I do hope Doug "Chubber" doesnt read this:lol:) I think this is particularly true of timber cladding.Hi John, can't one have fun with plastic! Nicely done that man.
Best wishes to all
Posted
Full Member
I forgot to to take progress shots:oops: but this gives some idea of the process

The walls are made from two layers of medium card laminated to create rebates for the corners with Slaters Brick plasticard glued to the exterior.
The door is made from Wills Clapboard and the window came from a Wills kit. Plastic strip for the Door Frame and Lintel
This is how I clad the Metcalfe Chimney

Here is the finished result
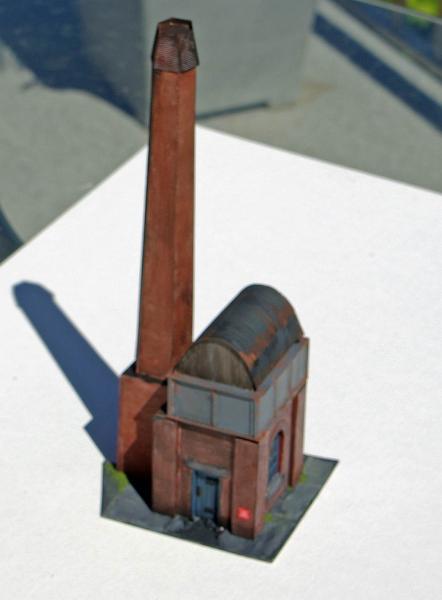
The water tank is from Wills Girder units…..a really handy kit
The corrugated roof is from their Asbestos sheet……although its transparent it paints up easily and is extremly flexible……I have used it a lot for corrugated roofing on Granby
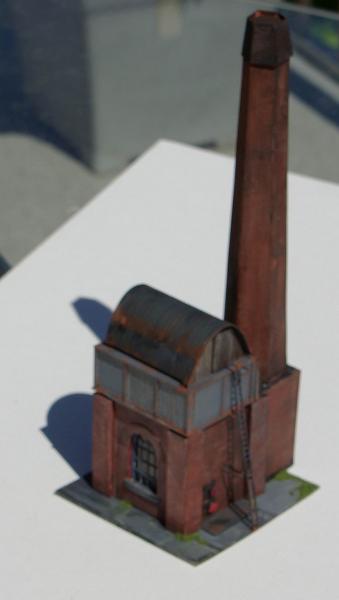
Some rather cruel close ups

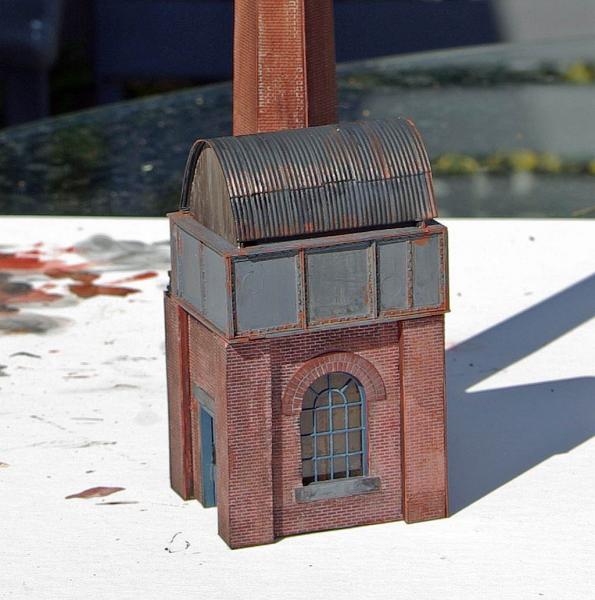
I spent an inordinate amount of time trying to get the weathering consistent on all sides………then took a moment off to look at real life! :roll: Weathering is never consistent it depends on exposure to sun and prevailing wind and rain
So there it is……ready to plonk!
Next post will be the Dairy wrap……….not before time some may say!
Posted
Full Member
Phil
Phil
1 guest and 0 members have just viewed this.