Granby Junction 1948 N. Wales
Posted

Full Member
GWR/LMS OO Gauge DCC RR&Co
Hullo John,Just getting my regular fix of Granby…is this to be a named dairy which takes milk from rail tanks and puts it in bottles for distribution to the populace, or a distributor to other dairies in road tanks for further distribution?
I ask because all of a sudden you are having to make the choice of lots of milk floats/horse, carts and stables or garaging/space for road tank lorries.
In turn, either rows of charging points or piles of 'orse poo, or garages etc.
Ho-hum!
Given the restricted site, and the increase in the use of structural steel in your era G.H.D. [Granby Hygienic Dairies] could go three floors? That would give under-building space for vehicle access etc, with a flat roof with an lift machinery room thereon…
O.K., I'll stop now….fetching coat nd hat!
Best wishes,
Doug
'You may share the labours of the great, but you will not share the spoil…' Aesop's Fables
"Beer is proof that God loves us and wants us to be happy" - Benjamin Franklin
In the land of the slap-dash and implausible, mediocrity is king
"Beer is proof that God loves us and wants us to be happy" - Benjamin Franklin
In the land of the slap-dash and implausible, mediocrity is king

Posted

Full Member
I do apologise for the delay in acknowledging your very helpful reply. Torrington must have been a vast enterprise, outputting at least 14 tankers a day. Although my dairy will only send out 2 tankers I am beginning to realise just how compressed my site is……….one of the reason I was so complimentary about the scale of your bacon factory:lol:
Thanks for the comment about the size of the loading pipes…..that has prevented me from doing something foolish with a water crane:oops:
Best wishes from a spring like Vancouver
John
Posted
Full Member
Hi DougHullo John,
Just getting my regular fix of Granby…is this to be a named dairy which takes milk from rail tanks and puts it in bottles for distribution to the populace, or a distributor to other dairies in road tanks for further distribution?
I ask because all of a sudden you are having to make the choice of lots of milk floats/horse, carts and stables or garaging/space for road tank lorries.
I really appreciate your post. It caused me to stop and reflect a while before I became guilty of attempting to do to many functions in such a confined space.
The prime purpose of GHD (actually it may have another name :cool:) was always to provide an excuse to have daily tail traffic from the branchup to Granby . I could never make up my mind whether it would receive milk by rail for bottling and distribuition or collect and process it for despatch to Birkenhead. Over the years, while making up my mind I acquired half a dozen milk floats and a road tanker…just in case.
For a number of reasons (ease of attaching and detaching to the main milk train at Granby and shunting from the steam cleaning bay to the loading bay at the dairy) I finally decided it would process milk and send two tankers a day to join the Shrewsbury-Birkenhead Milk train at Granby.
Until your post I was also attempting to incorporate a bottling facility using my milk floats:roll::oops: without reallly thinking of the space that would require…….again until your post and Jon's I hadnt really given any thought to the volume of unprocessed milk that would have to arrive each day…….I had incorporated a loading bay for churns collected on the branch line but it will hardly be adequate.
I will scrap the bottling plant idea and distribuite the floats around the layout…..the milk tanker can be one of a fictional fleet (garaged off site) and having seen a very evocative photo of the Express Dairy at Seaton I think need to get a couple of flat beds for churn deliveries
I did think about a flat roof but finally decided on the gables shown in the mock up…….partly influenced by Seaton but also I thought it would fit more easily into that location….the idea being that it was built when the railway first came to the Vale of Clewyd and it has evolved over the years adapting to the changes in Milk distribuition…….it remains to be seen whether I can establish this as a credible legend…….your post has certainly helped me to bring a sharper focus to the project…..the floats have been banished from the site already:lol:Given the restricted site, and the increase in the use of structural steel in your era G.H.D. [Granby Hygienic Dairies] could go three floors? That would give under-building space for vehicle access etc, with a flat roof with an lift machinery room thereon…
Many thanks Doug
Best Wishes
John
Posted
Full Member
Its slowly sorting itself out so now I can get back to doing some modelling:thumbs
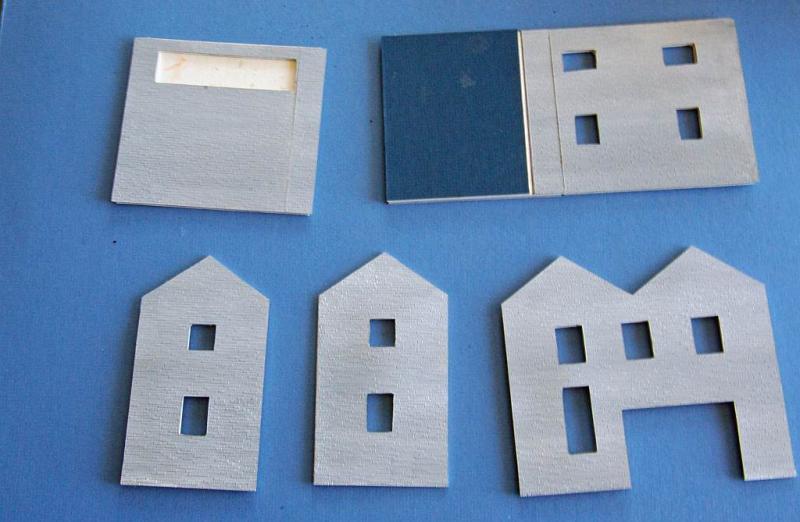
The window and door apertures were cut out and then Slaters plasticard was glued to the individual walls. I am using a sort of modified Scalescenes approach setting up rebated corners and slots by laminating layers of card……but sadly not with the same degree of precision!
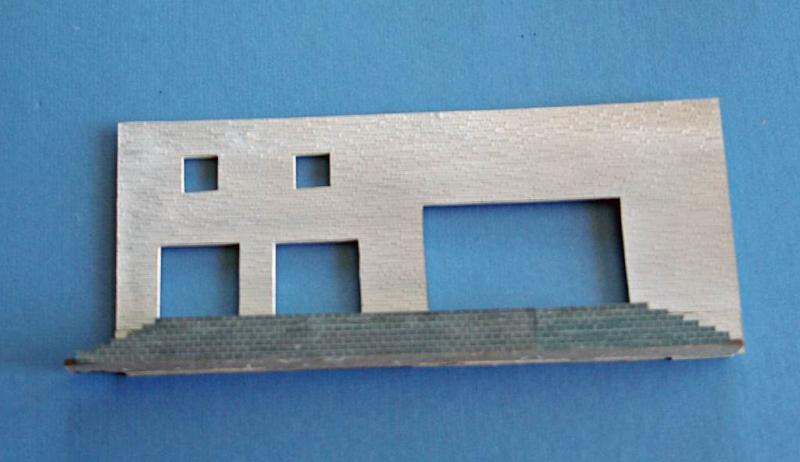
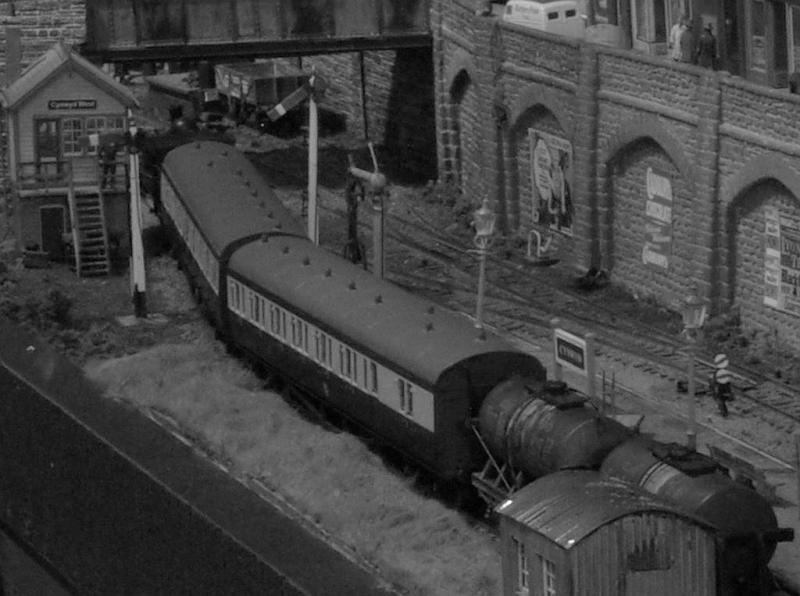
Here is the rail side wall, to which a loading platform has been added
In parallel with the building work, I am setting up numerous RR&Co schedules so that I can automatically get milk tankers from the dairy up to the main line.
I left you with Cynwyd's banking pannier 6757 hauling 2 laden tankers from the dairy, through the goods yard, to the bay platform there to await attachment to the regular branch passenger train
The tankers are left in the bay and 6757 heads off on other duties
Shortly afterwards the hourly service arrives from Granby hauled by 57xx 5773
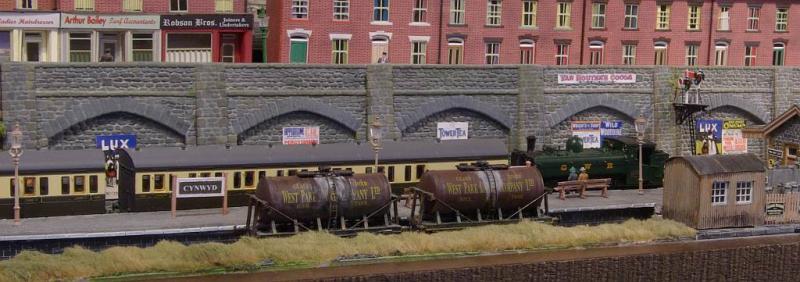
5773 runs around its train ready for the next trip to Granby. This regular routine is now pretty much a completely handsfree operation. Now I have to incorporate some checks so that Train Controller recognises there are two full tankers waiting to be coupled.
Once the train is ready to depart it pulls forward sufficient for the rear of the train to clear the bay point, pauses for it to be set for the bay and then reverses slowly into the bay to couple with the tankers
And then departs up Cynwyd bank for Granby. TC calculates momentum settings based on the tonnage the loco is hauling. Its fascinating to see the difference in performance between light engine and a laden train……one gets a similar effect with the addition of the two tankers
Hopefully next week I can show you the tankers arriving at Granby
Posted

Full Member
Raised beds are to help mature people with dodgy backs enjoy their gardening, not to give dodgy backs to silly old Hectors such as you an me! Having learnt my lesson (well almost), I get young Dan to do the heavy lifting round here, including digging (which I keep telling him is good for him). He's been digging out the pool, then barrowing the concrete round, while I've advised and driven the mixer and it seems to work. Anyway, even mature gents (aka old fools) periodically have to rest up for a bit and I hope your pain continues to ease.
The new main stone dairy building looks promising and I'm looking forward to see this compact site being well populated. I can see how your train scheduling brings much pleasure, as it really does represent the social history of the time and I like the way the system reproduces the additional load on the locomotive as it pulls away having coupled the additional wagons. There may be some merit to DCC after all! ;-)
Good health and modelling,
Bill :)
 Last edit: by Longchap
At 6'4'', Bill is a tall chap, then again, when horizontal he is rather long and people often used to trip over him! . . . and so a nickname was born :)
Posted
Full Member
Delegation is always a good idea……our extended family are coming for lunch over Easter but they have bee prewarned to wear old clothes and bring spades :lol:
[user=1814]Longchap[/user] wrote:
:thumbs The conversion is progressing albeit rather slowlyThere may be some merit to DCC after all! ;-)
Bill :)
:cheers:cheers
Posted
Full Member
I hope this split format is a more interesting way of posting a "how I did it":lol: . Comments/questions are always welcome.
Window frames from a Wills building pack have been added along with some dirty scalescene glazing. I guess I bought the pack 15 years ago and have used its contents on a number of projects. Getting down to the dregs now hence the rather eclectic collection!
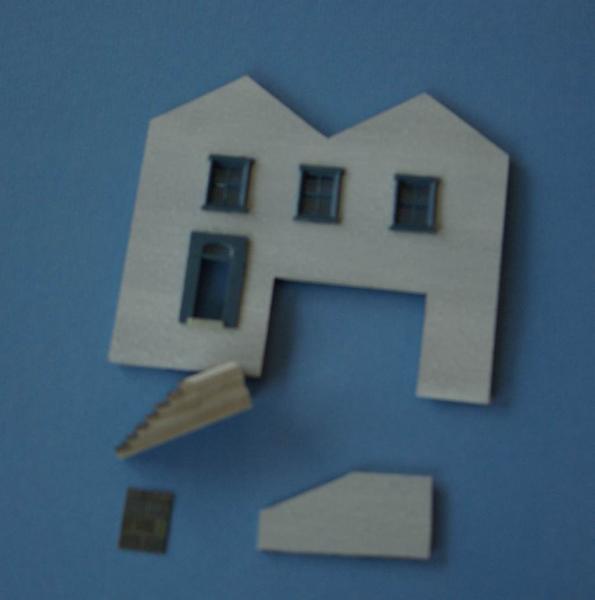
In the foreground are steps that will lead up to the office door using laminated strips of 2 mm card……here is the finished article now attached tp the end wall
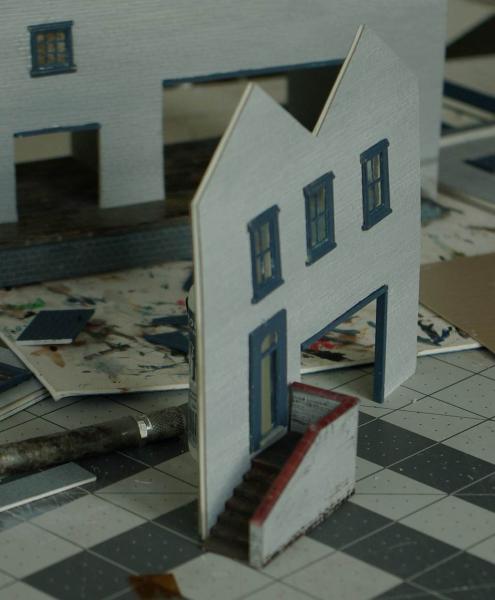
The single end gable and two intermediate walls were added to the long wall. Floors give added stability and stiffness

Slaters flagstones were added to the loading bay and exposed floors
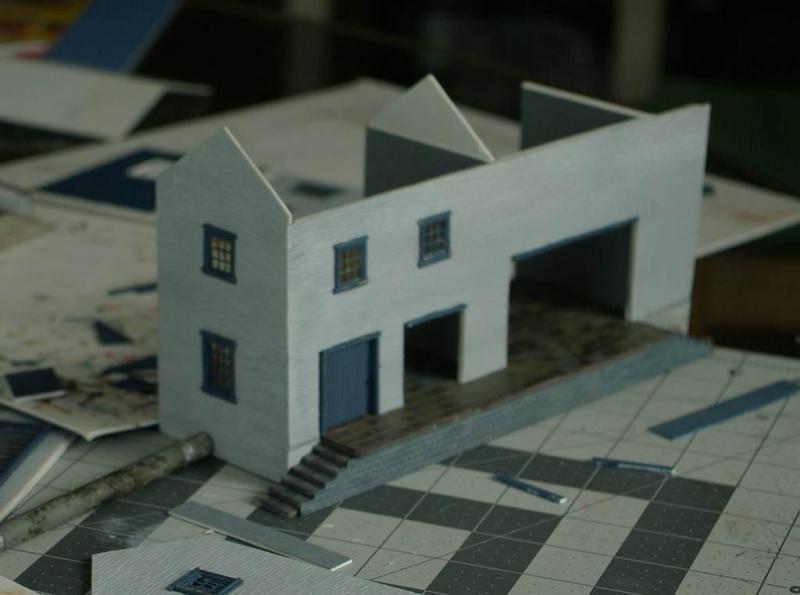
Door is Willls boarding with a bit of wire bent up as a handle. The other bay which will be used to receive churns of untreated milkwill be left open as will the larger opening for the despatch of pasteurised milk.
I aplogise for the poor quality of these photos…..they were a bit rushed. The contrast with the next ones shot remotely from a tripod is rather marked:oops:
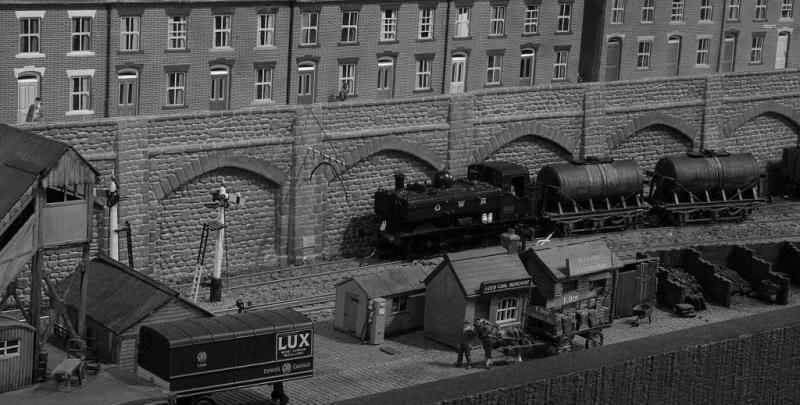
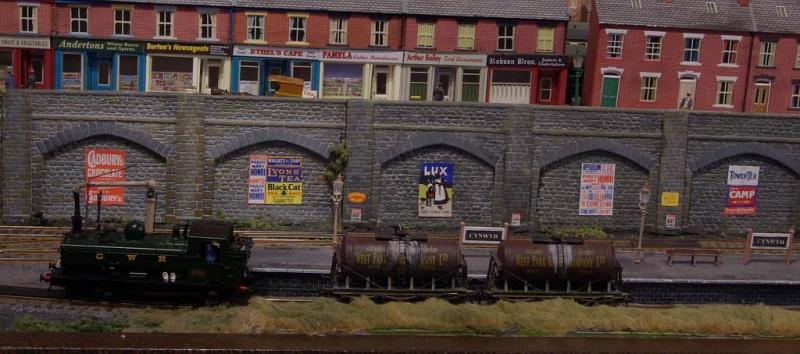
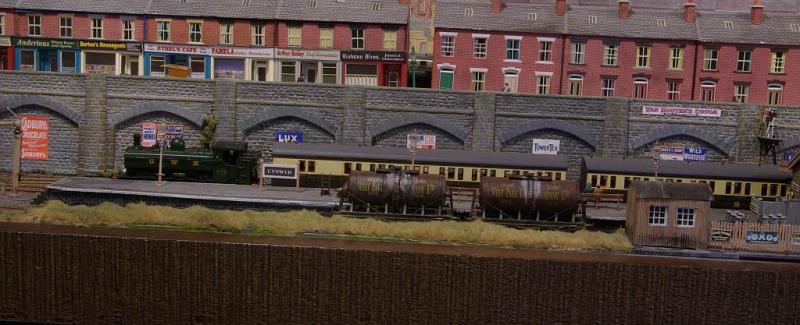
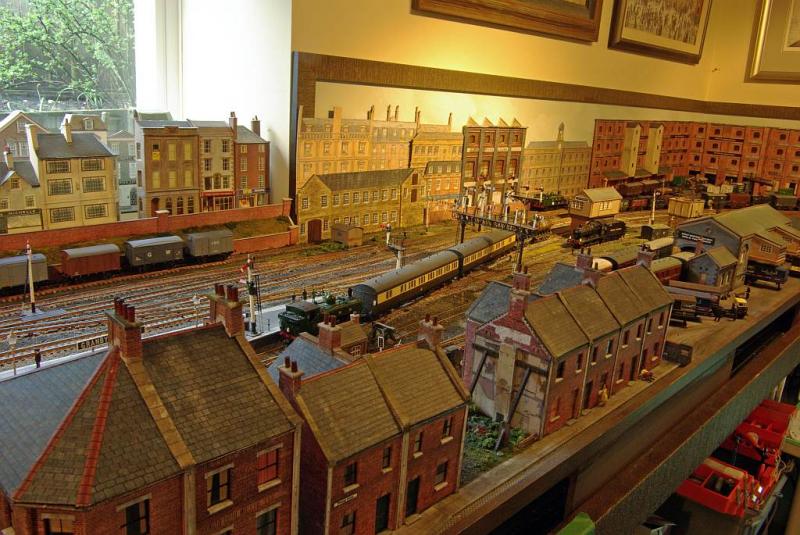
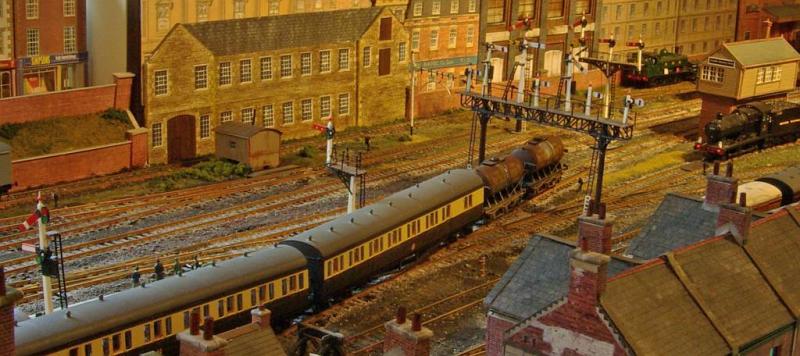
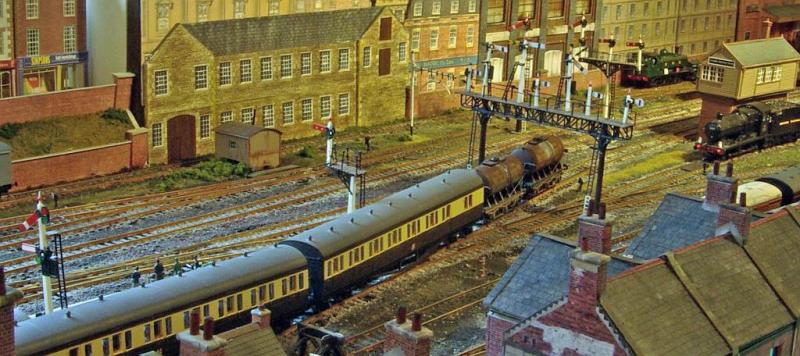
Here is an overall shot showing the passenger train with the two milk tankers arriving at Granby. Clearly spring has at last arrived in Vancouver….thats a gooseberry bush top left
In the prvious post I mentioned that this B Set automatically shuttles back and forth on a regular basis…..at the branch the loco runs around the carriages whereas at Granby there is a loco exchange with a new loco joining the train from the loco spur. To get a swift turnround RR&Co starts the schedule to move the relief loco from the spur the moment the train passes the signal box. Now that there are two trailing tankers I have to change this so that the station pilot will edge forward ready to uncouple the tankers…….simpler said than done

I am going to devise two separate uncoupling routines. Firstly, once the passengers have alighted the train will reverse about 6" to stop over an uncoupling magnet thus releasing the tankers then secondly forward to do the normal kadee shuffle over the buffers magnet uncoupling the incoming loco

The pilot, 2259 a shiny new Collet goods moves from the siding and couples up with the milk tankers. Thats why the train has to be pushed back so far….to avoid them being pushed back on to the carriages.
The pilot then pulls the tankers back on to the main head shunt to await the arrival of the Milk Train from Shrewsbury
Once the turnout to the main line is cleared the relief loco 9643 comes off the loco spur to couple up with the carriages ready for the return trip to Cynwyd

After Easter the main building should be ready for the roof and I hope to show you photos of the Milk Train as it approaches Granby
Posted

Full Member
Can I make a little suggestion, with the pics that turn out with an orange tone, just use a De-saturation tool, it will normalize that effect.
Phil
Phil
Posted
Full Member
That was careless/idle of me …….prattling on about tripods etc and forgetting to make any corrections…….the problem often comes up when its sunny outside but not sufficiently bright to dispense with the lighting in the room
I am afraid I just hit Smartfix but to my mind there is a discernible improvement ………I guess I should be more innovative and make more creative use of the editing tools.
Thanks again for the advice
Cheers
John
Posted
Full Member
There's a plugin that might interest you, it's called Helicon Focus, it is used when you want a close shot of a loco etc and you want the ground in front and behind in focus. Basically what you do is, set your camera up, take as many shots as you like but usually about three or four, focus on the near ground take the shot, focus on the loco, take the shot and the same for the background. Open Helicon Focus, open and tick the pictures and then click on render, it will automatically combine all the shots but only use the focused areas, so everything is in focus.
It's a free demo for a month but then it's I think just under £30 a year…but there are ways around that :lol:
Phil
Phil
Posted

Inactive Member
It's excellent.
Edit; One off payment.
Max
Port Elderley
Port Elderley
Posted
Full Member
Phil
PS I forgot to mention that if the camera moves slightly between shots, ie. not on a tripod, it also compensates for this.
Last edit: by Phil.c
Phil
Posted
Inactive Member
I just installed it on one of my laptops.
I have to do a complete rebuild of my desk top from the motherboard up, so I need to save all of my paid software, etc so I can keep operating.
The jewel in the crown will be an Intel pcie SSD 400 Gb.
Can't wait. :lol:
Max
Port Elderley
Port Elderley
Posted
Full Member
Cheers
John
Posted
Full Member
Phil
Phil
Posted
Full Member
Interesting, Phil - thank you. To date I've used Photoshop's blending layers to do focus stacking but on a couple of recent images it has failed to work - the reason being, I think, that the camera was so close to the subject that changing the focus point also slightly changed the focal length, "focus breathing" I think it has been termed. The normal Photoshop technique couldn't cope with this but Helicon looks to have managed it well - see http://yourmodelrailway.net/view_topic.php?id=11544&forum_id=21&jump_to=258589#p258589John,
There's a plugin that might interest you, it's called Helicon Focus, it is used when you want a close shot of a loco etc and you want the ground in front and behind in focus. Basically what you do is, set your camera up, take as many shots as you like but usually about three or four, focus on the near ground take the shot, focus on the loco, take the shot and the same for the background. Open Helicon Focus, open and tick the pictures and then click on render, it will automatically combine all the shots but only use the focused areas, so everything is in focus.
It's a free demo for a month but then it's I think just under £30 a year…but there are ways around that :lol:
Phil
There's probably other plugins that do similar, some more testing needed: need to run more trains:)
Once again, thanks for the info
Jon
Posted
Full Member
I know its hardly stop press news. These Coaches were announced by Hornby last May and arrived in the UK in February…..bearing in mind recent turn round times thats pretty amazing. They are apparently flying off the shelves which ,hopefully, will improve Hornby's finances somewhat.
For the non GWR enthusiasts these coaches were introduced in 1925 and intended for cross country expresses. Bow ended?…….to narrow the connection gap that had worried the more nervous passengers and to facilitate buck eye coupling. Hornby have released 5 variants LH Brake/3rd, LH 3rd/1st, RH 1st/3rd, All 3rd and RH 3rd/Brake. With this arrangement coaches could be assembled with the corridor always on the same side…..brake compartments at each end and 1sts together. Why? I have read of various reasons…varying from giving passengers a seaside view….or alternatively minimising sunlight fading.:shock: The most likely, I think, was to ensure that the corridors were always on the platform side at Paddington's platform 1 to facilitate boarding.
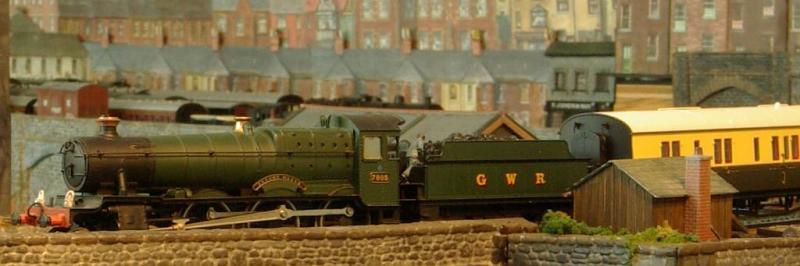
It seemed to take forever for the parcel to arrive from Cornwall! When it finally arrived, it was one of those joyous occasions when realisation is even better than expectation. Here is a rake of four headed by 7805 Broome Manor on the viaduct approaching Granby Junction. You can see the ventilators all lne up on the same side
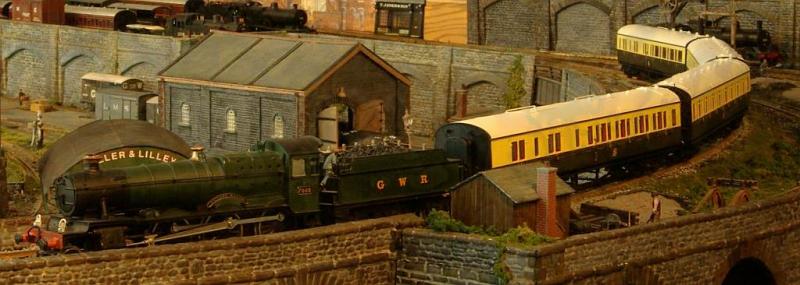
Encouraged by Phil and Jon this was my first, very tentative, experiment with photo stacking. A number of shots are taken from an identical fixed location and each shot is focussed on a different part of the screen…….the shots are then all merged together by some magical software so that the final result has much better overall definition.
Its by no means perfect but I guess its a start:lol: Not sure where the greyisg shadows on the coaches came from…..they are not on the individual shots
I ordered a rake of 6 coaches when they were first announced, without really appreciating how unlikely it would be for such a uniform rake to be still in service in 1947. Both the GWR and LMS had a reputation for mixing all their different carriages up. The aim being to have the right number of 1st and 3rd seats on a given train rather than any attempt at uniformity.
I am, however, going to stick with a rake of 4 on the Birkenhead-Pwllheli run……because hopefully that could well have happened…..particularly headed by a Manor
and perhaps more importantly because 4 x 57' coaches are much better operationally given the confines of my fiddle yard.:lol:
The extra 3rd and compo will be used to create a more typical higgeldy piggeldy GWR look on the 8 coach Birkenhead-Penzance train………Collet Sunshine, Hawksworths and now Bow ends all mixed up. Like many GWR modellers I now have rather a surplus of Bachmann Sunshine Coaches!
Here are some individual shots………….no idea why this is blue :oops::shock:
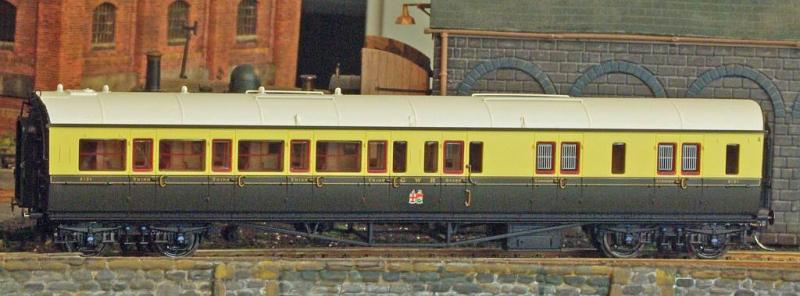
Brake/Third Corridor side
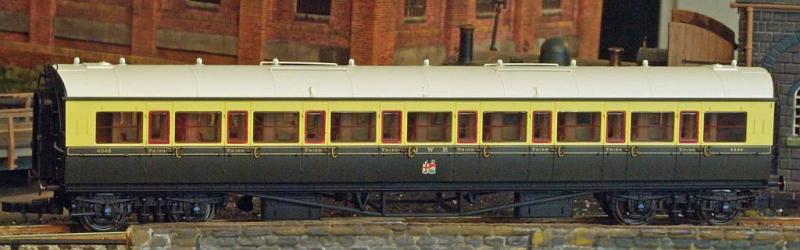
All Third Corridor side
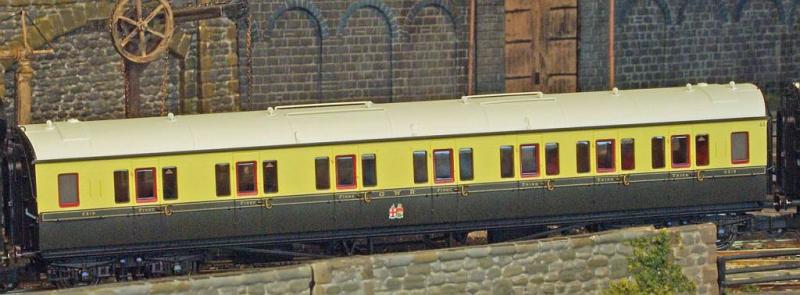
First/Third Compartment side……note the different window spacing
The detailing is superb
This is the 1927 livery ……I think there were at least 4 changes after that. I should really have either the shirt button or Great Western but I am afraid I may horrify the purists by sticking with this……although the white rooves have to go…….I am very inexperienced at spraying so I think it will be a case of hand painting dirty grey…..as with all my other GWR carriages.
For fixed rakes I use the alternative couplers that Hornby supply with Kadee #19 at the ends. The corridor connections are not quite as close as one gets with Hawksworths and Staniers but I must admit I prefer this simplified version…..I found fitting the earlier ones an absolute pain.
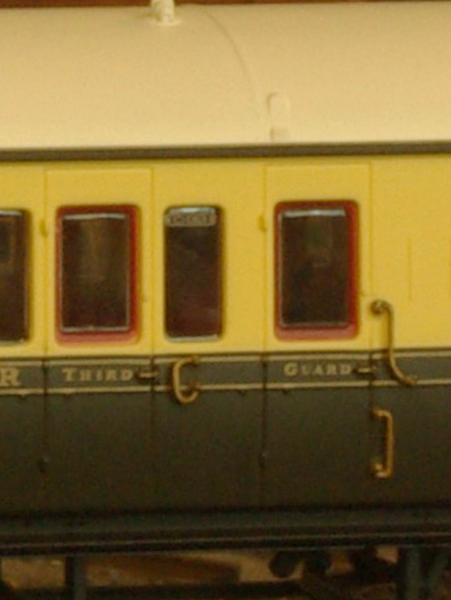
Look at the lamp holder!
To finish………last time with pristine rooves

Last edit: by John Dew
Posted
Inactive Member
The strange splotches are generated by the software.
It's trying to cope with shots that are out of order, or which have different exposures.
My strategy is to set the camera up on a tripod and then use the remote shutter release to take about 15 - 20 shots.
I start with the focus ring right around to one stop and then take each shot in succession, rotating the ring a few notches at a time.
When I reach the other stop, I download all of the images into a folder.
I edit out the few each end which are grossly out of focus and then load the rest of the stack into Helicon.
Then hit Render.
Then I save the resultant image as aaa. It will appear in the stack folder.
It's a bit of a business, but it makes for nice shots.
Only after I've rendered the stack, do I then use Faststone to adjust the colour and crop and resize the shot to 800 x 600 (or what ever you want.)
Finally, I use IrfanView to do one Sharpen, which sorts out all of the quality issues created by cropping and resizing.
I hope that helps a bit.
Cheers
Max
Port Elderley
Port Elderley
Posted
Full Member
I sort of guessed that the grey marks might relate to exposure or exposure metering.
Over the years I have developed an "ok" method of shooting using my wide angle lens and then cropping down……latterly I have used a tripod,remote control and my smallest aperture f22
My camera has the facility to select up to 11 different focus points……but with the wide angle a number of the points are way off the subject. I think I might be better to use my zoom lens and frame the shot from the outset?
I use photoshop elements to crop, sharpen and smart fix :oops:……..and then irfan view to resize………if I use fastone will that make elements redundant?
I wonder if this subject might reach a wider audience with a thread of its own…..what do you think? Should I start it and then you can move these posts?
Cheers
John
Posted
Full Member
If you have an aperature of f22 or more each shot should give you a very good depth of field so there is no need to take more than four, as an example, the shot below was just one shot, f22 and the focus set to three feet where the loco is, you will notice that pretty much everything is in good focus.
I picked this up when Chris Nevard was at my place taking pictures for the Magazine as he only took three shots per scene.
As Max mentioned, a trypod and timer is a must.
Once the pictures are taken, I find the best thing to do is open them into PS etc. "Slightly" sharpen then render then in Helecon.
After that open again in PS and correct the levels and possible de-saturate a little to cut down on colour brightness.
Phil

Last edit: by Phil.c
Phil
1 guest and 0 members have just viewed this.