Granby Junction 1948 N. Wales
Posted
Full Member
GWR/LMS OO Gauge DCC RR&Co
I sometimes use a Heljan class 27 to push mine round, but usually a class 45 or equivalent. It does need something heavy.
Cheers Pete.

Posted

Full Member
It was not entirely straightforward! This was a case where Plan B had to be hurriedly put into action when we realised that double sided tape was not quite as adhesive as we had hoped
I am very impressed with the product itself and I imagine with a brand new construction it would be easy to apply. Our problems resulted from being unable to apply it in situ. Leaning across 4' of baseboard and progressively removing the protective backing from a 5' long roll and then sticking it precisely on to the backboard was never going to work and happily we never attempted it.
Our solution was to mount the roll on to 2mm grey board and then stick the grey board to the backboard.
The Maximum length of the grey board is 40" and the two rolls of ID scenery were each 60" long. This meant we finished up with 2 x 40" and 2 x 20" boards. Each board had to be glued to the backboard so it was square not only with its neighbour but also with the base board and top frame. Plenty of opportunity for marital strife. We celebrate our 60th wedding anniversary next year so we have had lots of practice!
And in fact alls well that ends well:
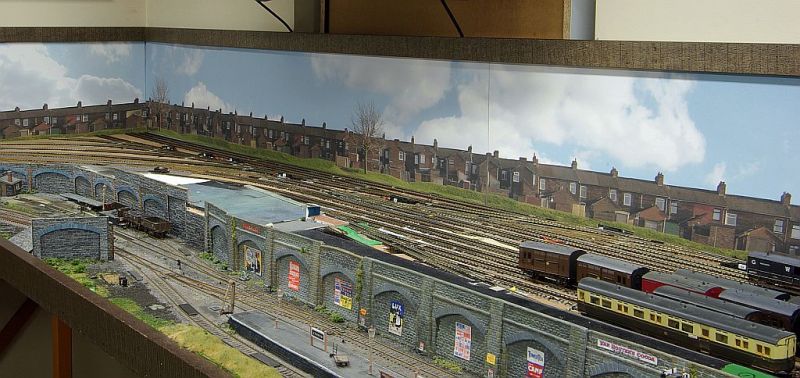
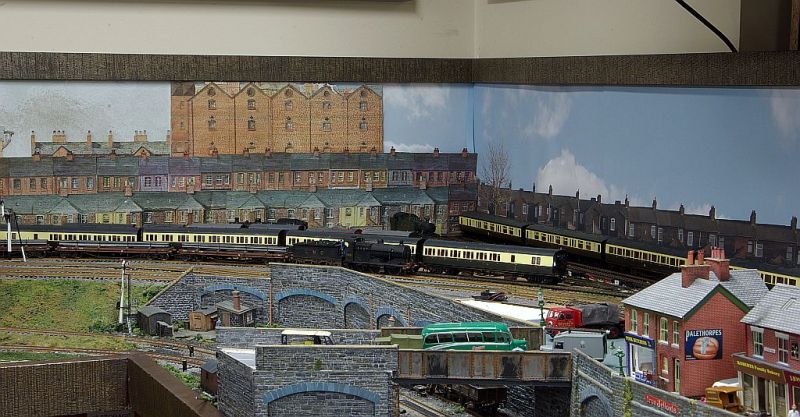
I am quite pleased with the overall effect. ID have a very comprehensive range but their townscapes and industrial scenes were too modern for Granby. Fortunately these house backs are not too far away from developments constructed in the thirties. I admit to a few anxious moments when I first checked the rolls in case there was a forest of Tv aerials
Having to use 4 separate boards resulted in two vertical joins but Mrs D believes she can make them disappear.
A greater challenge is at each end:

I have to re-position an assortment of Townscene low relief cut outs to camouflage the differing building styles and sky treatment. The contrast will remain but hopefully will not be to obvious. It is, after all, at the very back of the layout and normally there is a screen of buildings in the foreground.
Hopefully I can show the result next week.
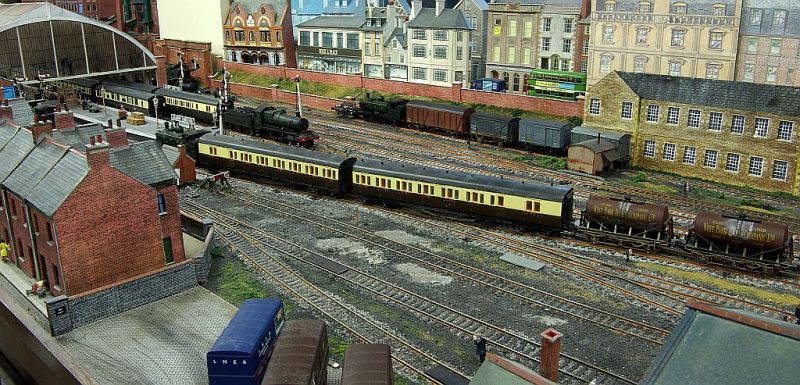
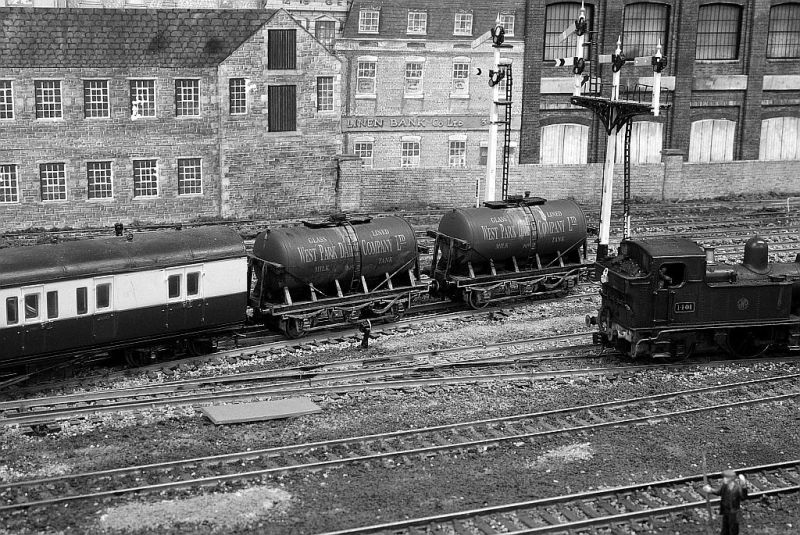
Meantime, here are a few more shots of the Milk Tankers wending their way from Cynwyd to Granby:
Best wishes from a sunny but still chilly Vancouver
Posted

Full Member
Congrats on being featured in BRM - just caught up with the news and I see that Granby feature in the digital edition for May is available now .
 Last edit: by gdaysydney
Posted
Full Member
Cheers Pete.
Posted

Full Member
Michael
Posted

Full Member
Phil
Posted

Full Member
Now I'm going to do some Granby revision - I've been "otherwise engaged" for the last week or so and have got behind on YMR postings, particularly those from Vancouver ………………
'Petermac
Posted
Full Member
Never a dull moment in Granby - you put my efforts to shame.
Congrats on being featured in BRM - just caught up with the news and I see that Granby feature in the digital edition for May is available now .
Thanks Dave - hope you enjoyed it - seems ages since I was taking reams of photos and trying to put 2000 words together
Best wishes
John
Posted
Full Member
Headmaster wrote:
Very well done on the backscene John (and Mrs D), a very professional job. I do like the Id backscenes but they are not the easiest things to work with. Super photos too, although that is a bit of a given!
Michael
Thank you Michael that is much appreciated particularly from you.
I had to persuade Mrs D to lend a hand because she is infinitely more practical than I when it comes to this sort of thing. I can still recall my pathetic first (and last) attempts to hang wall paper in our first house - I was fairly swiftly banished to holding the ladder! :oops:
Best wishes
John
Posted
Full Member
A very nice article in BRM John and great pictures too!
Thank you Phil. I am so glad you liked the pictures. It was an interesting exercise being coached by Andy York by email - thousands of miles and eight hours away. It was he, of course, who did all the editing and enhancing
Posted
Full Member
Thanks PeterGreat to finally see Granby in BRM John although the online copy I get via Readly is apparently different from the paper version - Granby is a banner on the cover rather than the whole front cover. Not sure what else is different but it's strange reading an article on a layout you feel you know almost personally in a magazine.
Now I'm going to do some Granby revision - I've been "otherwise engaged" for the last week or so and have got behind on YMR postings, particularly those from Vancouver ………………
I have, of course, read the digital version but I am still waiting for the arrival of the paper version. I hadnt realised that the digital and print versions varied. I will check it out when it arrives
You will see that the storage extension is now almost finished and you will be relieved to hear that I am just about to replace the screen of terraced houses that you were so concerned about.
 . I didnt feel I would be forgiven if they went astray
Posted
Full Member

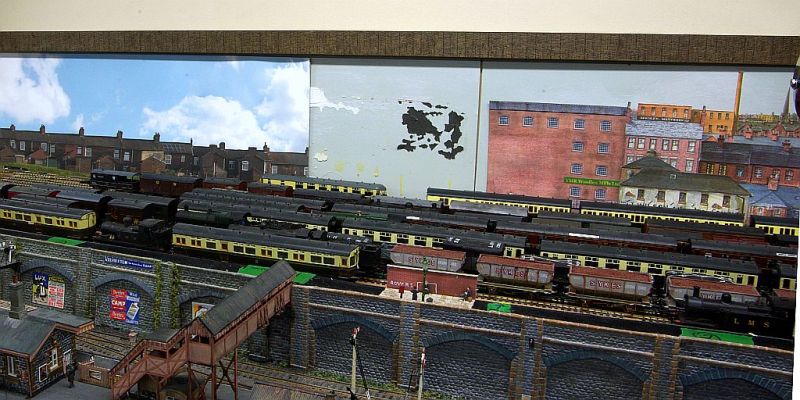
Having tried various combinations, I eventually came to the conclusion that it was not possible to achieve a seamless marriage between Impressionism and Realism.
Better to make a feature of the contrast with a big bold statement:
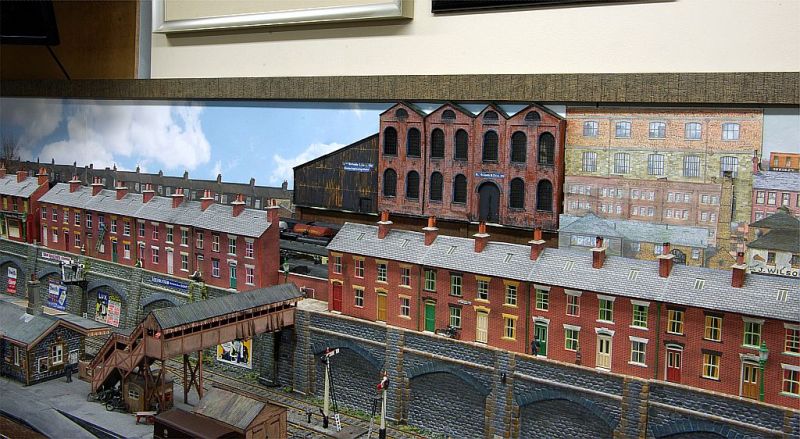
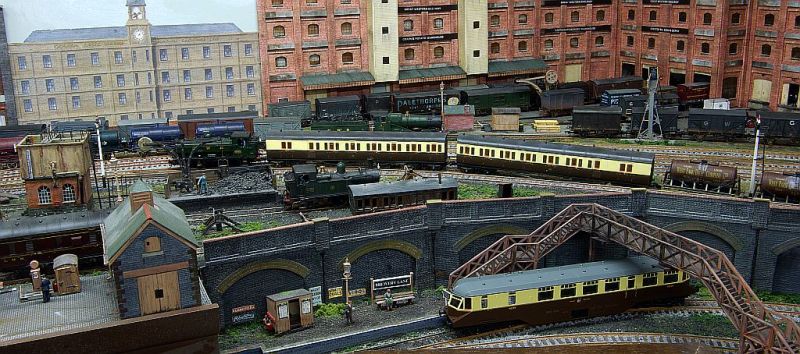
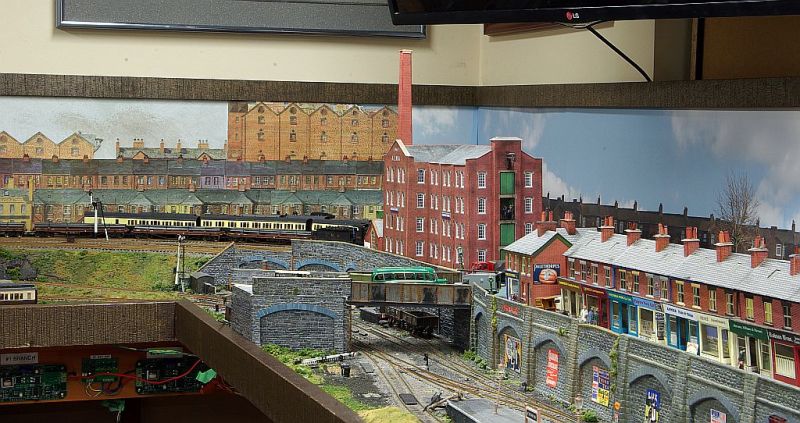
I was particularly anxious to retain the low relief engineering works. I built the brick built works 20 years ago from a Langley kit and added the scratch built section from Wills Corrugate. This is one of the various buildings scattered around Granby that are named after friends and family.
I had to build a narrower Scalescene wall to lift it and provide clearance. Happily the trains themselves and the Terraced housing screen conceal the cantilever effect.
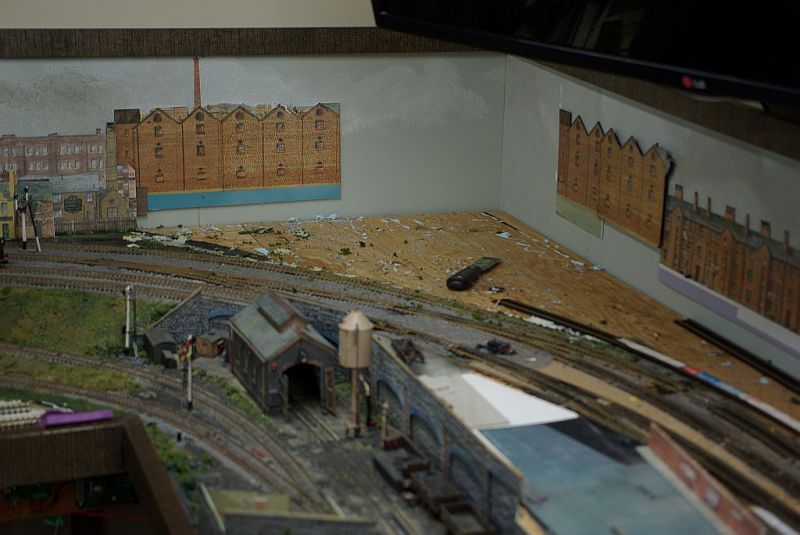
Here is a "before" of the other end of the ID Scene:
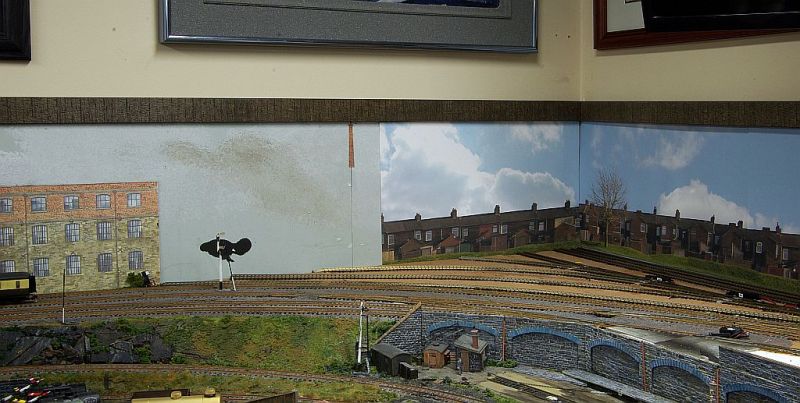
The solution - another bold statement:
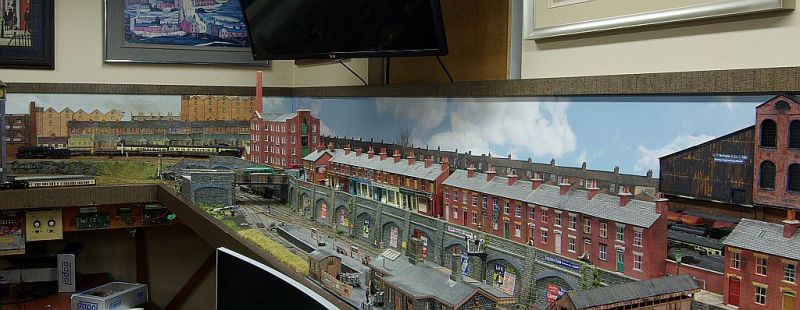
On the far wall, I chose to retained only the sky from the ID Scene.The vertical contrast between the two sets of back to back houses proved to be too great in a single plane.
Despite Mrs D's magic, the corner join still persists somewhat but is less obvious when the Alma Mill is replaced in the foreground:
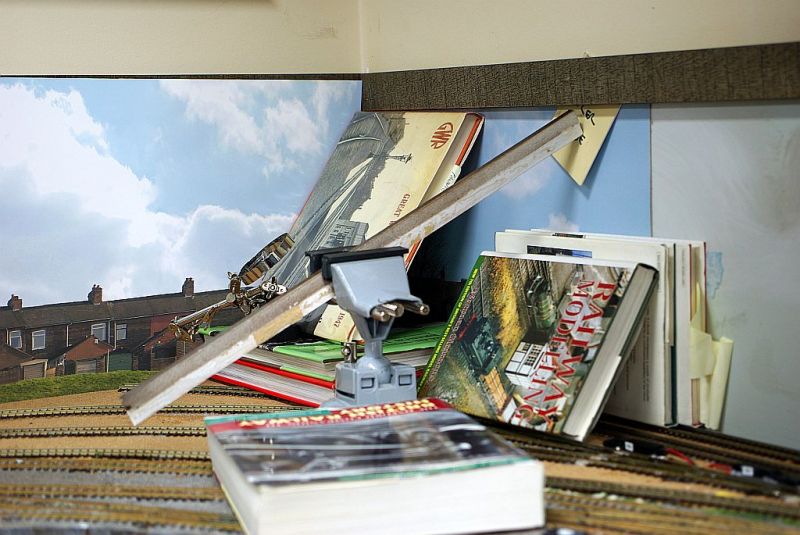
This shot exposes, in the foreground, some of the co-lateral damaged suffered from having to lean across to access the far corner.
The road bridge, complete with bus, is now restored. Beyond the bridge the branch Engine Shed and Water Tower will shortly be put back in place.
The devastation in front of the bridge will remain a while longer. Once I have run some trains, the next big project is to install two automated Dapol Junction signal and hook them up to Train Controller.
Here is an overall shot of the storage extension and its back scene along with the terraced house modular screen.
Next week, at long last, I hope to finish the storage extension with a post about the track plan.
Best wishes from Vancouver
Posted

Full Member
Barry
Shed dweller, Softie Southerner and Meglomaniac
Posted
Full Member
Cheers Pete.
Posted
Full Member
Thanks Barry - that is very kind of you. As you may have gathered I was a bit concerned it would not work so I am quite pleased with the end resultLooks good John - those backscenes merge together well, particularly as your eye is drawn to the foreground by the factory, bridges and other buildings. A nice overall scene.
Barry
Posted
Full Member
So true Pete - I have a list as long as your arm of what not to do "next time" - except there will not be a "next time" :sad: and retrofit improvements are rarely fun to do! :roll:As Barry said, it does look good. It's no fun leaning over a layout at the best of times. If I were ever to start again (more chance of getting struck by lightning) I'd make narrower baseboards and start with the back scene. Maybe we could be used as an example to people starting out with a layout. :)
Posted
Full Member
Michael
Posted
Full Member
Thank you so much Michael. I tend to think of you as the Master of Back Scenes.I was a bit worried about the introduction of an id photo backscene - firstly the actual mechanics, which you showed you were perfectly capable of achieving, and then how those two ends would join up with the other backscenes. I should never have doubted you, it's a clever and super solution and the final photograph shows just how well it has worked. A great job.
Michael
As I implied in my response to Barry, I was more than " a bit worried" when I unwrapped the roll on arrival :roll: . It didnt really look how I imagined it would - no criticism of ID Scenes, just my inabilty to visualise.:shock:
If I were doing it again (the retrofit extension) I think I would buy a couple more Townscene sheets and just extend the existing theme. On the other hand, if I were starting a new layout (which I am not!) I think I would use ID scenes throughout.
As it is I am delighted it has worked out ok - more by luck than judgement mind you!
Posted
Full Member
This was the scene in early March :
and eight weeks later:

Its not exactly as originallu planned. The tri-angular site was very restrictive and as the track laying progresses I found myself obliged to add a few inches of track here and there to ensure either clearance or a smooth transition. Each such inch added then resulted in similar loss in the sidings.
At first sight it might seem it was hardly worth all the effort but a quick summary of the stored trains will reveal some of the benefits : .
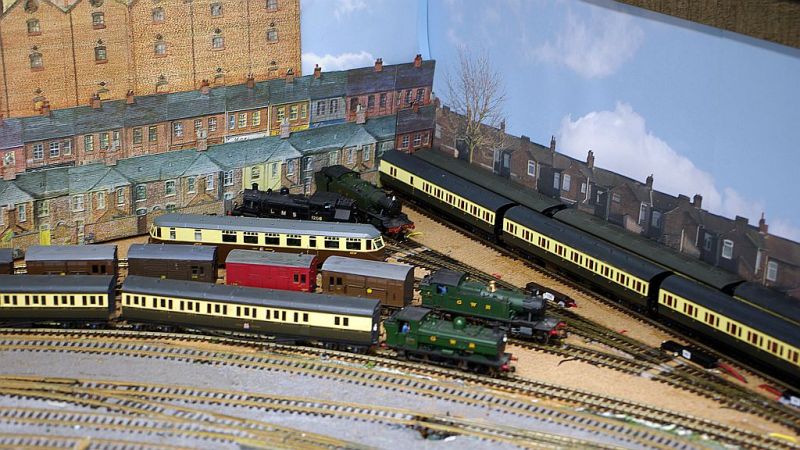
From the top :
1 5 Car GWR Express + Castle 4-6-0
2 4 Car GWR Suburban - sadly where I lost an inch or so which means the loco has to be stored elsewhere.
3 GWR Large Prairie GWR suburban relief
4 LMS Ivatt 2-6-2T LMS suburban relief
5 GWR diesel railcar
6 GWR Horsbox train + GWR Small Prairie
7 The photo shows a GWR B Set but in practice it will be home to the 4 Car LMS Suburban
All these trains were previously stored elsewhere. Their relocation means I now have space for a 5 Car LMS Newspaper/Parcels train and a second 4 Car GWR Suburban and the big plus some empty slots making train movements less inter dependent.
Here is the "before" schematic from RR&Co

Clearly designed for tail chasing circuits. The subsequent addition of the Storage Turntable and associated Loco sidings, bottom left, created opportunities for a more realistic " out and back" operation. However this proved cumbersome because most such trains arrive in the bottom siding 685 Barmouth. Obviously they have to be turned and immediately sent back before the next arrival to that block can be initiated
The "After" schematic shows how this situation has now been improved:
Note: the bottom block 685 has not been physically moved. It was just the most convenient way of fitting in the new sidings and point work into the diagram.
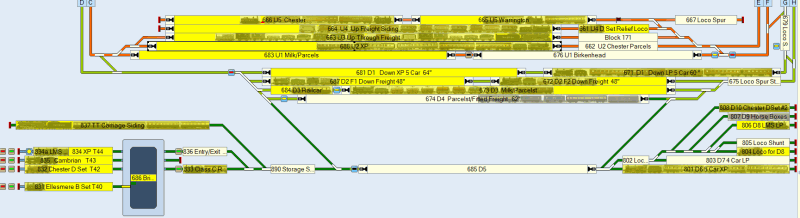
Imagine the arrival of a 4 car Suburban from Granby. I can drive it straight into the empty block 803 and seconds later Block 685 is released and any one of the other trains in the new sidings can immediately depart. Generally it will take a little longer than that because I like to first complete the set up for the return. Nevertheless Block 685 will be clear much sooner than before.
Now after 8 weeks slog and a lot of unplanned damage to the branch engine shed I can look forward to running lots of new trains
Regards from Vancouver where strong winds and snow are forecast! This weather is playing havoc with our normal gardening schedule. Tomatoes and Courgettest that I had just begun to harden off (2-3 weeks late) were hastily returned to the Greenhouse. Some of the Tomatoe plants are already in flower and one Courgette - named Desert - is bearing fruit!l
Posted

Full Member
Looks very good, barely a sq mm of available siding space unused! The triangular shape lends itself well to a fan of sidings as you've designed it.
Not sure the "neighbours" at the back will have such a positive attitude, trainspotting children aside!
Colin
Last edit: by Colin W
1 guest and 0 members have just viewed this.