Going Small with a GWR Branchline 1890-1920
Posted

Full Member
GWR Branchline in EM Gauge 4mm Scale
I'll get my scanner up and running for you,still on the bedroom floor…It says that a very volatile 'spirit' was a by product, sent for adding to coal gas. The Swindon works were built 1893 and updated in 1920-24. The first plant was at Wormwood Scrubs.
Do you have the Watlington Branch by Brian J. Dickson printed by the C&PRRA?
D
 Last edit: by Chubber
'You may share the labours of the great, but you will not share the spoil…' Aesop's Fables
"Beer is proof that God loves us and wants us to be happy" - Benjamin Franklin
In the land of the slap-dash and implausible, mediocrity is king
"Beer is proof that God loves us and wants us to be happy" - Benjamin Franklin
In the land of the slap-dash and implausible, mediocrity is king

Posted

Full Member
Looking forward to the scan. No, that book I don't have. Tempted, but I'm using a variety of other sources, including the one by Holden. Plus a lot of online research. I even located a photograph of the engine shed before it burned down. I have what locomotives ran in my time period and that only exist in kit form (517 class, Metro class, 2021 class), what passenger carriages were used, what goods went in and out, the track plan, a pile of images. Fair amount of extrapolation required before 1922, that's where the trade directories come in so useful. I have not yet come across definitive proof that a steam railmotor ran in the early 1900's, I do have data on the trailer that ran later on though. I talked with Kernow who are doing the OO steam railmotor, they seem unable to verify whether the chassis of the steam railmotor is going to be an easy conversion to EM. In the hands of the Chinese, so probably not. And I need a shorty version anyway. Expensive gamble to take. A motorized bogie is not the issue, it's that Walschaert valve gear. I have plans for that.
It may not be 100% accurate, but close enough for me.
Nigel
©Nigel C. Phillips
Posted
Full Member
That 3D 517 body print. Using various bits and pieces from the spares box it now has a chimney, large dome, medium safety valve, and tank vents, all in white metal, plus some brass buffers. Couldn't locate the Dean tapered ones, I checked photographs and some had the Dean self-contained types fitted. Of course the Dean tapered buffers turned up this morning. Arrgh! Few gaps here and there, pretty much as these engines were running after 30-40 years of service. While working on it the bunker suddenly decided to part company with the rest of the body. Just like that. A "Well I never" and "Would you believe it!" moment indeed. Definite weak point in the design. Held together with CA and a prayer at the moment. Should be OK when attached to the chassis. Passes the 3 feet/1 meter test, must be all those wivets, so good 'nuff. Seriously, any further effort is definitely on the diminishing returns pathway.
This is going on the K's 14xx chassis, so some fettling ahead, as the body is actually longer than the prototype (meant for the Hornby 14xx chassis, traction wheels, dodgy electrical wipers, anemic motor. I have an EM wheel set for this model, once bitten twice shy). GWR green paint required now. Circa 1910. I have a selection of Vallejo acrylic greens somewhere. Plus some tasteful rattle can Sherwood green. At least I have a color sample of the required green. Lot darker than later greens. Brass dome and safety valves, I have that paint. Now where did I put the coal? And the window rings? Lots of handrails to go on as well. Ah well, at least the Metro 2-4-0 and the 2021 0-6-0 kits can't be as bad as this one is turning out to be.
Talking with Dave at SE Finecast there may be trouble ahead. Their 517 body kit is meant for OO, he thinks clearance may be very tight for EM, especially with Romford drivers. Fingers crossed on that one, another bridge to cross. At least white metal is easier to work with than 3D printed plastic.
Below shows the added bits after a coat of grey primer. Doesn't look that bad actually. From a distance.
Nigel


©Nigel C. Phillips
Posted
Full Member
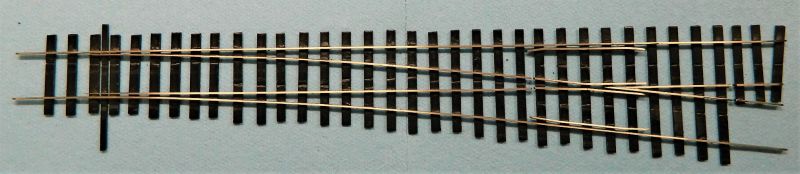
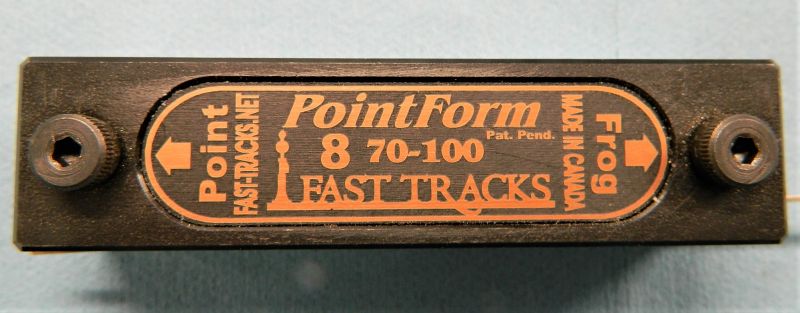
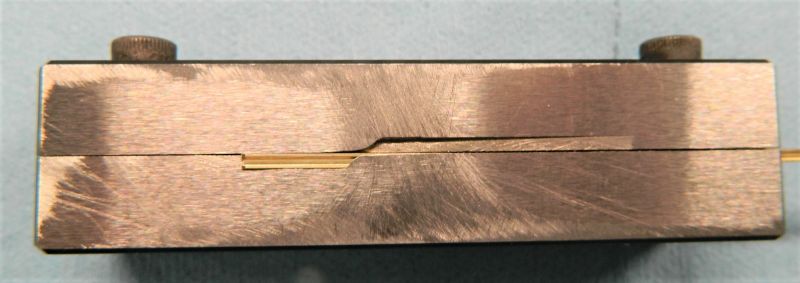
First turnout/point built, in this case a #8 frog using Templot, and a Fast Tracks frog and blade jig. Highly recommended, takes all the guesswork out of getting the correct frog angle and point rail blade slope.* I have shown a #8 frog jig, good for code 70-100 rail. Insert the rail at the appropriate end (Frog or Blade), file until the rail is level with the depression. Takes 5 minutes for the frog and blade rails. Only another 6-8 turnouts to go (the exact number will depend on whether I put a couple on the fiddle yard). Code 75 bullhead track and EM scale sleepers (copper-clad) 4mm wide.The blade bar is from a filed down piece of HO scale copper-clad sleeper strip.
Almost fine-scale standards, definitely not suitable for many regular wheels. Back to back needs to be exact as well. Jumpers and frog need wiring of course. My usual practice, no insulating rail joiners will be used. There is no junction on the closure/blade rail, code 75 bullhead rail is very flexible and much easier to work with compared to FB rail.. Makes wiring easy. I might just add some cosmetic chairs, I have a coupe of packs of plastic GWR ones.
Nigel
*I have no association with Fast Tracks other than being a satisfied customer. These jigs are around $60 Can each, IMO a very good investment.


©Nigel C. Phillips
Posted

Full Member
I've often admired these Fast Tracks jigs but have never gone down the track building route. From what I've read, plain track isn't really worth it economically but points are considerably cheaper. Of course, that's before you factor in the cost of the jigs !! Is that $ 60 Can for each radius of point or are they adjustable ?
Also, when filing the frogs and switch blades, is there a risk of filing the jig as well ?
'Petermac
Posted

Full Member
Nice looking point Nigel - much smoother than the Peco type offerings.
I've often admired these Fast Tracks jigs but have never gone down the track building route. From what I've read, plain track isn't really worth it economically but points are considerably cheaper. Of course, that's before you factor in the cost of the jigs !! Is that $ 60 Can for each radius of point or are they adjustable ?
Also, when filing the frogs and switch blades, is there a risk of filing the jig as well ?
This video is very good, was fascinated to see it being used even if I never go this way myself
https://youtu.be/z-VNg9eEMj0
Last edit: by Colin W
Posted
Full Member
Colin. The life of one of the jigs is probably at least 50-100 turnouts. I have a #4 frog jig that has done some 25 points so far.
Yes, the jig gets scratched but at the edges.
Nigel
©Nigel C. Phillips
Posted
Full Member
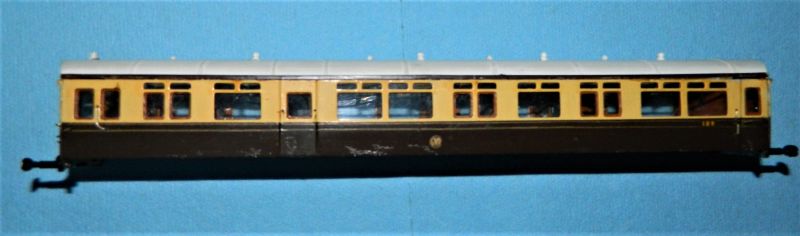
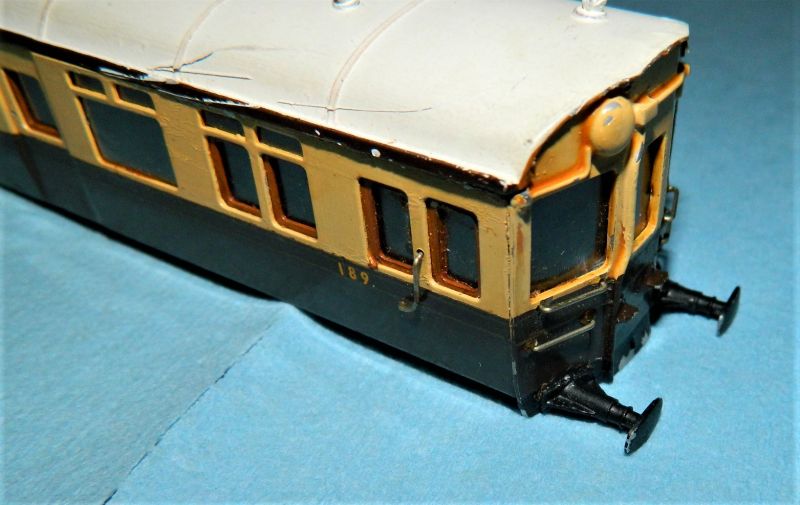
Silk ear from a sow's purse. Or what to do with that BSL kit of a 57' GWR autocoach I got recently because it has the correct buffers for an autocoach with bowed ends. {Try getting these without the body and bogies attached. Current supplier closed for the epidemic duration. At £8.00 the kit was a bargain. Less than the cost of buffers, wheels and bogies.] I know very little about these kits, I have a feeling they came with the paint job already done. Anybody have further information?
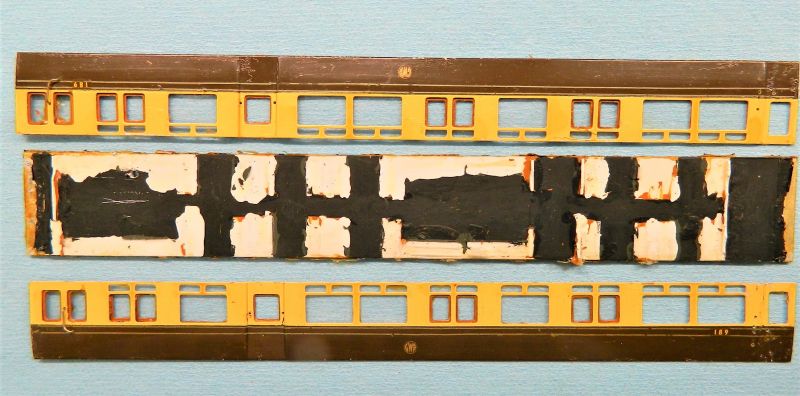
Now the "plan" calls for a matchboard autocoach/trailer (number 177) for the branch line. Looking at the BSL body last night it crossed my mind that it would be an easy conversion to a Diagram N Branch Line trailer, built in 1907. Reference to Russell (Great Western Coaches) and Lewis (Great Western Auto Trailers) showed the seating arrangement is the same as the BSL model (numbered 189, presumably meant to be a 1930's Collett version, probably A…), and the body only needs a slight adjustment to the driver's door (currently recessed, should be flat), and some windows made in the paneled end. Slightly overlong, but close enough. The roof needs some slight modifications, along with the addition of some gas lamp covers. One thing I did notice is that whoever built the kit made the driving compartment in the luggage end. Oops. Ends need removing and swapping over as the body is not symmetrical.
The kit came with a plastic plate girder under-frame, battery boxes and dynamo (probably from a RTR model), that will need replacing with a queen post truss and rod/turnbuckle under-frame, and the steps will need replacing/rebuilding. Plus a gas tank for the lights. Etches of lavatory grab bars and door handles are available, as are the gas lamp covers (I have some somewhere). Game on!
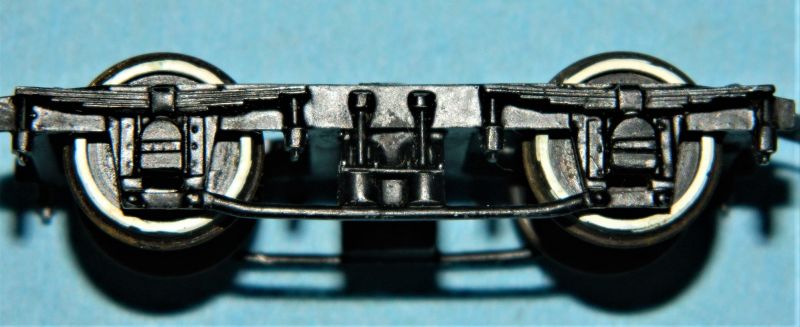
The kit also came with a set of white metal bogies and fine scale wheels. I was able to adjust the gauge to EM (just) without taking them apart. Diagram N apparently called for volute bogies, American ones were used in the build. Those in the kit look like a cross between Dean 8'6" and 7' coach bogies. I'll stick with what I have, as the detailing is way better than anything found in a 3D print.
The kit is a PITA to take apart, some sort of contact/mastic adhesive nicely hardened with age. The body is currently having a good soak in hot water and dish-washing liquid to see if it will soften enough to take the ends and sides off the base. So far after 3 hours still rock hard, looks like paint stripper is up next. There is some Goo Gone glue remover under the kitchen sink. I wonder…
I read an interesting tidbit about the autocoaches used on the Watlington branch line. They were used as trailers, with the locomotive running around the coach. No autogear was used. This meant that the luggage compartment was available for the odd milk churn (found an old photo of this). Space was so tight that the coach was dropped before the platform, the locomotive then run around and shunted the coach into the station ready for the return journey.
Might as well put the extra modeling time to good use.
Nigel
Coach body and roof. Press aluminum body, nice and thin. Roof is plastic. White metal buffers.
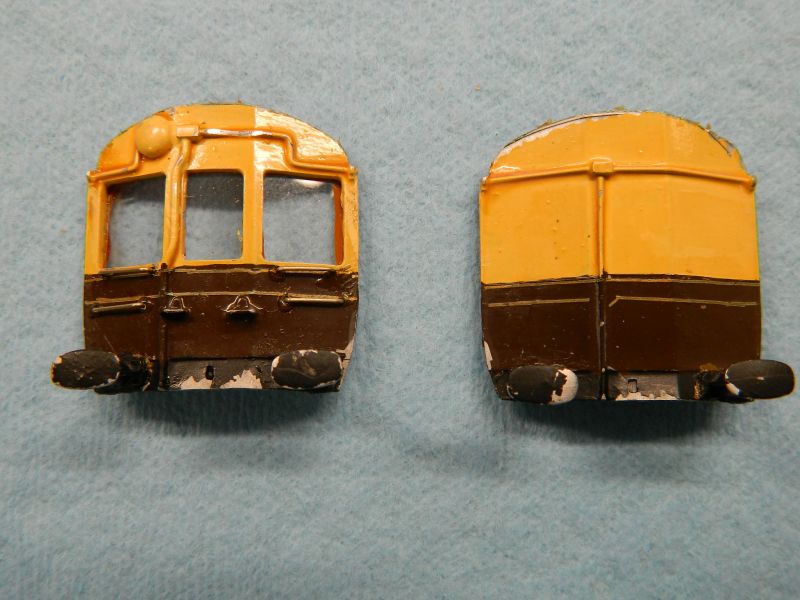
Driving end. Hmm.

Baggage end. Hmm-hmm. The gong needs to go, early autocoaches and trailers did not have them. Access to this end should be via two doors. Bet there are scribed lines under the paint. I have a feeling the ends could be white metal, not aluminum.
Roof and interior. The roof moldings (1930's) need removing and replaced with lateral rail channels (1900's). Plus some gas lamp covers and piping. Luggage and driving ends incorrect. The recess for the doors on the LHS to the drivers compartment needs to be flat for a Diagram N.

The bogie. I think it is supposed to be a Dean 8'6" bogie. Could be a 7' coach bogie. Nice detailing.
©Nigel C. Phillips
Posted
Full Member
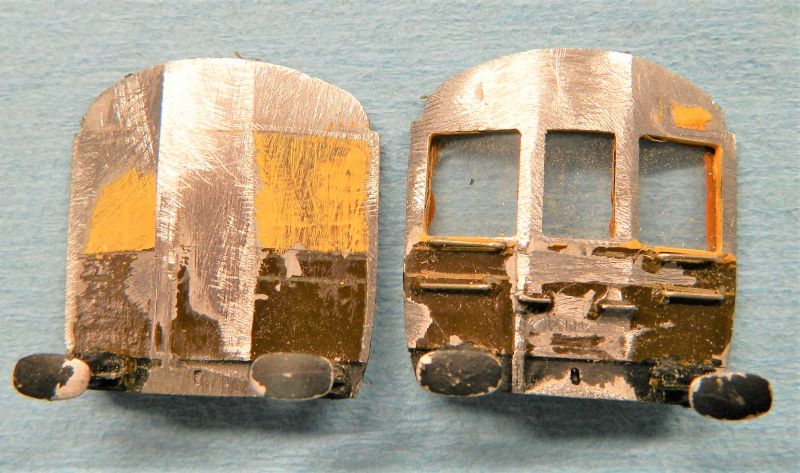
The hot water treatment did soften the glue sufficiently that I was able to remove the ends from the BSL autocoach kit. As I suspected, white metal. So the next job will be filing/sanding away the gong and cables, then cutting some windows in the paneled end. Rather than start sanding and scraping the rest of the body, which is soft and pliable aluminum, I am waiting on a delivery of some "green" paint/adhesive remover gel, due this Friday. Says it can be safely disposed off down the sink. Guaranteed to remove 5 layers of anything in 24 hours apparently. I am going to try and get the interior seating and partitions out before stripping, otherwise I will be looking at very sticky globs of semi-liquid plastic.
Interesting design for the bolection representations, I will try and save them. No more on that as I do not want to give a spoilier for Bill's Clifton Down set. Wonder if I can fettle some working drop lights?
Some trawling on the web came up with the following from the Southern Railways Group: BSL kits became Phoenix coach kits. Not currently in production due to broken or very worn tools and equipment. The range was impressive - I counted GWR 83 kits. Aluminum sides and white metal ends (I was right on that one) and fittings. The 57 foot Autocoach kit was a Diagram A27 from 1929, which was essentially an update by Collett of the Diagram N of 1907. The bogies are apparently 7 foot plate ones (Collett design). I'll change those for white metal Dean ones when the supplier gets back in business.
Nigel
©Nigel C. Phillips
Posted

Full Member
You have another interesting project there, reminding me of the old K's white metal trailer from the 70s, apparently made of lead (at least mine was), so the BSL aluminium sides should reduce stress on the motive power!
I'm intrigued with the mystery bolection design, but rest assured, the Clifton Downs trailer is out of hibernation, is next to the workbench and will be my active project in a couple of days.
Good luck with the new green super stripper and thanks again for posting such an interesting project.
Bill
At 6'4'', Bill is a tall chap, then again, when horizontal he is rather long and people often used to trip over him! . . . and so a nickname was born :)
Posted
Full Member
I wasn't heavily into model railways in the 70's - I think girls, cars and marriage had taken over what time and funds I had in those days. After this strange life we're all having to live now is behind us, I may well see if my skills have improved. I suspect some of the stock I'll need won't be available from the mainstream manufacturers - if those mainstream manufacturers survive and we can still afford their prices …………………..
I'm following this with more than a modicum of interest Nigel ……………………..
'Petermac
Posted
Full Member
White metal and aluminum sides are a lot easier (and thinner!) than 3D printed items to work with. I've built a few old Walthers HO passenger car kits recently, same principle of white metal ends and fittings but polished stainless steel sides. Wood base though. With the current one the issue is getting it apart so I can do the body modifications without distorting it. Hopefully the stripper will do the job.
The hunt is on for some queen posts.
Nigel
©Nigel C. Phillips
Posted
Full Member
'Petermac
Posted
Full Member
Regular CA glue will work for all the materials as long as there is a keyed surface. Thick variety has a working time of 15 seconds. Epoxy will also work. Contact adhesive as well, but that has zero fiddle time. Silicone sealant also works as long as it is a thin coat.
The model was built using some sort of mastic and epoxy.
Nigel
©Nigel C. Phillips
Posted
Full Member
That soak in hot water/detergent loosed thing up enough for me to break the body shell of the Autocoach into the various components. Seats just snapped off using some smooth ended pliers. The floor base is a shet of styre glued tt an alumium strip.so i will see if that comes off with a chisel before stripping. The seats will get refurbished. The stripper is due today (amazing what you can order from Amazon), so a dunk overnight is next. I cleaned the ends of the electrical moldings and the gong, after a strip it will be time to get the windows cut and the sections filed square. I flattened the end of one side using a Manchester screwdriver, not that difficult to keep the tumblehome profile. More of that after the strip. It will take some steel formers to do it properly.
Nigel

©Nigel C. Phillips
Posted

Site staff
Ron
NCE DCC ; 00 scale UK outline.
NCE DCC ; 00 scale UK outline.
Posted

Full Member
Especially because Nigel wrote: "The stripper will arrive today"!That will keep you out of the pub for a while then Nigel!
Cheers,
Claus
www.flickr.com/photos/ellef/
Claus
www.flickr.com/photos/ellef/
Posted
Full Member
From Amazon, no less! That is diversification![user=606]Sol[/user] wrote:Especially because Nigel wrote: "The stripper will arrive today"!That will keep you out of the pub for a while then Nigel!
Posted
Full Member

I'm watching this thread - very closely !!!……………………………………… :cool wink
'Petermac
Posted

Full Member
Michael
1 guest and 0 members have just viewed this.