Birkenhead Woodside
Posted
Full Member
A layout in progress, slow progress...
Peter, don’t forget that was the average between the top and middle boards…. which on reflection didn’t seem quite right… a second attempt this morning at measuring the track length and it is more like 1 in 55. That top curve is one of the steepest sections, and with the curve it may just be an excuse for the earlier 4-6-0s. More recent models are OK.Keith
Do I have a plan? Na, if I did I'd spend most of my time trying to remember where I put it.

Posted

Full Member
At 1 in 55, I should be fine and I also plan to level off on the corners because I know that increases the drag considerably. As I said, I won't have any 5 coach trains climbing to the upper level - in fact, I don't think I'll have anything above 3 coaches unfortunately …………………

The high level is currently in the very early planning stages and the intention is to have that level as a rural branch line.
'Petermac
Posted
Full Member
At this point, the very start of things, I hit major problems, couldn’t get the pick-up freight beyond the signal, despite all my switches being set correctly…. having double checked everything, the last resort – to check the actual switch wiring …and sure enough two push on terminals had come adrift from a power switch. That has never happened before. Having sorted that, once the pickup freight reached Hooton the point in the goods yard started playing up, probably down to lack of use – more delays. Progress after that was a bit slow as I had to remember all the operations I had allowed for with my switches which made this whole exercise possible. So although the times shown on the camera are rather longer than the timetable, I did prove that the layout could be managed in real time with one experienced operator dealing with the pickup freight and another dealing with the main line and some shunting at Woodside station. Sadly such operators do not exist at present. I also proved that when it comes to some of the more involved operations, I am seriously rusty.
Anyway, this is my solution to that minor shunting problem…. The new look pickup freight arrives at Hooton, the crew checking with the signalman ‘what’s occurring’ before proceeding (the crew and the signalman are, of course, on a list).

The freight then moves forward until the brake is clear of the crossover point. The pickup freight then reverses into platform 2, and detaches the cattle wagon, and then moves forward with the wagon to clear the slip on the up line and waits. At the same time the Hooton pilot takes the loaded van from the goods shed and leaves it in the adjacent siding…

…and then proceeds to the end of platform 3, and waits. Once clear of the slip the cattle wagon is detached and the 4F moves forward and waits. The Hooton pilot then moves from platform 3 to collect the cattle wagon….

…. and then shunts it into the goods shed. A standard 4 departs platform 1 with the 2.24pm s/f from Chester. The pilot then picks up the loaded van from the siding and takes it to the up line, coupling up to the 4F, and then returns to the goods siding. The 4F can now back down, with the loaded van, onto the remainder of the freight in platform 2, and await departure. Meanwhile the Derby Lightweights have arrived and departed from platform 1, with the 2.29pm stopping train from Helsby. Finally the pickup freight departs from platform 2 heading for Birkenhead. Job done.

More pics in the gallery. Note that when the s/f from Chester departs Hooton the distant, beyond the signal box, is on, similarly with stopper from Helsby – this is a reminder for the operator that the train is entering a storage loop which already has one occupant, and so needs to be watched – the pick-up freight has the distant off – which means that loop is empty, and the pickup freight can be left to stop automatically… that’s just me with my signals….
Very definitely rusty – I need more operating time, before I start on those lists…. and now the sun is shining again…. and gardening beckons….
Keith
Do I have a plan? Na, if I did I'd spend most of my time trying to remember where I put it.
Posted
Full Member
Working signals to boot - I am impressed !!! How do they work ?
'Petermac
Posted
Full Member
The w-i-t is connected to the opposite side of the balance weight arm, through the baseboard to the point motor.
The photos show the set up.
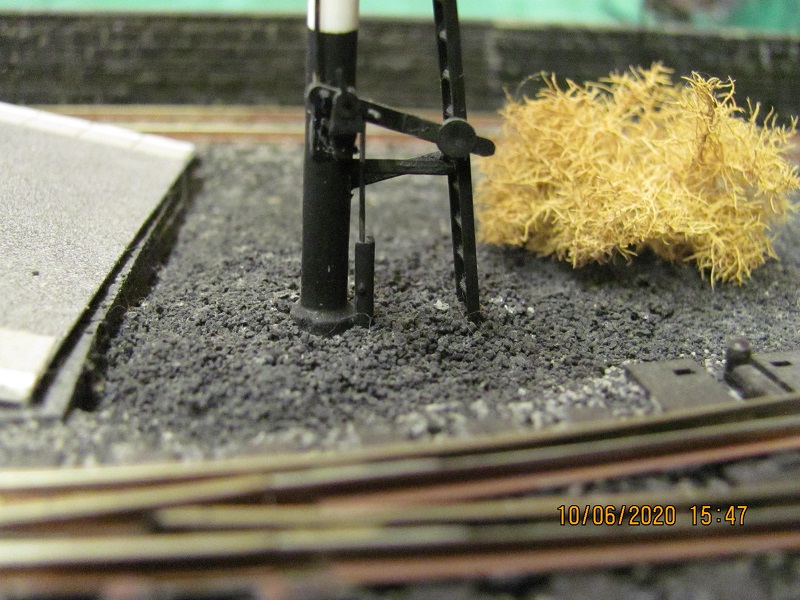
Initially I tried to fit the wire as a single piece, but after a couple of failed attempts decided it was better to do it in two sections which would allow for fine adjustments, without needing to rebend the ends of the wire. The two sections are joined using the metal part of a 2 amp wire connector, I found using two helped with the fine adjustment, I note one has lost a screw at some stage, how appropriate! I also added a crank to the wire to act as a sort of shock absorber for the signal – the point motors can be a bit vicious sometimes. I just use the standard SPDT centre off (biased) toggle switches for all the signals, same as the points.
System seems fairly robust – the only ones I’ve had problems with have been signals which were ‘disturbed’ by a fat controller not looking what a trailing sleeve might be catching as he reached across the layout….
Keith
Do I have a plan? Na, if I did I'd spend most of my time trying to remember where I put it.
Posted
Full Member
When you said they work from point motors I did wonder about some kind of damper/omega loop thing - as you say, they can go with as heck of a thump.
Are the signals themselves MSE offerings ? I'm assuming they're not Ratio type plastic ones ………….. :hmm
'Petermac
Posted
Full Member
Keith
Do I have a plan? Na, if I did I'd spend most of my time trying to remember where I put it.
Posted
Full Member
The fact that they do work and can handle the motors is full marks to Ratio and yes, MSE (Model Signal Engineering) are brass kits.
'Petermac
Posted

Full Member
You know me, I like to see working signals, but I never had that much success with the Ratio kits - it's not the kits, it's me and my fingers that don't cope too well with small, fiddly bits of plastic - that and perhaps a bit too much rushing to get the kit finished! On my first layout, I did have a couple of Ratio signals installed; they looked a bit wonky, but they did function. So it's good to see yours standing proud.
In fact, Keith, you have inspired me to remove a couple of the LED colour signals at the small halt station with it's siding and replace them with semaphore types (modernisation backwards, eh?). Like Peter, I'm surprised the Ratio kits stand up to the hammerings from the point motors. But the controlling wire-in-tube method looks to be working very well for you.
If I go ahead with the swap-out - which is a distinct possibility - and change these two signals to semaphore I think I'll use Tortoise motors - I've a couple of these motors just doing nothing at the moment (and no plans for them either). I'm sure they can still be incorporated into my processor controlled system for the signalling.
Again, nice work and overall attention to detail.
Posted
Full Member
Keith
——————————–
Dave, I’ve still got lots of signals to add, and I too am finding that the fingers are not what they used to be when it comes to small, fiddly bits of plastic – main reason why I decided on colour lights for Woodside station for now. That should be a relatively easy job… once I can get started. Using tortoise motors sounds like a really good idea, could probably do without the crank with them, I’m assuming they are more expensive than the standard Peco offering, but would certainly give a more realistic movement – which may well make it worth the extra. As to linking them to your control system… way, way above my pay grade…! For now another job for you to put on another list.
Keith
Do I have a plan? Na, if I did I'd spend most of my time trying to remember where I put it.
Posted

Full Member
As another fully paid up member of the non-working signal fraternity, I have been looking at options for my proposed BR(E)R layout - not wishing to contemplate the idea of MSE ex-GNR somersault types for obvious reasons. I can solder a wire to a track length and have (when I woz yung) soldered wagon kits together but I am not sure I would fancy MSE these days. Luckily, the LMS round post signals look quite like the BR round post signals that were installed as the older types were upgraded. As with most things, the vast majority of people coming to see my trains wouldn't know that they were LMS signals - even some of the "experts" that came to my old shed didn't pick up on it. I win.
Something else I have been tempted to play with but have yet to pluck up enough courage are servos. Apparently, there are manufacturers who make idiot-proof servos with controllers that give you bounce and all sorts - ooh err!
Given the continuation of lockdown and not-owning-my-house-yet-syndrome, I can see a couple of purchases looming and a few evenings trying to get servos to work. I have built the Ratio kits before and like them - the LNER set that gives you a range of signals is very useful and I have a couple of boxes in store. I acquired a few Playcraft signals from a recent club clear-out and whilst, by modern standards, they are cr*p, they will give me something to test the servos on.
Keep inspiring
Barry
Shed dweller, Softie Southerner and Meglomaniac
Posted
Full Member
The Tortoise motors are quite a bit more expensive than the Peco point motors - around £20 but appear to be in short supply at this time. But as I already have some of Tortoise types, they may be pressed into service. Quite how I'll link them to the signals is another matter. I have the purpose kits from Circuitron to do the job but they are a bit awkward to get fitted and space is at a premium in this location.
My first item on the never ending list of lists would be to purchase and build the lattice-type LNER/SR signal posts - as mentioned earlier, my first attempt some years ago left them a bit wonky as the build slipped whilst the glue was setting and by the time I spotted it the glue had set - end of a neat and proper job. Maybe this time around I can have more time on my hands to do a better job. I'm not sure I'm up to the MSE signals (and they don't appear to make a combined Home/Distant variant) - although, looking at their website Barry, they do indicate that the round post was used on the LNER and BR(E), so maybe no-one needs to know that you have the LMS type installed - there seems to be very little difference between the two other than the LNER type appears to have a small platform whereas the LMS type do not. I never new that! Till today.
As far as servo motors go, Barry, yes they're quite good and if you get the relevant board (from MERG, I think - although there may be others) it can give good results, complete with, as you say, "bounce". Maybe that's the way I'll try. More investigation here is required, me thinks.
Dave
Posted
Full Member
I was also about to mention servos for operation but you got there first Barry. In a moment of madness, I bought the Megapoints starter kit at a show just becuase I was so impressed with the signal operation and proper "lift" and "bounce" actions as the signal was pulled off or released. It really is very impressive. As a result of the purchase, I also bought some mini servos - they too are a delight. I've only used the system for point operation on the old Maxmill so far but intend to give signals a bash at some time.
I'm pretty sure servos would be the best bet for signals - much cheaper than Tortoise, much softer than solenoid point motors, fully adjustable and, being small, easy to hide. You do however, need a system to operate them and the Megapoints system aint cheap !! No idea how much the MERG kit would cost nor how easy it is to build but I think MERG also supply ready made units ……………….
For non-working signals, I think one would need to go a long way to beat Ratio - they're good looking and sensibly priced. Keith has proved that they also work although I've never had much success in getting them to do so !!!
'Petermac
Posted
Full Member
I've resurrected my old Ratio junction signal, just to see how it has faired since being boxed up between layout builds - it's looking pretty good but in need of a Distant arm. And I've a few mini servos (in a box somewhere) and a chip to drive them. I looked at the Megapoints system and thought, probably too pricey for me. And my thoughts are why use huge (in comparison) Tortoise motors in the small space I have available when I could get away with fitting these small servos. All I need now is to find the box with the signal bits in (the cranks, etc.), get some programming time and complete the signal(s).
I'm so easily distracted from the job in hand! Or maybe, it's another item on another list?
Seems like we've hijacked your page Keith - sorry, and back to you. But thanks for the idea on the semaphores.
Thanks guys - Keith for the semaphore photos and Peter for the ideas surrounding getting them operational.
Dave
Posted
Full Member
++++++++++++++++++++
Barry, Dave and Peter
I’m relieved that it’s not just me that thinks the MSE signals, excellent as I am sure they are, are just a bit beyond the abilities of their fingers! Must admit even the Ratio kits may well be something of a challenge these days, it is nigh on five years since I produced the signals for Hooton. On a list somewhere is a rebuild for the up home bracket at Hooton… always been a source of trouble since I rested the goods shed on it a couple of years back while I was fitting the shed lights, perhaps I should give that a go.
These servos sound very interesting, if there is an idiot proof system available, and it is not too expensive which could simply replace what I already have, please tell me more. I’m not that fussed about “bounceâ€, but a slower rise and fall, rather than the instant action of the point motor, would be nice.
All this talk of signals has really got me thinking about getting Woodside station sorted… after a little more operating therapy perhaps…
Barry – as lockdown starts to ease, hopefully you’ll soon be in the house, and you can really start some proper planning.
Keith
Do I have a plan? Na, if I did I'd spend most of my time trying to remember where I put it.
Posted
Full Member
There are a few companies out there that make suitable driver boards for them, complete with a suitable chip suitably programmed - all that is needed is some setting up as to the low position, the high position and the speed the servos move. MERG do one (the SERVO-4) and the previously mentioned Megapoints (Servo Controller-4) - to mention two companies. Each will run 4 servos (4 points or 4 signals, depending on what you need them for). But they ain't cheap. Good though (from the reports read).
Don't hold your breath for seeing a video of mine working - it could be quite some time - it's now on a looonngg list of things to do. Running trains would make a change for me! I need some incentive to do something in there.
Back to you Keith.
Dave
Posted
Full Member
The dreaded lists…. I recommend operational therapy… for a while you can forget about the lists!
Keith
Do I have a plan? Na, if I did I'd spend most of my time trying to remember where I put it.
Posted
Full Member
I don't think I saw any reference but do you have CCTV watching over your lower level ? I'm wondering because there doesn't appear to be much headroom under there. I will also have a partial "top deck" but want to keep the gradient to the minimum for obvious reasons so wonder if I could reduce my planned clearance somewhat ………………. What do you do if/when there's a derailment under there ?
Also, I noticed you have what looked like Eckon yard lights - maybe they're not Eckon but they look very similar to some of mine. Mine came with the unit so I don't have any instructions plus, I don't seem able to find any online notes. Some, tall ones in the MPD, appear to be soldered directly to the (DCC) track and others, in the coal yard, are supplied by a separate bus. No idea what the voltage of this bus should be (it's not powered at present) and nor do I know if these lights require additional resistors. Are they ordinary 12v DC ? I presume my taller ones that are/were soldered to the track can cope with the DCC 15v or so ……………….
I'm going back to read more now - a lovely read I'm having. :thumbs
'Petermac
Posted
Full Member
Probably a bit off topic on this thread but….
Some while ago I noticed you were asking about motorising ground disc signals, possibly the Ratio type. I'm wanting to add some to my layout. I've had a look at photos of the kit (not much to them at all!) and think it might be possible with a little dexterity and a fair wind.
I did find a kit from somewhere (not Ratio) that appeared to be motorised (I think) lower quadrant type but not suited to LNER upper quadrant. But I think the Ratio kits are simply a paint-on job, so would suit either upper or lower quadrant. Also hoping to put a light behind the disc through freshly drilled holes. I think some nimble fingers might be required for this little project.
I wonder whether you managed to motorise it, find any information of how to do it, or whatever.
Cheers
Dave
Posted

Full Member
I was just nostalgically looking for some Birkenhead images from the late 50s, while reminiscing about frequent weekends jaunts with my Grandad on the ferry across the Mersey and I came across this:
https://www.youtube.com/watch?v=Kml7qXFJ0Ts
I strongly suspect you will have seen it, but others may well find it interesting to know just a bit more behind the scenes of your railway. I found it fascinating and such wide platforms.
Best,
Bill
 Last edit: by Longchap
At 6'4'', Bill is a tall chap, then again, when horizontal he is rather long and people often used to trip over him! . . . and so a nickname was born :)
1 guest and 0 members have just viewed this.